Knowledge Model - Flags
When you discover unwanted behavior in your process that impacts business goals (KPIs), you can flag and capture those instances within Celonis. This enables your business users to know which Execution Gaps have to be tackled. These Exection Gaps are captured as Flag objects within the Knowledge Model.
How are they used?
The main use case for Flags is their implementation within the Execution Gap List component in Views. With the Execution Gap List component, you can give your users an overview of how the Flags they have defined in their Knowledge Model impact certain KPIs. You can learn more about the Execution Gap List component here.
How are they created?
Before you create your Flags, please make sure the appropriate conditions are met. For Flags to work correctly:
the Flag must be assigned to a Record
the underlying Record must already have an Identifier
Using the Visual Editor
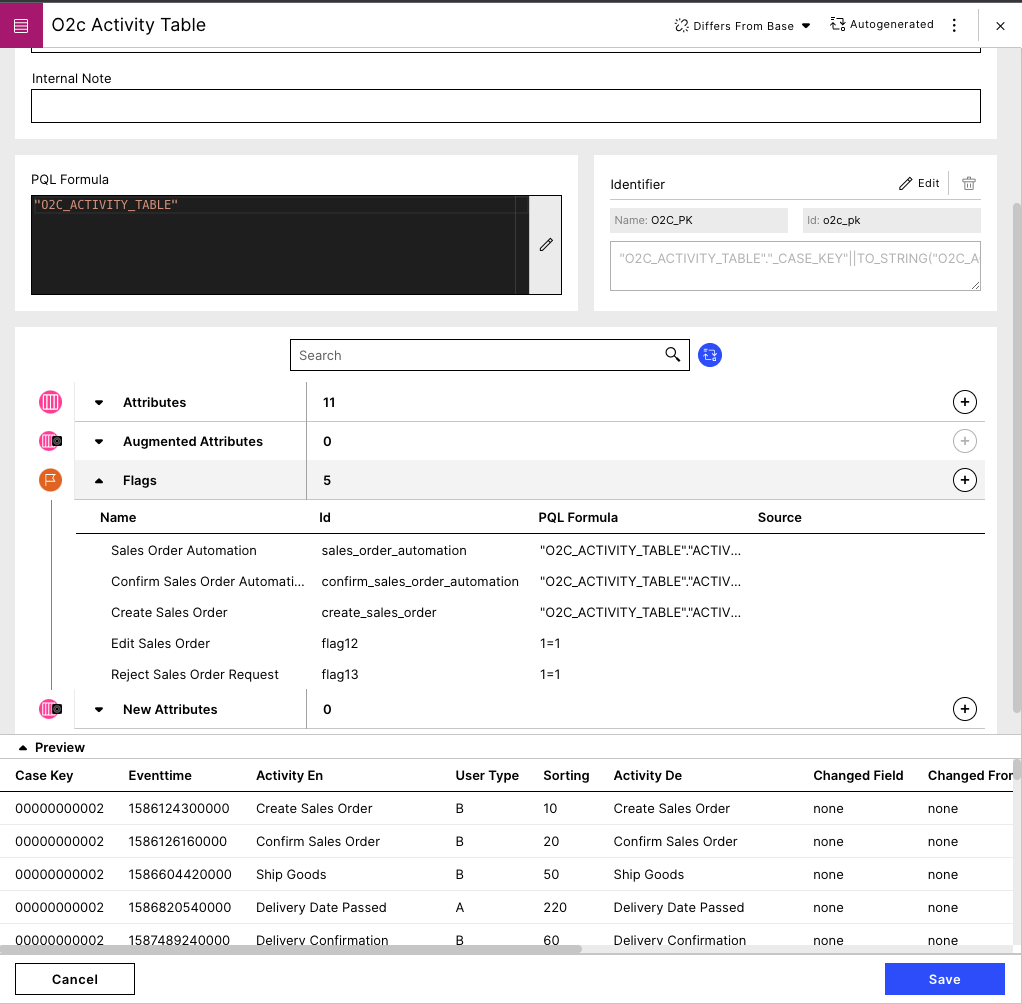
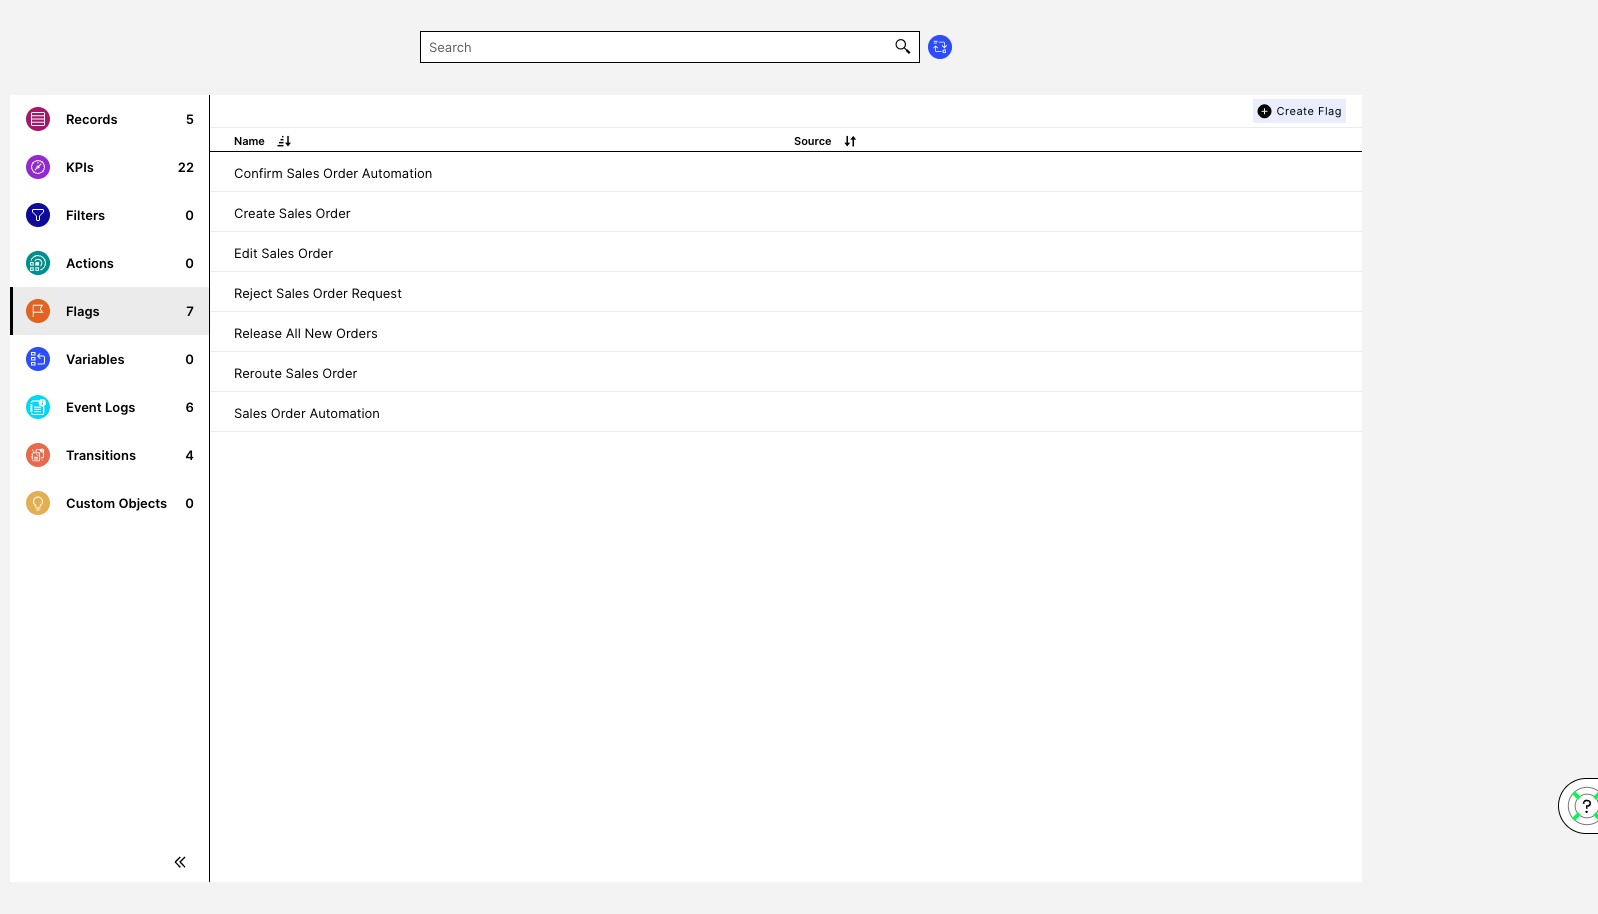
In the Visual Editor, Flags can be created from inside the Records tab in the Knowledge Model or within the Flag specific tab in the Knowledge Model Main Listing. The Flag section within the Record contains all the Flags that exist for this Record, whereas the individual Flag Tab contains all the Flags that exist in the Knowledge Model. You can create a Flag from inside a Record by clicking on the plus button on the Flag section:
 |
If you want to create a Flag from inside the Flag Tab in the Knowledge Model Main Listing, you can click on the Create Flag button on the top right corner of the Flag Main List:
 |
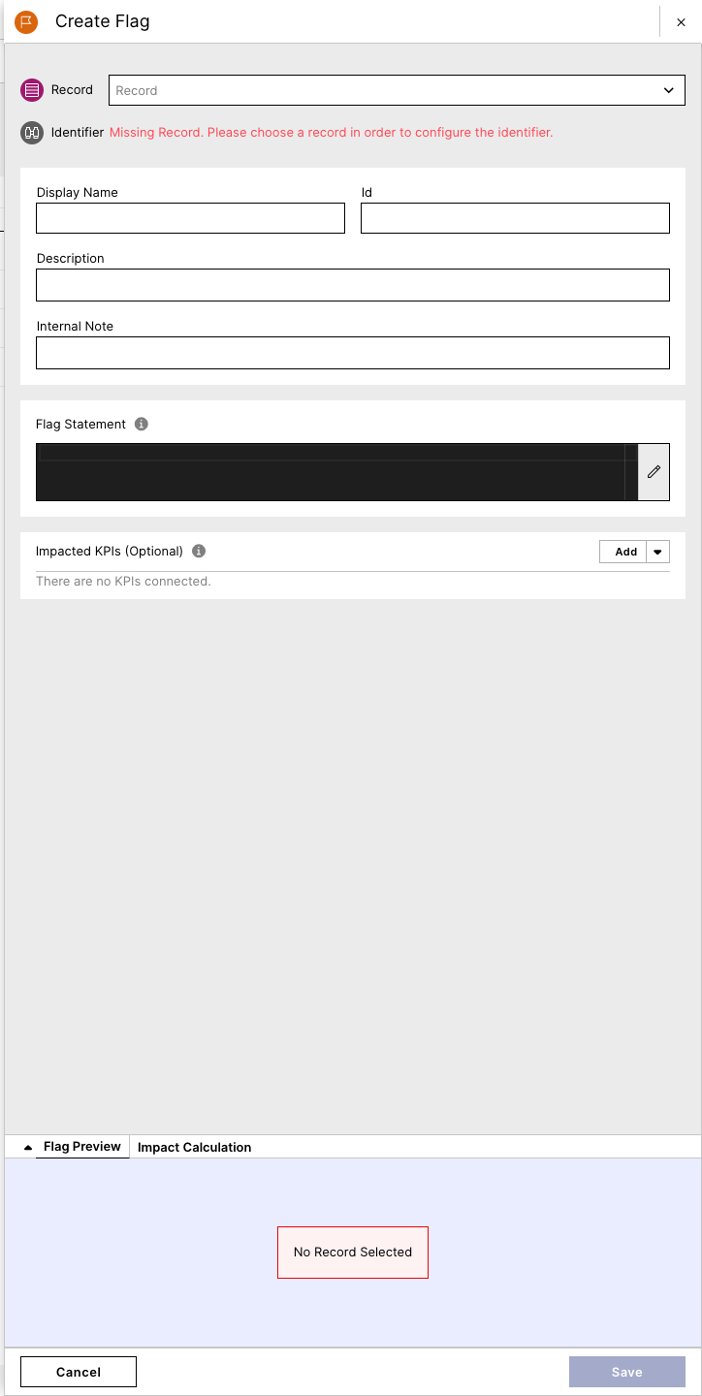
Both of these options will lead you to the Flag Creation window, which contains all Flag associated value assignments. These associated value assignments are the following:
Prerequisite Fields:
Record Dropdown: Shows the Record that will contain the Flag. This field is auto populated if the Flag is created from inside the Record in the Knowledge Model.
Identifier: Shows the name of the Identifier for the Record that will contain the new Flag. Studio reminds you to add an Identifier for your Record if you try to build a Flag on a Record that does not already have an Identifier.
General Settings:
Display Name: A human-readable label used in the user interface.
ID: A unique technical identifier used to reference this Flag. Must be unique within all Flags in the Record.
Description: A human-readable description for the Flag.
Internal Note: A field only visible within the Knowledge Model.
Flag Settings:
Flag Statement: Contains the PQL query that will flag specific rows of your Record if they meet the condition described in this field. Once a valid PQL query is written inside the Flag Statement, the Flag Preview will update to show which of the first 50 rows in your Record meet the condition on this field. Studio will also show you how many of the first 50 rows in your Record were flagged by the statement in this field.
Impacted KPIs: Lists the KPIs on which the Flag will be applied. Once a KPI is added to the list and selected, the preview will show the Impact Calculation for the KPI. This Impact Calculation Preview has the global value for the KPI, the resulting value for the KPI once the Flag Statement is applied to it and the difference between the global KPI and the flagged KPI.
Once you select a KPI you can also choose whether to use a default or a custom impact calculation. To learn more about the impact calculation methods you can review the Execution Gap List documentation.
Knowledge Object ID: Discloses the ID of the Record that contains the Flag. Is first shown and automatically populated once a Flag is saved with an Impacted KPI. This Record ID is used to link the Execution Gap List to a Profile View.
Let's assume you are using Studio to improve an Order Management process. You heard from a colleague that a lot of manual tasks need to be completed in order to create a new sales order. To verify this, you want to see the impact the 'Create Sales Order' Activity has on the O2C Automation Rate KPI that contains the automation rate for this process. To see the impact this Activity has in the Automation Rate, you add a Flag for all 'Create Sales Order' activities within your process and relate it to the O2C Automation Rate KPI. You do this with the Visual Editor, which results in the following:
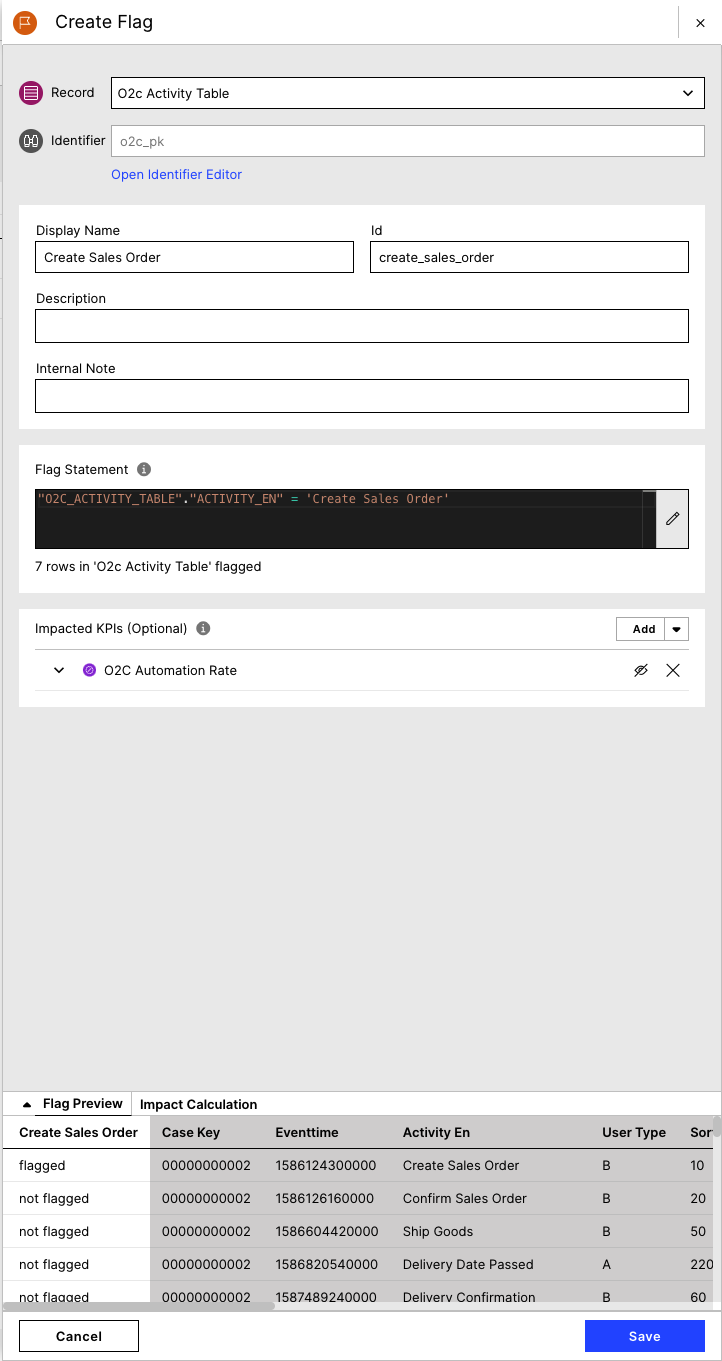 |
You now want to see how your Automation Rate is impacted by only selecting the 'Create Sales Order' activities, so you click on the O2C Automation Rate KPI in your Impacted KPI List. This switches the preview to the Impact Calculation Preview, which shows you the following values:
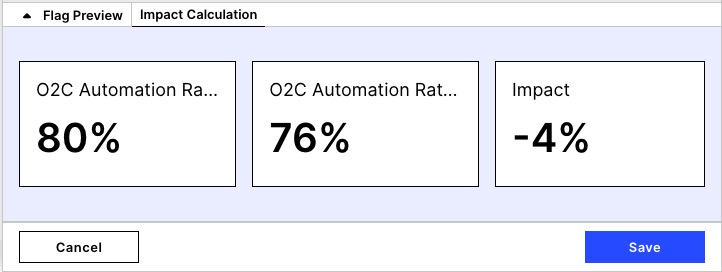 |
By looking at the updated Impact Calculation, you see that while the overall Automation Rate for your process is 80%, the Automation Rate for your 'Create Sales Order' Activity is only 76%. This indicates a difference of 4% between your global Automation Rate and your flagged Automation Rate. With this you can conclude that your 'Create Sales Order' Activity requires more manual input than the rest of the Activities in the process.
Using YAML:
In YAML, Flag objects have the following value declaration format:
records:
  - id: O2C_ACTIVITY_TAB
    flags:
      - id: sales_order_automation
        displayName: Sales Order Automation
        pql: "\"O2C_ACTIVITY_TABLE\".\"ACTIVITY_EN\" = 'Create Sales Order'"
where:
id: A unique technical identifier used to reference this Flag. Must be unique within all Flags in the Record.
displayName: A human-readable label used in the user interface.
description (optional): A human-readable description for the Flag.
pql: Contains the PQL query that will flag specific rows of your Record if they meet the condition described in this field.
You can also add KPIs that will be impacted by the Flags in your Knowledge Model by creating new anomalies. These are added in the anomalies section of the Knowledge Model and have the following value declaration format:
anomalies:
  - id: sales_order_automation_ANOMALY
    displayName: Sales Order Automation
    flag: sales_order_automation
    kpiIds: []
    kpis:
      - id: o2c_automation_rate_undefined
        kpiId: o2c_automation_rate
    knowledgeObjectId: O2C_ACTIVITY_TABLE_ANOMALY
    type: ANOMALY
where:
id: Is the unique identifier for the anomaly. Must be unique among all anomalies within the Knowledge Model.
displayName: A human-readable label used in the user interface.
description(optional): A human-readable description for the impacted KPI.
flag: The ID of the Flag that will be used with this anomaly.
Kpiids (deprecated): Impacted KPI <kpiIds is only used by the deprecated anomaly list component>
kpis: List of KPIs impacted in this anomaly, where each of these KPIs has:
id: A unique identifier for the KPI in the anomaly.
kpiId: Id of the KPI impacted in this anomaly.
impactCalculation (optional): The KPI used for the custom impact calculation. Field only needs to be included if the impact calculation will differ from the default method. To learn more about the impact calculation methods you can review the Execution Gap List documentation.
knowledgeObjectId: Discloses the ID of the Record that contains the Flag. This Record ID is used to link the Execution Gap List to a Profile View.
type: Contains the type of object.
Note
The KPIs referenced inside the anomaly section must have 'desiredDirection' set. This is used to understand if the impact is positive or negative. Follow this link to see how to define a KPI.
Example
An example configuration for late entered invoices could be defined as the following:
anomalies:
 - id: LATE_ENTERED_INVOICES
   displayName: "Anomaly: Invoices entered late"
   description: "This Anomaly displays Invoices that were entered late"
   flag: FLAG_LATE_ENTERED_INVOICES
   kpis:
     - kpiId: KPI_ON_TIME_PAYMENT
       impactCalculation: IMPACT_FOR_PERCENTAGES
   knowledgeObjectId: "INVOICE"
This anomaly calls the Flag FLAG_LATE_ENTERED_INVOICES which was defined inside the Record INVOICE.
records:
    - id: INVOICE
      displayName: Invoice
      flags:
        - id: LATE_ENTERED_INVOICES
        displayName: Late Entered Invoices
        pql: DAYS_BETWEEN("BKPF"."BLDAT", ROUND_DAY(PU_MIN(BSEG,     ROUND_DAY("_CEL_AP_ACTIVITIES".EVENTTIME),"_CEL_AP_ACTIVITIES"."ACTIVITY_EN" IN ('Enter in Cockpit')))) > 10
In the definition for a KPI that will be used with a Flag, you can specify up to three special pql parameters with the keywords: global, flagged and nonFlagged. These will be populated by the Execution Gap List with the following values:
global will be populated with the unfiltered value of the selected KPI in the execution gap list component.
flagged will be populated with the value of the KPI when filtering only on Records that have been flagged with the anomaly.
nonFlagged will be populated with the value of the KPI when filtering on Records that have not been flagged with the anomaly.
Such as:
kpis:
  - id: IMPACT_FOR_PERCENTAGES
    displayName: Impact for percentages
    format: "+.0%"
    pql: "CASE WHEN {p2} > 0.0 THEN ({p2} - {p1}) / {p1} ELSE 0.0 END"
    parameters:
      - id: global
        displayName: global
        defaultValue: 100
      - id: flagged
        displayName: flagged
        defaultValue: 75
As mentioned above, the Execution Gap List Component is used to display the Flags you have created impact certain KPIs. Here is a minimal YAML configuration of such a component within a View:
  - id: Execution Gaps
    type: execution-gap-list
    settings:
      kpi: "KPI_ON_TIME_PAYMENT"