Transformation Hub in Views: Configuring Action Flows and writeback connection
After configuring your object-centric data model, you now need to set up four Action Flows and configure the writeback connection. Action Flows are essential for the Transformation Hub in Views app to function correctly, acting as the connection between your analytical data and your actual business operations.
Without setting up Action Flows, the Transformation Hub would be a "read-only" environment. You need Action Flows to manage the following:
Enable writeback: They allow the system to send data back to your data pools, ensuring that the manual mapping and configurations you do in the interface are saved and reflected in the underlying data.
Automate manual tasks: They replace the need for manual data entry by automatically updating attributes when triggered.
Track value: They are the mechanism that links specific "Opportunities" to "KPIs," which is how Celonis calculates and tracks the realized value of your process improvements.
For the Transformation Hub in Views app, you need to configure four Action Flows:
Action Flow | Purpose |
|---|---|
Map Opportunity | Takes inputs like |
Map KPI (Action Based) | Updates Augmented Attributes in your Knowledge Model to define how specific actions contribute to a KPI. See: Manually configuring the Map KPI (Action Based) Action Flow. |
Map KPI (Rate Based) | Handles KPI mapping where the value is derived from a frequency or percentage rate. See: Manually configuring the Map KPI (Rate Based) Action Flow. |
Map KPI (Non-Monetary) | Manages tracking for KPIs that aren't measured in currency (e.g., carbon emissions or cycle time). See: Manually configuring the Map KPI (Non Monetary) Action Flow. |
When setting up the four essential Action Flows for the Transformation Hub in Views app, you can choose between importing pre-built blueprints or configuring each module from scratch.
You should use blueprints when:
Speed is a priority: Blueprints provide the underlying logic and module structure immediately, significantly reducing setup time.
Standardizing across environments: If you are deploying the Transformation Hub across multiple teams or instances, blueprints ensure a consistent configuration.
Reducing manual error: Importing a JSON file eliminates the risk of missing a specific module or misconfiguring the basic flow logic.
And you should fully manually configure your Action Flows when:
Custom data structures are required: If your data pool or Knowledge Model uses highly customized table names or attributes that deviate from the standard app installation, manual setup allows for precise mapping.
Blueprint access is restricted: In environments where external file imports (JSON) are restricted by security policies, you must follow the manual steps to build the flow.
Troubleshooting specific steps: If a blueprint fails to run due to environment-specific variables, manually building the modules can help identify exactly where the connection or mapping is breaking.
To accelerate your setup, Celonis provides pre-configured blueprints for the four required Action Flows. These blueprints contain the standard logic and module sequences out-of-the-box, allowing you to establish the connection between your Transformation Hub and Data Pool with minimal manual effort. Follow the steps below to retrieve these assets from the Marketplace and import them into your Studio package.
To download and import Map Action Flow blueprints:
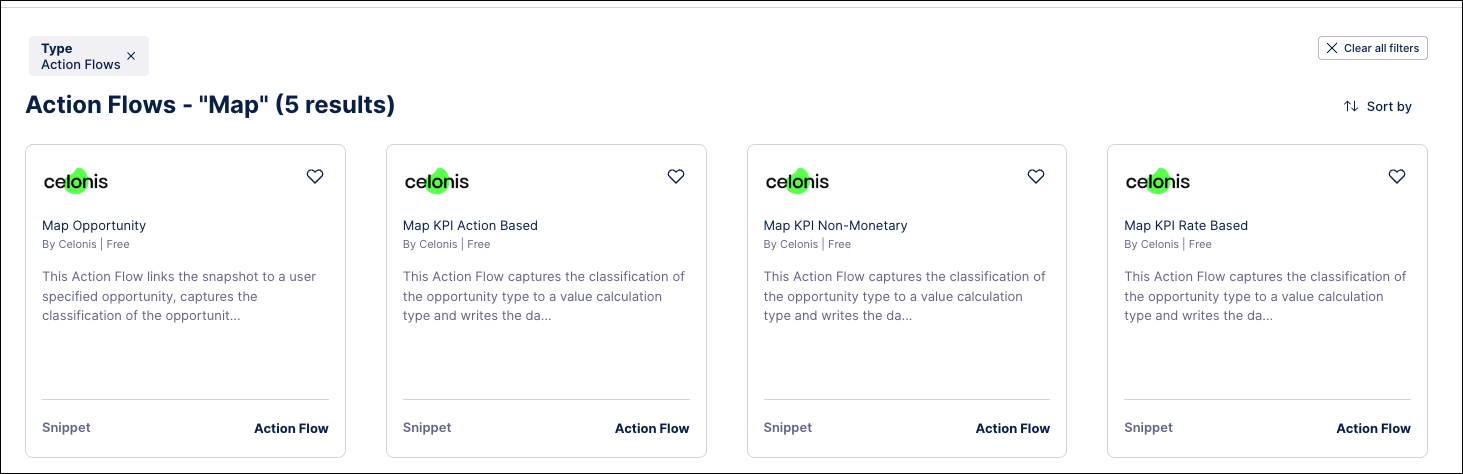
Click Celonis Marketplace.
Search for 'Map', displaying the four Action Flow blueprint needed:
Map Opportunity
Map KPI Action Based
Map KPI Non-monetary
Map KPI Rate Based
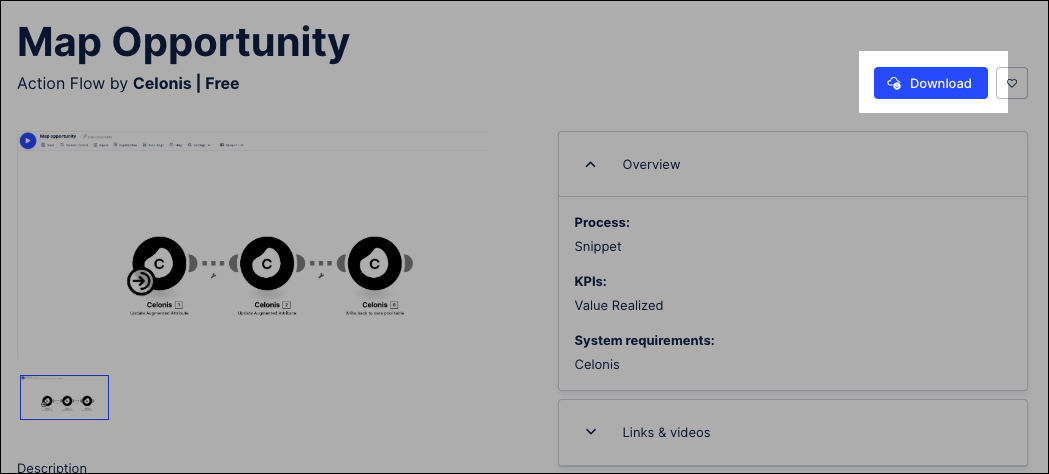
Open each Action Flow module and click Download.
This saves a local JSON file, allowing you to import that to your Action Flow. In this example, we're downloading the Map Opportunity blueprint.
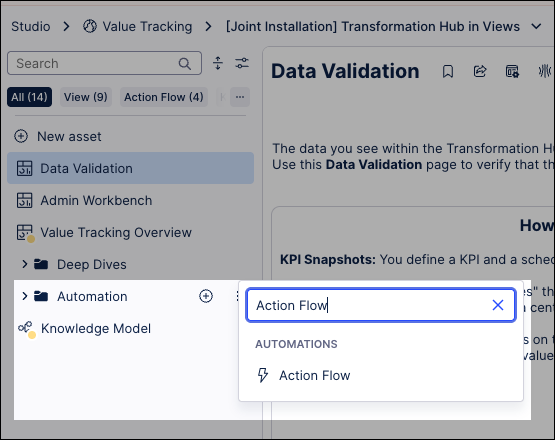
Click Studio and open the package where you installed the Transformation Hub in Views app (as part of Installing the App).
Find the Automation folder and click + Asset - Action Flow.
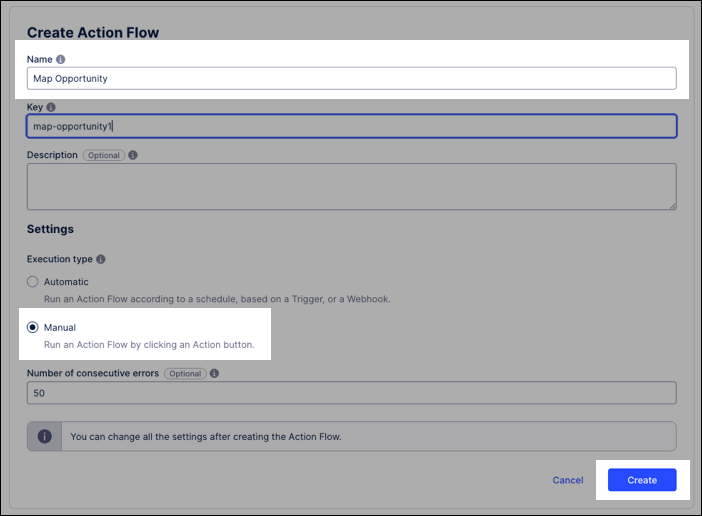
Configure the following Action Flow fields:
Name: We suggest
Map Opportunityor relevant name for the module you're importing.Execution type: Select Manual.
Click Create.
The Action Flow is added to the Studio package and the configuration screen loads.
Click Blueprints - Import Blueprint and select the local JSON file.

The blueprint is added to your Action Flow editor, allowing you to fast track the configuration of each Action Flow.
Repeat steps 5 to 9 for each of the four Action Flows you need to configure.
Once you have successfully imported the blueprints, the core logic for your Action Flows is established. However, because every environment has unique connection parameters, you must now open each Action Flow and map the specific Connections, Knowledge Models, and Data Pool variables to match your instance.
Tip
If you've downloading and imported the Map Opportunities blueprint (as detailed in Recommended: Downloading and importing Action Flow blueprints), you can start this process at Step 8.
The Map Opportunity Action Flow takes inputs like SnapshotTaskID and OpportunityName and writes them into a specific OpportunityMapping table in your data pool.
To manually configure the Action Flow for the Transformation Hub in Views app:
Click Studio and open the package where you installed the Transformation Hub in Views app (as part of Installing the App).
Find the Automation folder and click + Asset - Action Flow.
Configure the following Action Flow fields:
Name: We suggest
Map Opportunity.Execution type: Select Manual.
Click Create.
The Action Flow is added to the Studio package and the configuration screen loads.
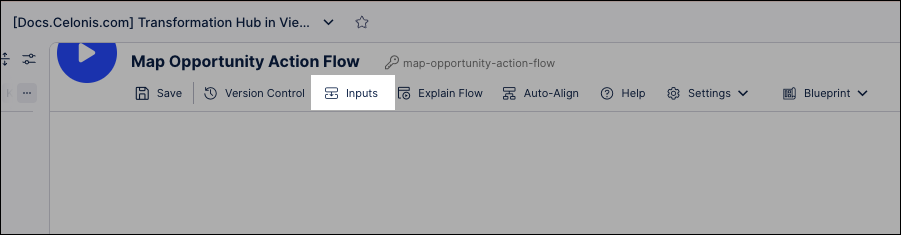
Click Inputs.
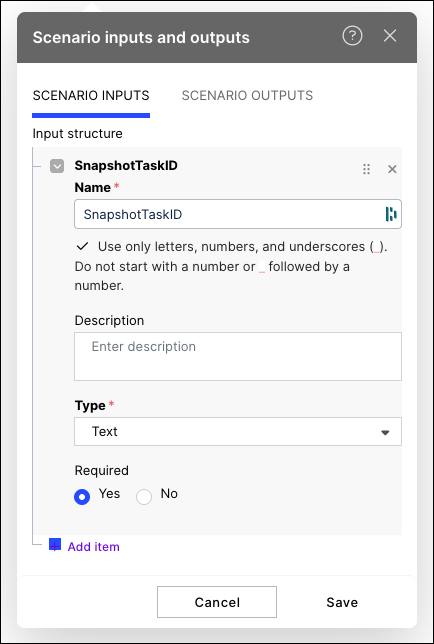
Add the following inputs:
Input Name
Input Type
Required
SnapshotTaskID
Text
Yes
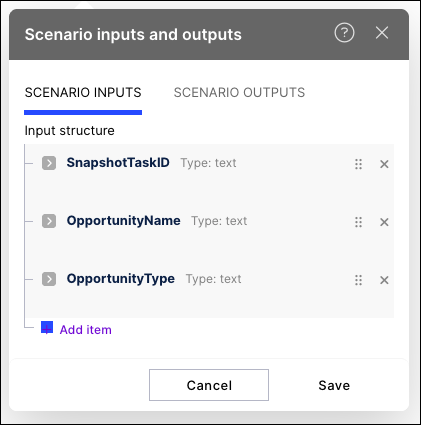
OpportunityName
Text
Yes
OpportunityType
Text
Yes
For example:
You input configuration should then look like this:
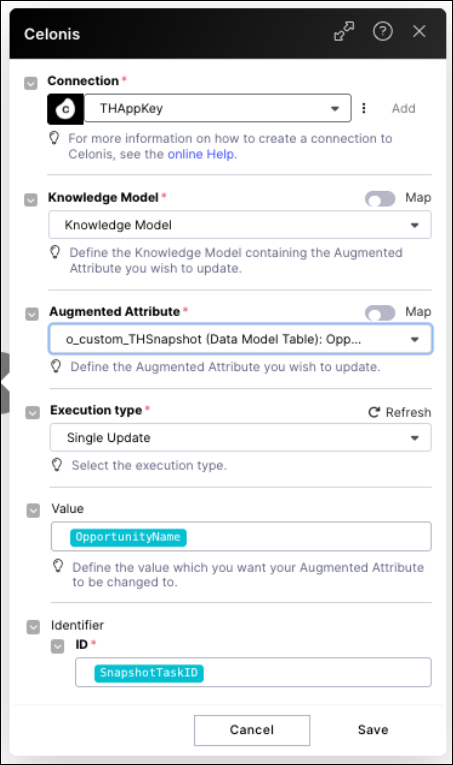
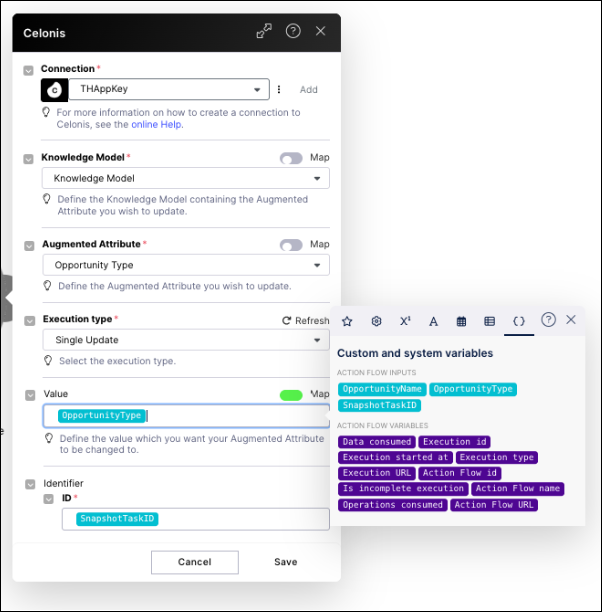
Using the Action Flow editor, click Add Module - Celonis and select Update Augmented Attribute.

Configure the Action Flow module using the following fields:
Connection: Select the created Application Key
Knowledge Model: Select the Knowledge Model from the same Studio package as the app installation.
Augmented Attribute: Select
Opportunity Name. When selecting the attribute, ensure you choose the one listed under theo_custom_THSnapshotData Model Table in the dropdown menu.Execution type: Single update.
Value: Select
OpportunityName.Identifier: Select
SnapshotTaskID.
Create a second Celonis - Update Augmented Attribute module and configure it using the following fields:
Connection: Select the created Application Key
Knowledge Model: Select the Knowledge Model from the same Studio package as the app installation.
Augmented Attribute: Select
Opportunity Type. When selecting the attribute, ensure you choose the one listed under theo_custom_THSnapshotData Model Table in the dropdown menu.Execution type: Single update.
Value: Select
OpportunityType. You may need to map this value by toggling the Map button, going to the Variable tab, and selecting theOpportunityTypeAction Flow input.Identifier: Select
SnapShotID.
Create a third module, selecting Celonis - Write back to data pool table and configure it using the following fields:
Note
A '404: Undefined' error may appear by default during this step. To resolve this, manually select the correct Data Pool connection from the dropdown menu as specified below.
Connection: Select the created Application Key
Data Pool: Select the Data Pool of the app (
Marketplace Installed Pool) from the dropdown menuKnowledge Model: Select the Knowledge Model from the same Studio package as the app installation.
New Connection Name: Enter
TH Writeback. Use the same name as the backend object transformations that reference this name.Create a new table name: Enter
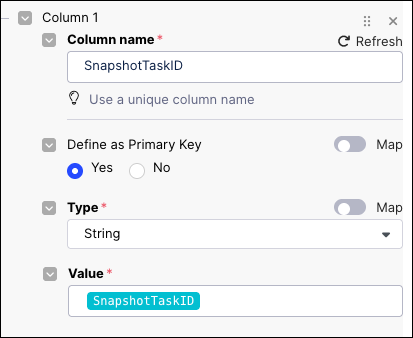
OpportunityMapping.Data source: Select Manually map table columns. And then add three columns:
Column name
Define as Primary Key
Type
Value
Example
SnapshotTaskID
Yes
String
SnapshotTaskID
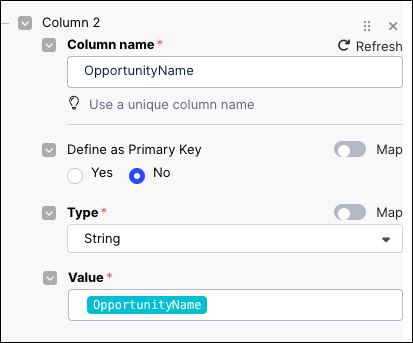
OpportunityName
No
String
OpportunityName
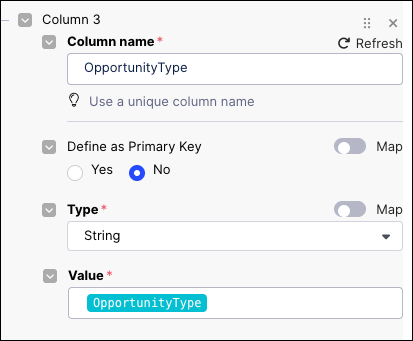
OpportunityType
No
String
OpportunityType
After configuring the Action Flow modules, click Save.
Your Action Flow should look like this:
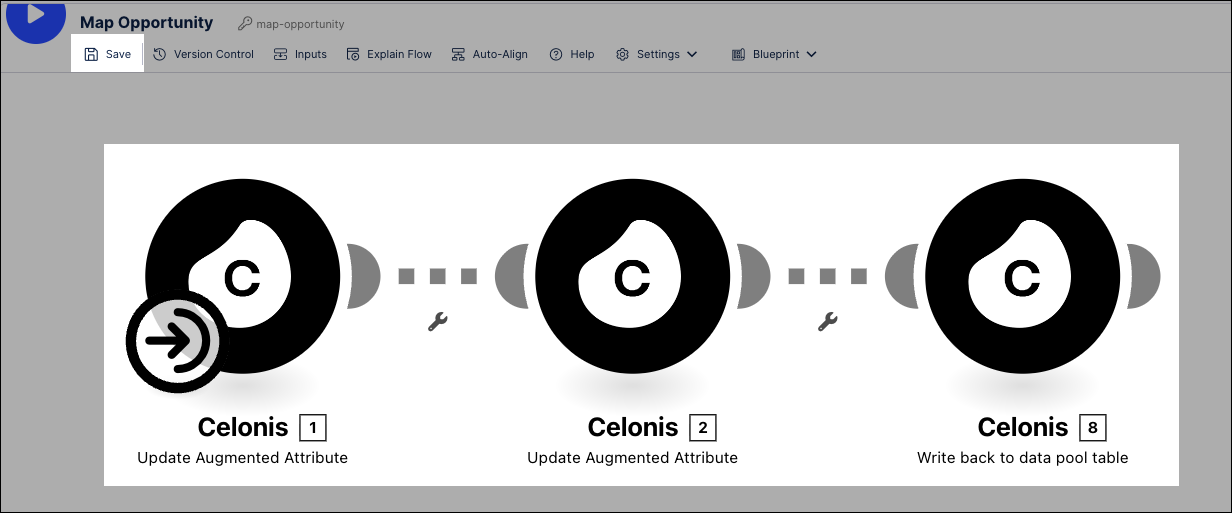
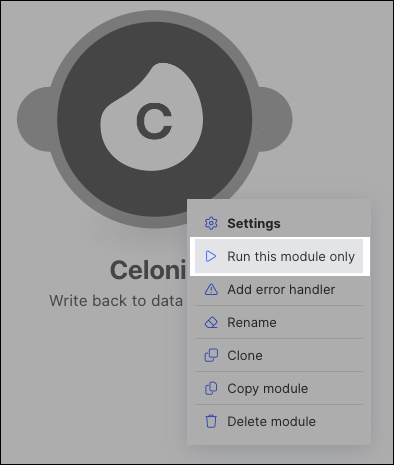
To establish the writeback connection, right click on the Write back to data pool table module and click Run this module only.
To confirm that the writeback connection is active, click Data - Data Integration and open your Marketplace Installed Pool.
Click Data Connections and confim that your
TH Writebackconnection is active.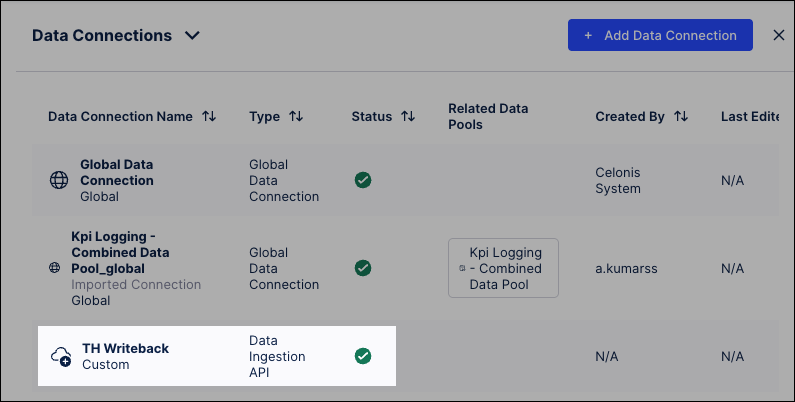
Tip
If you've downloading and imported the Map KPI (Action Based) blueprint (as detailed in Recommended: Downloading and importing Action Flow blueprints), you can start this process at Step 8.
This Action Flow updates Augmented Attributes in your Knowledge Model to define how specific actions contribute to a KPI.
Click Studio and open the package where you installed the Transformation Hub in Views app (as part of Installing the App).
Find the Automation folder and click + Asset - Action Flow.
Configure the following Action Flow fields:
Name: We suggest
Map KPI (Action Based).Execution type: Select Manual.
Click Create.
The Action Flow is added to the Studio package and the configuration screen loads.
Click Inputs.

Add the following inputs:
Input Name
Input Type
Required
KpiID
Text
Yes
kpiApproach
Text
Yes
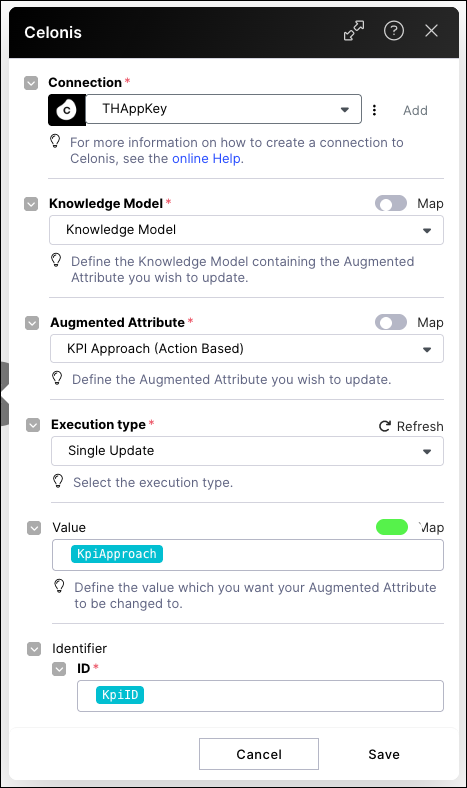
Using the Action Flow editor, click Add Module - Celonis and select Update Augmented Attribute.
Configure the Action Flow module using the following fields:
Connection: Select the created Application Key
Knowledge Model: Select the Knowledge Model from the same Studio package as the app installation.
Augmented Attribute: Select
KPI Approach (Action Based). When selecting the attribute, ensure you choose the one listed under theo_custom_THKPIData Model Table in the dropdown menu.Execution type: Single update.
Value: Select
KpiApproach. You may need to map this value by toggling the Map button, going to the Variable tab, and selecting theKpiApproachAction Flow inputIdentifier: Select
KpiID.
Create a second module, selecting Celonis - Write back to data pool table and configure it using the following fields:
Connection: Select the previously created
TH Writebackconnection.Knowledge Model: Select the Knowledge Model from the same Studio package as the app installation.
Create a new table name: Enter
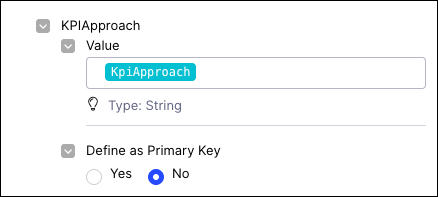
KPIMapping.Data source: Select Manually map table columns. And then add two columns:
Column name
Define as Primary Key
Type
Value
Example
KpiID
Yes
String
KpiID
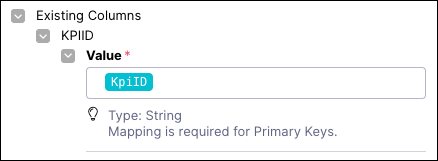
KPIApproach
No
String
KpiApproach
After configuring the Action Flow modules, click Save.
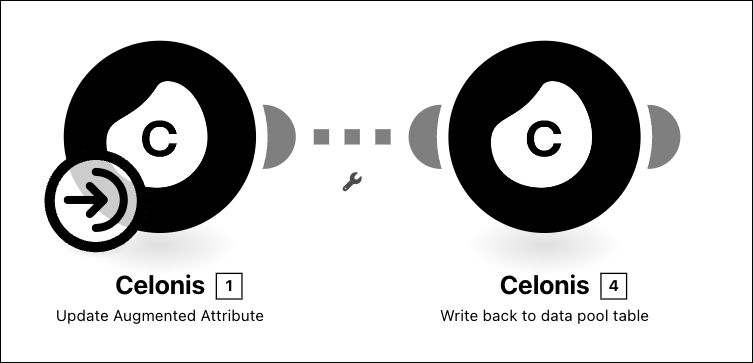
Your Action Flow should look like this:
To establish the writeback connection, right click on the Write back to data pool table module and click Run this module only.
To confirm that the writeback connection is active, click Data - Data Integration and open your Marketplace Installed Pool.
Click Data Connections and confim that your
TH Writebackconnection is active.
Tip
If you've downloading and imported the Map KPI (Rate Based) blueprint (as detailed in Recommended: Downloading and importing Action Flow blueprints), you can start this process at Step 8.
This Action Flow handles KPI mapping where the value is derived from a frequency or percentage rate.
Click Studio and open the package where you installed the Transformation Hub in Views app (as part of Installing the App).
Find the Automation folder and click + Asset - Action Flow.
Configure the following Action Flow fields:
Name: We suggest
Map KPI (Rate Based).Execution type: Select Manual.
Click Create.
The Action Flow is added to the Studio package and the configuration screen loads.
Click Inputs.

Add the following inputs:
Input Name
Input Type
Required
KpiID
Text
Yes
kpiApproach
Text
Yes
Using the Action Flow editor, click Add Module - Celonis and select Update Augmented Attribute.
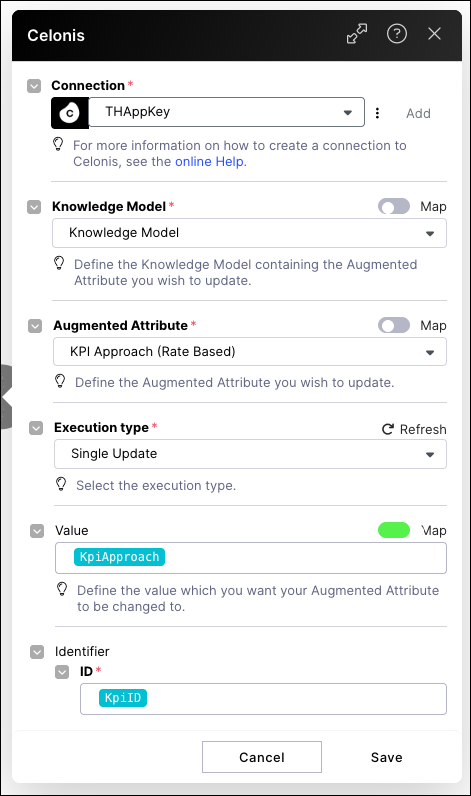
Configure the Action Flow module using the following fields:
Connection: Select the created Application Key
Knowledge Model: Select the Knowledge Model from the same Studio package as the app installation.
Augmented Attribute: Select
KPI Approach (Rate Based). When selecting the attribute, ensure you choose the one listed under theo_custom_THKPIData Model Table in the dropdown menu.Execution type: Single update.
Value: Select
KpiApproach. You may need to map this value by toggling the Map button, going to the Variable tab, and selecting theKpiApproachAction Flow inputIdentifier: Select
KpiID.
Create a second module, selecting Celonis - Write back to data pool table and configure it using the following fields:
Connection: Select the previously created
TH Writebackconnection.Knowledge Model: Select the Knowledge Model from the same Studio package as the app installation.
Table: Select the existing
KPIMapping.Data source: Select Manually map table columns. And then add two columns:
Column name
Define as Primary Key
Type
Value
Example
KpiID
Yes
String
KpiID
KPIApproach
No
String
KpiApproach
After configuring the Action Flow modules, click Save.
Your Action Flow should look like this:
To establish the writeback connection, right click on the Write back to data pool table module and click Run this module only.
Tip
If you've downloading and imported the Map KPI (Non Monetary) blueprint (as detailed in Recommended: Downloading and importing Action Flow blueprints), you can start this process at Step 8.
This Action flow manages tracking for KPIs that aren't measured in currency (e.g., carbon emissions or cycle time).
Click Studio and open the package where you installed the Transformation Hub in Views app (as part of Installing the App).
Find the Automation folder and click + Asset - Action Flow.
Configure the following Action Flow fields:
Name: We suggest
Map KPI (Non Monetary).Execution type: Select Manual.
Click Create.
The Action Flow is added to the Studio package and the configuration screen loads.
Click Inputs.

Add the following inputs:
Input Name
Input Type
Required
KpiID
Text
Yes
kpiApproach
Text
Yes
Using the Action Flow editor, click Add Module - Celonis and select Update Augmented Attribute.
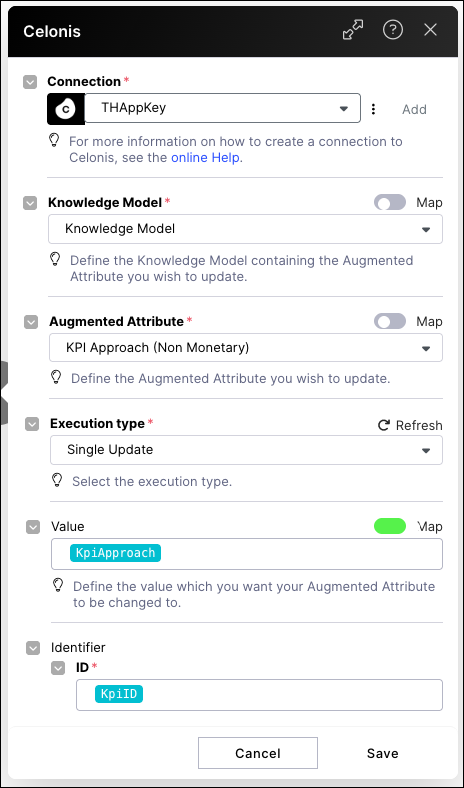
Configure the Action Flow module using the following fields:
Connection: Select the created Application Key
Knowledge Model: Select the Knowledge Model from the same Studio package as the app installation.
Augmented Attribute: Select
KPI Approach (Non monetary). When selecting the attribute, ensure you choose the one listed under theo_custom_THKPIData Model Table in the dropdown menu.Execution type: Single update.
Value: Select
KpiApproach. You may need to map this value by toggling the Map button, going to the Variable tab, and selecting theKpiApproachAction Flow inputIdentifier: Select
KpiID.
Create a second module, selecting Celonis - Write back to data pool table and configure it using the following fields:
Connection: Select the previously created
TH Writebackconnection.Knowledge Model: Select the Knowledge Model from the same Studio package as the app installation.
Table: Select the existing
KPIMappingtable.Data source: Select Manually map table columns. And then add two columns:
Column name
Define as Primary Key
Type
Value
Example
KpiID
Yes
String
KpiID
KPIApproach
No
String
KpiApproach
After configuring the Action Flow modules, click Save.
Your Action Flow should look like this:
To establish the writeback connection, right click on the Write back to data pool table module and click Run this module only.
Next steps
Setting up the remaining object transformations in the OCDM (Object Centric Data Model) is the final technical bridge that connects your raw data to the Transformation Hub.