Provide default actions
Default Actions allow the Business User to trigger a Skill manually by clicking on the respective Manual Sensor somewhere in a View. Read this guide in order to learn about how to set up these Default Actions. First, choose the type of Manual Sensor you want to configure. Second, follow along with one of the two step-by-step guides depending on the type of Manual Sensor that you chose.
There are two options to enable the user to manually trigger a Skill:
Option 1: Allows the triggering from anywhere inside a View via a button.
Option 2: Allows the triggering from tables and profile views that show items of a specific record.
When to use each of the options:
Option 1: When the Skill should trigger a generic action that doesn't require detailed information about the object you are looking at.
Example: Send a mail to a colleague asking them to look at the View from which you triggered the action.

Option 2: When the Skill action requires detailed information about the attribute values of the object you are looking at.
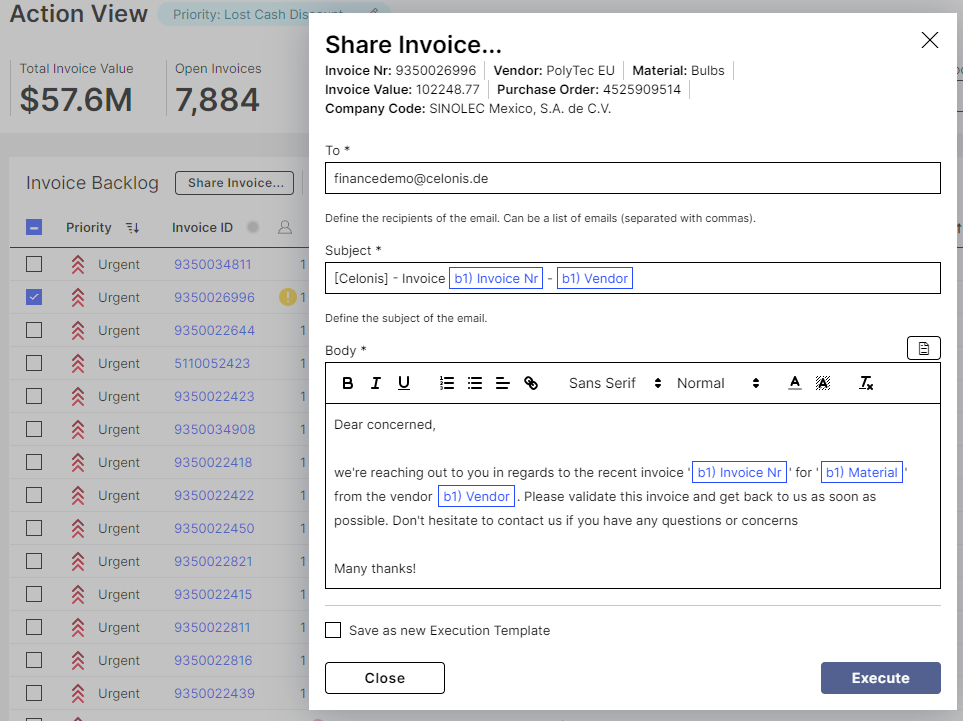
Example: Share details about a specific invoice to get it validated. The item attributes are automatically filled with the respective values and can be used in the action configuration.
Choose the View in which you want to place your Button
Click Edit
Add a new Button component in the "components:" section of your View.
Note
Note 1: Be aware that you can only provide pre-defined inputs, e.g. the name of the View. In case you want to provide object-specific inputs, please have a look at Option 2 for a Manual Sensor.
Note 2: If you haven't set up a Skill yet, choose a dummy value as skillKey for now - but remember to come back later and use the correct key of the Skill that you set up in Step 2.
Tip
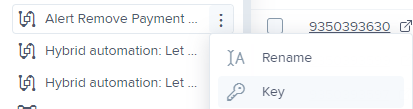
Where do I find the key of my Skill?
When hovering over the respective Skill in the bar on the left of your screen, three dots will appear on which you can click. Choose "Key" and copy the key that shows up. Make sure that the key does not contain the package name but only the key of your Skill (e.g. "remove-payment-block" which is the automatically created Skill key for a Skill called "Remove Payment Block").
 |
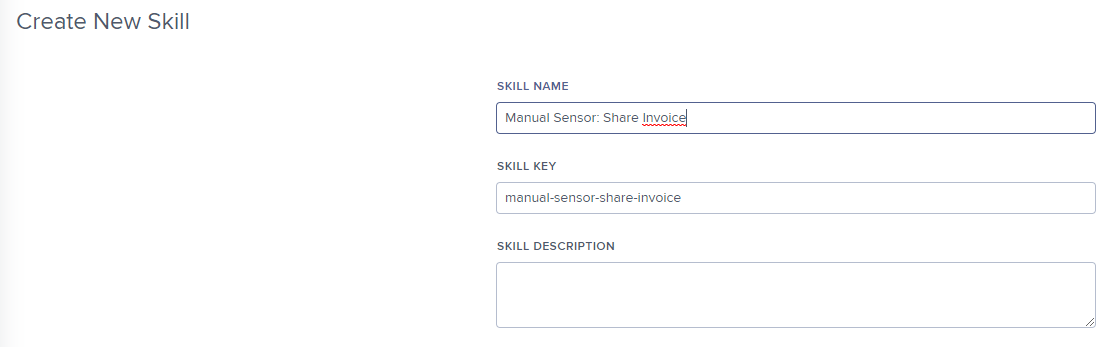
Define a Skill name.
The Skill key will be automatically created. The Skill key is unique and can be used to refer to a specific Skill throughout the Celonis Platform.
Optional: Add a Skill description.
Click Create.
In this example, we will build a Skill that will allow the User to pick an invoice and share it:
 |
Click Add Sensor.
Select "Manual Sensor" which you can find in the "Celonis" group:

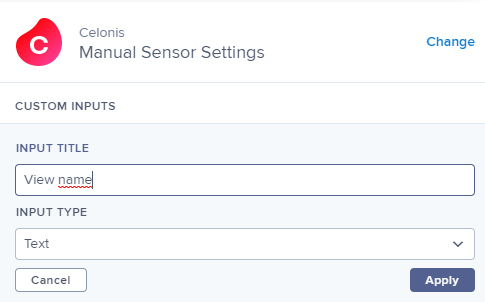
Define all the inputs needed for the Default Action and for the subsequent steps of the Skill you are about to build.
Note
The "Input Title" here must coincide with the "name:" in the input section of the Button configuration. This mapping is case-sensitive.
Note
Please note that Manual Sensor inputs with the Request Manual Input from User option selected will only display in the Profile View modal if that input is also being utilized by consecutive steps of this action.
For example:
Check for compliance with the Button configuration:
1
2
3
4
5
6
7
8
9
10
11
12
13
14
id:button-skilltype:button-listsettings:align:leftname:Trigger Skillbuttons:-icon:product-workflowslabel:TriggeronClick:executeSkill:skillKey:button-testinputs:-name:View namevalue: ${view_name}In this case, view name is a variable set manually by a text box into the input "view_name".
Click Apply and then click Save.
Click Add Next Step.
Add one or several actions to your Skill.
Note
In order to connect to a third-party system or to a Celonis internal application, make sure that you set up all needed connections and assigned them to connection variables correctly.
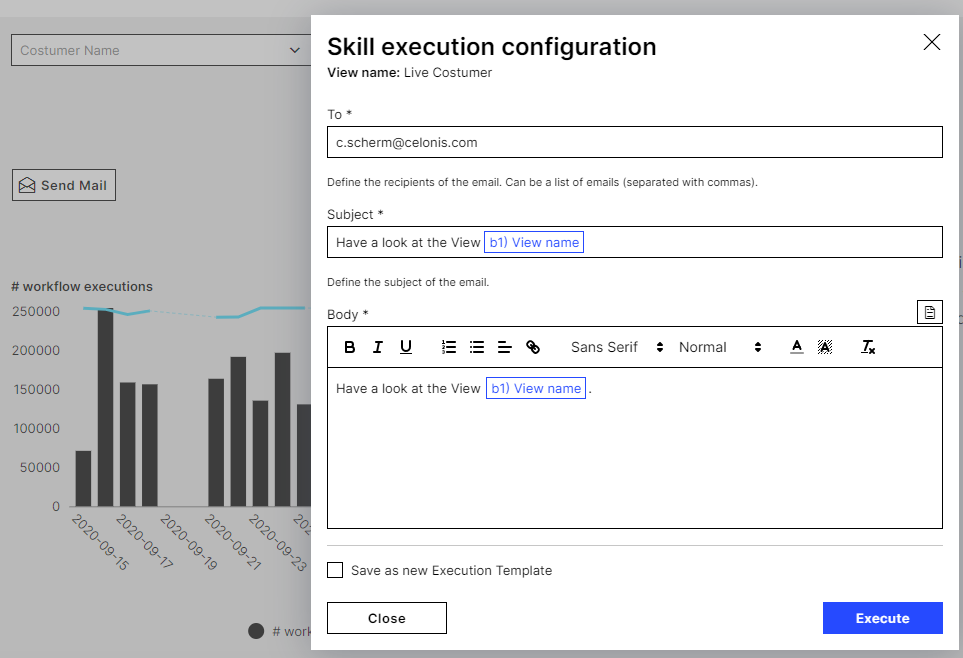
We choose to trigger an email to a colleague:
Note
Note 1: Changes won't be saved automatically here - so make sure to click Save.
Note 2: Notice how the inputs defined in the step before ("View name") can here be used for the configuration.
 |
Note 3: When you select the "Set value before execution" option, the respective value can be entered or - when providing a default value as in the example - modified by the Business User before executing the action:
 |
When you have defined all required inputs, click Test to monitor the Test Execution Logs. This will only be possible if all the required inputs are defined.
Edit the Skill where appropriate and click Publish to ensure that the Skill is ready to use.
Monitor the Execution Logs of your Skill by clicking Logs (Sensor Logs will be available soon).
Edit your Skill by clicking Edit and then clicking Save again once all changes are made.
To enable the user to trigger the Skill that you want to set up, you need to make sure that the Default Action is displayed on certain Views or View Components. In order to do so, the "actions []" section in the Knowledge Model must be configured.
Note
Note that users who don't have "Use" access to the underlying skill configured on the default action will not be able to see the default action when selecting rows on a table or on the profile view.
You can decide to display your Default Actions on Tables:

To do so, you first need to adjust the section"actions: []" in the Knowledge Model configuration. After you have done that, you can either decide to display your Default Actions on Profile Views additionally or directly jump to Step 2 to set up your Skill.
Note
If you haven't set up a Skill yet, choose a dummy value as skillKey for now - but remember to come back later and use the correct key of the Skill that you set up in Step 2.
Next to triggering Default Actions from Tables, you might also want to trigger them from the respective Profile Views:
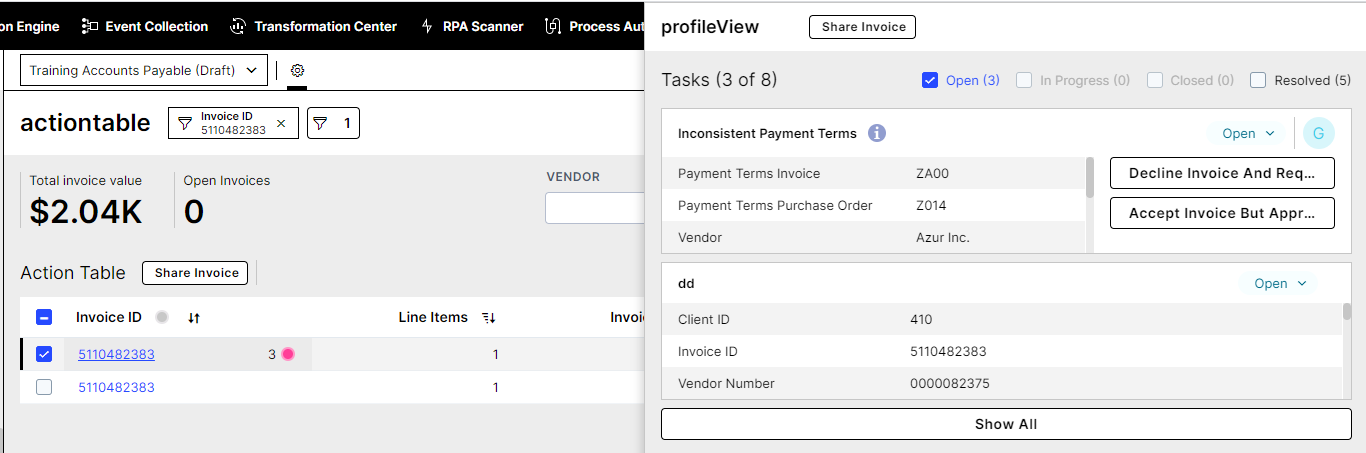 |
Note
Be aware that you cannot display Default Actions on Profile Views only but that they will always be displayed on the respective Tables too.
To do so, you first need to configure the section "actions: []" in your Knowledge Model.
Second, you have to add the following code snippet to your Profile View configuration:
YAML Code | Position in Profile View Code |
|---|---|
includedTools: - "default-action" | metadata: [] inputs: [] includedTools: - "default-action" |
Note
Make sure to add the snippet above to your Profile View configuration - not to your Knowledge Model.
You have the option to restrict the display of Default Actions to certain Profile Views.
Define a Skill name.
The Skill key will be automatically created. The Skill key is unique and can be used to refer to a specific Skill throughout the Celonis Platform.
Optional: Add a Skill description.
Click Create.
In this example, we will build a Skill that will allow the User to pick an invoice and share it:
|
Click Add Sensor.
Select "Manual Sensor" which you can find in the "Celonis" group:
Define all the inputs needed for the Default Action and for the subsequent steps of the Skill you are about to build.
Note
The "Input Title" here must be the same as the attribute "name:" in the input section of the action in the Knowledge Model. This mapping is case sensitive.
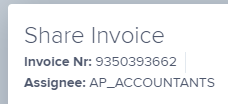
In our example, the required inputs are:

Check for correlation with the example of the Knowledge Model configuration.
inputs:
  - name: Assignee
    attribute: CELONIS_ASSIGNEE
  - name: Invoice Nr
    attribute: INVOICE_BELNR
Click Apply and then click Save.
Click Add Next Step.
Add one or several actions to your Skill.
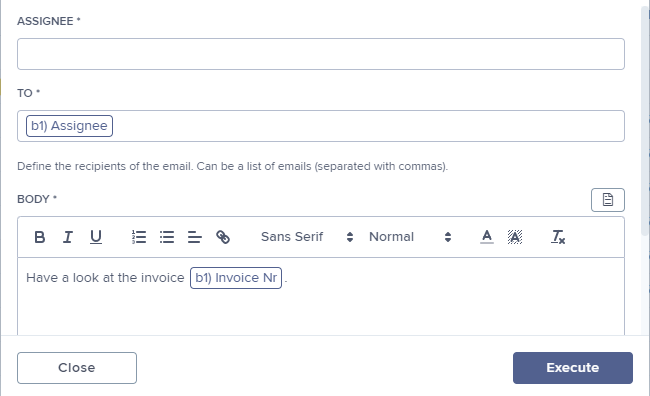
We choose to trigger an email to the responsible person in our example:
Note
Note 1: Changes won't be saved automatically here - so make sure to click on "Save".
Note 2: Notice how the inputs defined in the step before ("Assignee" and "Invoice Nr" in our example) can here be used for the configuration and will be automatically filled with the respective attribute value when executing the action:
Note 3: When you tick "Set value before execution" the respective value can be entered or - when providing a default value as in the example - modified by the Business User before executing the action:
Once you have defined all required inputs, click Test to monitor the Test Execution Logs. This will only be possible if all the required inputs are defined.
Edit the Skill where appropriate and click Publish to ensure that the Skill is ready to use.
Monitor the Execution Logs of your Skill by clicking Logs (Sensor Logs will be available soon).
Edit your Skill by clicking Edit and then click Save again once all changes are made.