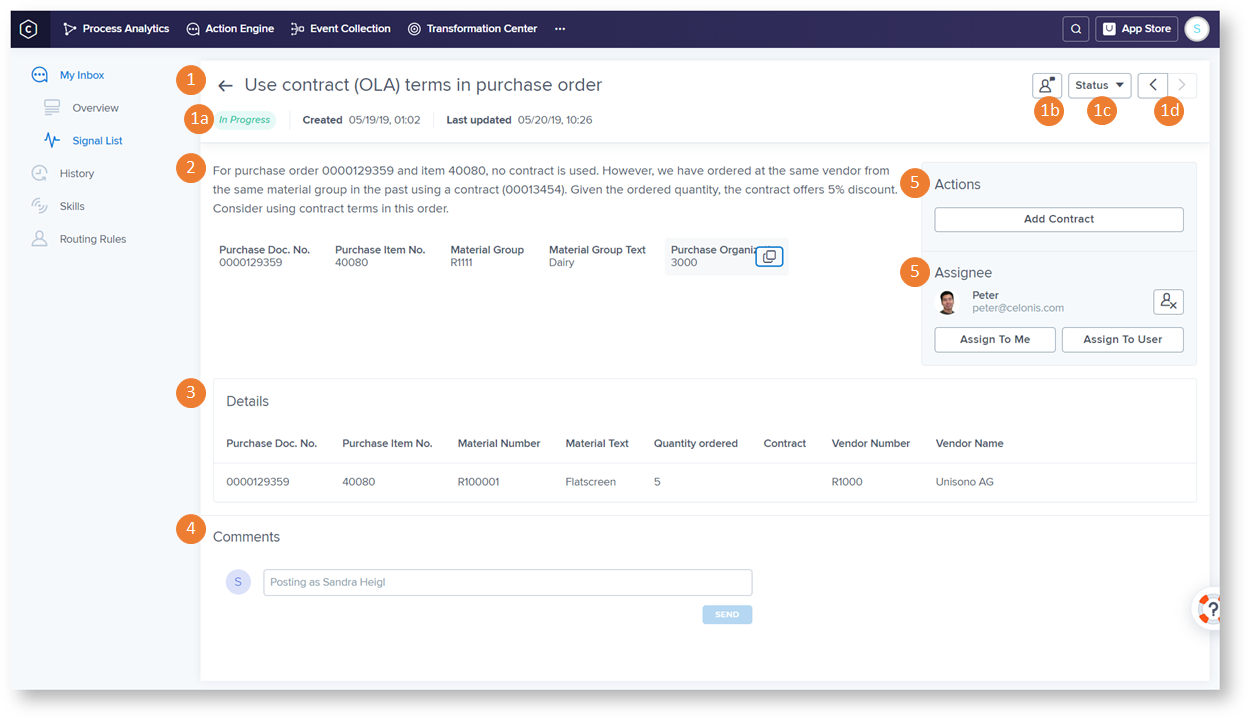
Celonis Product Documentation

Signal Details

The Signal Details section provides the business user with all context-relevant information necessary to take immediate action upon notification of a Signal. This could be additional information about the Signal, the possibility to trigger actions, to change the status of the Signals workflow, and to collaborate with team members.

22118428.png

When clicking on a Signal in the Signal List, the details page for the Signal shows up, with the following information:

  1. Signal Overview:

    1. Status and creation date of Signal: current status of the Signal, as well as the date on which Signal was created and updated, are shown.

    2. Send Feedback: give Feedback to the Skill Owner, who created the underlying Skill. Whether you need more Details in your Signals or anything else that should be changed, this can directly be sent via Email through this button.

    3. Change Status:

      Allows the business user to change the status of the Signal, which is initially open. The available statuses are:

      • In Progress: Once the business user has executed action or become active otherwise, he/she can mark the Signal as In Progress to indicate that something has been done already.

      • Resolved: The Signal can be set to resolve in two ways: either the Signal is resolved automatically since the business user has taken appropriate Action. Therefore, Action Engine does not detect the Signal in the Celonis data anymore and the Signal vanishes from the Signal list. On the other hand, the user might be able to set the Signal on resolved manually, if the change take can not be found be Action Engine within the data.

      • Snooze: The Signal can be set on Snooze, if the business user wants to be reminded of the Signal again in up to 21 days.

      • Unread: If the business user wants to be notified of the Signal again, he/she can mark the Signal as unread.

      • Delete: If the business user already has acted on the Signal, he/she can delete the Signal manually.

    4. Navigation between Signals: allows to directly jump to the next Signal without going back to Signal List

  2. Description:

    • Signal attributes from the Signal list, date of creation, and optionally a Signal description provide the business user with additional general information.

    • Copy to clipboard: by hovering over the attributes, a button appears which allows copying the attribute value to your clipboard.

  3. Details:

    • Optionally the business user can be provided with more details (e.g. in table format) to be able to decide how to act on the concrete incident.

    • For example, a common pattern is to have Signals on order level (e.g. a purchase order with a missing order confirmation by the supplier) while showing the line items of the purchase order in the Signal details.

    Note

    The Signal Details are loaded and saved when opening a Signal for the first time. Therefore, when resolving a Signal without opening it once, the Details also won't be displayed in the History.

  4. Comments:

    • The business user can comment on the Signal.

    • The comment section also includes the history of all activities (such as reassigning a Signal, changing its status, …) which are automatically posted as comments.

  5. Actions:

    • The Business User can directly trigger Actions for the Signal in concern, e.g. send an overdue notice.

    • The actions can consist in generating an SAP transaction, opening a web link (to execute commands for general web applications such as Salesforce), displaying a pop-up, jumping into a Celonis analysis, or sending an email.

    • A peculiarity of Action Engine: actions already contain the information on the selected Signal, i.e. the SAP transaction is filled with the correct parameters of the overdue notice.

  6. Assignee:

    • Collaboration with colleagues: business user can assign the Signal to themselves or unassign themselves from the Signal if they are the current Assignee.

    • Assignee indicates the current processor of the incident (also displayed in the Assignee column in the Signal list).

    • Assign another team member by clicking on the Assign User button to choose the relevant Action Engine user and optionally attach a message. When attaching a message, the assigned user receives an email notification right away.