Email (Action Flow)
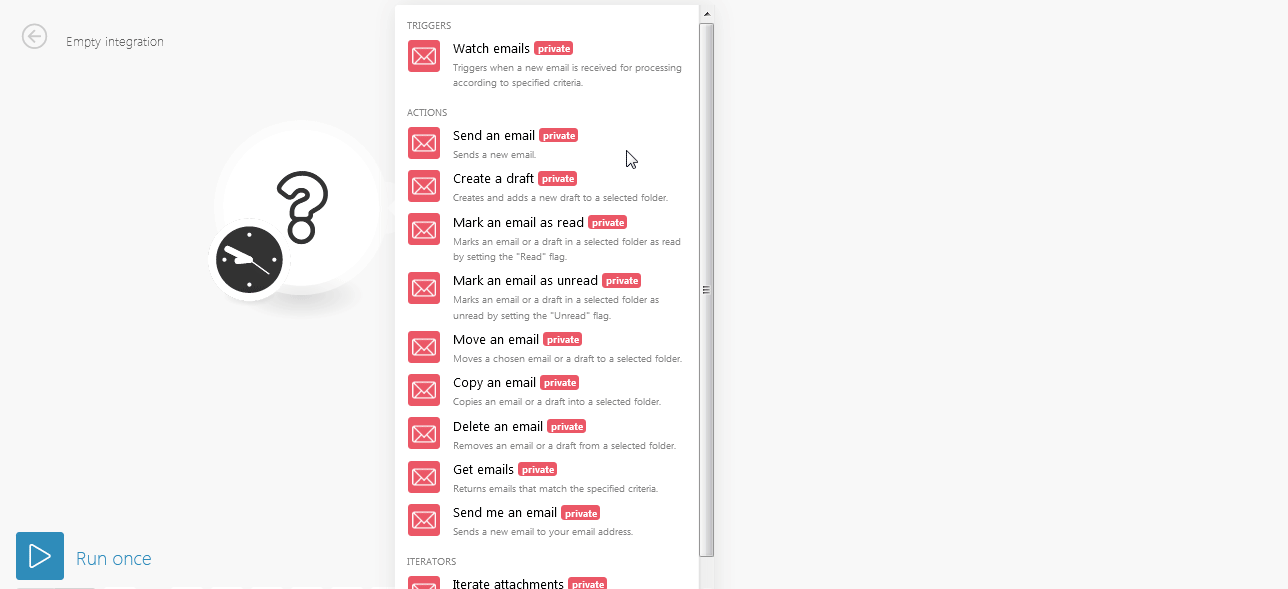
The Email app allows you to download emails via IMAP, send emails via SMTP, create new drafts, move and copy emails from one folder to another folder, mark emails as read or unread, and delete emails.
You can connect your Email account to Celonis platform using the following methods:
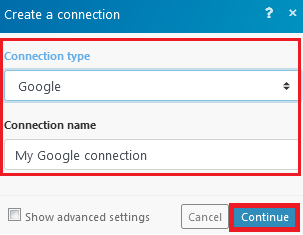
1. Go to Celonis platform and open the Email module's Create a connection dialogue and select the Connection type as Google.
2. In the Connection name field, enter a name for the connection and click Continue.
3. Confirm the access by clicking Allow.
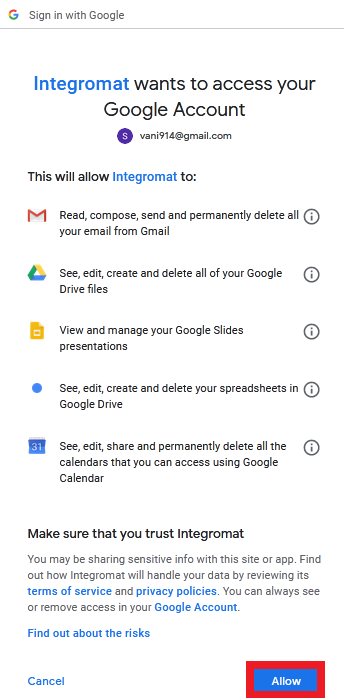
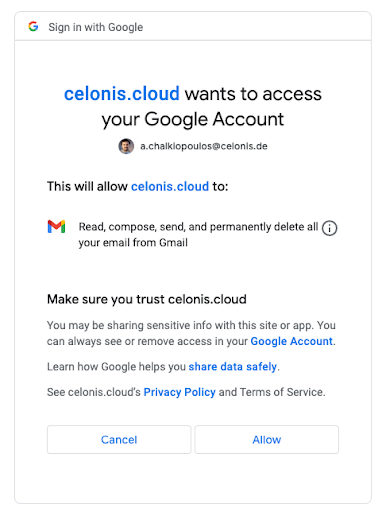
The connection has been established.
When creating a connection with this method, you can authorize Celonis platform to authenticate using Microsoft account or you can use your own credentials.
Go to Celonis Platform and open the Email module's Create a connection dialogue.
Select the Connection type as Microsoft SMTP/IMAP OAuth and click Save.
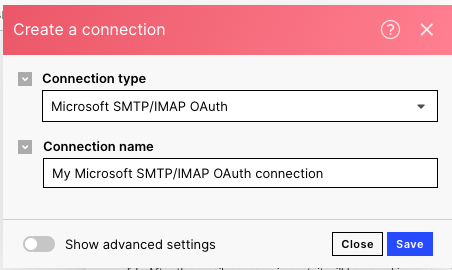
Celonis platform will request authentication with your default third-party authentication software.
The connection has been established.
Before you begin:
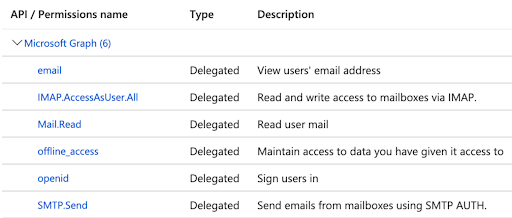
Make sure you have ClientID and secret ready.
If haven't created your credentials yet, you need to create a custom app in your Azure account to generate the CliendID and secret. See Generating credentials in Microsoft Azure.
Make sure the Email application has the the following permissions assigned in the Azure portal:
To create a connection using own credentials:
Go to Celonis platform, and open the Email module's Create a connection dialogue and select the Connection type as Microsoft SMTP/IMAP OAuth.
Click the Show advance settings toggle.
Enter your credentials and click Save.
1. Go to Celonis platform, open the Email module's Create a connection screen, and select the Connection type as Others (IMAP).
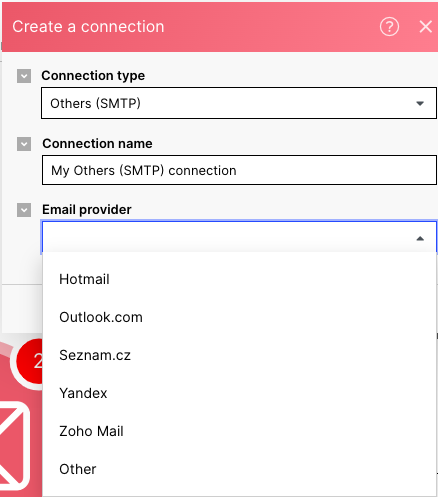
2. Select one of the Email providers and enter your email details, or select Other.
3. If you select Other as the Email provider, you get access to all low-level details of setting up an SMTP connection:
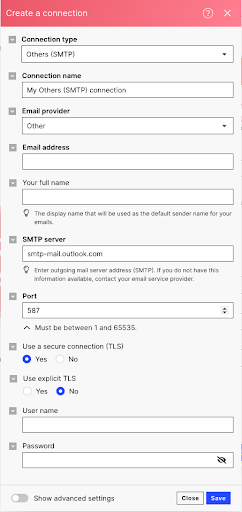
As fields in the Celonis platform Action Flow user interface which are displayed in bold are mandatory, you will have to enter the Email address, the SMTP server and port and additional settings:
SMTP Server: Enter mail server address (SMTP). If you do not have this information available, contact your email service provider.
Port: Enter the port number.
Use Secure Connection (TLS): Select to establish a secure connection between the servers.
Use explicit TLS: This explicitly requests TLS/SSL encryption to be turned on during the initial handshake. When set to No, the client will first connect to the server and then negotiate a TLS/SSL session. The support TLS version is 1.2 or higher.
User name: Enter your email address.
Password: Enter your password.
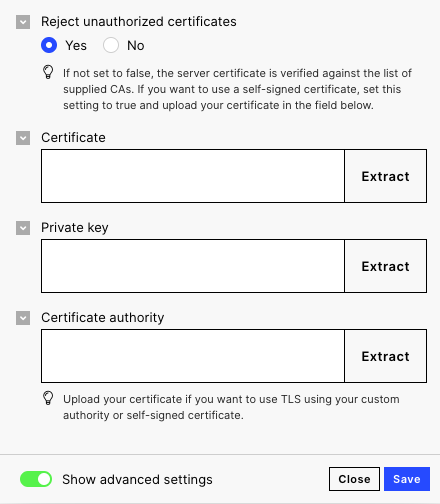
Additionally, a Mutual TLS (mTLS) secure email connection, can be set up using the “advanced settings”:
Setting | Description |
|---|---|
Reject unauthorized certificates | If Yes, the server certificate is verified against the list of supplied CAs. For self-signed certificates as they will not be matched with the built-in CAs, either set this option to Yes and upload your certificate in the “Certificate Authority” field, or set this option to No (this will cause all certificate validations to be skipped). |
Certificate | Your IT will need to issue a new client certificate, to be provided in this configuration. Your email server will be using this certificate to validate the Celonis service. |
Private Key | Your IT will need to issue a new private key, to be provided in this configuration. Your email server will be using this private key to validate the Celonis service. |
Certificate authority | Add your certificate authority in this configuration. A self-signed certificate can also be used as a Certificate Authority. Celonis will be using this to verify the identity of your SMTP server. This ensures the bi-directional certificate based identity verification of the mTLS protocol. |
Note
To use mTLS, you might need to allowlist the IP Addresses of Celonis platform, in addition to providing you the above files. Reach out to your IT team for more information.
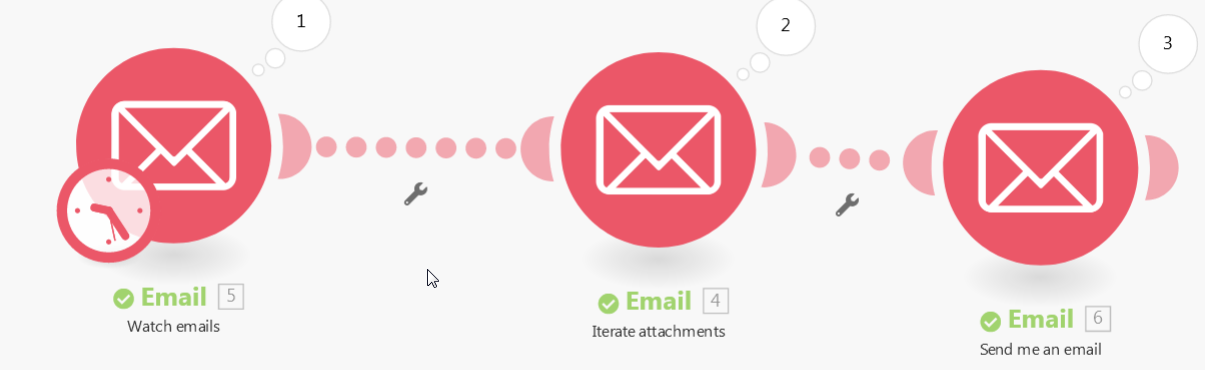
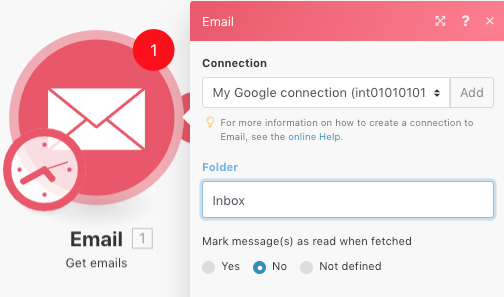
Watch Emails
Triggers when a new email is received for processing according to specified criteria.
Connection | |
Folder | Select the folder whose emails you want to watch. |
Criteria | Select the criteria of the emails you want to watch:
|
Sender Email Address | Enter the email address of the sender whose emails you want to watch. |
Recipient Email Address | Enter the email address of the recipient whose emails you want to watch. |
Subject | Enter the subject of the email you want to watch. |
Phrase | Enter any keywords to watch only those emails containing specific phrases. |
Mark message(s) as read when fetched | Select the option if you want to mark the unread email as read after retrieving the details. |
Maximum number of results | The maximum number of emails Celonis platform should return during one Action Flow execution cycle. |
Copy an Email
Copies an email or a draft into a selected folder.
Connection | |
Source Folder | Select the folder from which you want to copy the email. For example, Inbox, Primary, Work, and so on. |
Destination Folder | Select the folder to which you want to copy the email. For example, Inbox, Primary, Work, and so on. |
Email ID (UID) | Enter the Email ID UID of the email you want to copy to the destination folder. You can get the UID of the email by using Celonis platform's Watch Email module or Search Email module. |
Create a Draft
Creates and adds a new draft to a selected folder.
Connection | |
Folder | Select the folder in which you want to create the draft email. |
To | Enter the email address to which you want to send the email. |
Subject | Enter the subject line of the email. |
Content Type | Select the content type for the email:
|
HTML | Enter the email content in HTML format using HTML tags or in the plain text as selected in the Content type field. |
Attachments | Add an attachment: File name Enter the file name. For example, sample.doc. Data Enter the path to the folder to upload the attachment. Content-ID Enter the content ID to insert the attachment (image) in the content. |
Copy Recipient | Enter the email address to whom you want to send a copy of this email. |
Blind Copy Recipient | Enter the email address to whom you want to send a copy of this email without appearing their email addresses in the email. |
From | Enter the email address that appears in the From field. |
Sender | Enter the email address that appears in the Sender field. |
Reply-To | Enter the details of the email for which you are sending this email as a reply. |
In-Reply-To | Enter the details of the email for which you are drafting this email in reply to. |
References | Enter the details of any reference you want to add to the email. |
Priority | Select the priority:
|
Headers | Add the headers: Key Add the key. Value Enter the value fo the key. |
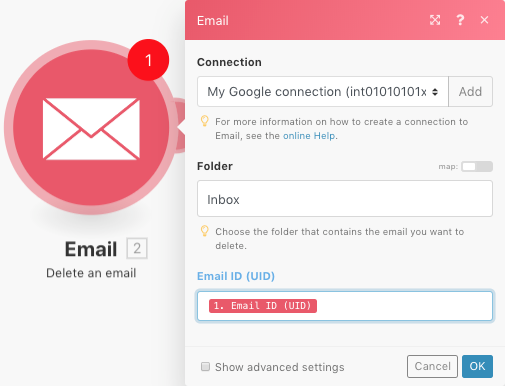
Delete an Email
Removes an email or a draft from ta selected folder.
Connection | |
Folder | Select the folder of the email you want to delete. For example, Inbox, Primary, Work, and so on. |
Email ID (UID) | Enter the Email UID of the email you want to delete. You can get the UID of the email by using Celonis platform's Watch Email module or Search Email module. |
Expunge | If selected, permanently removes all the messages marked as Deleted in the currently open mailbox. When you use Gmail then the behavior is driven by the setting in Settings > Forwarding POP/IMAP in IMAP access section. |
The Unique Email ID in IMAP protocol
The Unique Email ID known as 'Email ID (UID)' is the email's identifier. The Email ID is specific for each of the email's folders.
For getting and deleting the same email from the same folder, you can see below:
Getting an email from the 'Inbox' folder
Deleting the email from the 'Inbox' folder
Get Emails
Returns emails that match the specified criteria.
Connection | |
Folder | Select the folder whose email details you want to retrieve. For example, Inbox, Primary, Work, and so on. |
Mark message(s) as read when fetched | Select the option if you want to mark the unread email as read after retrieving the details. |
Criteria | Select the emails you want to retrieve:
|
Sender email address | Enter the email address of the sender whose emails you want to retrieve. |
Recipient email address | Enter the email address of the recipient whose emails you want to retrieve. |
From date | Enter the date to retrieve the emails processed on or after the specified date. |
Before date | Enter the date to retrieve the emails processed on or before the specified date. |
Subject | Enter the subject of the email you want to retrieve. |
Phrase | Enter any keywords to retrieve only those containing those phrases. |
Email ID (UID) | Enter the Email ID (UID) of the email whose details you want to retrieve. You can get the UID of the email by using Celonis platform's Watch Email module or Search Email module. |
Maximum number of results | The maximum number of emails Celonis platform should return during one Action Flow execution cycle. |
Continue the execution of the route even if the module returns no results | Select if you want to continue to run the module even if there are no results returned. |
Mark an Email as Read
Marks an email or a draft in a selected folder as read by setting the Read flag.
Connection | |
Folder | Select the folder of the email you want to mark as read. For example, Inbox, Primary, Work, and so on. |
Email ID (UID) | Enter the Email UID of the email you want to mark as read. You can get the UID of the email by using Celonis platform's Watch Email module or Search Email module. |
Mark an Email as Unread
Marks an email or a draft in a selected folder as unread by setting the Unread flag.
Connection | |
Folder | Select the folder of the email you want to mark as unread. For example, Inbox, Primary, Work, and so on. |
Email ID | Enter the Email UID of the email you want to mark as unread. You can get the UID of the email by using Celonis platform's Watch Email module or Search Email module. |
Move an Email
Moves a chosen email or a draft to a selected folder.
Connection | |
Source Folder | Select the folder from which you want to move the email. For example, Inbox, Primary, Work, and so on. |
Destination Folder | Select the folder to which you want to add the email. For example, Inbox, Primary, Work, and so on. |
Email ID (UID) | Enter the Email ID UID of the email you want to move to the destination folder. You can get the UID of the email by using Celonis platform's Watch Email module or Search Email module. |
Send an Email
Sends a new email.
Connection | |
Save Message after Sending | Select whether you want to save the email in your mail box after sending it. |
To | Enter the email address to whom you want to send the email. |
Subject | Enter the subject line of the email. |
Content Type | Select the content type for the email:
|
Content | Enter the email content in HTML format using HTML tags or in the plain text as selected in the Content Type field. |
Attachments | Add an attachment: File name Enter the file name. For example, sample.doc. Data Enter the path to the folder to upload the attachment. Content-ID Enter the content ID to insert the attachment (image) in the content. |
Copy Recipient | Enter the email address to whom you want to send a copy of this email. |
Blind Copy Recipient | Enter the email address to whom you want to send a copy of this email without having their email addresses appear in the email. |
From | Enter the email address (and name, if needed) that appears in the From field in the email. Use the correct syntax: |
Sender | Enter the email address that appears in the Sender field in the email. 1. Open the Send an email action advanced settings using the checkbox 2. Enter the required sender name or email Use the correct syntax as shown in the hint on the screenshot below. 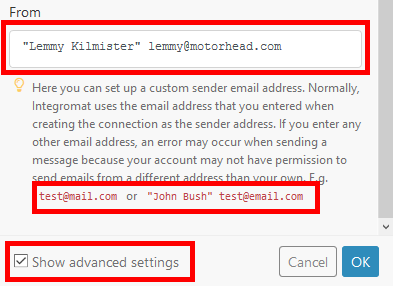 |
Reply-To | Enter the details of the email for which you are sending this email as a reply. |
In-Reply-To | Enter the details of the email for which you are drafting this email in reply to. |
References | Enter the details of any reference you want to add to the email. |
Priority | Select the priority of the email:
|
Headers | Add the headers: Key Add the key. For example, Sender, Date, To, and so on. Value Enter the value for the key. |

Send me an Email
Sends a new email to your email address.
Subject | |
Content | Enter the subject and body of the email. |