Migration from v2 to v3
Guide to migrate the shipping emissions reduction app from v2.X to v3.X
In this guide, you will learn how to migrate your shipping emissions app based on v 2.X to v 3.X. In version 3.X, we decided to change the emissions calculation by our carbon engine from a user-hosted approach to a centrally hosted approach. This change will significantly simplify the implementation of the app, provide more flexibility and improve usability. Unfortunately, this was only possible through drastic changes.
Migration Instructions
(estimated effort: 1 h)
Update your shipping emissions app to the latest version
Go to the Settings page in the app package, click on Dependencies and then update the app.
Adapt your data transformations to align with the newest app version
Go to the data pool used for the app
Update the shipping type metadata tables
Why?
With the new setup, the shipping type configuration will be managed within the app. So the previous shipping type metadata file is not needed anymore.
How?
Important
A common problem with long running transformations and slow data model loads is due to missing statistics in Vertica. This issue can be resolved by adding the Vertica ANALYZE_STATISTICS statement directly in the SQL. For more information, refer to Vertica Transformations Optimization.
In the data transformation “Create Table: Shipment Network (Signal Link)” update the SHIPPING_TYPES table to the following version:
DROP TABLE IF EXISTS SHIPPING_TYPES;
CREATE TABLE SHIPPING_TYPES AS
SELECT DISTINCT
"VTTS"."MANDT"
,"VTTS"."TKNUM"
,"VTTS"."TSNUM"
,COALESCE("VTTS"."VSART","VTTK"."VSART") AS "VSART"
,COALESCE("VTTS"."BEZEI","VTTK"."BEZEI") AS "BEZEI"
FROM "O2C_VTTS" AS "VTTS"
LEFT JOIN "O2C_VTSP" AS "VTSP"
AND "VTTS"."MANDT" = "VTSP"."MANDT"
AND "VTTS"."TKNUM" = "VTSP"."TKNUM"
AND "VTTS"."TSNUM" = "VTSP"."TSNUM"
LEFT JOIN "O2C_VTTP" AS "VTTP"
AND "VTSP"."MANDT" = "VTTP"."MANDT"
AND "VTSP"."TKNUM" = "VTTP"."TKNUM"
AND "VTSP"."TPNUM" = "VTTP"."TPNUM"
LEFT JOIN "O2C_VTTK" AS "VTTK"
AND "VTTP"."MANDT" = "VTTK"."MANDT"
AND "VTTP"."TKNUM" = "VTTK"."TKNUM";
In the data transformation “Create Datamodel Views” update the O2C_SHIPPING_TYPE_METADATA table to the following version:
DROP VIEW IF EXISTS O2C_SHIPPING_TYPE_METADATA;
CREATE VIEW "O2C_SHIPPING_TYPE_METADATA" AS (
SELECT DISTINCT
"VSART" AS "SHIPPING_TYPE"
,"BEZEI" AS "SHIPPING_TYPE_DESCRIPTION"
FROM <%=INSERT_YOUR_DATA_JOB_HERE%>."SHIPPING_TYPES" AS "SHIPPING_TYPES"
);
Update the route tables
Why?
In the previous versions we used a combination of country and city as input for the carbon engine to calculate the emissions for a route. Now we added two now columns called DEPARTURE_QUERY and ARRIVAL_QUERY. From now on these columns will be used as input for the carbon engine. As default the query is still the combination of country and city, but it provides you with the flexibility to adjust it based on your needs. So, for example, if you have the zip code or street data available, you can add it to the query to make the emissions calculation more detailed.
How?
In the data transformation “Create Table: Shipment Network (Signal Link)” add the following two columns to SHIPMENT_DELIVERY_TMP:
DEPARTURE_QUERY
...
,COALESCE("STAGE_PLANT_CUSTOMER"."DEPARTURE_COUNTRY", "ADDRESS_BACKUP"."DEPARTURE_COUNTRY") ||'-'|| COALESCE("STAGE_PLANT_CUSTOMER"."DEPARTURE_CITY", "ADDRESS_BACKUP"."DEPARTURE_CITY") AS "DEPARTURE_QUERY" -- Departure Query
...
ARRIVAL_QUERY
...
,COALESCE("STAGE_PLANT_CUSTOMER"."ARRIVAL_COUNTRY", "ADDRESS_BACKUP"."ARRIVAL_COUNTRY") ||'-'|| COALESCE("STAGE_PLANT_CUSTOMER"."ARRIVAL_CITY", "ADDRESS_BACKUP"."ARRIVAL_CITY") AS "ARRIVAL_QUERY" -- Arrival Query
...
Important
The two new fields DEPARTURE_QUERY and ARRIVAL_QUERY will be used to specify the route for the emission calculation. It is possible to add additional address information like postal codes or street names to the queries if these information are available in your data. But make sure, that any change on this query fields also needs to be reflected in the UNIQUE_STAGE_IDENTIFIER column as this Identifier needs to be the combination of DEPARTURE_QUERY-ARRIVAL_QUERY-SHIPPING_TYPE
In addition, add the DEPARTURE_QUERY and ARRIVAL_QUERY (bold) columns to the UNIQUE_SHIPPING_STAGES table:
DROP TABLE IF EXISTS UNIQUE_SHIPPING_STAGES;
CREATE TABLE UNIQUE_SHIPPING_STAGES AS
SELECT
...
,"DEPARTURE_QUERY"
...
,"ARRIVAL_QUERY"
...
FROM (
SELECT
...
,"DEPARTURE_QUERY"
...
,"ARRIVAL_QUERY"
...
) AS "UNIQUE_SHIPPING_STAGES"
WHERE ROW_NUM = 1
;
In the data transformation “Create Datamodel Views” add the DEPARTUER_QUERY and ARRIVAL_QUERY (bold) columns to the O2C_UNIQUE_SHIPPING_ROUTES table:
DROP VIEW IF EXISTS O2C_UNIQUE_SHIPPING_ROUTES;
CREATE VIEW "O2C_UNIQUE_SHIPPING_ROUTES" AS (
SELECT
...
,"DEPARTURE_QUERY"
...
,"ARRIVAL_QUERY"
...
FROM (
SELECT
...
,"DEPARTURE_QUERY"
...
,"ARRIVAL_QUERY"
...
)
AS "UNIQUE_SHIPPING_STAGES"WHERE ROW_NUM = 1
);
Re-load data model
To reflect the changes, please make sure to re-run the Create Table: Shipment Network (Signal Link) and Create Datamodel Views transformations. It is also necessary to re-load the data model.
Knowledge Model Configuration
By moving the carbon engine from the MLWB to the centralized backend version, it is necessary to configure your user-specific parameters in the app knowledge model. The following parameters needs to be set, before the emission calculation can be executed:
Carbon Engine API Key
Celonis API Token
Celonis URL
Data Pool ID
Data Model ID
Space ID
Package ID
Knowledge Model ID
For this purpose, add the following yaml configuration to the "variables" section in your knowledge model:
- displayName: Endpoint URL for our carbon engine
id: VAR_CARBON_ENGINE_ENDPOINT_URL
value: https://beta4.api.climatiq.io/freight/intermodal
- displayName: API key for our carbon engine
id: VAR_CARBON_ENGINE_API_KEY
value: Bearer <YOUR_CLIMATIQ_API_KEY>
- displayName: Celonis API token required for triggering the emission calcluation
id: VAR_CELONIS_API_TOKEN
value: <YOUR_PERSONAL_API_KEY>
- description: "Example: https://companyA.eu-1.celonis.cloud/"
displayName: Your Celonis Platform team URL
id: VAR_CELONIS_URL
value: <YOUR_CELONIS_URL>
- displayName: ID of the data pool the app is using
id: VAR_DATA_POOL_ID
value: <YOUR_DATA_POOL_ID>
- displayName: ID of the data model the app is using
id: VAR_DATA_MODEL_ID
value: <YOUR_DATA_MODEL_ID>
- displayName: ID of the space where the application is stored
id: VAR_SPACE_ID
value: <YOUR_SPACE_ID>
- displayName: ID of the app package
id: VAR_PACKAGE_ID
value: <YOUR_PACKAGE_ID>
- displayName: ID of the app knowledge model
id: VAR_KNOWLEDGE_MODEL_ID
value: <YOUR_KNOWLEDGE_MODEL_ID>
- id: VAR_CONFIG_TEST_DEPARTURE_CITY
displayName: VAR_CONFIG_TEST_DEPARTURE_CITY
value: ${{RT_VAR_CONFIG_TEST_DEPARTURE_CITY}}
- id: VAR_BENCHMARKING_TRANSPORT_A_EXISTING_CONFIG_DEPARTURE_LOCATION
displayName: VAR_BENCHMARKING_TRANSPORT_A_EXISTING_CONFIG_DEPARTURE_LOCATION
value: ${{RT_VAR_BENCHMARKING_TRANSPORT_A_EXISTING_CONFIG_DEPARTURE_LOCATION}}
- id: VAR_BENCHMARKING_TRANSPORT_A_EXISTING_CONFIG_ARRIVAL_LOCATION
displayName: VAR_BENCHMARKING_TRANSPORT_A_EXISTING_CONFIG_ARRIVAL_LOCATION
value: ${{RT_VAR_BENCHMARKING_TRANSPORT_A_EXISTING_CONFIG_ARRIVAL_LOCATION}}
- id: VAR_BENCHMARKING_TRANSPORT_A_EXISTING_CONFIG_SHIPPING_TYPE
displayName: VAR_BENCHMARKING_TRANSPORT_A_EXISTING_CONFIG_SHIPPING_TYPE
value: ${{RT_VAR_BENCHMARKING_TRANSPORT_A_EXISTING_CONFIG_SHIPPING_TYPE}}
- id: VAR_BENCHMARKING_TRANSPORT_B_EXISTING_CONFIG_DEPARTURE_LOCATION
displayName: VAR_BENCHMARKING_TRANSPORT_B_EXISTING_CONFIG_DEPARTURE_LOCATION
value: ${{RT_VAR_BENCHMARKING_TRANSPORT_B_EXISTING_CONFIG_DEPARTURE_LOCATION}}
- id: VAR_BENCHMARKING_TRANSPORT_B_EXISTING_CONFIG_ARRIVAL_LOCATION
displayName: VAR_BENCHMARKING_TRANSPORT_B_EXISTING_CONFIG_ARRIVAL_LOCATION
value: ${{RT_VAR_BENCHMARKING_TRANSPORT_B_EXISTING_CONFIG_ARRIVAL_LOCATION}}
- id: VAR_BENCHMARKING_TRANSPORT_B_EXISTING_CONFIG_SHIPPING_TYPE
displayName: VAR_BENCHMARKING_TRANSPORT_B_EXISTING_CONFIG_SHIPPING_TYPE
value: ${{RT_VAR_BENCHMARKING_TRANSPORT_B_EXISTING_CONFIG_SHIPPING_TYPE}}
- id: VAR_BENCHMARKING_TRANSPORT_A_NEW_CONFIG_DEPARTURE_LOCATION
displayName: VAR_BENCHMARKING_TRANSPORT_A_NEW_CONFIG_DEPARTURE_LOCATION
value: ${{RT_VAR_BENCHMARKING_TRANSPORT_A_NEW_CONFIG_DEPARTURE_LOCATION}}
- id: VAR_BENCHMARKING_TRANSPORT_A_NEW_CONFIG_ARRIVAL_LOCATION
displayName: VAR_BENCHMARKING_TRANSPORT_A_NEW_CONFIG_ARRIVAL_LOCATION
value: ${{RT_VAR_BENCHMARKING_TRANSPORT_A_NEW_CONFIG_ARRIVAL_LOCATION}}
- id: VAR_BENCHMARKING_TRANSPORT_A_NEW_CONFIG_SHIPPING_TYPE
displayName: VAR_BENCHMARKING_TRANSPORT_A_NEW_CONFIG_SHIPPING_TYPE
value: ${{RT_VAR_BENCHMARKING_TRANSPORT_A_NEW_CONFIG_SHIPPING_TYPE}}
- id: VAR_BENCHMARKING_TRANSPORT_B_NEW_CONFIG_DEPARTURE_LOCATION
displayName: VAR_BENCHMARKING_TRANSPORT_B_NEW_CONFIG_DEPARTURE_LOCATION
value: ${{RT_VAR_BENCHMARKING_TRANSPORT_B_NEW_CONFIG_DEPARTURE_LOCATION}}
- id: VAR_BENCHMARKING_TRANSPORT_B_NEW_CONFIG_ARRIVAL_LOCATION
displayName: VAR_BENCHMARKING_TRANSPORT_B_NEW_CONFIG_ARRIVAL_LOCATION
value: ${{RT_VAR_BENCHMARKING_TRANSPORT_B_NEW_CONFIG_ARRIVAL_LOCATION}}
- id: VAR_BENCHMARKING_TRANSPORT_B_NEW_CONFIG_SHIPPING_TYPE
displayName: VAR_BENCHMARKING_TRANSPORT_B_NEW_CONFIG_SHIPPING_TYPE
value: ${{RT_VAR_BENCHMARKING_TRANSPORT_B_NEW_CONFIG_SHIPPING_TYPE}}
- id: VAR_BENCHMARKING_TRANSPORT_A_NEW_CONFIG_EMISSIONS
displayName: VAR_BENCHMARKING_TRANSPORT_A_NEW_CONFIG_EMISSIONS
value: "0"
- id: VAR_BENCHMARKING_TRANSPORT_A_NEW_CONFIG_DISTANCE
displayName: VAR_BENCHMARKING_TRANSPORT_A_NEW_CONFIG_DISTANCE
value: "0"
- id: VAR_BENCHMARKING_TRANSPORT_A_NEW_CONFIG_ERROR_MESSAGE
displayName: VAR_BENCHMARKING_TRANSPORT_A_NEW_CONFIG_ERROR_MESSAGE
value: "'No error'"
- id: VAR_BENCHMARKING_TRANSPORT_B_NEW_CONFIG_EMISSIONS
displayName: VAR_BENCHMARKING_TRANSPORT_B_NEW_CONFIG_EMISSIONS
value: "0"
- id: VAR_BENCHMARKING_TRANSPORT_B_NEW_CONFIG_DISTANCE
displayName: VAR_BENCHMARKING_TRANSPORT_B_NEW_CONFIG_DISTANCE
value: "0"
- id: VAR_BENCHMARKING_TRANSPORT_B_NEW_CONFIG_ERROR_MESSAGE
displayName: VAR_BENCHMARKING_TRANSPORT_B_NEW_CONFIG_ERROR_MESSAGE
value: "'No error'"
- id: VAR_LAST_EMISSION_CALC_TIME
displayName: VAR_LAST_EMISSION_CALC_TIME
value: "'1900-01-01 23:59:59'"
- id: VAR_TEST_ST_CONFIG_DISTANCE
displayName: VAR_TEST_ST_CONFIG_DISTANCE
value: "0"
- id: VAR_TEST_ST_CONFIG_EMISSIONS
displayName: VAR_TEST_ST_CONFIG_EMISSIONS
value: "0"
- id: VAR_TEST_ST_CONFIG_ERROR_MESSAGE
displayName: VAR_TEST_ST_CONFIG_ERROR_MESSAGE
value: "'No error'"
- id: VAR_BENCHMARKING_TRANSPORT_A_NEW_CONFIG_ROUTE_LAST_CALC
displayName: VAR_BENCHMARKING_TRANSPORT_A_NEW_CONFIG_ROUTE_LAST_CALC
value: "'undefined'"
- id: VAR_BENCHMARKING_TRANSPORT_A_NEW_CONFIG_SHIPPING_TYPE_LAST_CALC
displayName: VAR_BENCHMARKING_TRANSPORT_A_NEW_CONFIG_SHIPPING_TYPE_LAST_CALC
value: "'None'"
- id: VAR_BENCHMARKING_TRANSPORT_B_NEW_CONFIG_ROUTE_LAST_CALC
displayName: VAR_BENCHMARKING_TRANSPORT_B_NEW_CONFIG_ROUTE_LAST_CALC
value: "'undefined'"
- id: VAR_BENCHMARKING_TRANSPORT_B_NEW_CONFIG_SHIPPING_TYPE_LAST_CALC
displayName: VAR_BENCHMARKING_TRANSPORT_B_NEW_CONFIG_SHIIPPING_TYPE_LAST_CALC
value: "'None'"
- id: VAR_LAST_EMISSION_CALC_COUNT_ROUTES
displayName: VAR_LAST_EMISSION_CALC_COUNT_ROUTES
value: "0"
- id: VAR_TEST_ST_CONFIG_LAST_SHIPPING_TYPE
displayName: VAR_TEST_ST_CONFIG_LAST_SHIPPING_TYPE
value: "'None'"
Carbon Engine API Key
In the knowledge model search for <YOUR_CLIMATIQ_API_KEY>, please replace it by your personal Climatiq API key.
Celoins Team URL
In the knowledge model search for <YOUR_CELONIS_TEAM_URL>, please replace it by your Celonis Platform-team URL (like "https://companyA.eu-1.celonis.cloud/").
Celonis API Token
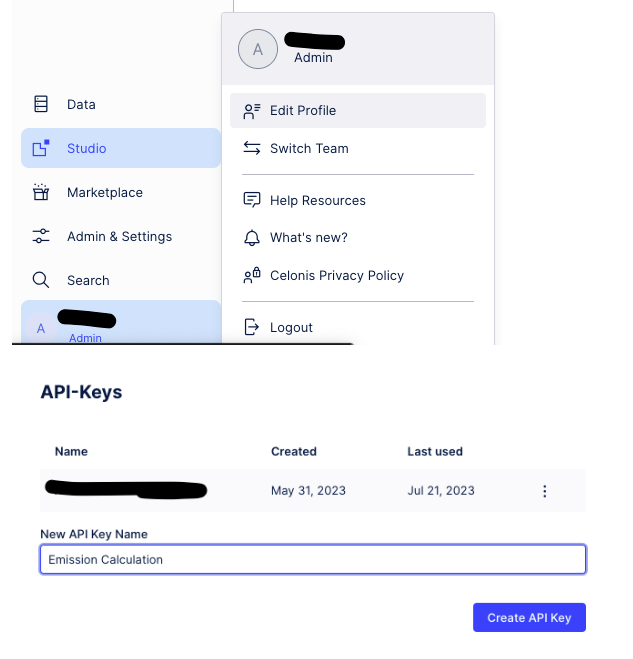
This application token is needed to trigger the carbon engine via an action flow. The best way to do so is by going to your Celonis profile and clicking on “Edit profile”.
In the section “API-Keys”, input a “New API Key Name” like “Emission Calculation” and click on “Create API KEY”. Copy this key to your clipboard.
In the studio knowledge model search for <YOUR_PERSONAL_API_KEY>, please replace it by your Climatiq API key which you have received from us.
Data Pool ID
Navigate to the data pool you are using for the app. Copy the id from the URL.
Example:
https://your_team.eu-1.celonis.cloud/integration/ui/pools/0baf644f-b9b7-4ca2-b375-9f875828a969
In the studio knowledge model search for <VAR_DATA_POOL_ID>. Replace it by the copied ID.
Data Model ID
Navigate to the data model you are using for the app. Copy the id from the URL.
Example:
https://your_team.eu-1.celonis.cloud/integration/ui/pools/0baf644f-b9b7-4ca2-b375-9f875828a969/data-configuration/process-data-models/141d3e14-8854-411c-8f30-0083a6c3f4df?tab=data-model
In the studio knowledge model search for <VAR_DATA_MODEL_ID>. Replace it by the copied ID.
Space ID
Navigate to the space in which the app is located. Copy the id from the URL.
Example:
https://sustainability-dev.beta.celonis.cloud/package-manager/ui/studio/ui/spaces/92650a1a-6f0e-48e3-ae10-06b984d75780/nodes/8deb29ae-3615-4d6f-b84b-0c4d4af98b45
In the studio knowledge model search for <YOUR_SPACE_ID>. Replace it by the copied ID.
Package ID
Navigate to the settings of your app. Copy the id from the URL.
Example:
https://sustainability-dev.beta.celonis.cloud/package-manager/ui/studio/ui/spaces/92650a1a-6f0e-48e3-ae10-06b984d75780/nodes/4c1c8985-6ad5-46c2-b38b-61aeaef4c53a/settings?tab=GENERAL
In the studio knowledge model search for <YOUR_PACKAGE_ID>. Replace it by the copied ID.
Knowledge Model ID
Navigate to the knowledge model of your app. Copy the id from the URL.
Example:
https://sustainability-dev.beta.celonis.cloud/package-manager/ui/studio/ui/spaces/92650a1a-6f0e-48e3-ae10-06b984d75780/nodes/3813376e-b5f5-474d-bfaa-4c73bec5e38d
In the studio knowledge model search for <YOUR_KNOWLEDGE_MODEL_ID>. Replace it by the copied ID.
Set up the emission calculation trigger
Download the action flow blueprints
To trigger the carbon engine inside the app, we are using two action flows (“Emission Calculation - user input” and “Emission Calculation - data based”). Please download the blueprints of these action flows from the marketplace page of the app.
Create the action flows and import the blueprints
Create a new action flow inside the app package and call it “Emission Calculation - user input”. Import the corresponding blueprint.
Set up the action flows the following way:
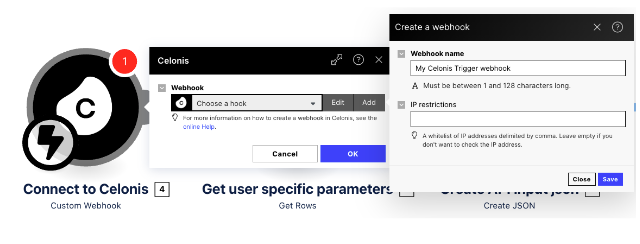
Add a hook to “Connect to Celonis” module
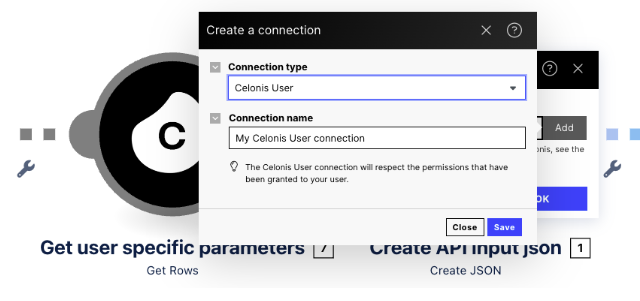
Add connection to “Get user specific parameters” module (the recommended option here is the choose “Celonis User” as connection type
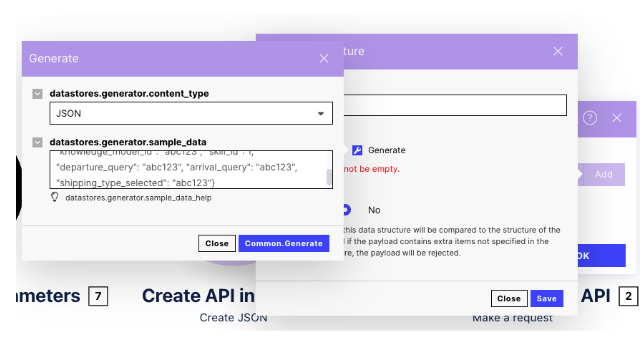
Create the json structure for the “Create API input json” module by using the json generator and copy/paste the following example:
{"data_pool_id": "abc123", "data_model_id": "abc123", "space_id": "abc123", "package_id": "abc123", "knowledge_model_id": "abc123", "skill_id": 1, "departure_query": "abc123", "arrival_query": "abc123", "shipping_type_selected": "abc123"}
Save the action flow
Create another action flow inside the app package and call it “Emission Calculation - data based”. Import the corresponding blueprint.
Select the same user connection for the “Get user specific parameters” module as above
Select the same data structure for the “Create API input json” module (json will look a bit different) as above
Save the action flow
Important
After setting up the action flows, please test and activate them. If the execution was successful, please publish the package.
Set up the “trigger carbon engine” skill
Go to the “Trigger Carbon Engine” skill, click Edit and select the “execute action flow” module. Make sure that the Action Flow “Emission Calculation - user input” is chosen. After that, publish the package again.
Set permissions
When the carbon engine is triggered via the action flow for the first time in your Celonis Platform team, an application key is created (called “shipping-emissions-job”). You can manage the key in the Applications tab of the Admin & Settings section in the Celonis Platform.
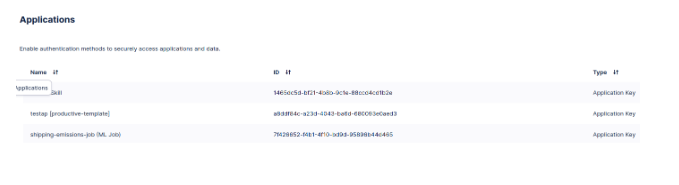
By default, the key does not have any permissions in the team yet. In the Permissions tab you need to set the necessary permissions for services used in the app.
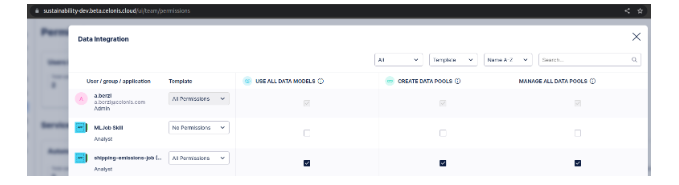
In addition, you have to set the permissions on the specific Celonis Platform objects used for the emission calculation. This is necessary, because, for example, the carbon engine is pulling and pushing data from your data model. Therefore it is required to give the AppKey of the carbon engine permission on that data pool.
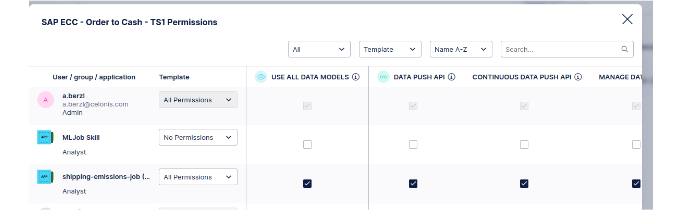
Please provide permissions for the “shipping-emissions-job” on the following components:
The data pool which is used by the app
The data model which is used by the app
The studio in which the app package is located
The app package
Configure the carbon engine and start the emission calculation
Go to the “Configuration Carbon Engine” view in the “App Configuration” folder and then follow the guide to configure your shipping types for the emission calculation.