Prerequisites for the Contract Leakage app
Before you set up the object-centric version of the Contract Leakage app, you’ll need to enable and configure the Procurement process from the Celonis catalog. Load the object-centric data model with your data and validate that it's all working in the standard Procurement perspective. Then publish it to the production environment.
To enable the real-time and operational capabilities of the Contract Leakage app, we recommend bringing in no more than 2 years of data. If any of your tables exceed 30 million rows, you won’t be able to use tasks.
To enable contract recommendations, you’ll need to create a custom relationship and custom attributes for Celonis object types. Then you’ll need to include these in an extension to the standard Procurement perspective, and use the extended perspective with the app.
Extending the Procurement process for contract recommendations
To enable the Contract Leakage app to provide contract recommendations, you’ll need to create a custom relationship between the ContractItem and PurchaseRequisitionItem objects, add the transformation for it, and extend the Celonis catalog Procurement perspective to add it. You’ll also need to add some custom attributes to the ContractItem object, and add the transformation for them.
Important
The transformations in this topic are built for an SAP ECC source system. If you need transformations for another source system, ask your Celonis point of contact.
Here’s how to extend the Procurement process:
From the Celonis navigation bar, select Data > Objects and Events, then select Objects in the top navigation bar.
Create the object to object relationship between the PurchaseRequisitionItem object type and the ContractItem object type. Here’s how:
Browse or search to find the Celonis object type PurchaseRequisitionItem in the list of object types, and select it.
Select Relationships to objects.
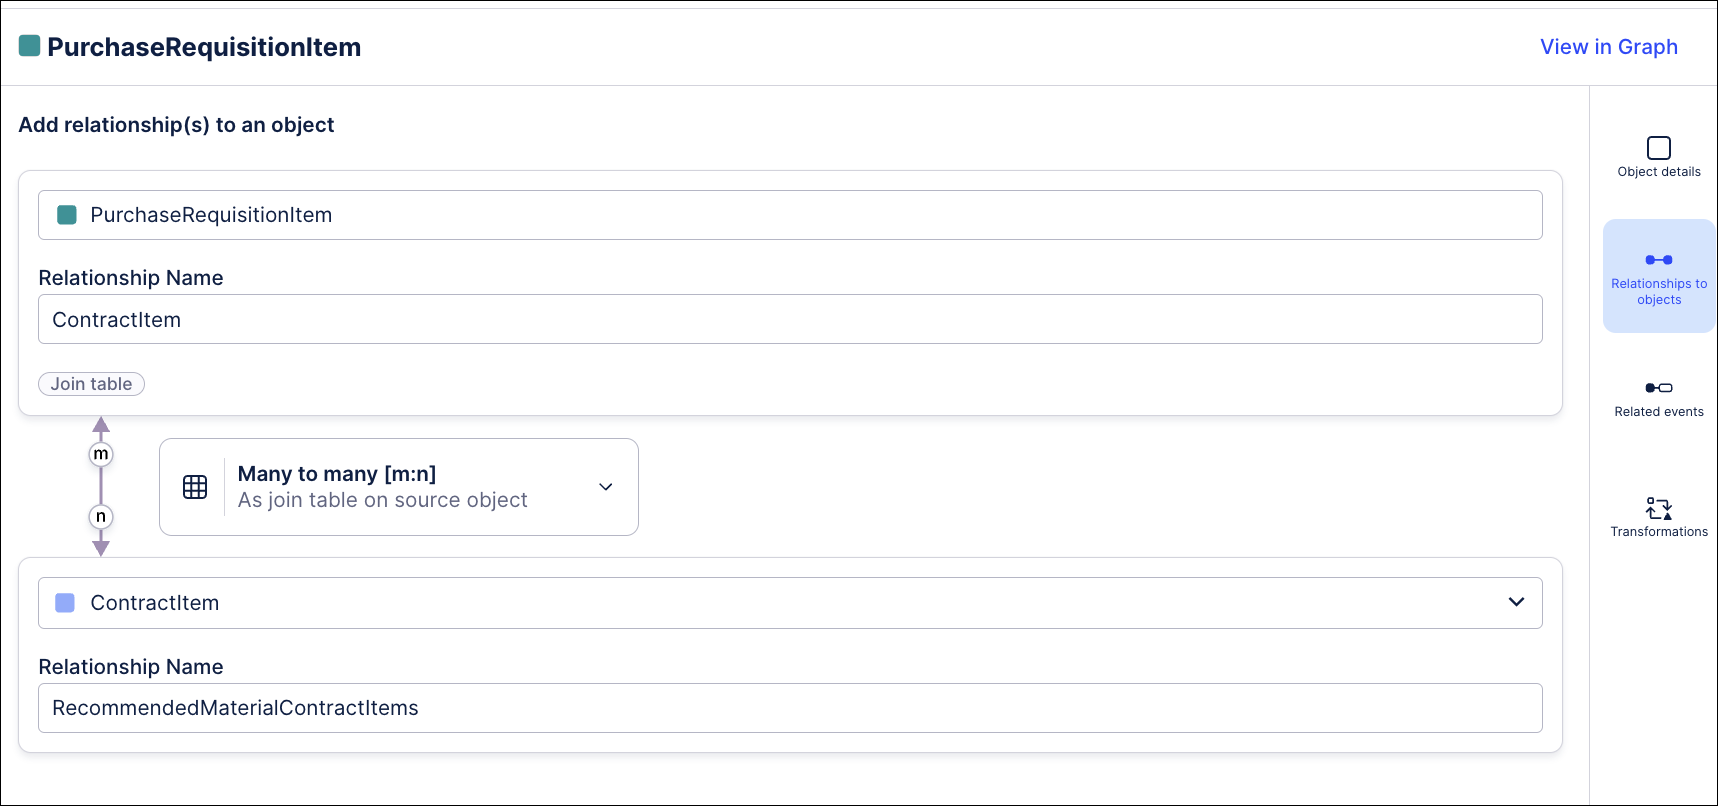
Click Add to add an outgoing relationship, and select the Celonis object type ContractItem as the target object type.
Select “Many to many [m:n]”, with the join table on the source object (which is PurchaseRequisitionItem).
Type in “RecommendedMaterialContractItems” as the relationship name. Here's how the relationship should look:

Click Save to create the object to object relationship.
Add the transformation for the relationship table to the PurchaseRequisitionItem object type. Here’s how:
In the PurchaseRequisitionItem object type, click Transformations.
Find the Custom Relationships folder and the folder for the RecommendedMaterialContractItem relationship.
Click the + icon to create a new transformation script, and give it a name.
Paste this SQL script into the SQL editor, replacing the generated suggestion:
WITH "CTE_TMP_MaterialContractItem" AS
        (SELECT "EKPO"."MANDT" || "EKPO"."EBELN" || "EKPO"."EBELP"    AS "ID",
                "EKPO"."MANDT",
                "EKPO"."WERKS",
                "EKKO"."WAERS",
                "EKPO"."MATNR",
                ROW_NUMBER() OVER (PARTITION BY "EKPO"."MANDT", "EKPO"."WERKS", "EKKO"."WAERS", "EKPO"."MATNR"
                    ORDER BY "EKKO"."KDATE" DESC, "EKPO"."NETPR" ASC) AS "rn"
         FROM "EKPO" AS "EKPO"
                  LEFT JOIN "EKKO" AS "EKKO"
                            ON "EKPO"."MANDT" = "EKKO"."MANDT"
                                AND "EKPO"."EBELN" = "EKKO"."EBELN"
         WHERE "EKPO"."BSTYP" = 'K')
SELECT <%=sourceSystem%> || 'PurchaseRequisitionItem_' || "EBAN"."MANDT" || "EBAN"."BANFN" || "EBAN"."BNFPO" AS "ID",
    <%=sourceSystem%> || 'ContractItem_' || "MaterialContractItem"."ID"                             AS "RecommendedMaterialContractItems"
       FROM "EBAN" AS "EBAN"
        INNER JOIN "CTE_TMP_MaterialContractItem" AS "MaterialContractItem"
                   ON "EBAN"."WERKS" = "MaterialContractItem"."WERKS"
                       AND "EBAN"."WAERS" = "MaterialContractItem"."WAERS"
                       AND "EBAN"."MATNR" = "MaterialContractItem"."MATNR"
                       AND "MaterialContractItem"."rn" < 6
 AND "EBAN"."MANDT" IS NOT NULL
 AND "MaterialContractItem"."MANDT" IS NOT NULL
Click Save to save and validate the transformation.
Extend the Celonis object type ContractItem to add the packing status change as an attribute. Here’s how:
In the Objects page of the Objects and Events environment, browse or search to find the Celonis object type ContractItem in the list of object types, and select it.
Select Object details.
Click Add to add a new attribute. Add these three attributes with the appropriate data types:
ValidityPeriodEndDate (data type Datetime)
ValidityPeriodStartDate (data type Datetime)
Vendor (data type String)
Click Save to apply the extension to the ContractItem object type.
Create a transformation script for your extension to the ContractItem object type. Here’s how:
In the ContractItem object type, select Transformations, then click the name of the transformation you’re using for the object type.
Click the + icon next to the folder Custom Attributes to create a new transformation script, and give it a name.
Paste this SQL script into the SQL editor, replacing the generated suggestion:
WITH "CTE_Changes" AS (SELECT "CDPOS"."MANDANT",
                             "CDPOS"."TABKEY",
                             "CDHDR"."UDATE",
                             "CDHDR"."UTIME",
                             "CDHDR"."USERNAME",
                             ROW_NUMBER()
                             OVER (PARTITION BY "CDPOS"."TABKEY" ORDER BY "CDHDR"."UDATE" ASC, "CDHDR"."UTIME" DESC) AS "rn"
                      FROM "CDPOS" AS "CDPOS"
                               LEFT JOIN "CDHDR" AS "CDHDR"
                                         ON "CDPOS"."MANDANT" = "CDHDR"."MANDANT"
                                             AND "CDPOS"."CHANGENR" = "CDHDR"."CHANGENR"
                                             AND "CDPOS"."OBJECTCLAS" = "CDHDR"."OBJECTCLAS"
                                             AND "CDPOS"."OBJECTID" = "CDHDR"."OBJECTID"
                      WHERE "CDPOS"."OBJECTCLAS" = 'EINKBELEG'
                        AND "CDPOS"."TABNAME" = 'EKKO'
                        AND "CDPOS"."FNAME" = 'KEY'
                        AND "CDPOS"."CHNGIND" = 'I')


SELECT <%=sourceSystem%>  || 'ContractItem_' || "EKPO"."MANDT" || "EKPO"."EBELN" || "EKPO"."EBELP" AS "ID",
CAST("EKKO"."KDATB" AS TIMESTAMP)                                                           AS "ValidityPeriodStartDate",
      CAST("EKKO"."KDATE" AS TIMESTAMP)                                                    AS "ValidityPeriodEndDate",
<%=sourceSystem%>  || 'Vendor_' || "EKKO"."MANDT" || "EKKO"."LIFNR"                         AS "Vendor"


FROM "EKKO" AS "EKKO"
        LEFT JOIN "CTE_Changes" AS "Changes"
                  ON "EKKO"."MANDT" = "Changes"."MANDANT"
                      AND "EKKO"."MANDT" || "EKKO"."EBELN" = "Changes"."TABKEY"
                      AND "Changes"."rn" = 1
        LEFT JOIN "EKPO" AS "EKPO"
                  ON "EKPO"."MANDT" = "EKKO"."MANDT"
                      AND "EKPO"."EBELN" = "EKKO"."EBELN"


WHERE "EKKO"."MANDT" IS NOT NULL
 AND "EKKO"."BSTYP" = 'K'
Click Save to save and validate the transformation.
Extend the Celonis catalog perspective for the Procurement process to add the custom relationship. The perspective already contains the ContractItem object, so the new attributes will be available for the app automatically. Here’s how to extend the perspective:
Go back to the Objects and Events environment, and select Perspectives in the top navigation bar. Find the Celonis-supplied Procurement perspective (perspective_celonis_Procurement).
Click the Extend button, or go to the context menu (the three vertical dots) for the perspective and select Extend.
Type a name for the extension - we recommend “ContractLeakage” - and click Next.
Search, browse the list, or look in the graph view for the PurchaseRequisitionItem object type. Select it to see its details pane.
Select Embedded objects in the sidebar.
Click Add and start typing the name of the ContractItem object type, then click to select it.
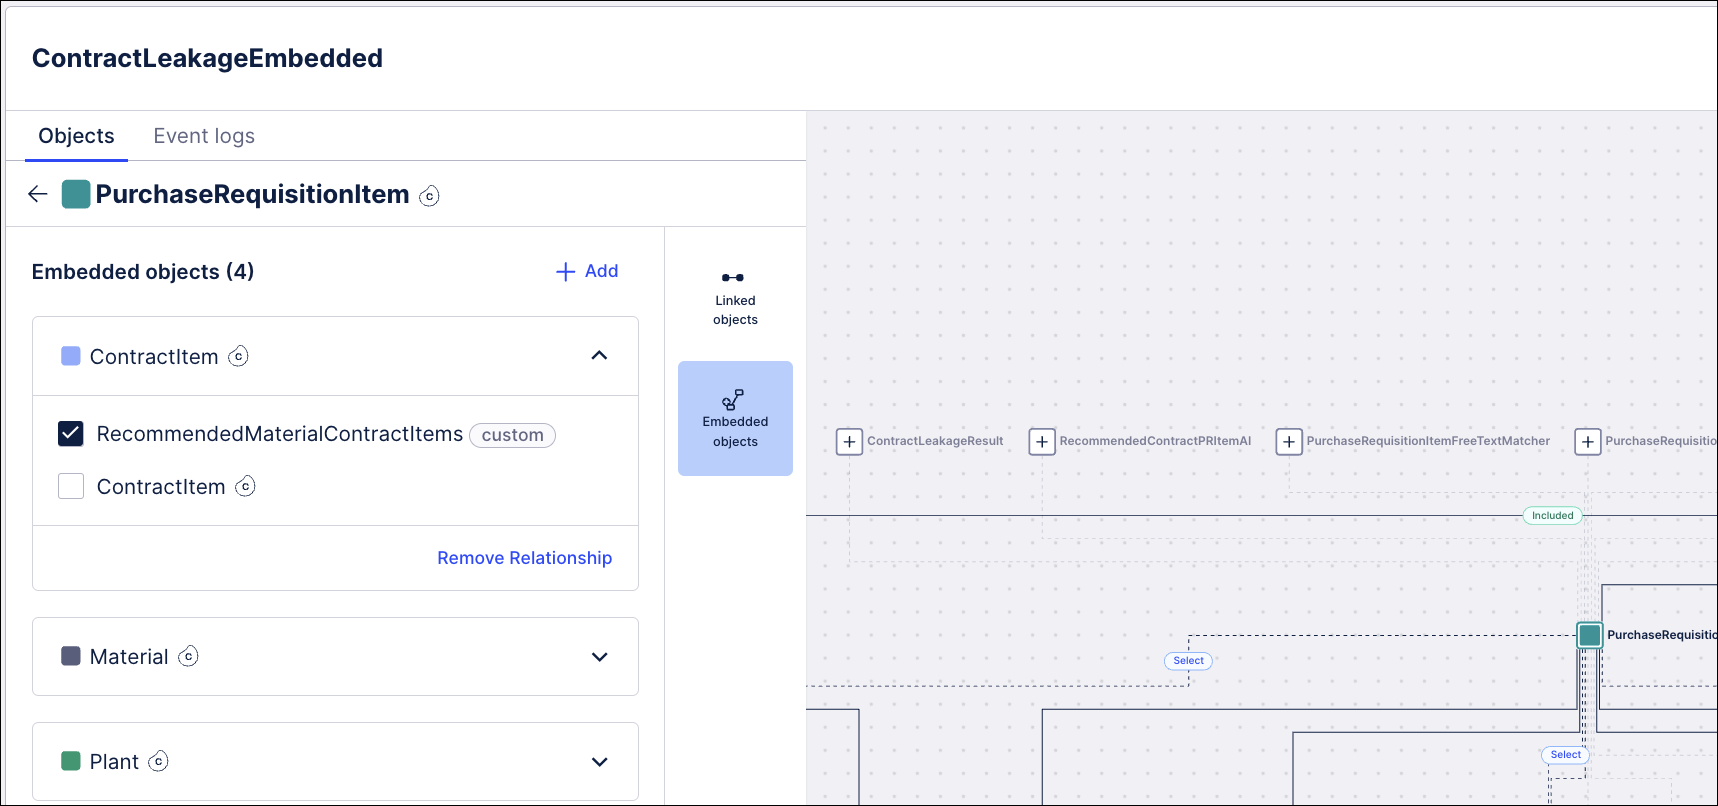
Select the radio button for the RecommendedMaterialContractItems relationship between the two object types. Here’s how the relationship should look:

Click Save to save the extension. Here’s how the links for the PurchaseRequisitionItem object should look in the perspective:

Select Publish > Publish to development to publish all your changes to the development environment.
Follow the instructions in Running transformations to run test:ocpm-data-job to create objects and events in the development environment. Check that there are no errors. If you prefer to run just the updated transformations, they are:
transformation_ENTITY_FIELD_EXTENSION_custom_Contractltem_celonis_Contractltem_change
transformation_ENTITY_FIELD_EXTENSION_custom_ContractItem_celonis_Contractltem
transformation_ENTITY_FIELD_EXTENSION_custom_PurchaseRequisitionItem_celonis_PurchaseRequisitionItem
transformation_ENTITY_FIELD_EXTENSION_custom_PurchaseRequisitionItem_celonis_PurchaseRequisitionItem_change
In the data pool where you’re working with objects and events, carry out a full load of the data model for the extended perspective ContractLeakage (or your chosen name for the custom perspective).