Configuring on-premise JDBC extractor with OAuth-based authentication and authorization
OAuth authentication, specifically the private_key_jwt flow which the Celonis Platform uses, provides a securer authentication method compared to the legacy custom client_id/client_secret approach. By connecting to your data source using OAuth-based authentication, your private keys are securely stored, preventing unauthorized extraction or exposure.
You can configure your on-premise JDBC extractor authentication using a Docker-based setup:
To configure the Docker-based setup:
Prerequisites
Before proceeding, ensure the following are in place:
A dockerized JDBC Extractor package (currently available as a Docker tarball file).
A Docker environment.
Step 1: Loading the docker image into local registry
The extractor package includes a Docker image in the tarball format. To load it into the local Docker registry, use the following command:
docker load --input <connector_package_name>.tar.gz
Step 2: Generating the Key Pair
The extractor image includes a key generation utility. To create a public (unencrypted) and a private (encrypted) key pair in PEM format, run the following Docker command:
docker run --rm -it \ -v "<host directory>:/home/celonis-user/keys" \ -e PASSPHRASE=<pass phrase> \ --entrypoint /keygen.sh \ <image name>:<image tag>
The generated key pair will be saved in the specified output directory.
Variable | Description |
|---|---|
<host directory> | Specifies the output directory on a host system. |
<pass phrase> | Specifies pass phrase to be used for the private key encryption. |
<image name> | Specifies the image name to be used (connector-jdbc-on-prem for commercial realms or connector-jdbc-fedramp-on-prem for FedRamp). |
<image tag> | Specifies the image tag (version) to be used. |
Step 3: Creating Uplink Integration
To create an uplink integration in the Celonis Platform:
Navigate to Admin & Settings - Uplink Integrations - Connect new system.
Select Connector with OAuth.
Chose a name for the integration.
Provide your generated public key and specify the used algorithm (only RS256 supported at the moment).
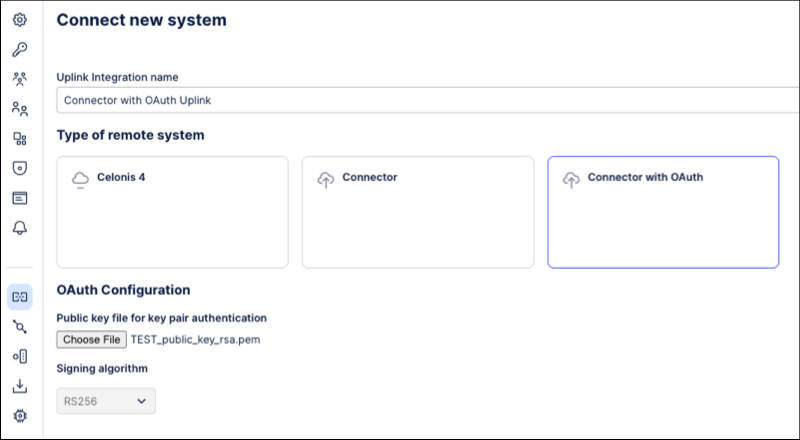
Click Save.
Copy the shown ClientID (required in the next step).
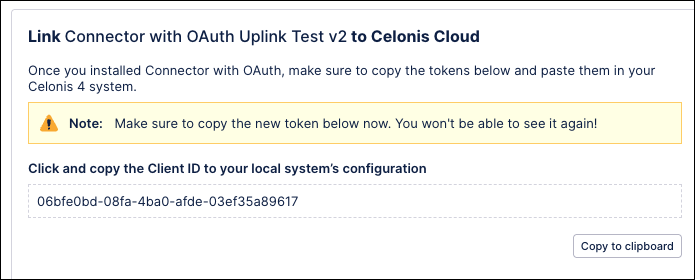
Click Finish.
Step 4: Starting the JDBC extractor
To run the dockerized extractor locally with the generated private key, use the following Docker command:
docker run --rm -it \
 -v "<absolute path to the private key>:/home/celonis-user/keys/private_key_rsa.pem" \
 -v "<absolute path to the log files directory>:/home/celonis-user/extractor-logs" \
 -e UPLINK_CLIENTID=<uplink ClientId> \
 -e UPLINK_DOMAIN-URL=<team domain URL> \
 -e UPLINK_OAUTH_CLIENT_PRIVATE-KEY-PATH=/home/celonis-user/keys/private_key_rsa.pem \
 -e UPLINK_OAUTH_CLIENT_PRIVATE-KEY-PASSPHRASE=<pass phrase> \
 -e LOGGING_FILE_PATH=/home/celonis-user/extractor-logs \
 <image name>:<image tag>
Variable | Description |
|---|---|
<absolute path to the private key> | Specifies the absolute path to the encrypted private key file on a host system. |
<absolute path to the log files directory> | Specifies the absolute path to the directory on a host system where extractor logs will be written. |
<pass phrase> | Specifies pass phrase to be used for the private key encryption. |
<uplink ClientID> | ClientId received when Uplink Registration was created. |
<team domain URL> | Complete team domain URL (e.g. https://dev.develop.celonis.cloud). |
<image name> | Specifies the image name to be used (connector-jdbc-on-prem for commercial realms or connector-jdbc-fedramp-on-prem for FedRamp). |
<image tag> | Specifies the image tag (version) to be used. |
Regularly rotating your encryption keys enhances security by limiting the amount of data exposed if a key is compromised.
To rotate the keys for your on-premise JDBC extractor with OAuth authorization:
Step 1: Stopping JDBC extractor
Before rotating keys, ensure the JDBC Extractor is stopped to prevent connection issues and subsequent errors during the key update process.
Step 2: Generating new Key Pair
Generate a new public and private key pair by repeating the same key generation instructions used during the initial setup. If you use the same directory, you need to delete the old key pair first.
Step 3: Updating the public key in Celonis Platform
Click Admin & Settings - Uplink Integrations.
Locate and select the corresponding uplink integration entry.
From the integration's action menu, select Rotate public key.
A dialog with a form opens.
Upload the newly generated public key using this form.
Once the public key is uploaded via the form, the old one is no longer valid. If the Extractor was not stopped as described in Step 1, it will remain authenticated for a few minutes until its JWT expires, after which it will no longer be able to connect to the Celonis Platform.
Step 4: Restarting JDBC extractor
Restart the JDBC Extractor. Ensure that the argument for the absolute path to the private key in your startup command or `application.yaml` correctly points to the newly generated private key. All other configuration details should remain the same.
If you already have an Extractor using ClientId/ClientSecret-based Authentication and Authorization and you want to migrate it to a more secure OAuth-based Authentication and Authorization you have to set up a new Extractor instance as described in the sections above.
After that, you can update DataSource connection in all your data pools switching to the Uplink Registration. All new jobs will be scheduled on a new instance. Please keep an old instance running for 2 days to ensure that all already triggered extractions can complete successfully.Now you can shutdown the old instance and delete it.