
Setting up Action Flows in Studio

Action Flows enrich the Celonis Platform platform by providing out-of-the-box integrations and intelligent automations to trigger actions in numerous operational systems like SAP, Oracle, and Salesforce.

Within Celonis Studio, you can build literally any automation - from sending out emails, managing files, updating sales orders in SAP, to simply getting data from various tools. Leverage the drag-and-drop builder to add any application to your automated workflows… and to automate any process of any complexity.

Note

In simple terms, an Action Flow is a way to define an automated process flow. It consists of multiple events, decision points and alternative routes and it can involve an arbitrary number of different applications.

Decorative image showing a sample Action Flow

Before you begin

To kickstart your Action Flow implementation, we provide frequently used templates. You can find specific use cases as well as snippets that you can use for different scenarios. The templates can be used as an inspiration for how key modules are connected in various use cases. See Action Flow Templates.

To set up Action Flows in Celonis Platform

  1. Click the + icon next to your package and select "Action Flow".

    Create Action Flow window
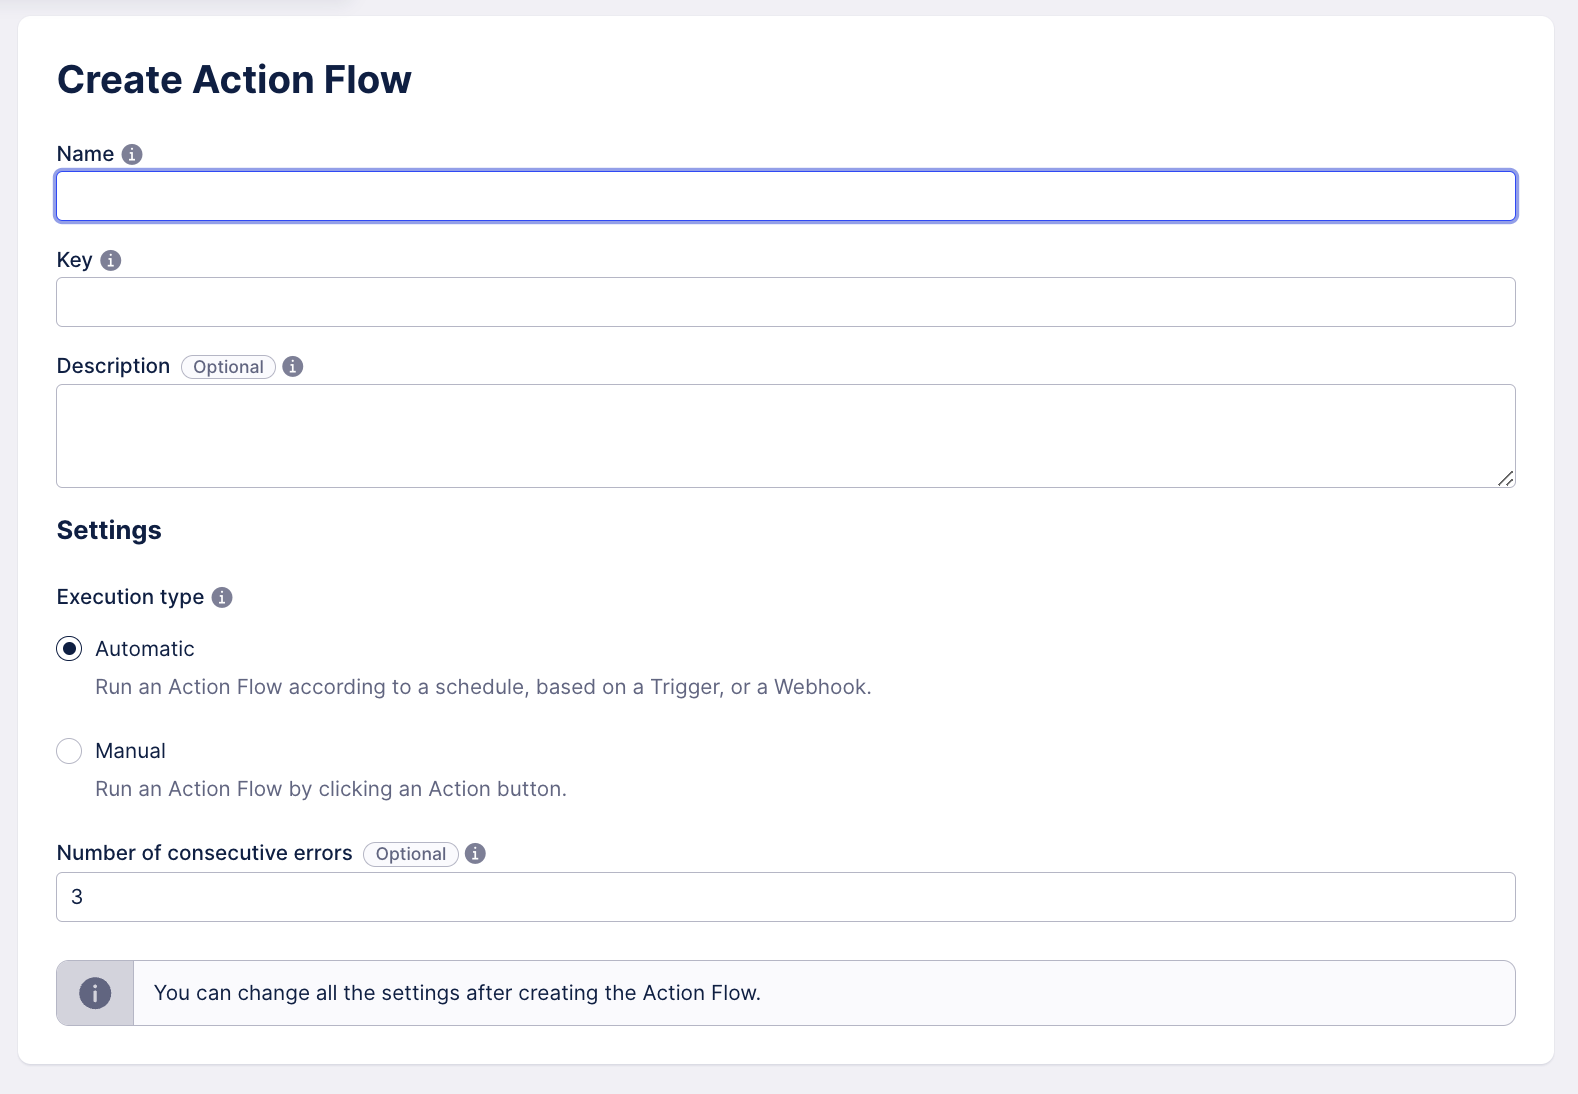
  2. Give your Action Flow a name.

    The key will be automatically created. This key is unique and can be used to refer to a specific Action Flow throughout the Celonis Platform.

  3. (Optional) Add a description.

  4. Select automation type:

    • Automatic - select this option if you want your Action Flow to run according to a schedule; the scheduling of the Action Flow is set to According to schedule.

    • Manual - select this option if you want your Action Flow to be started manually; the scheduling of the Action Flow is automatically set to On-demand.

  5. (Optional) Set the number of consecutive errors after which the Action Flow will be disabled.

  6. Click Create.

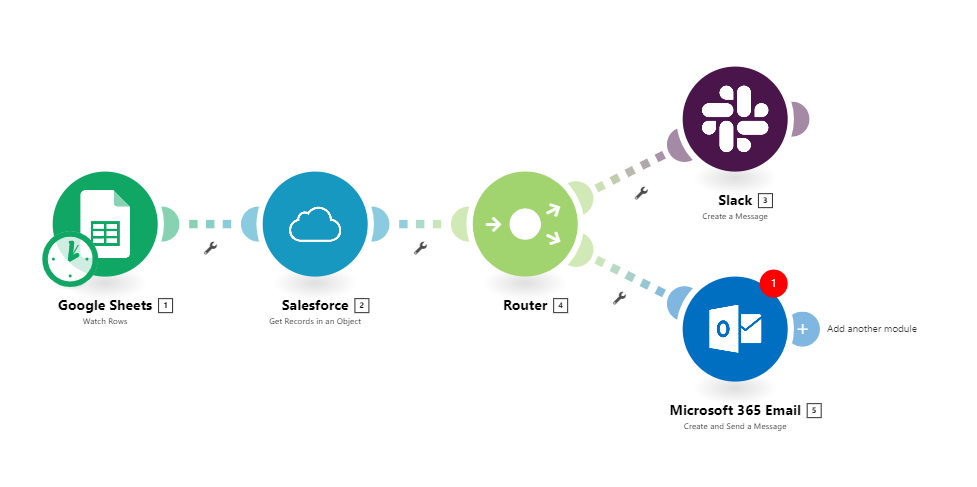
  • In general, Action Flows consist of five different module types:

  • In addition, you can use a variety of different tools such as:

  • You can add any number of modules to your Action Flow and recreate any business logic needed.

Draft vs. Published

In the edit mode, you are working on your Action Flow in "draft" mode. As soon as the Action Flow is published, all changes are being pushed to the published version.

An example of module list

At any time during the creation process, you can run your Action Flow manually to test single modules or the entire Action Flow.

Action Flow window with a sample Action Flow and the Run once option button highlighted.

Publishing is necessary to activate the Action Flow for the first time and after making any changes to the Action Flow.

For information on scheduling Action Flows, see Scheduling.

The Overview shows you your currently published Action Flow and provides:

  • information about currently running executions,

  • a preview of the execution history based on UTC+00 time zone,

  • and high-level statistics on your executions over time.

Log retention time

Logs are stored for 30 days inside the Celonis Platform.

Sample Action Flow workflow with Google Sheets module.

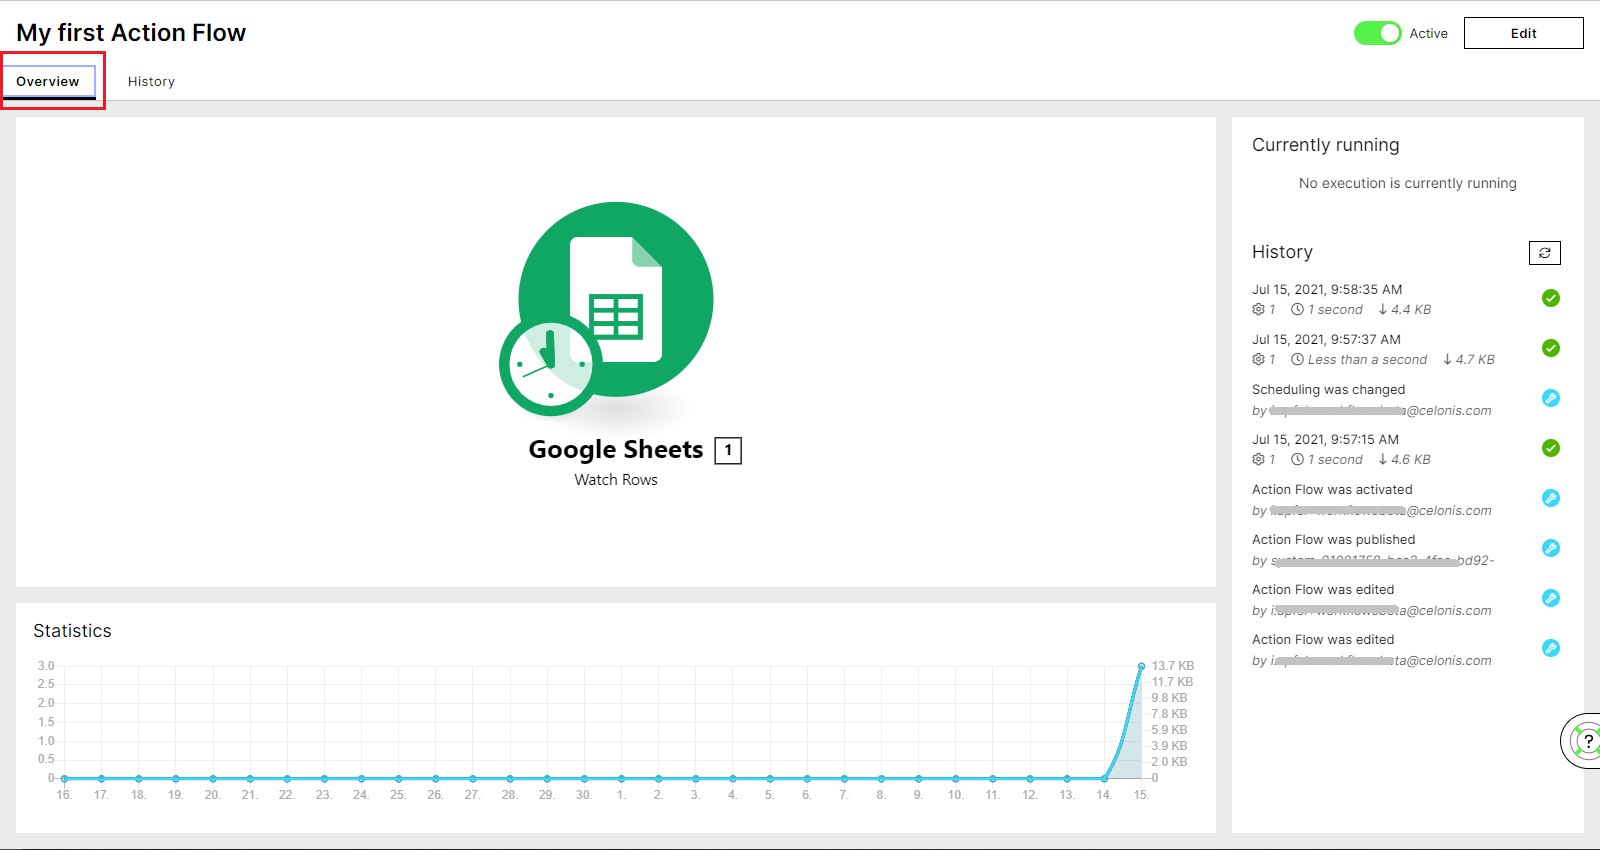
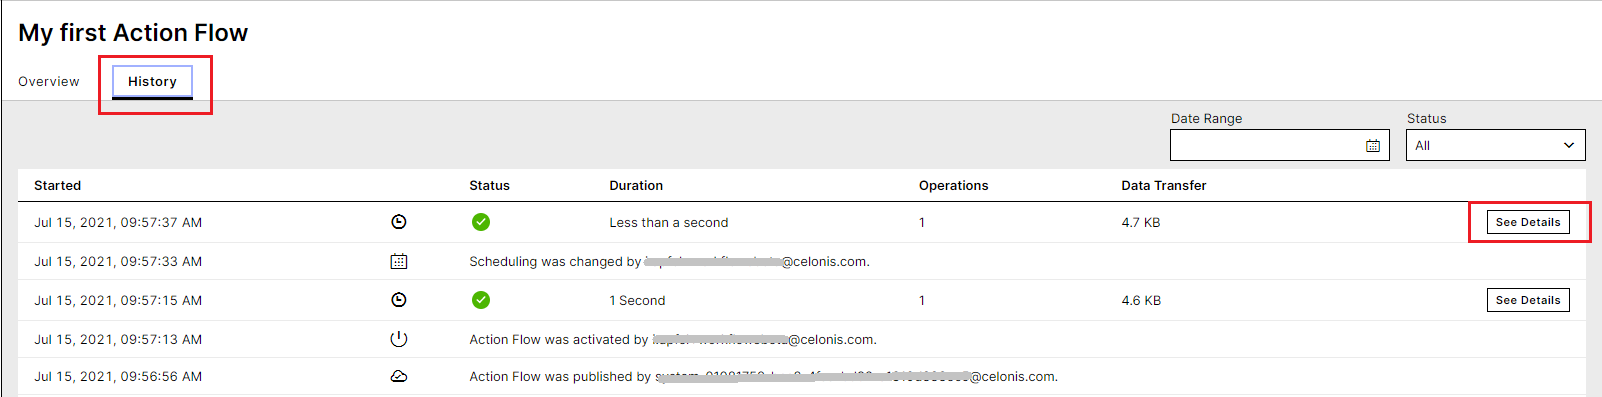
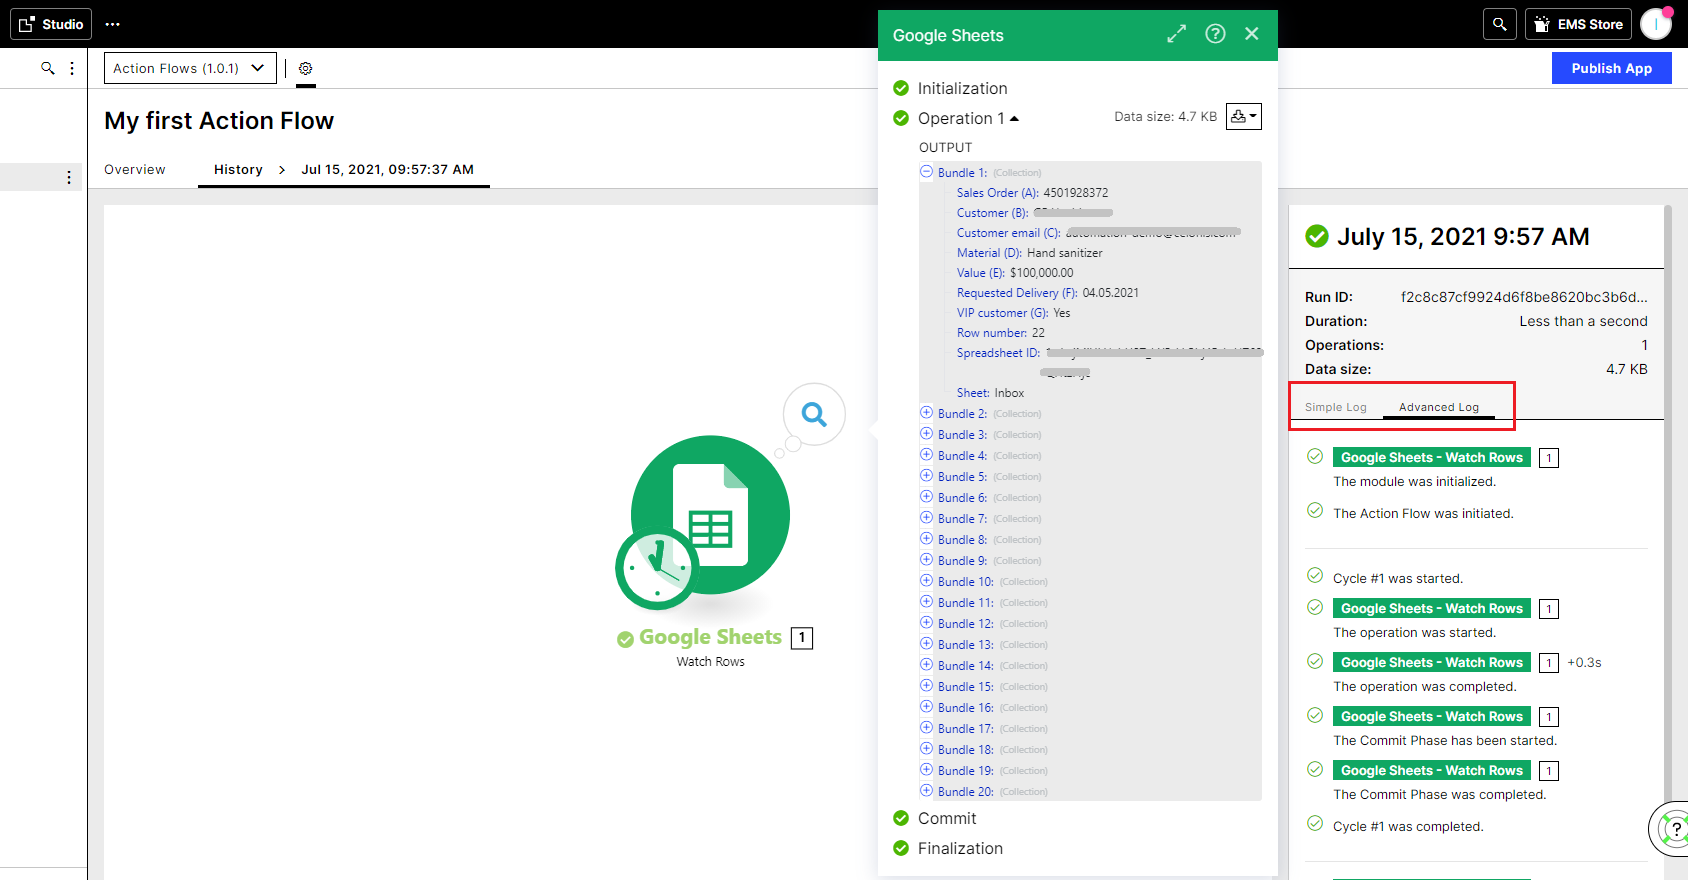
For more detailed information, you can go to the History to deep-dive into every single execution.

Action Flow window with the History tab open.
Details of a sample Google Sheets module

Related topics

Action Flow inputs allow you to pass structured data into your automation every time it runs. They act as a bridge between Celonis and other systems, ensuring that your Action Flow has all the specific information it needs to execute its logic correctly.

To find Action Flows inputs, go to your automation editor and click inputs icon on the toolbar.

The location on the inputs icon on the Action Flow editor toolbar.

Action Flow inputs function as the primary configuration layer for manual or hybrid automations. Here is a look at each stage of the lifecycle:

  1. Define the structure: During the design phase, you establish the "schema" or blueprint of the data your Action Flow needs to function.

    • Field Mapping: You define specific keys (e.g., customer_email, total_amount) and assign them data types (text, number, date, or boolean).

    • Validation Rules: You can designate specific fields as Required, ensuring the automation never runs with missing critical data.

    • User Interface: These definitions automatically generate the labels and tooltips that the end-user will see when they trigger the flow.

  2. Input data (the trigger event): When a user initiates the Action Flow—either from a button in a Celonis View or directly within the Action Flows module—the system intercepts the request.

    • Dynamic Form Generation: Celonis renders a real-time input form based on your defined structure.

    • User Interaction: The user enters the specific values for that unique execution (e.g., typing in a specific "New Hire Name" or selecting a "Reason for Rejection").

    • Gatekeeping: If any Required fields are missing, the "Run" button remains disabled or returns an error, preventing partial or failed executions.

  3. Automation execution and data distribution: Once the form is submitted, the data enters the Action Flow environment as a set of global variables.

    • Variable Availability: The input data becomes a selectable "pill" in the mapping panel of every subsequent module (e.g., Jira, Slack, or ServiceNow).

    • Consistency: Because the data is collected once at the start, the same value (like an Employee ID) is synchronized across all connected platforms, eliminating manual entry errors.

    • Process Transparency: These inputs are logged in the execution history, allowing you to audit exactly what data was used to trigger a specific run.

If you need to set up accounts for a new hire across Jira, Slack, and Email. Instead of manually logging into each platform, you can use Action Flow inputs:

  • The inputs: You define fields for First Name, Last Name, Work Email, and Employee ID.

  • The action: Once you enter this information into the input form, the Action Flow automatically creates the accounts in all systems simultaneously.

  • The benefit: You don't need to understand the complex logic or API connections happening in the background; you just provide the data, and the automation handles the rest.

Other common use case scenarios include:

  • Customer Syncing: Updating profile information across multiple CRM platforms.

  • Lead Management: Adding offline event leads to CRMs and mailing lists.

  • Document Generation: Creating invoices or orders by providing a specific set of variables.

Related topics

Creating and managing Action Flow inputs

Action Flow inputs allow you to pass data with a predefined structure to a Action Flow every time you run it. First, define the expected data structure necessary to start your Action Flow. Then, whenever you run the Action Flow with defined Action Flow inputs,Celonis platform shows a form where you enter the required data. You can use the data from your Action Flow input in all modules in the Action Flow.

You can define Action Flow inputs for your Action Flow before or after adding your modules.

  1. In the Action Flow editor, click the Action Flow input icon.

  2. Click Add item.

  3. Enter the Name. This field is mandatory.

    • You cannot use spaces or special characters in the name. You can use letters, numbers, and the underscore symbol (_).

    • You can only start with a letter or underscore.

  4. Select one of the following input data type from the dropdown menu:

    • Array

    • Boolean

    • Collection

    • Date

    • Number

    • Text

  5. In Required, select whether this input is required or not to start your Action Flow.

    • If you select Yes, your Action Flow cannot run unless you provide the required input.

      Important

      To use required inputs, your Action Flow scheduling type must be set to On-demand

    • If you select No, the Action Flow can run without the specific input.

  6. Optional: If you selected Text, Array, or Collection as your Specification, in Multi-line, select how you want your text to show.

    • Selecting Yes shows multiple lines of text to show.

    • Selecting No shows only one line of text.

  7. Repeat the process if you need to add more items.

  8. Click Save.

    Action Flow input menu
  9. Click the save icon to save your Action Flow.

Tip

You can use the Action Flow inputs as mappable values in your Action Flows. You can find them under the Variables tab in the mapping dialog.

Custom and system variables menu in an Action Flow module with inputs icon highlighted.

Warning

Editing the input structure item(s) in an active Action Flow might lead to data inconsistencies and Action Flow failure.

  1. Navigate to the Action Flow input icon in the Action Flow editor.

  2. Click the item you want to edit.

  3. Make your changes.

    Caution

    Changing the Action Flow input name will cause Action Flows to fail with errors. 

    If you need to change the input name, we recommend deleting the old item and adding a new one with the new name.

    Caution

    If you change the inputs from not required to required, you need to change your scheduling to On-demand.

  4. Click Save.

Once you save your changes, the changes update automatically everywhere you use the specific input mappable value.

Once you define your Action Flow inputs, your defined Action Flow inputs appear as mappable values under the Variables tab in the mapping dialog. You can use Action Flow input mappable values in your Action Flows.

With defined Action Flow inputs, every time you trigger a Action Flow (via Run Once or via API), the Action Flow inputs window pops up.

The Action Flow with Action Flow inputs can run only if you fill in all the required fields with the correct data types.

Warning

Deleting the input structure item(s) in the active Action Flow might lead to data inconsistencies and Action Flow failure.

Screenshot of an 'Action Flow inputs' configuration dialog showing the input definition interface. The dialog contains a 'DEFINE INPUTS' section with one input field configured called 'MyInput' of type 'text'. The input field has options to reorder (shown by dots) and delete (shown by an X button with cursor hovering over it). Below is a blue '+ Add item' button to create additional inputs. The dialog has 'Cancel' and 'Save' buttons at the bottom, with 'Save' highlighted in blue.
  1. To delete an item from an input structure, navigate to the Action Flow input icon in the Action Flow editor.

  2. Find an item you want to delete.

  3. Click X to delete the item.

    To delete all items, click X for all of the items.

  4. Click Save to save your changes.

Related topics