
Celonis Product Documentation

Configuring and using Actions in views (action flows, augmented attributes, emails)

Note

You're currently viewing a topic describing a Studio feature that's in limited availability. For more information, see: Studio (new experience).

For all other Studio features, see: Studio.

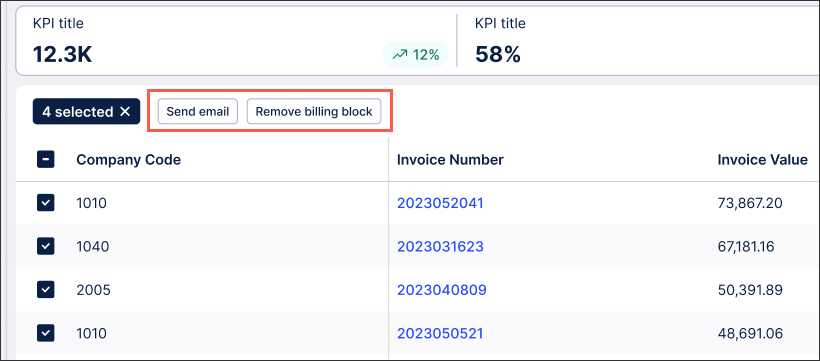
With the new Studio experience, you can now configure and use view actions such as sending emails, running action flows from within a view, and updating augmented attributes. These actions can be configured within a table component, allowing app users to select cells and then either send an email using that data or click to start an action flow / automated process running based on it.

In this example, both a send email and an action flow have been configured for this table:

example_actions.png

With email actions, a user can select cells from a table and then use their default email programme (which we refer to as 'mailto') to send an email containing data from those sells. This may require users to enable pop-ups in their browser for their default email programme or to correctly assign their default email programme for their operating system.

To configure an email action from a table within your view:

  1. Either select an existing table or drag and drop a table from the component menu.

  2. With the table settings open, expand the Interactions section and click Add Action.

    table_interactions.png
  3. Select Send Email and the email configuration wizard opens.

    configure_send_email.png
  4. Select Mailto as your delivery method, optionally provide an email template, and then personalize your action button.

    Email template: When creating an email template, you can insert dynamic placeholders into the body text.

    There is a 1:1 relationship between selections in the table and an email - placeholders can only be filled for one selection (row of data). If you make multiple selections, multiple distinct drafts would open.

    add_placeholder_to_email_template.png
  5. Click Done.

    The send email action has now been configured.

    You can edit this action at any time by returning to the table settings and clicking the Edit button:

    edit_email_action.png

To create an Action Flow action, the package has to contain at least one active Action Flow scheduled to run “On demand". Without this prerequisite, the option is grayed out in your table settings.

To configure an action flow action in a table:

  1. Either select an existing table or drag and drop a table from the component menu.

  2. With the table settings open, expand the Interactions section and click Add Action.

    table_interactions.png
  3. Select Run Action Flow and the action flow configuration wizard opens.

    run_action_flow.png
  4. Select an existing Action Flow, configure any available inputs, and then personalize the Action button.

    create_action_flow.png
  5. Click Done.

    The send email action has now been configured.

    You can edit this Action at any time by returning to the table settings and clicking the Edit button.

    edit_action_flow.png

Using table actions, you can update augmented attributes when interacting with them in a published view. With the attributed selected, an customizable button appears above the table, allowing you to update values in real-time.

update_augmented_attribute_example.png

Augmented attributes are a Knowledge Model asset that can be updated in real-time and without the data model reloading. For more information, see: Augmented attributes

To configure an action that let's you update an augmented attribute while viewing a table containing that attribute:

  1. Either select an existing table or drag and drop a table from the component menu.

  2. With the table settings open, expand the Interactions section and click Add Action.

    table_interactions.png
  3. Select Update Augmented Attribute and the action flow configuration wizard opens.

    update_augmented_attribute.png
  4. Select the augmented attributes you want to update from those available and then personalize the action button.

    augmented_attribute_wizard.png
  5. Click Done.

    The update augmented attribute button has now been configured.

    You can edit this Action at any time by returning to the table settings and clicking the Edit button.