Implementation Guide OM Starter Kit
Views in the Order Management Starter Kit
The Order Management (OM) Starter Kit (SK) architecture focuses on maintainability and reusability and has customizations in mind. This is achieved by leveraging the Base and Extension functionality, the use of view variables, as well as the use of embedded views.
1. View architecture
The SK has some central Base views in which the standard layout and standard components for the respective context are defined. The following views are the main Base Views.
Process Cockpit Base
Validation Cockpit Base
VD Deep Dive Base
Inefficiency Deep Dive Base
Filterbar Base
Widget Base
Chart base
Overview Base
KPI Detail Base
KPI Calculation Base
KPI Tab Documentation Base
KPI Chart Documentation Base
Set Target, Benchmark and Thresholds Base
This means, in case you want to adjust the content (e.g., change the type of chart, adjust the size of sidebar, add a new component), those views are the starting point.
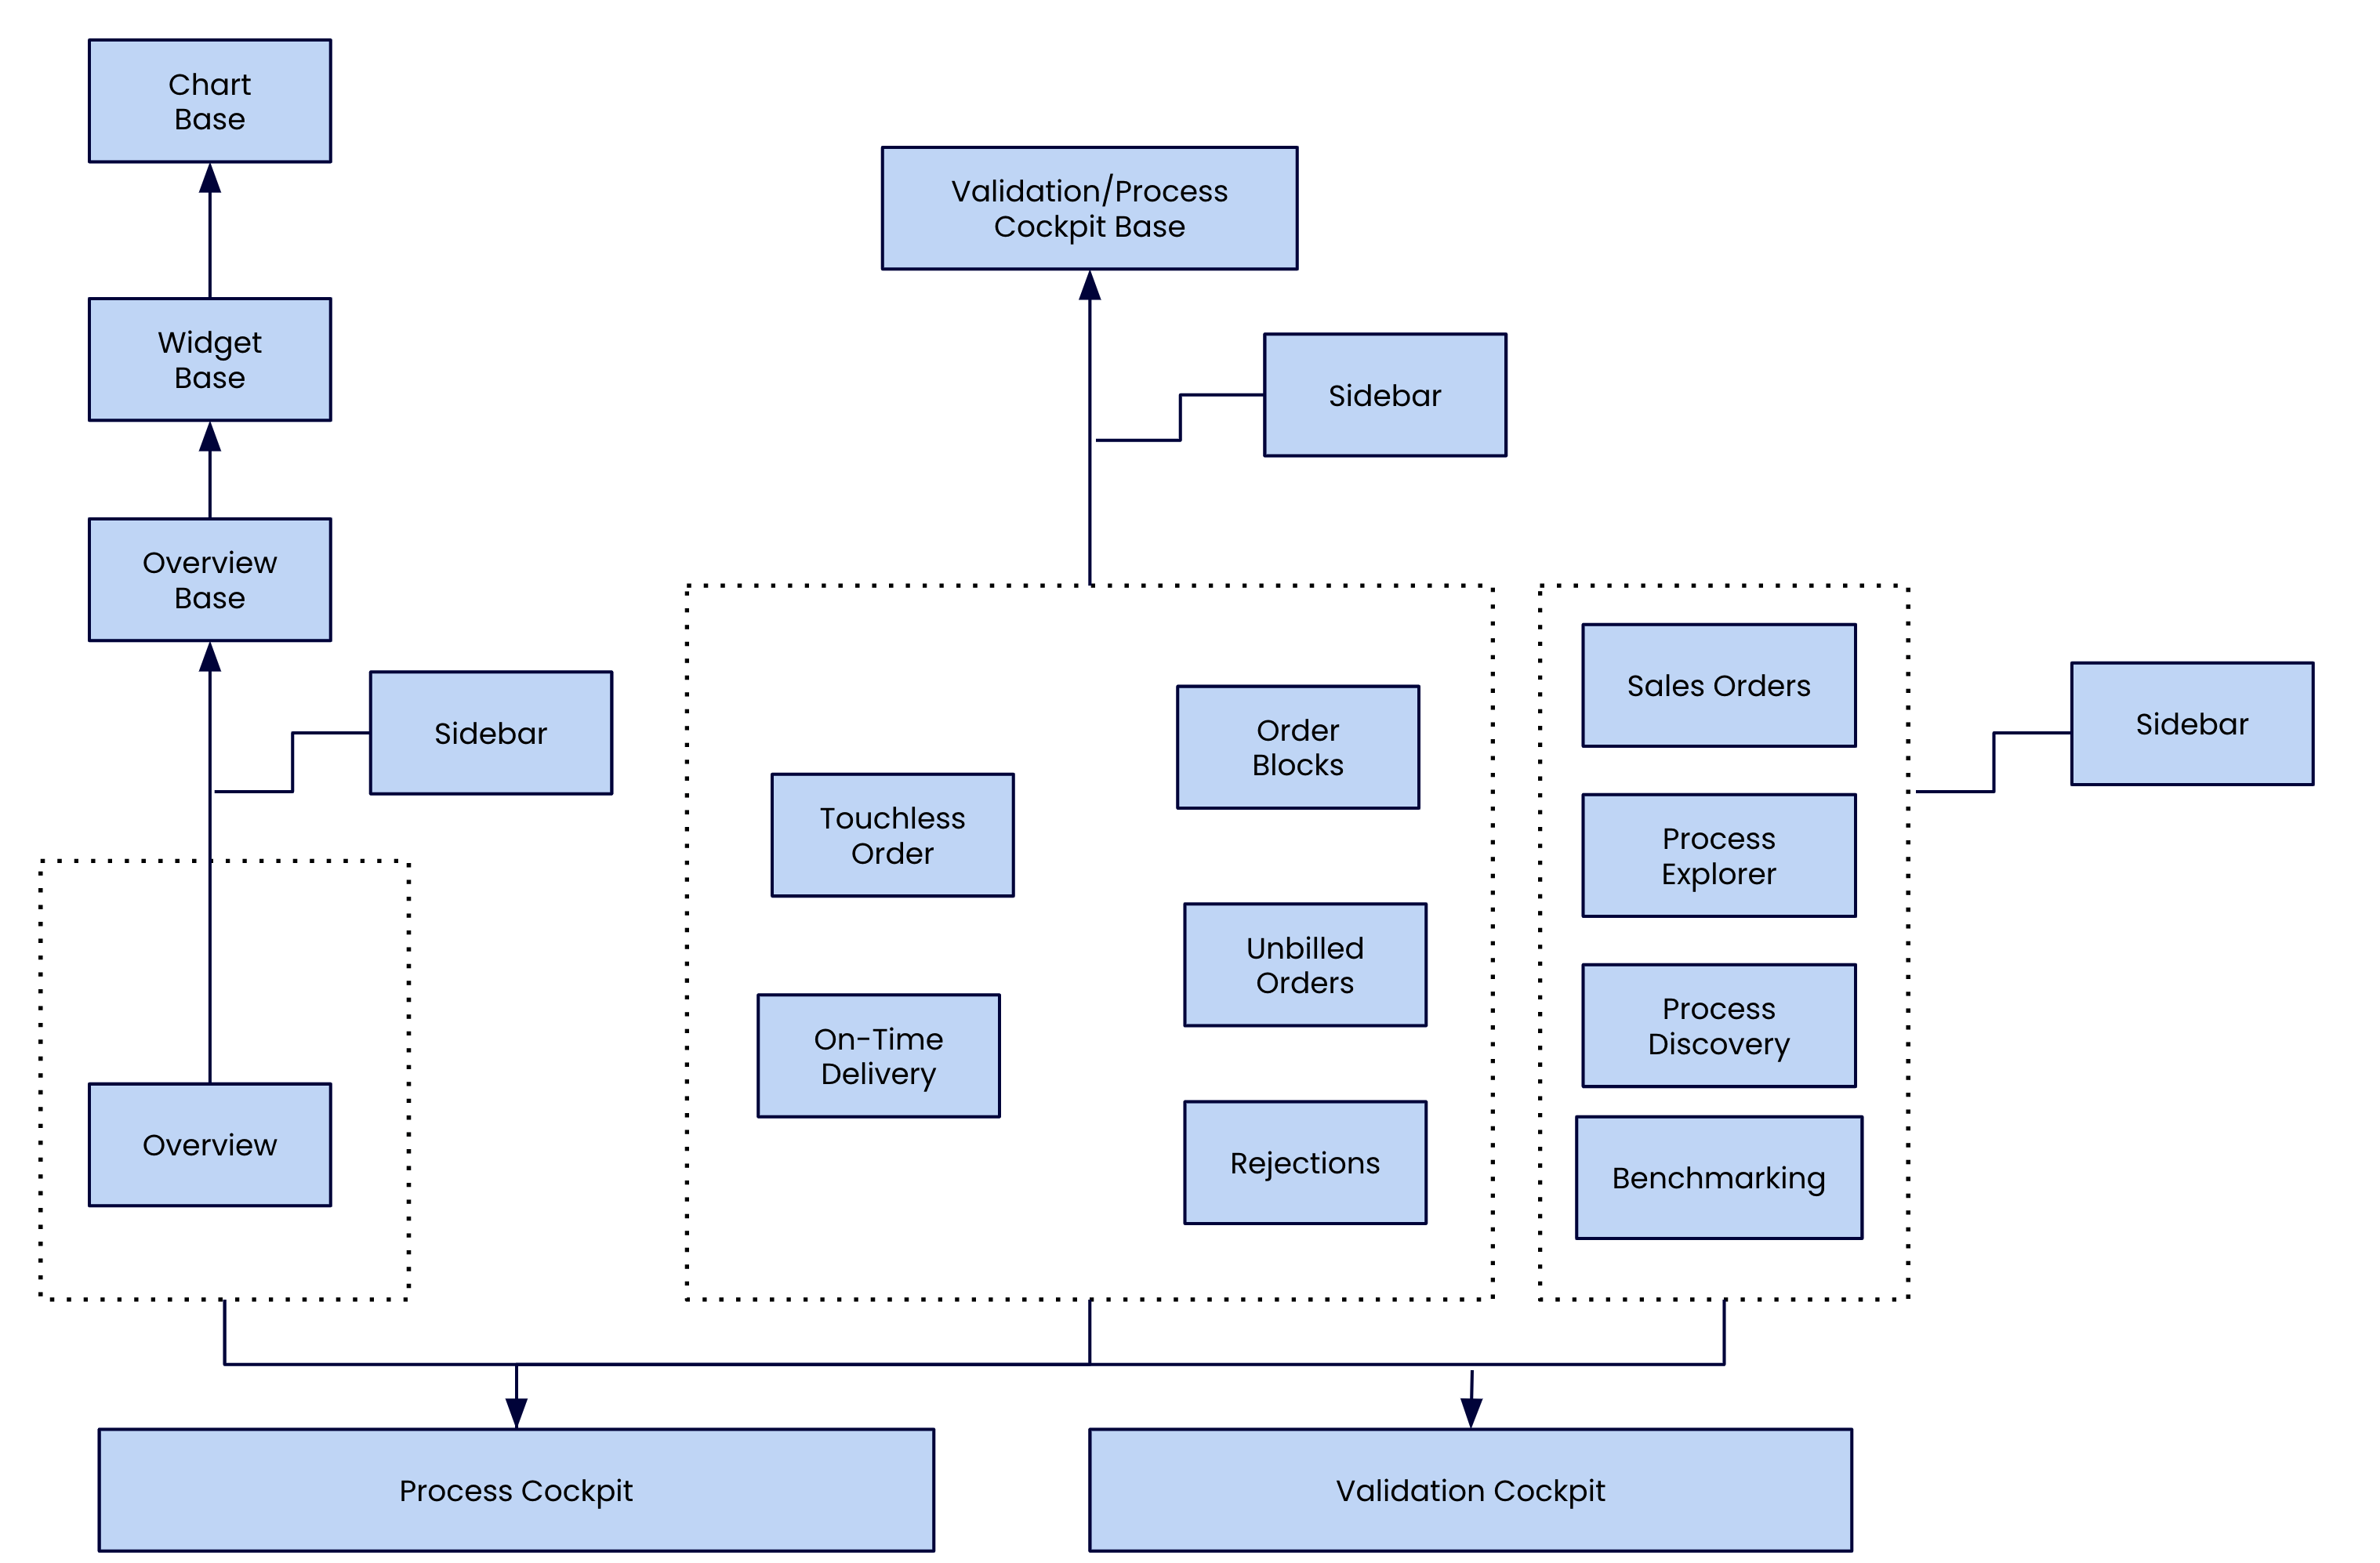
The architecture diagram below shows how the individual components are connected. The use cases (Touchless Orders, On-Time Delivery, Order Rejections, Order Blocks and Unbilled Orders) extend the Base Views “Process Cockpit Base” and “Validation Cockpit Base” while the Overview views extends the “Overview Base” view. The Sidebar is used in every view as an embedded view. The “Widget Base” defines base that the Widgets in the “Overview” extend and the Chart Base is the base view for embedded views inside the widgets.
 |
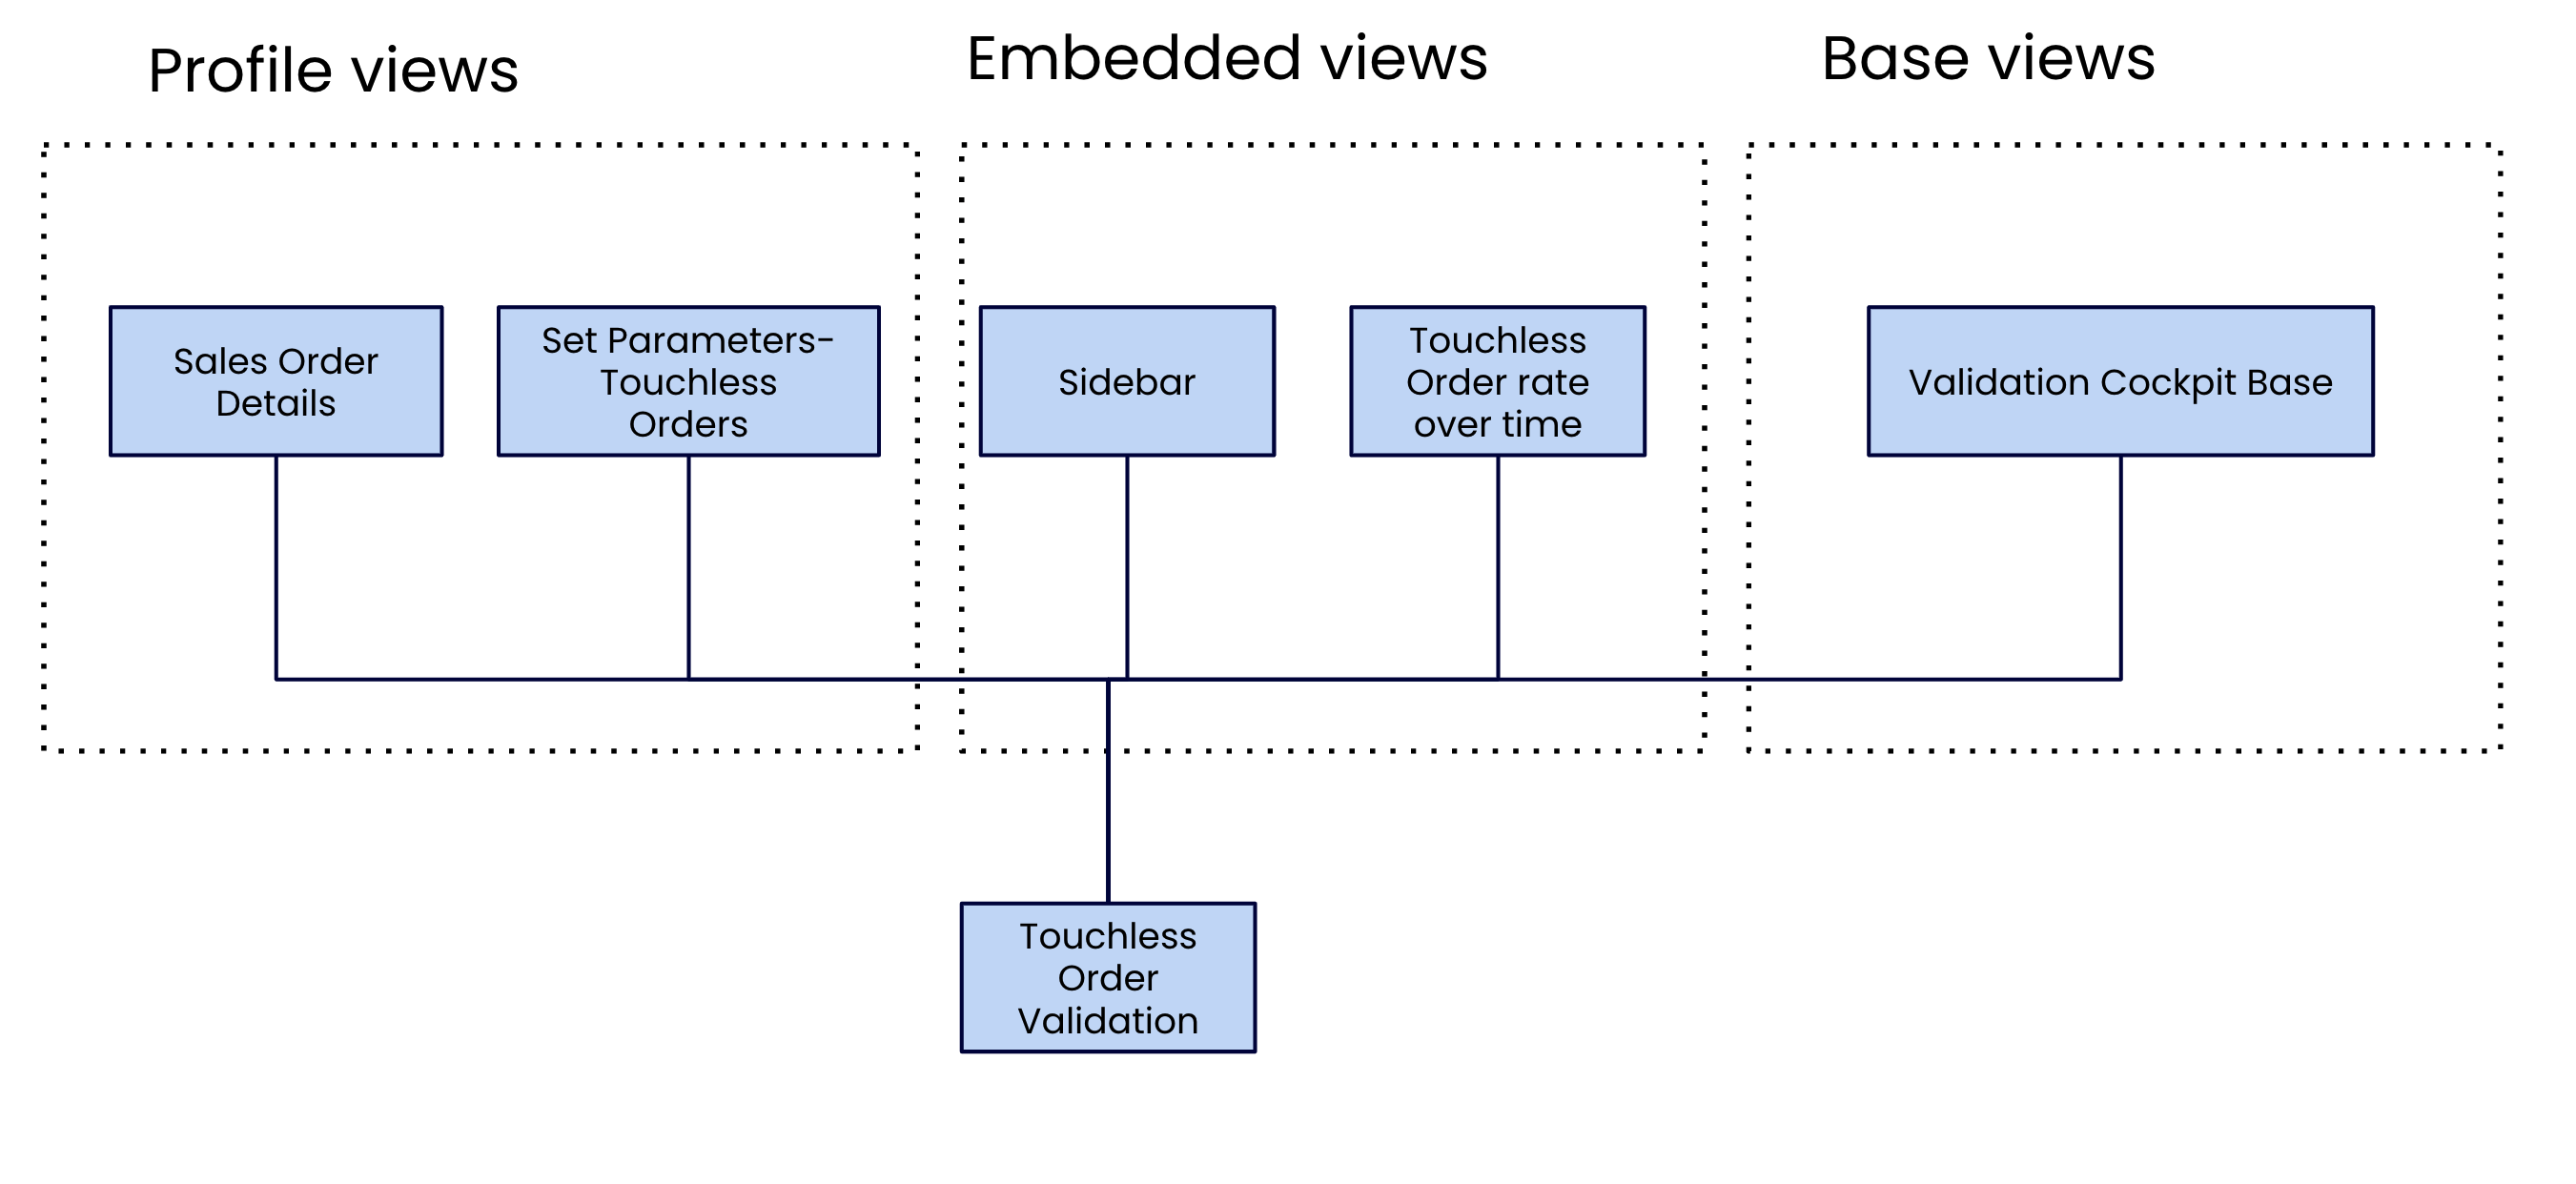
The following diagram shows in more detail how the Touchless Orders Validation Cockpit view is built. It has the Sales Order Details and the Settings views as profile views, the sidebar and touchless rate chart as embedded view and the Validation Cockpit Base view as a base.
 |
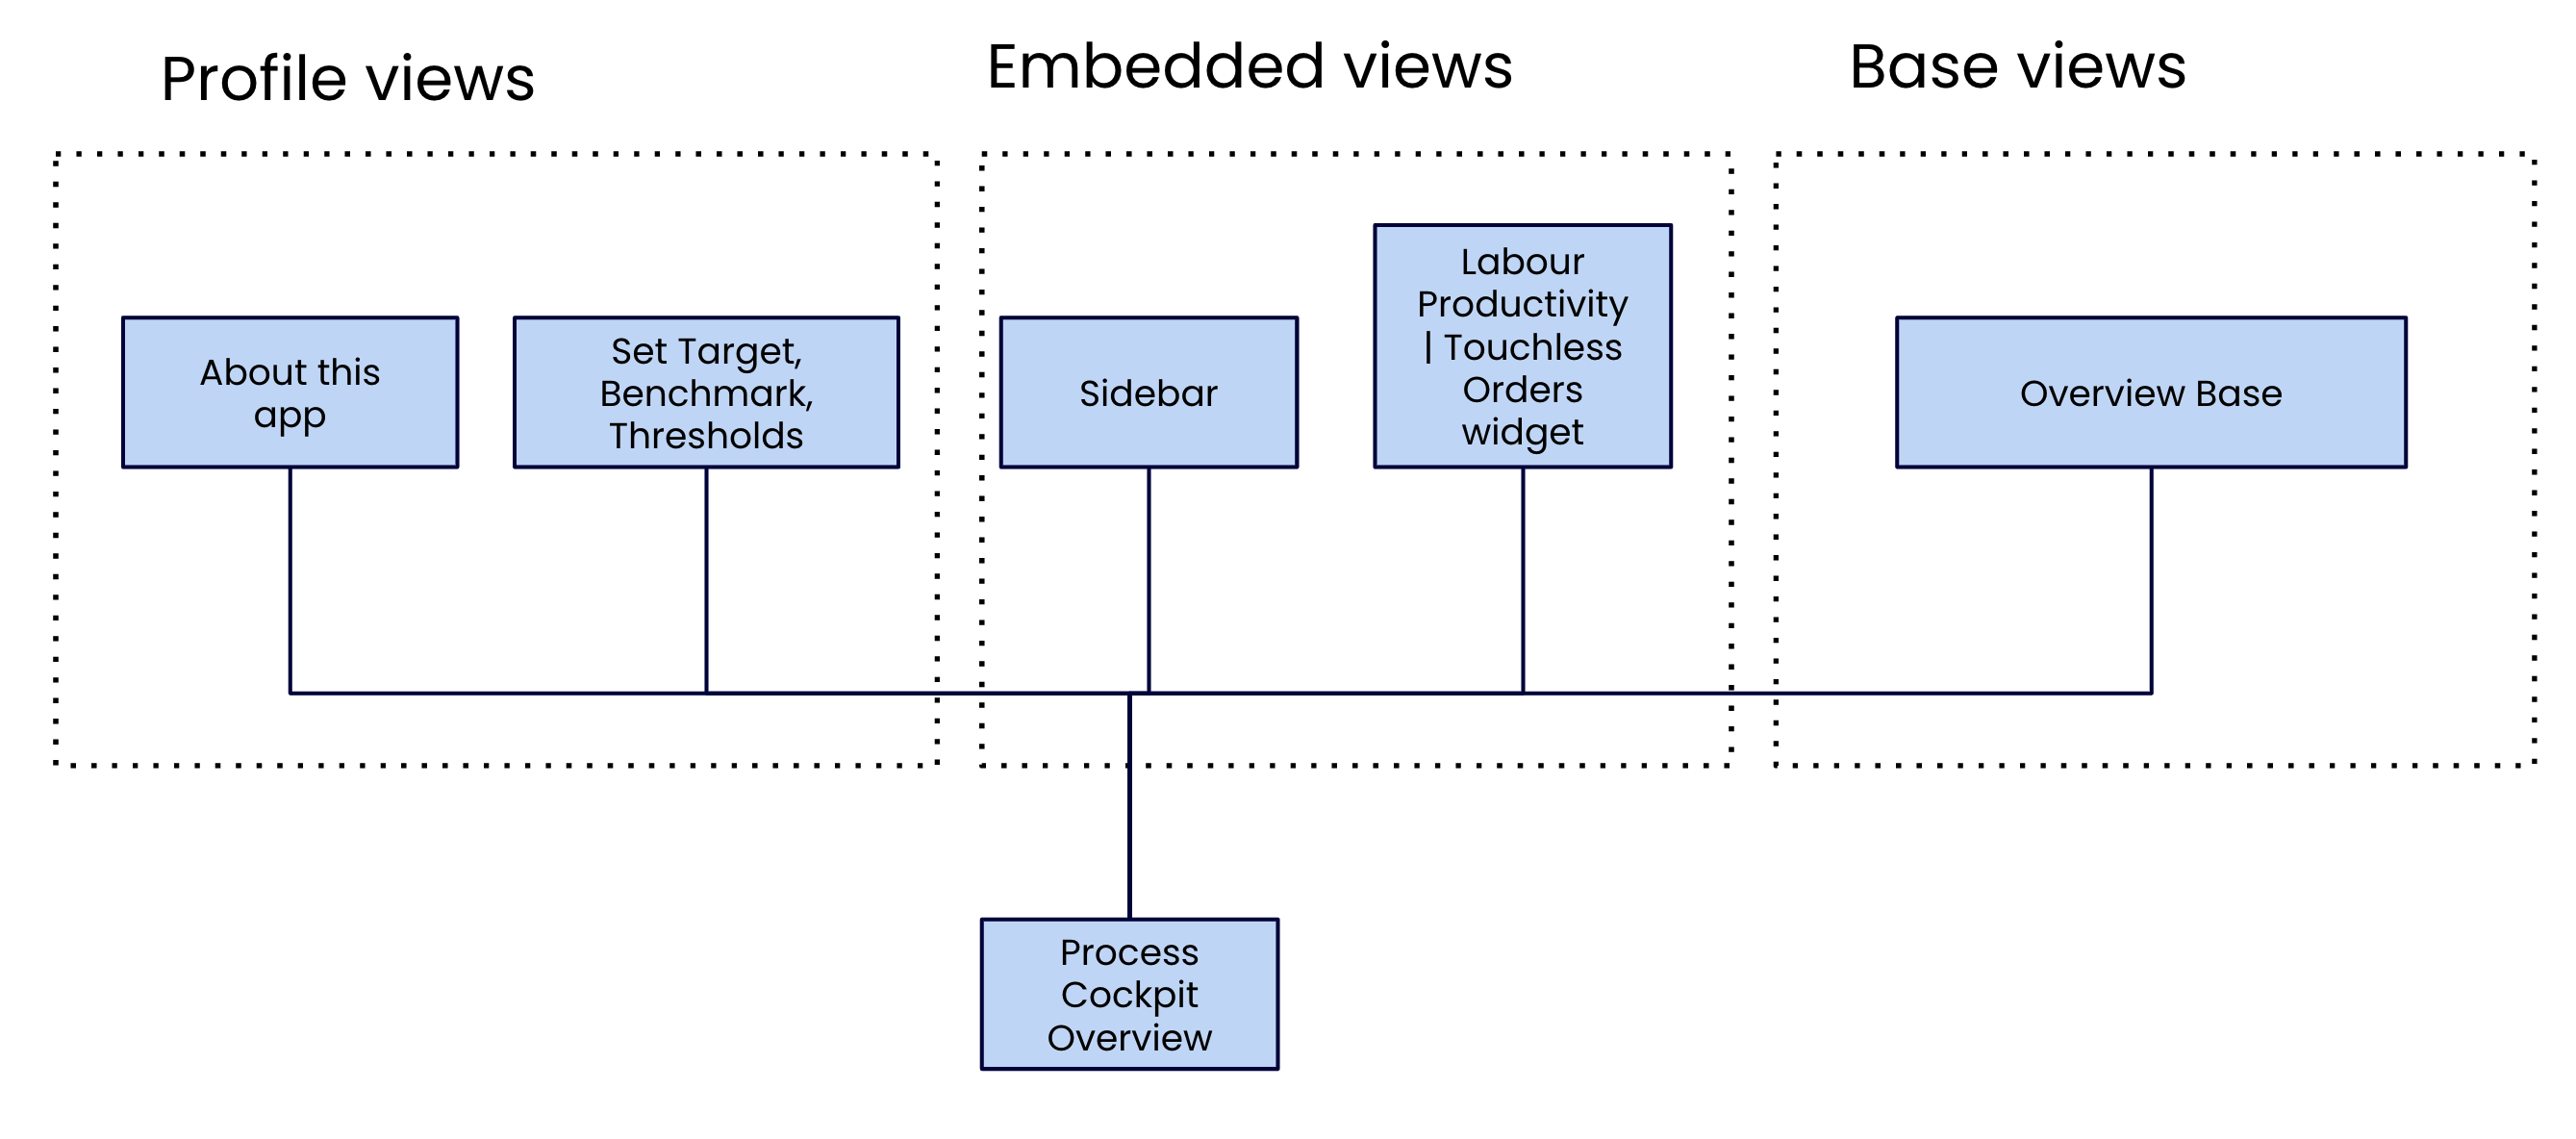
The next diagram shows how the Process Cockpit Overview is built. It has the sidebar and the settings view as profile views, the sidebar and widgets as embedded views and the overview base as a base view.
 |
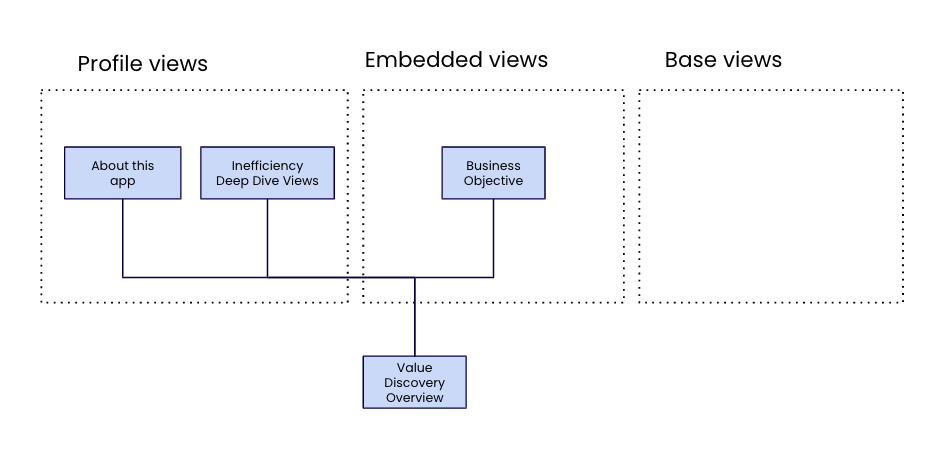
The Value Discovery App is set up slightly differently. It has the about this app view and the inefficiency deep dive views as profile views, the business objectives view is an embedded view.
 |
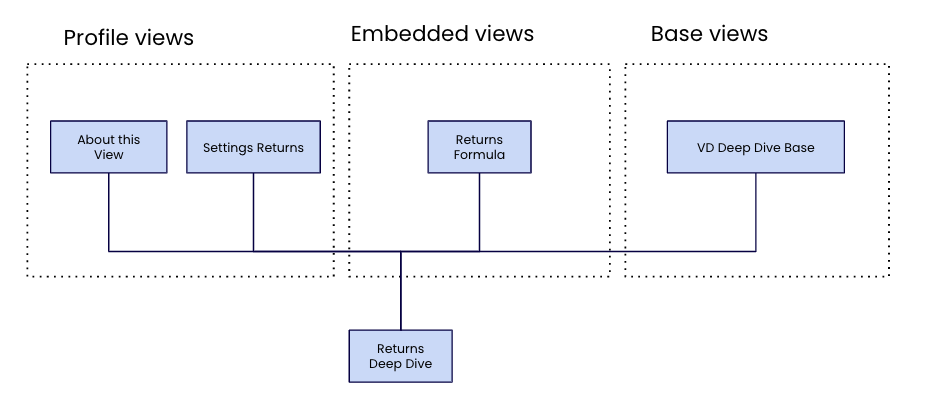
The deep dives follow a homogeneous approach as seen in the diagram below (example: Returns Deep Dive). The about this view and the settings view are profile views. Some inefficiencies may have a parameter settings view in addition. The formula visualized is an embedded view and every deep dive is an extension of the vd deep dive base view.
 |
2. View Customizations
In the below section, we’ll have a look at the best practices on how to customize the application. In general, only the updates on the tabs structure are performed in the “Process Cockpit'' or "Validation Cockpit" views. All other updates are performed in the Base views or in the content views (=Tabs) embedded in the “Process Cockpit'', "Validation Cockpit" or "Value Discovery App" views.
If something should be updated throughout the whole application, one of the Base views is the place to start in most situations (= bulk update). If a specific view should be customized, the content view itself is the place to go (=individual update).
2.1 Base Updates (Bulk Update)
As all components and layout in the Base View are inherited to the extending Views, all updates performed in the Base View are populated to the extending views. If the extending views have overwritten the configuration or the layout already the update is ignored in the extending view. So updating the Base is a powerful way to change general patterns in the application.
So let’s have a look at a few examples:
Update Layout
Let’s assume that the KPI List should be removed for all Process Cockpit Views.
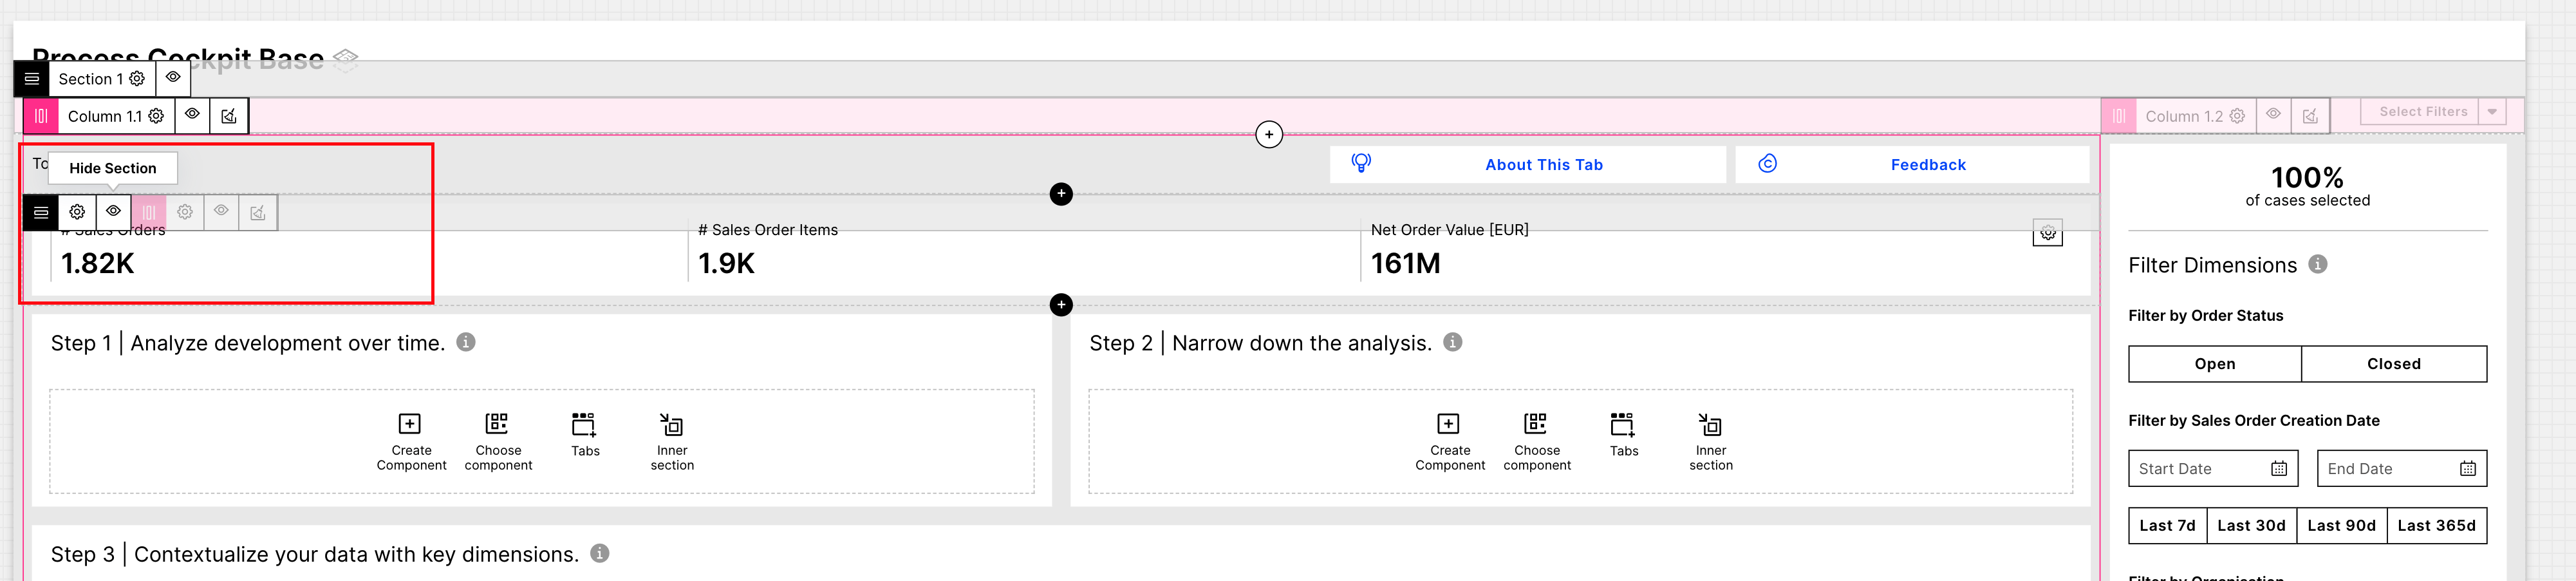 |
To do this, navigate to the Base View “Process Cockpit Base” and click Edit Mode.
Navigate to the KPI list and click on the “eye” saying “Hide section”. Click Save and leave the edit mode.
If you navigate to the extending views (e.g., Touchless), you will see that the KPI list is gone.
Update Components
The update of components works very similarly. So let’s assume you want to adjust the KPI list not to show some KPIs.
 |
To do this, navigate to the Base View “Process Cockpit Base” and click Edit Mode.
Navigate to the KPI list and click Edit Component.
Click on “Hide” for the items you want to hide.
Click Save and leave the edit mode. If you navigate to extending views , you will see that all extending views show only the KPIs defined in the base view.
Extension Updates (Content View)
While the updates in the Base views provide potent updates to the general structure, it’s still essential to customize the individual view to show the most relevant information. You might have noticed that the App does this already out-of-the-box by using, for instance in the “Order Blocks” view, a different structure than the one in the base view. So, in case specific views should be updated individually, you should navigate to the Tabs folder and look for the respective view.
2.2 Creating a new Extension View from a Base
To better understand the advantages of the Base/Extension concept, the following section explains how to create an entirely new view focusing on a specific set of KPIs as defined in the Knowledge Model. Therefore, the already mentioned methods around Base/Extension Views are used to build a basic view.
To simplify the process, the following example will use some existing KPIs coming from the Knowledge Model that will result in a view allowing the business user to analyze the development of the “Return Rate” as well as the “amount affected sales orders”. This, however, will also work with any other KPI created in the Knowledge Model.
To do this, first of all, create a new view in the same package where we store the other views of the Starter Kit App, ideally in the Tabs folder, called “Returns” (as an example) by clicking on the “+” icon in the folder.
Select the Knowledge Model from the Dropdown and select the View Process Cockpit Base as the Base View for the new Extension View. Once the Base for the Returns view is selected, clicking the create button shows an exact copy of the base view in the Edit Mode.
Switching to the YAML editor by clicking on the </> button in the top right corner results in basically an empty view without any Layout or Component definitions. All components you see in the View are inherited from the Base View. So far, nothing was overwritten by the Extension.
To adapt the content to show the mentioned KPIs, all we need to do is change/add a few KPIs in the components. These would be:
KPI List
Trend Chart
Drilldown table
Once made the changes to the Base View, you can add new tables, charts depending on what you want to show for the Order Returns Process Cockpit View.
2.3 Adding a new Inefficiency to the Value Discovery App
To customize the value discovery app, the following section explains how to create an entirely new inefficiency in the value discovery app. This will allow you to estimate and frame a value for inefficiencies specific to your processes.
To simplify the exercise, the following example will use some existing KPIs coming from the Knowledge Model and will help you to analyze manual sales order creations - a process step that should be highly automated. While this inefficiency already exists in the Knowledge Model it can be used as a blueprint for new inefficiencies.
First of all the inefficiency needs to be categorized by its business objective (labor productivity, working capital, or revenue). Further, an indicator (e.g. FORMULA_ORDER_INDICATOR_MANUAL_ORDER_CREATION) needs to be set up that allows us to clearly determine if an object is affected by an inefficiency or not. In the example, it returns 1.0 if an order has been created manually and 0.0 if it happened automatically. This indicator will be reused in the flag (e.g. FLAG_ORDER_MANUAL_ORDER_CREATION).
To understand the impact of an inefficiency it is important to calculate the estimated value (e.g. KPI_ORDER_CALC_POTENTIAL_VALUE_MANUAL_ORDER_CREATION). As an example of labor productivity-related inefficiencies, one would calculate the number of manual activities multiplied by the effort needed, the FTE cost, and a realization potential that is estimated when using Celonis. The effort and the realization potential can be set up as a run-time variable to allow for user input. Depending on the business objective the estimated value needs to be added to the respective KPIs (e.g. KPI_GLOBAL_CALC_POTENTIAL_VALUE_LABOR_PRODUCTIVITY & KPI_GLOBAL_CALC_POTENTIAL_VALUE_ALL).
Last but not least, the anomaly needs to be set up (e.g. INEFFICIENCY_ORDER_MANUAL_ORDER_CREATION). Both estimated value KPIs (e.g. KPI_GLOBAL_CALC_POTENTIAL_VALUE_LABOR_PRODUCTIVITY & KPI_GLOBAL_CALC_POTENTIAL_VALUE_ALL) need to be linked and a knowledge object ID, in case a deep dive view should be created.
Tip
Optional I: To create a deep dive view, a new view can be created that is extending the “VD Deep Dive Base”. Here all relevant KPIs can be added to analyze the inefficiency and frame a value. To make it fully functional, all buttons need to be updated and the inefficiency needs to be added to the data model (see optional II).
Optional II: If a write-back of the framed value in the data model is desired one needs to adjust the “inefficiency table” in the data pool. Therefore, a record needs to be added to the table with the name and estimated time-to-value. The confirm and reject button of the respective deep dive needs to be updated accordingly.
In-App Documentation
Every Tab comes with detailed business user documentation having (1) a short description, (2) a detailed description including the business logic of the KPIs used in this view and (3) a detailed component explanation. In general, the lightbulb icon always links to a more detailed explanation, while the info icons indicate quick help on how to use components.
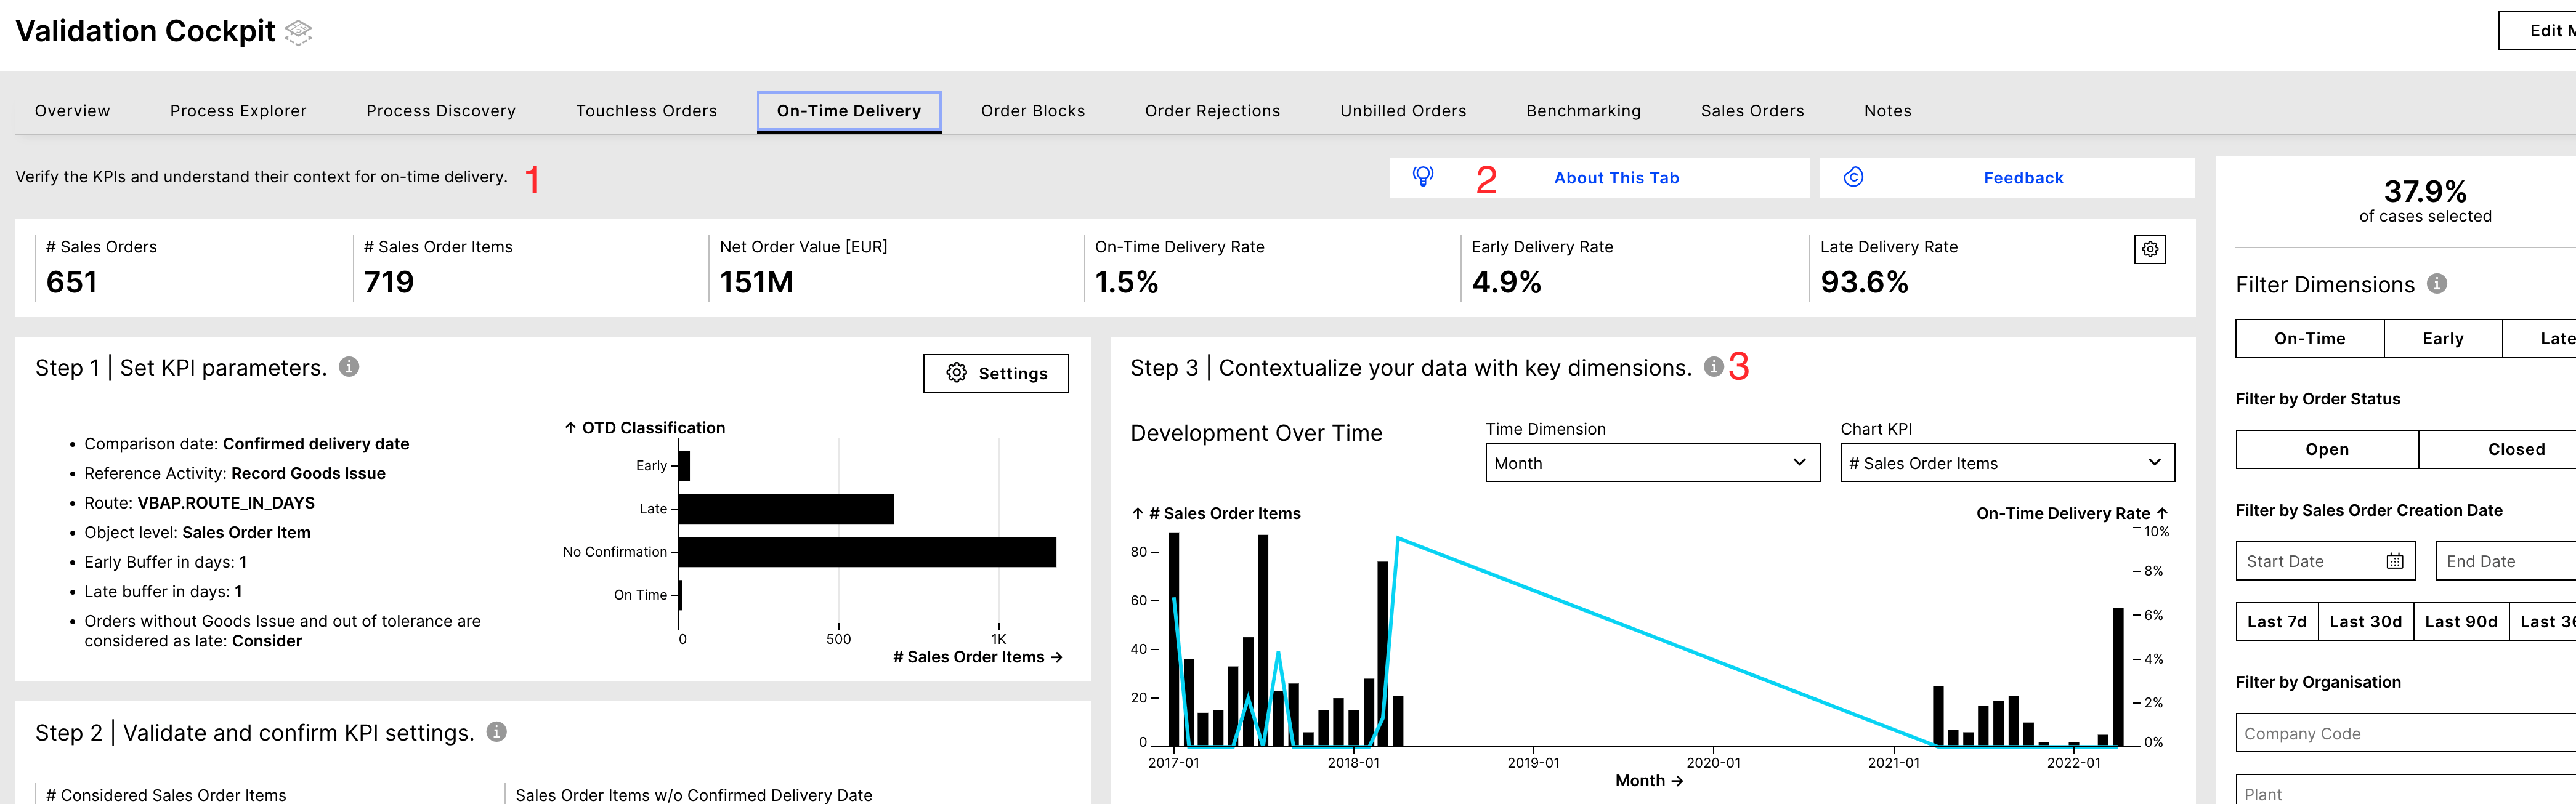 |
By clicking on (2) “About This Tab”, a profile view with a detailed tab and KPI documentation is opened. So in case you are making updates to the underlying business logic of a KPI, it’s essential to update the “About the KPI used in this Tab” section to keep business users up to date, especially when it comes to KPI definitions and calculations.
The current definitions can be found in the Documentation folder.
Tip
Hint 1: The documentation for views and KPIs can be found in the folder “Documentation”. These views are also accessible for Business Users using Business Views, not having access to Studio.
Hint 2: The documentation views follow the Base/Extension Logic like other Views.
Hint 3: Updating the documentation is similar to updating any other KPI view
User Feedback
We encourage all App users to provide direct feedback using the integrated “Feedback” button that is available in every tab. The user will be forwarded to a short Office Form by clicking on the button.
 |
Bugs and Feature Requests for the OM Starter Kit
If you are stuck and don’t find any solution in this installation guide or the Celonis help Center, we recommend creating a ticket in the Support Portal. The Order Management team will come back to you and help you resolve the problem.
Update Guide and Release Notes
This page stores all information on updates to the Order Management Starter Kit starting with version 1.6.4.
We encourage you to update your application on a regular cadence to continuously benefit from our developments and avoid major maintenance when multiple updates must be installed at once.
Note
Updates can easily be installed from the package settings and usually do not affect your customizations. However, when there is a major upgrade - which we will thoroughly test upfront and mention in the version - caution is required. The following guide should help you to update your application.