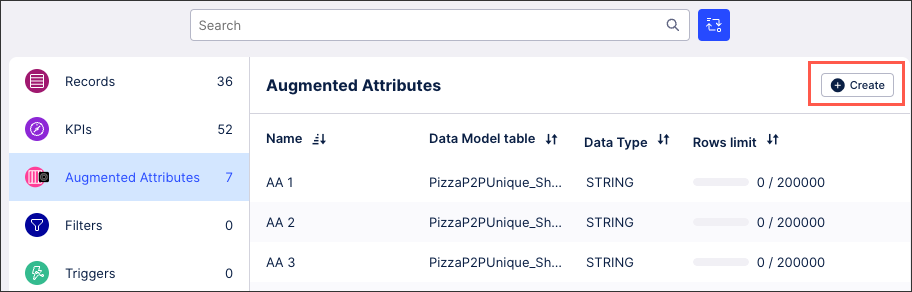
Creating and using augmented attributes
Replacing User IDs
In the augmentation table storing the augmented attribute values, the “Changed by” information is only stored with the User ID.
If you would like to display the user name or user email instead, see: Replacing User IDs.
Augmented attributes are a Knowledge Model (KM) asset that can be updated in real-time and without the data model reloading. By assigning an augmented attribute to a specific table in the data model, you can add additional information to the source system. This additional information can then be referenced in your Views, describing your business objects in further detail and generating additional process insights.
For example, let's look at an On-Time Delivery Classification use case:
A company wants to monitor its delivery performance, specifically, how many orders are delivered on time versus late. The raw Data Model contains these fields:
Order_IDPlanned_Delivery_DateActual_Delivery_DateCustomer_IDMaterial_Number
However, there’s no existing field that explicitly labels an order as “On-Time” or “Late”. To deal with this, the company creates an augmented attribute in the Data Model called Delivery_Status with logic like:
CASE
    WHEN "Actual_Delivery_Date" <= "Planned_Delivery_Date" THEN 'On Time'
    ELSE 'Late'
END
This new attribute is stored as a column in the Data Model, not calculated ad hoc in the View, meaning it can be reused across multiple Views, dashboards, and KPIs.
The benefits of using augmented attributes in the Celonis Platform include, but aren't limited to, the following:
Standardization of business logic: You can encode business rules once (e.g., “On-Time Delivery,” “High-Value Customer,” “Late Payment”) directly in the Data Model. Every View and user in your team then uses the same consistent logic, preventing discrepancies.
Re-usability across Studio assets: Once you define augmented attributes in a View, all analyses built on that View can reuse them.
Improved performance: Augmented attributes are pre-computed when the View is processed. This means dashboards and analyses using the View load faster than if the same logic were implemented as calculated fields.
Encapsulation of business context: Augmented attributes let you embed business meaning directly into the View. Instead of exposing only raw data (like timestamps, IDs, or codes), you can expose interpreted attributes (like “Late Delivery,” “Payment Delay Category,” etc.).
Governance and version control: Since Views are versioned and managed separately from the base data model, augmented attributes defined in Views support controlled evolution of business logic. You can safely test or adjust logic in a View without impacting other models or analyses.
Augmented attributes are created within and added to a KM (which itself is stored within a Studio package).
To create an augmented attribute:
Click Studio and then open the package containing the KM you want to create the augmented attribute for.
Open your KM and click Augmented Attributes - Create Augmented Attribute.
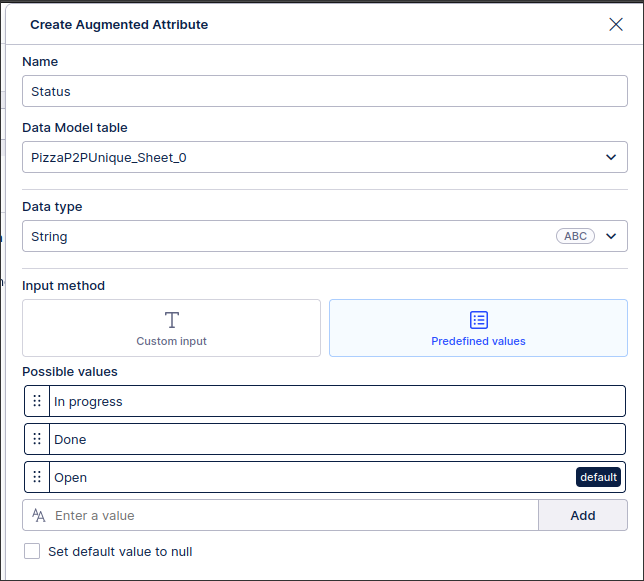
Provide the following details:
Name: A reference for the augmented attribute.
Data Model table: Select a Data Model table with an identifier.
Data type: You can select from the following data types here:
String: Text values.
Integer: Whole number values (whether positive, negative, or zero).
Float: A number with a decimal point value.
Boolean: A True or False value.
Date: Use one of preset date format or set a custom one.
Input method: And you can select from the following input methods here:
Predefined: Manually enter the values that can be selected and define a default value.
Custom input: Allow the user to enter a custom value (with the option to define a default value).
Set default value to null
Enable housekeeping: When the augmented table exceeds 190,000 rows, values linked to missing Data Model entries are automatically deleted.
Click Save.
The augmented attribute is saved to the KM and can be referenced in your Views. This update will then be able in your app when the version you're editing is next published.
Relationship between augmented attributes and the data model
When you create an augmented attribute, a table is automatically created in memory on the PQL side. This table is referenced as:
O_CELONIS_AUG_RECORD_NAME
For example, if you have table PurchaseOrder in the Data Model, then two tables will be referenced as:
O_CELONIS_AUG_PurchaseOrder
O_CELONIS_PurchaseOrder
These tables have a 1:1 relationship, where only the latest augmented attribute value is stored on O_CELONIS_AUG_PurchaseOrder.
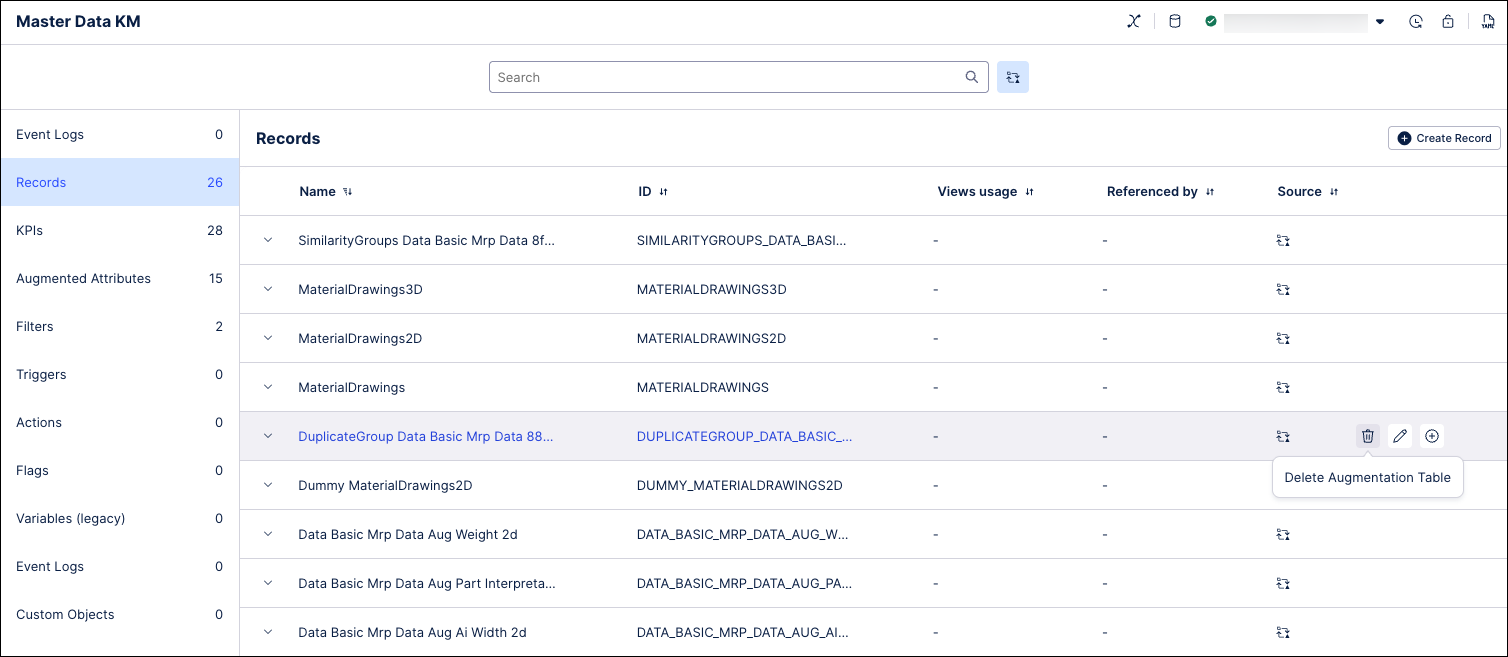
Autogenerated records cannot be deleted from the Knowledge Model. However, augmentation tables generated from AI tools such as Annotation Builder can be deleted from the “Records” tab in the Knowledge Model. To delete one of these records, hover over the record and then select the Delete Augmentation Table icon to the right. You will be required to confirm the deletion before it is removed from the Knowledge Model.
 |
Note
The delete icon will also display for autogenerated records but will be inactive.
Deleting outdated tables helps to remove clutter and avoid potential confusion between similarly named tables. Removing any deprecated or unneeded annotation tables can also help ensure you stay under the maximum limit of 200 augmentation tables per Data Model.
For more information on generating these augmentation tables, see Running your Annotation Builder.
Using the PQL editor, you can leverage augmented attributes in your Views in the following ways:
With the augmented attribute appearing under the Data Model table to which it has been added, you can use it as a reference in your components. When using the augmented attribute in this way, the autogenerated PQL will be consistently correct even if the configuration of the attribute changes.
Each augmented attribute has it's own table in the Data Model. With this table, more advanced information can be extracted (such as the time of the last update or the user who performed it).
This table uses the following naming convention:
<data model table>_AUG_<Augmented Attribute Name>
When configuring a table component within a View, you can assign augmented attributes and enable inline editing of the data displayed per column.
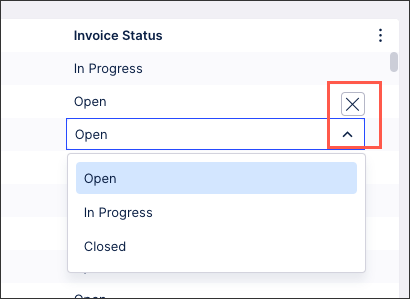
To enable inline editing for a table column, click the column configuration icon and then select Cell Interactions - Inline Editing:
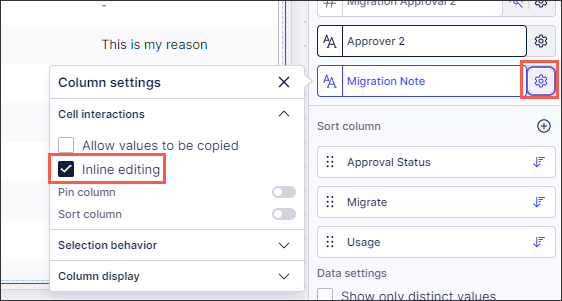
For example, the invoice status column in this table is based on an augmented attribute. When inline editing is enabled, the app user can edit this table column to update the current status of the invoice from Open to In Progress.
Updates to augmented attributes are kept regardless of the user's team or Celonis Platform status. As such, if a user is removed from a team, any augmented attributes they have updated will remain in their updated state.
Note
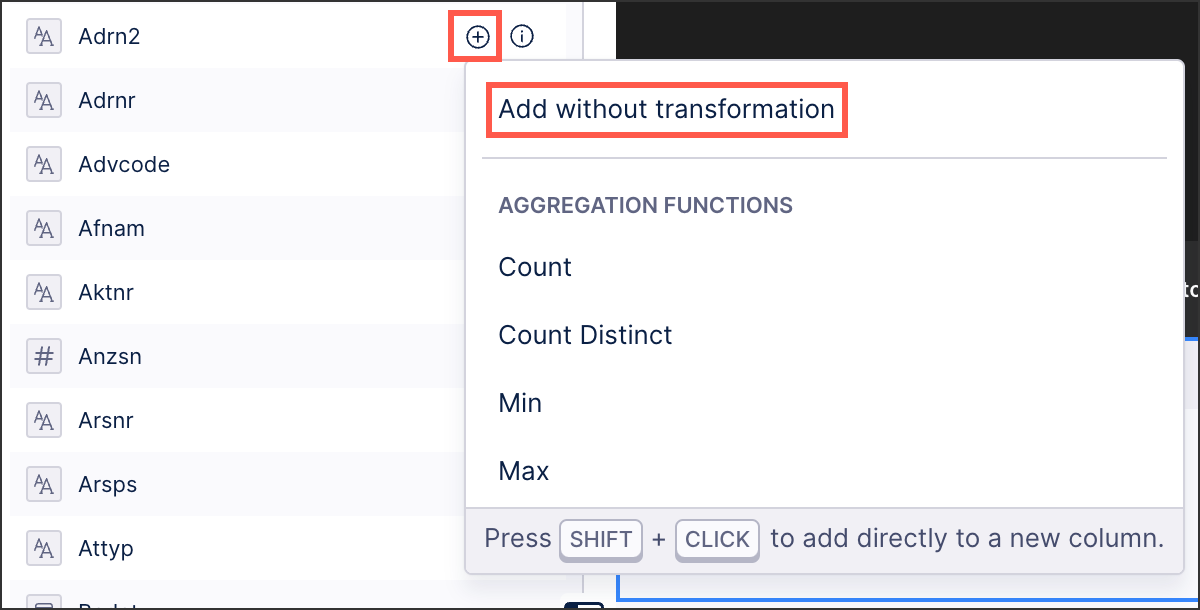
Only Augmented attributes added to the PQL editor without transformation (also known as 'raw') can be used for inline editing or updating via table actions (next section).
 |
When using or updating an augmented attribute, the following conditions apply:
The table in the data model you assign the augmented attribute can have a maximum of 150 million rows.
The maximum number of augmentation tables per data model is 200.
The maximum number of values per augmented attribute is 200k (however rows containing the default value are not included).
Table names and column names in your data model can't contain spaces. For example, you should use "VENDOR_INFO" instead of "VENDOR INFO" as a table name.
Any tables you want to use must have a primary key (also known as an identifier) set in the data model. For more about identifiers, see: Setting identifiers.
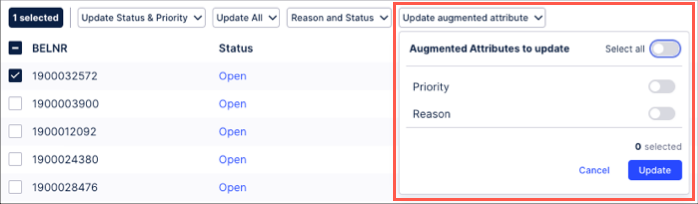
Using table actions, you can update augmented attributes when interacting with them in a published View. With the attributed selected, an customizable button appears above the table, allowing you to update values in real-time.
For more information, see: View Actions.
 |
With Studio Views, augmented attributes reference tables in the Data Model, while legacy Views reference individual records. To maintain compatibility with Studio Views, migrate any record-based attributes to the table-based format.
To migrate your record-based augmented attributes to the table-based format:
Click Studio and then open the package containing the KM you want to create the augmented attribute for.
Click Records and then select your record.
In your record, go to the augmented attribute you want to migrate.
At the bottom of the augmented attribute editor, go to the Migration Tool.
Package:Select the Studio package to use.
Knowledge Model: Select the Knowledge Model within the selected Studio package to migrate the augmented attribute to.
To migrate an attribute to another Knowledge Model, add a new attribute to your source Knowledge Model record. This new attribute must have the
CELONIS_MIGRATION_ATTRIBUTEID.Augmented attribute name: Add a name for the augmented attributes.
Do not remove added values: Select this option to copy data to the target attribute without overwriting its existing values.
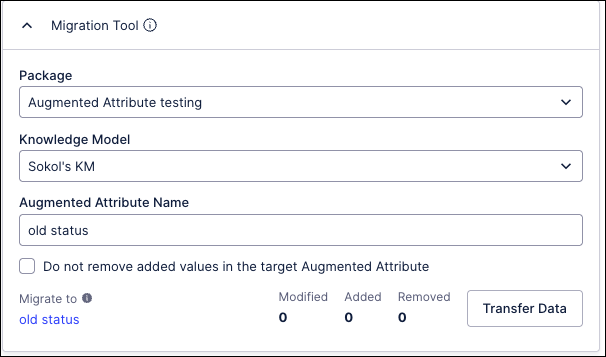
Click Transfer Data to copy over all values of the old augmented attribute value to the new one.
The migration tool count shows differences between old and new augmented attributes since the last transfer. Clicking Transfer Data replaces the new attribute’s values with the latest data from the old one. If all values are null, both versions match.
Tip
To avoid conflicts, we suggest scheduling with your team a cut-off date for making changes to the old augmented attribute as part of the migration process.