Executing delta extractions
For a stable and optimized data pipeline, we recommend executing delta extractions from your source system using SQL upserts. SQL upserts eliminate the need for multiple checks and separate insert or update operations, making your code more concise and efficient.
Before introducing SQL upserts, you should understand the difference between delta and full load extractions:
When extracting data from your source systems into the Celonis Platform, you can either execute full load or delta extractions.
A full load extraction creates or replaces all of the data in one or more tables on the Celonis Platform by copying all of the data in the scope of one or more Process Mining Use Cases from a source system into the Celonis Platform. Full load extractions are typically done when setting up a new data model, during initial data loads, or when a complete refresh of the data is required. You should also do a full load extraction if you need to identify and remove any deleted records.
Delta extractions refer to the process of identifying and extracting only the data that has changed (added or updated) since the last extraction or data refresh. This is particularly useful in ETL (Extract, Transform, Load) processes and in scenarios where real-time or near-real-time data updates are required.
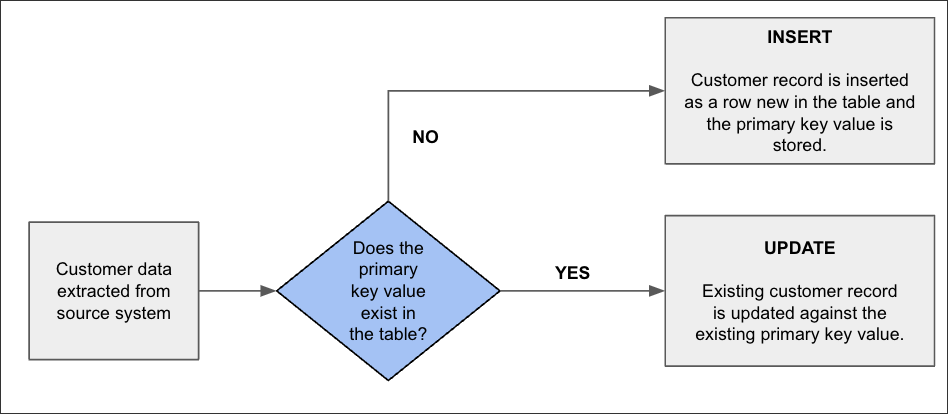
Upsert is slang for a database MERGE operation, combining the words “update” and “insert”. Using SQL upsets allow you to perform either an update or an insert on a table based on a specified primary key value. If the primary key value already exists in a row, the upsert will update the row, and if the value does not exist, it will insert a new row.
As an example, when managing customer contact data:
Updated records: An existing customer contact has been updated since the last data extraction was run, such as a change of address. This is identified by the primary key value and the record against that value is updated.
Insert records: A new customer has been signed and their contact details have been added. As the record is new, no primary key value exists in the row and therefore a new row is added and the new primary key is stored.
As a basic process diagram:
 |
Performing SQL upserts
Performing SQL upserts can be done using different SQL dialects.
Below are examples for three popular SQL databases: PostgreSQL, MySQL, and SQLite.
PostgreSQL provides the INSERT ... ON CONFLICT statement to perform upserts.
-- Create a table for demonstration
CREATE TABLE users (
    id SERIAL PRIMARY KEY,
    username VARCHAR(50) UNIQUE,
    email VARCHAR(100)
);

-- Upsert example
INSERT INTO customers (customer_name, email)
VALUES (customer1, 'customer1@customer.com')
ON CONFLICT (customer_name)
DO UPDATE SET email = EXCLUDED.email;
MySQL uses the INSERT ... ON DUPLICATE KEY UPDATE statement for upserts.
-- Create a table for demonstration
CREATE TABLE customers (
    id INT AUTO_INCREMENT PRIMARY KEY,
    customer_name VARCHAR(50) UNIQUE,
    email VARCHAR(100)
);

-- Upsert example
INSERT INTO customers (customer_name, email)
VALUES (customer1, 'customer1@customer.com')
ON DUPLICATE KEY UPDATE email = VALUES(email);
SQLite uses the INSERT OR REPLACE INTO or the INSERT ... ON CONFLICT statement for upserts.
-- Create a table for demonstration
CREATE TABLE users (
    id INTEGER PRIMARY KEY AUTOINCREMENT,
    username TEXT UNIQUE,
    email TEXT
);

-- Upsert example using INSERT OR REPLACE
INSERT OR REPLACE INTO users (id, customer_name, email)
VALUES ((SELECT id FROM users WHERE customer_name = customer1), customer1, 'customer1@customer.com');

-- Alternative upsert using INSERT ... ON CONFLICT
INSERT INTO users (customer_name, email)
VALUES ('customer1', 'customer1@customer.com')
ON CONFLICT(customer_name) DO UPDATE SET email=excluded.email;When executing delta extractions, you have the following options:
Delta transformations allow you to identify which rows changed in a data model table since the last successful data model load, so these must be configured for your data jobs.
The final tables used for the process data model are often based on views. Views in Vertica do not have the epoch timestamp column included automatically (like tables). For the delta data model load to work, all view-based tables in the data model need to have an epoch column. This epoch column needs to be added manually by adapting the SQL scripts in the workbench.
Epoch represents a logical timestamp for the data in Vertica, which is implicitly stored for every row in a table. The epoch advances when the data is committed with a DML operation (Insert, Update, Merge, Copy, Delete). This approach allows for efficient detection of changed rows in Vertica.
For view definitions, there are three cases:
Simple views
For a simple view, the epoch can be projected as follows in SQL (shortened example):
DROP VIEW IF EXISTS P2P_MARC;

CREATE VIEW P2P_MARC AS(
SELECT
     MARC.*,
     epoch
FROM
     MARC AS MARC
...);
UNION ALL views
For views based on a UNION ALL of multiple tables, the epoch is projected as follows in SQL:
DROP VIEW IF EXISTS BKPF_UNION;

CREATE VIEW BKPF_UNION AS(
SELECT *, epoch from BKPF_BSIK
UNION ALL
SELECT *, epoch from BKPF_BSAK
);
JOIN views
For views based on JOINS, the minimum epoch needs to be projected from the underlying base tables as follows in SQL:
DROP VIEW IF EXISTS P2P_EKPO;

CREATE VIEW P2P_EKPO AS(
SELECT
      ...
      EKPO.epoch
   FROM
      EKPO AS EKPO
      JOIN P2P_EKPO_STAGING ON 1=1
...
);
Setting an identifier for tables within a data model
Identifiers allow you to identify unique rows in each table, enabling you to merge the deltas to the existing and loaded data model. You must set identifiers for every table within your data model.
For data models created from process connectors, you may find that the identifier has already been set as part of the guided configuration. You can edit or update identifiers using the same steps below if needed.
To set identifiers from your data pool diagram:
Click Data Models.
Select the data model you want to use for delta loads, opening the data model diagram.
For each database table, click Set Identifier.
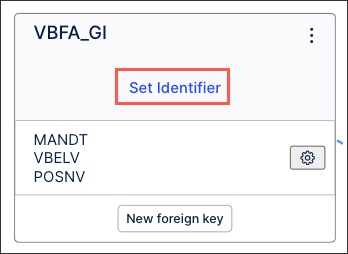
Select the identifier(s) you want to use for this table:

Click Save.
The identifier(s) are now configured for this table, with the key icon indicating this in the data model diagram:
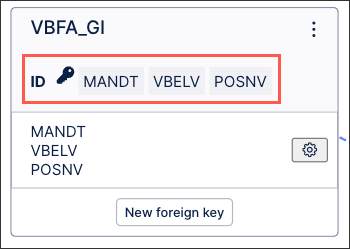
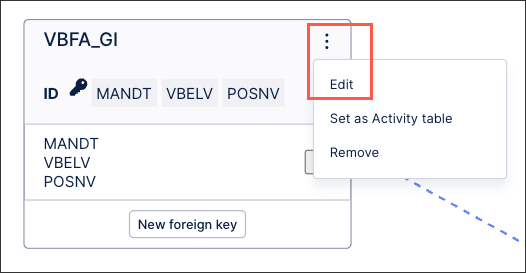
You can edit existing identifiers from your data model diagram by clicking Options - Edit:
 |