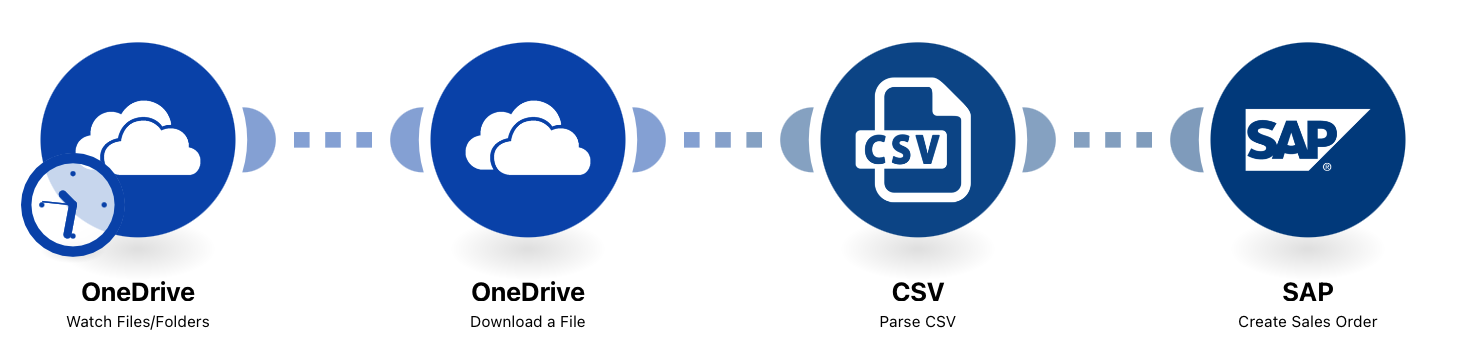
Create new Sales Order from CSV files
Eliminate manual data entry by automatically generating SAP Sales Orders. This Action Flow monitors a dedicated OneDrive folder, parses incoming .csv files, and instantly creates the corresponding Sales Orders in SAP.
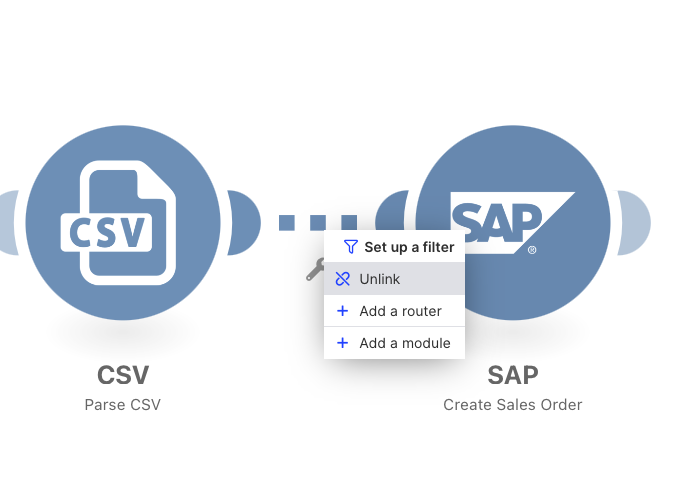
The image below illustrates a pre-configured Action Flow designed to bridge the gap between cloud storage and your ERP. The automation executes the following logic:
Automated monitoring: The flow continuously watches a specific OneDrive folder for new .csv uploads and triggers a download the moment a file is detected.
Data transformation: It parses the raw CSV content according to your defined schema (columns and delimiters), converting it into structured data.
ERP integration: The parsed data is mapped directly into SAP to create a new Sales Order instantly, bypassing manual entry.
 |
Below you will find the step-by-step guide for configuring each module of the above Action Flow.
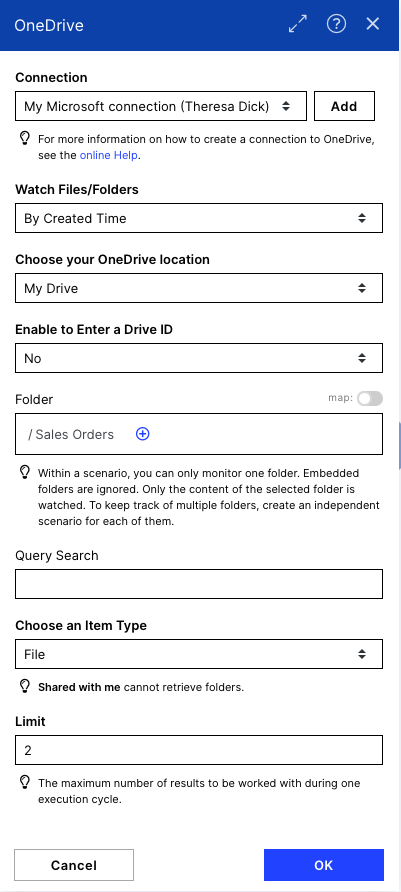
To get the .csv file you want to use as a base for the Sales Order you need to set up a storage module watching a folder for new files. We decided to go with a One Drive Module in this example, but you could also use SFTP or similar modules where you would want to store files including sales order data. Please connect your account and set up the module as shown in the screenshot.
Folder: Choose the folder in your drive where you will only upload sales order .csv files to be created
Item Type: File
 |
Configuration:
Action Flows Module: OneDrive
Action: Watch Files/Folders
 |
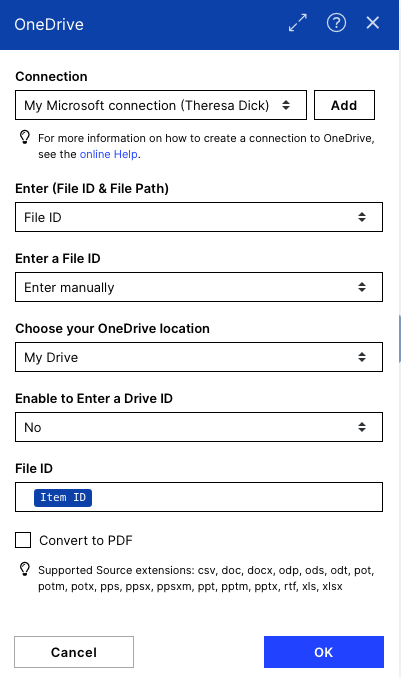
When a file is detected in the folder you have to download it to get access to its data. You access the file by downloading it via its File ID. You can get the File ID as an item from the module before (Item ID). Please connect to your account and set up the module as shown in the screenshot.
Enter (File ID & File Path): File ID
 |
Configuration:
Action Flows Module: OneDrive
Action: Download a file
 |
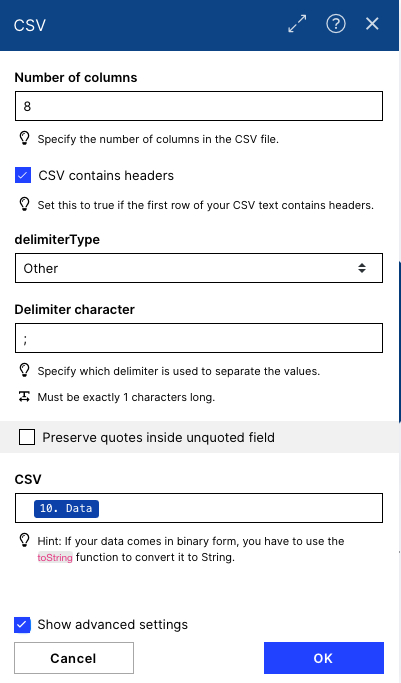
After downloading the .csv file you have to parse the data to make it usable in the following SAP module. You do this by defining how many columns your .csv file contains and how they are delimited. In this example the input file has eight columns and the default delimiter character for .csv files is ; which you have to define. Add the data item of the module before as the source data (CSV field).
Number of columns: Depending on your input file
delimiterType: Other
Delimiter Character: ;
 |
Configuration:
Action Flows Module: CSV
Action: Parse CSV
Run the Flow once to make the columns available as items in the following module.
 |
Make sure to structure the .csv file the right way. You do not have to structure it exactly as shown below but you have to be consistent. In this example case we only have the columns stated in the following SAP module to make it easy. Normally you might have more columns and have to make sure you choose the right columns later. For this example make sure to structure the .csv in the right order. We used headers in this example, as we also stated in the module before. If you have problems converting a .xlsx to a .csv file have a look at the instructions below for assistance.
Fill out the table with data which is valid for YOUR SAP System (e.g. a valid Number for the Sold-to-party). You can use the .csv we provide below as a template to know how incoming .csv files have to be structured.
SalesOrder.csv
 |
 |
How do I convert XLSX to CSV without losing data?
Select the column containing the data to convert.
Go to Data > Text to Columns.
Select Delimited > Next > Deselect all delimiters > Next > Select Text as Column Data Format and then click Finish.
Save as .csv.
IMPORTANT
Please unlink the SAP module and run the flow once to make the columns of the csv accessible in the SAP module. After successfully running the Flow reconnect the SAP module and go on with the set up.
 |
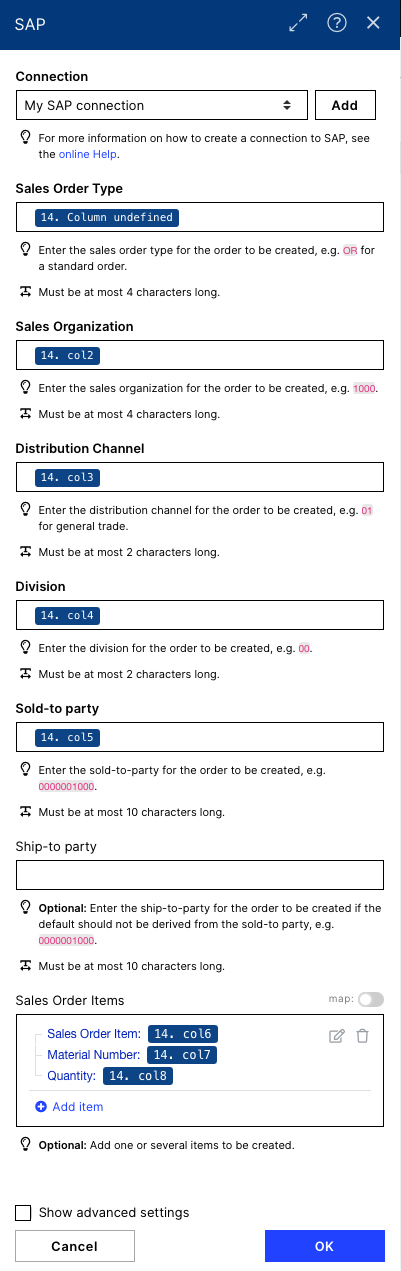
Connect to your SAP account and fill in the fields with the columns you defined in the module before. Make sure your input data in the .csv file got the right format (e.g. Distribution Channel 01 → leading zero can be difficult to set if creating the .csv file with excel) and in the right order (if the Sales Organization was second in the .csv file you have to choose col2 as an item for Sales Organization). In the example it has to be filled out as followed:
Sales Order Type: col1/Column undefined (first item of the Parse CSV module)
Sales Organization: col2
Distribution Channel: col3
Division: col4
Sold-to-party: col5
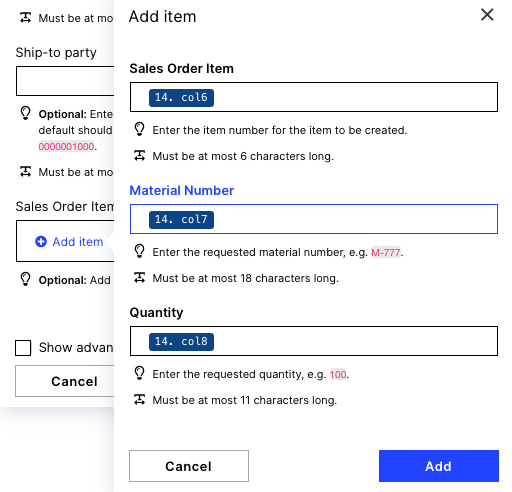
Sales Order Item: col6
Material Number: col7
Quantity: col8
col1 col2 col3 col4 col5 col6 col7 col8
|
 |
Configuration:
Action Flows Module: SAP
Action: Create Sales Order
 |
 |