Coupa (Action Flow)
The Coupa modules enable you to grant or reject approvals, and update or add approvers to requisitions in your Coupa account.
To get started with Coupa, create an account at Coupa.com.
To connect your Coupa account to Celonis platform you need to obtain the client credentials from the Integrations section of your Coupa account.
Log in to your Coupa account.
Click Setup > Integration > OAuth2/OpenID Connect Clients. Alternatively, use the search option to locate OAuth2/OpenID Connect Clients.
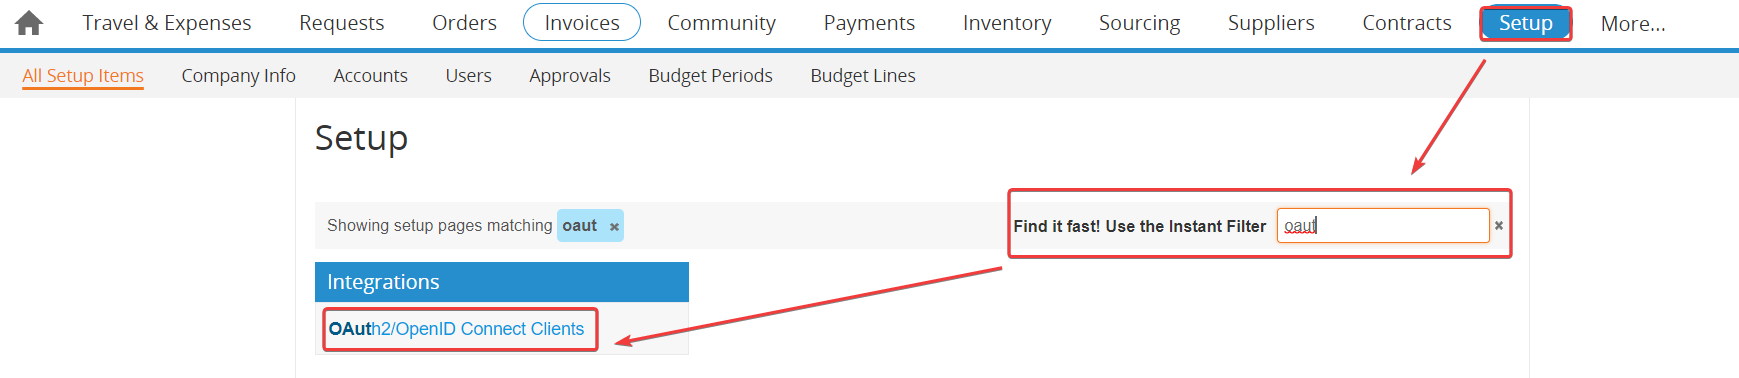
Click Create.
Enter the details as provided in the table below and click Save.

Grant Type
Select Client credentials.
Name
Enter the app's name.
JWK URI
Enter the following redirect URI:
https://auth.redirect.celonis.cloud/oauth/cb/coupaLogin
Enter the login username of the user.
Contact First Name
Enter the user's first name.
Contact Last Name
Enter the user's last name.
Contact Email
Enter the user's email address.
Scopes
Select the following mandatory scopes for the user:
email
login
offline_acces
openid
profile
core.accounting.read
Copy the Identifier value, click Show/hide against the Secret field, and copy the value to a safe place.
In Studio, go to your package and either start editing an existing Action Flow or start a new one by clicking New asset > Action Flow.
Click Add module and from the list select Coupa.
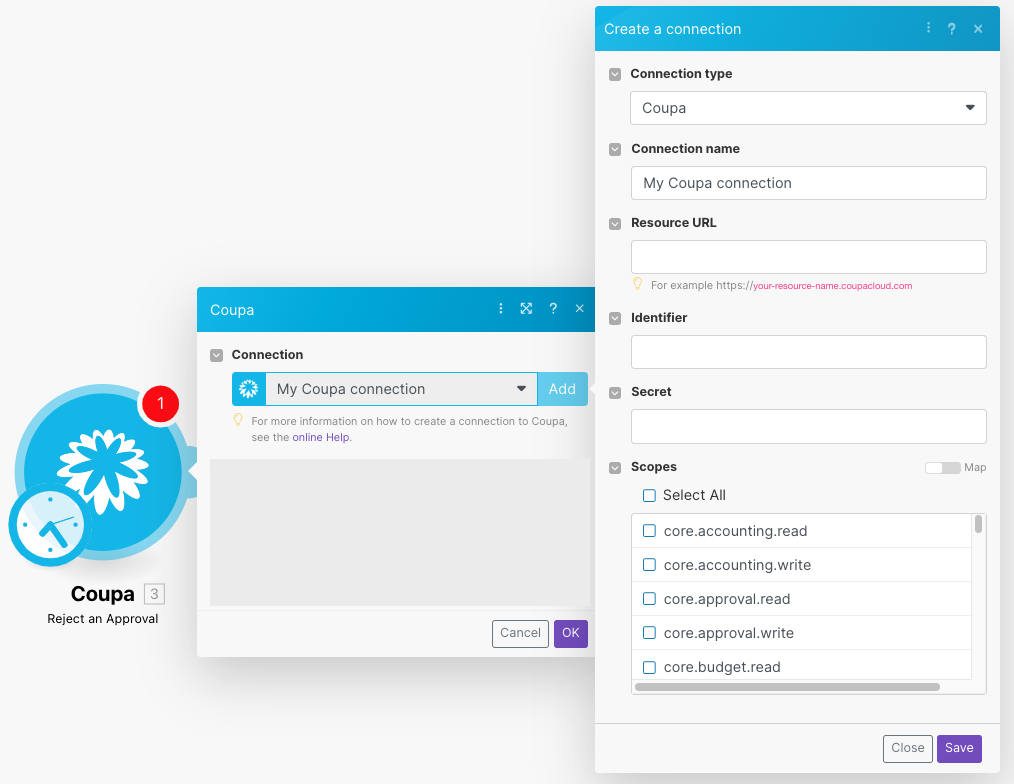
Click Create a connection.
In the Connection name field, enter the connection name.
In the Resource URL field, enter your account's URL address without
https://.In the Identifier, and Secret fields, enter the client credentials copied earlier. Select the scopes, and click Save.
The connection is established. You can proceed with setting up the module.
Approvals
Approves a requisition.
Connection | |
Enter Approval ID | Select whether you want to specify Approval ID manually or select from the list. |
Requisition | Select the requisition you want to grant approval for. |
Approval | Select the approval or enter (map) the ID of the pending approval you want to grant. |
Note | Enter the reason for approval. |
Rejects a requisition.
Connection | Establish a connection to your Coupa account. |
Enter Approval ID | Select whether you want to specify Approval ID manually or select from the list. |
Requisition | Select the requisition you want to reject an approval for. |
Approval | Select the approval or enter (map) the ID of the pending approval you want to reject. |
Reason on Rejection | Enter the reason for rejection. |
Requisitions
Updates an existing requisition line.
Connection | |
Enter Requisition Line ID | Select whether you want to specify requisition line ID manually or select from the list. |
Requisition | Select or enter (map) the requisition that contains the line you want to update. |
Requisition Line ID | Select the line or enter (map) the ID of the line you want to update. |
Quantity | Enter the quantity. |
Unit Price | Enter the unit price. |
Item ID | Select item or enter the item unique identifier. |
Contract ID | Enter (map) the ID of the contract. |
Supplier ID | Enter (map) the ID of the supplier. |
Payment Term Code | Enter the code of the payment term. |
Currency Code | Enter the currency code. |
Need by Date | Enter the date when the item is no longer useful to you. |
Adds an approver to a requisition.
Connection | Establish a connection to your Coupa account. |
Requisition ID | Select the requisition or enter (map) the ID of the requisition you want to add an approver to. |
Position | Select whether to add the new approver before or after the current approver. |
Approver ID | Select the approver or enter (map) the ID of the approver you want to add to the requisition. |
Current Approver ID | Select or enter the ID of the current approver. |
Other
Allows you to perform a custom API call.
Connection | |
URL | Enter a path relative to Note For the list of available endpoints, refer to the Coupa API Documentation. |
Method | Select the HTTP method you want to use: GET to retrieve information for an entry. POST to create a new entry. PUT to update/replace an existing entry. PATCH to make a partial entry update. DELETE to delete an entry. |
Headers | Enter the desired request headers. You don't have to add authorization headers; we added those for you. |
Query String | Enter the request query string. |
Body | Enter the body content for your API call. |
The following API call returns requisitions in your Coupa account:
URL: /api/requisitions/
Method: GET
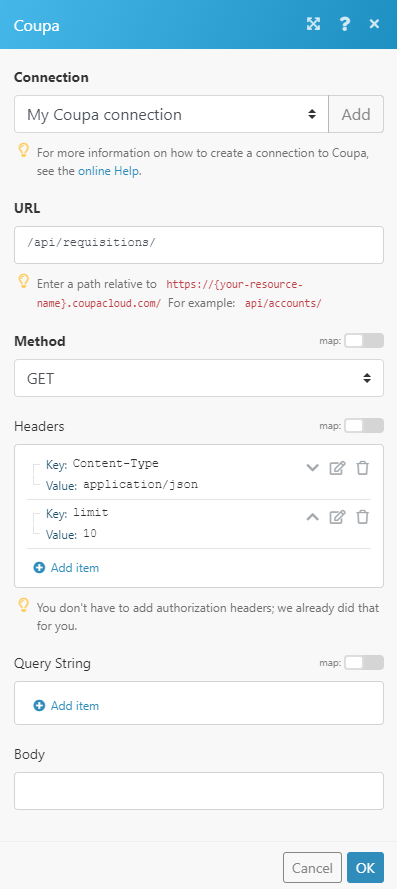
The result can be found in the module's Output under Bundle > Body.