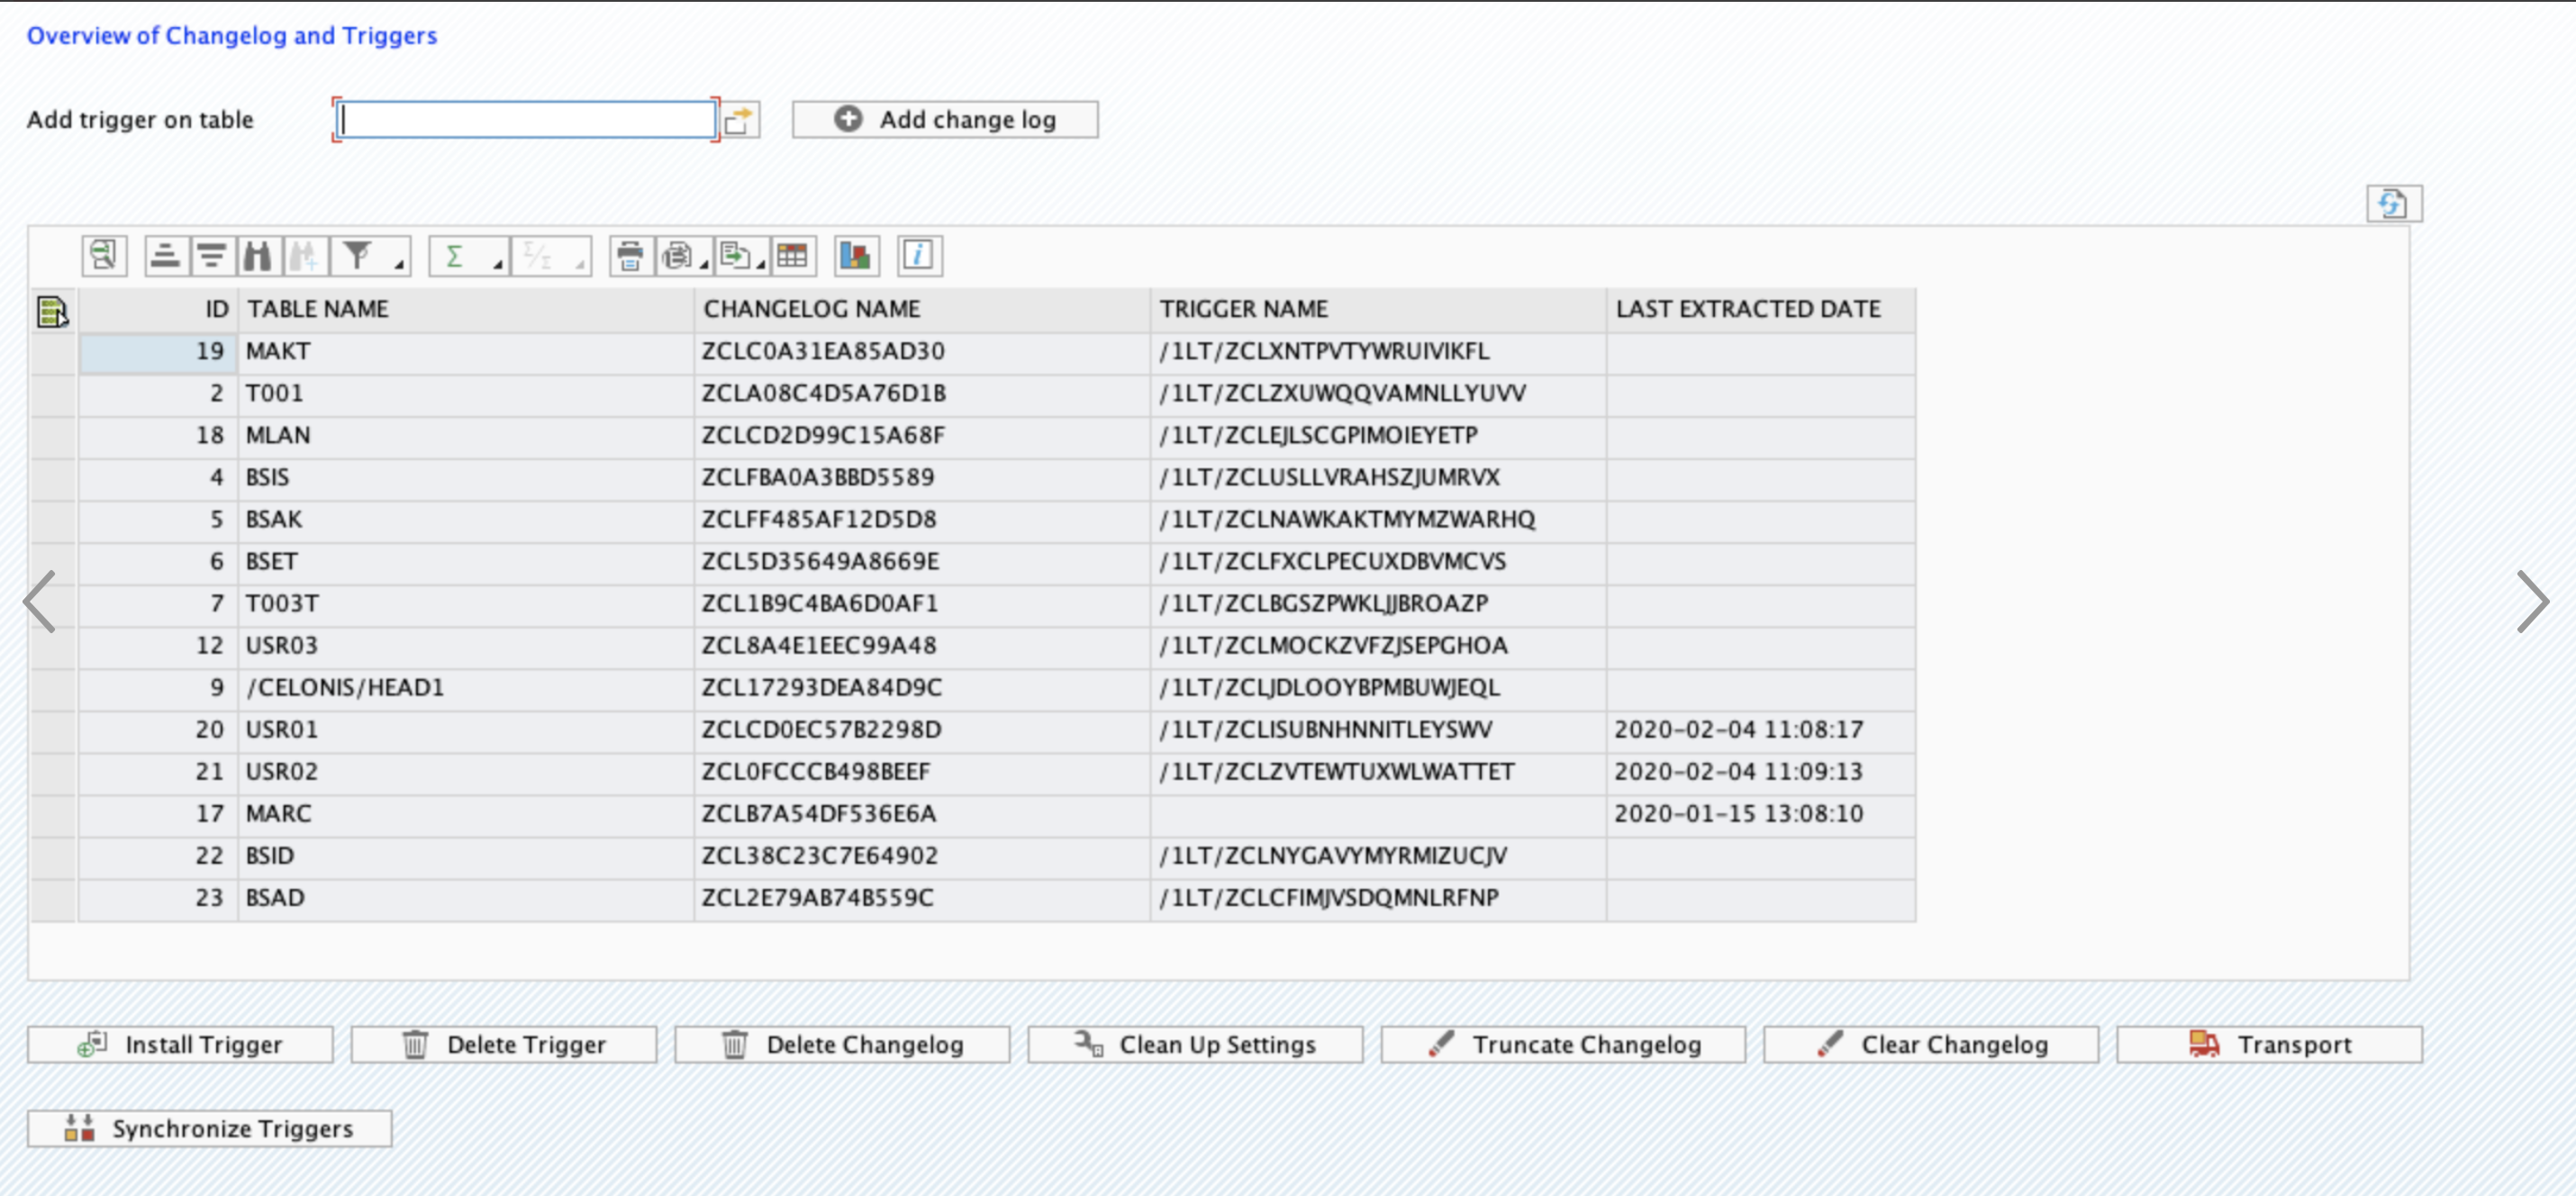
Setting up the Replication Cockpit
Learn how to configure the Replication Cockpit from start to finish to enable continuous, real-time data streaming from your SAP system into Celonis.
Ensure that you meet the system requirements and have completed your checklist:
With your system requirements met, the first step is to install and configure the Celonis Real-Time Extension directly in your SAP environment. This extension is available for Full Cloud and Hybrid (LYDIP) scenarios.
Before proceeding, confirm your underlying SAP database is supported. Real-time extraction relies on database triggers, which are currently supported for:
Oracle
DB2
MS SQL (2012 and higher)
SAP HANA
Sybase
The real-time extension requires you to install the core Celonis RFC Module and Extractor service in your SAP system.
If you have not yet installed these baseline components, you must perform a clean installation of the RFC Module and Extractor Service.
The Real-time extractor setup mainly includes the following two actions:
Create the Log tables to store the changes in SAP
Install triggers to monitor the changes in SAP
This step has been simplified by including the Change Logs of the standard templates (O2C, P2P, AR, AP) in the transports of the Celonis RFC Module. This means that the customer who are installing the RFC Extractor the first time, can easily activate the Change Log tables for the respective process with a minimal effort, as described below.
Note
If you're migrating from SAP ECC to S/4HANA, before setting up your log tables, be aware that many traditional ECC tables have been replaced by simplified tables in the S/4HANA data model.
For example:
MATDOCreplacesMSEG,MKPF, and other related inventory tables.ACDOCAreplacesBSEG,COEP, and other financial/controlling line item tables.
Before configuring log tables for replication, we recommend checking if you are targeting outdated ECC tables, and switching to the S/4HANA-native replacement. For more information, see the following SAP documentation:
The standard SAP landscape is comprised of 3 systems - DEV, QA and PROD. The Log tables can usually be created only in the DEV system, because the QA and PROD systems are locked for these kinds of changes.After the tables are added in DEV, they should be transported to QA and then to PRD via a transport. However, the triggers are not transportable, and should be installed in QA (for testing) and then subsequently in PRD (for productive use). The diagram below describes a typical setup process.
 |
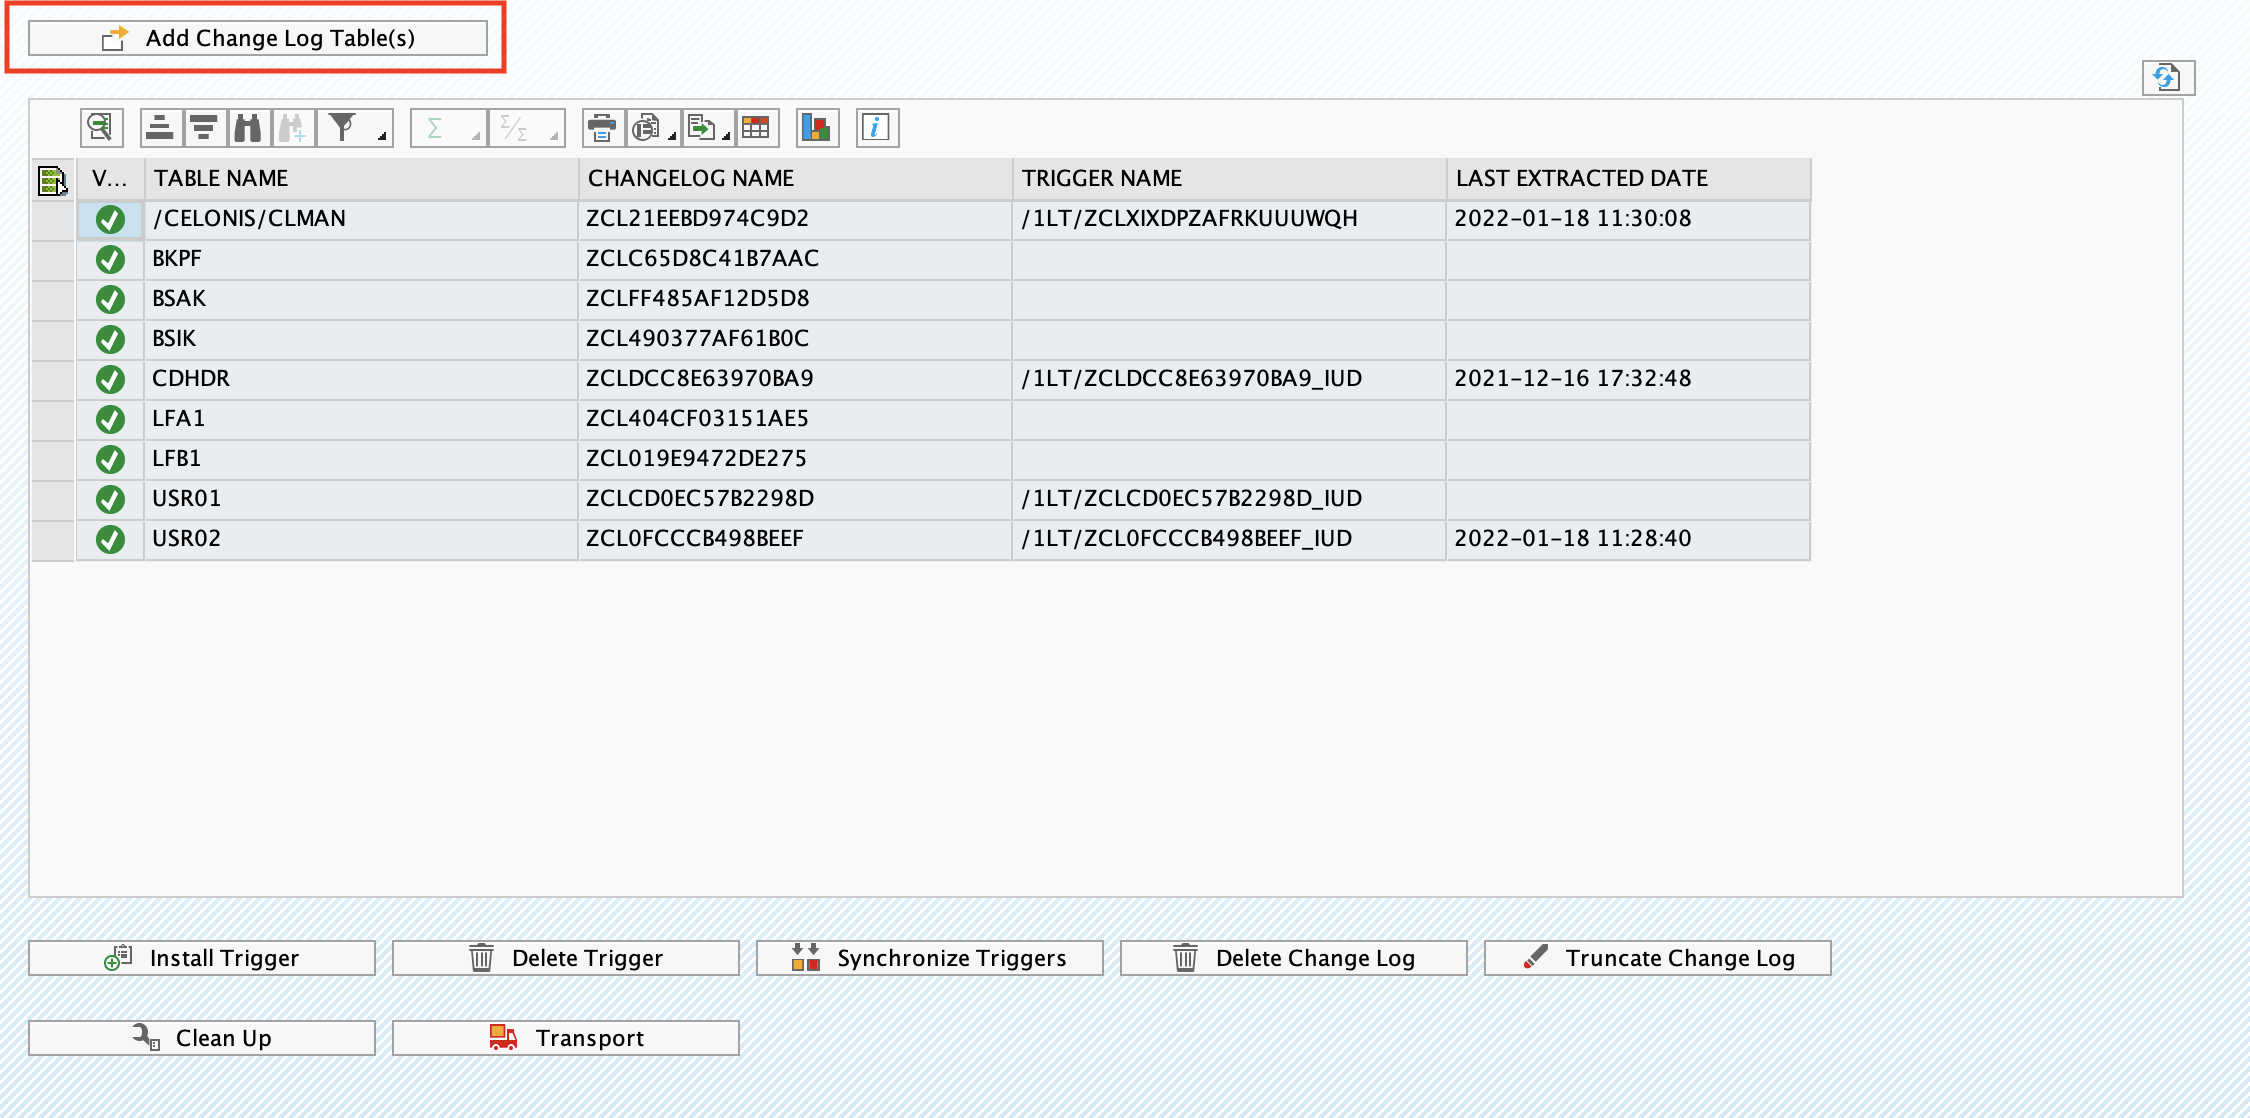
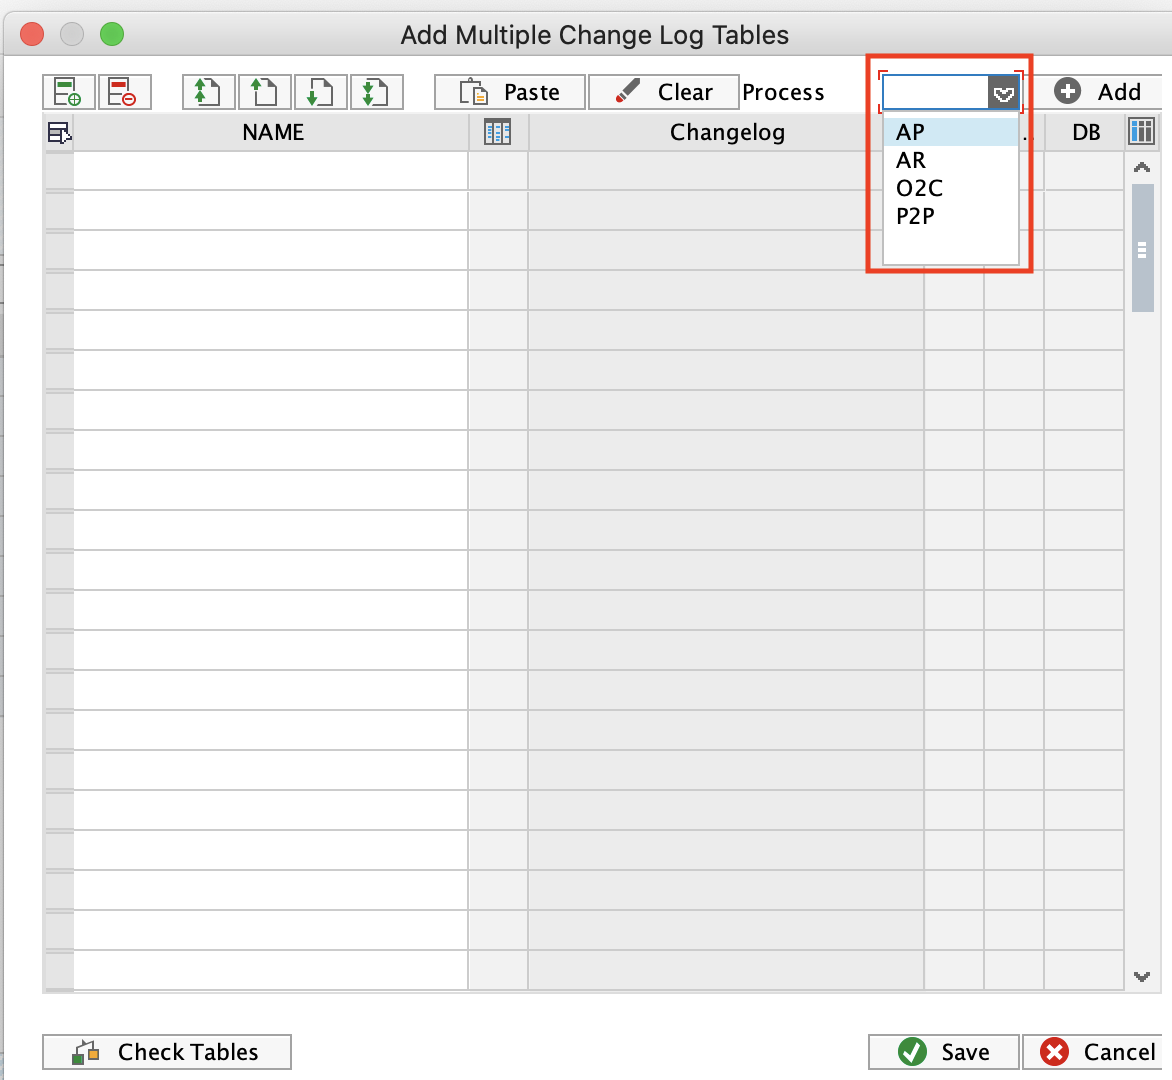
To add a Change Log table:
Log in into SAP and navigate to Transaction Code /CELONIS/CLMAN_UI.
Click the Add Change Log Tables button.
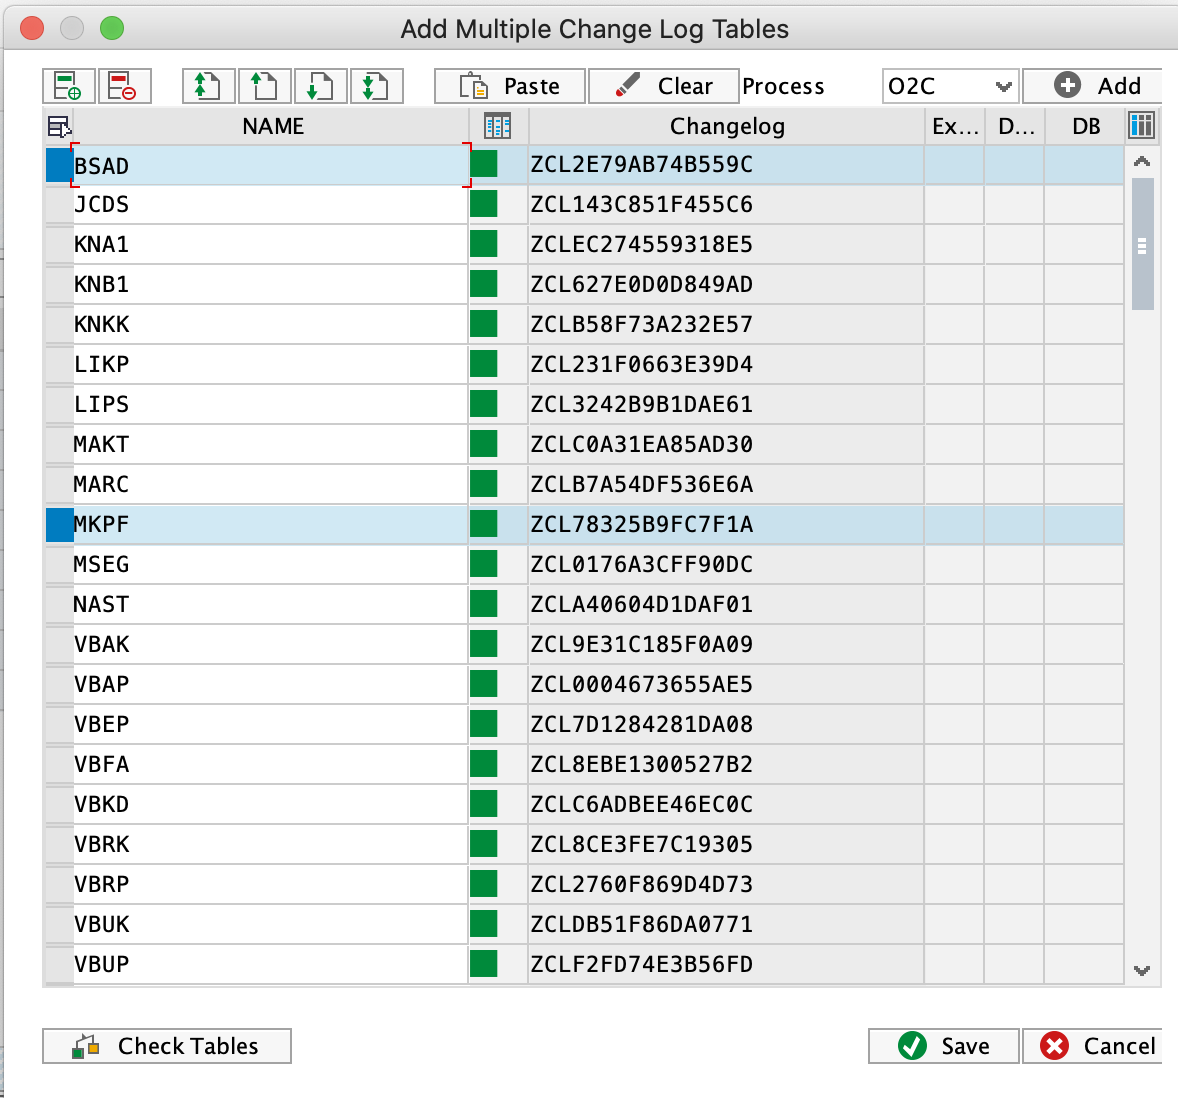
In the pop up select the process you want to activate. The respective tables will be populated in the screen.
Click Check Tables to dry run the creation process. If everything is green, click Save, and the Change Log tables will be added.
 |
 |
 |
After the tables are created, you will need to transport them to the next system as described inn the next section.
Required SAP rights to add log tables and triggers
The SAP User should have minimum the following rights to be able to create the tables and add triggers. However, usually this action is performed by SAP BASIS who has full admin rights.
To access /CELONIS/CLMAN_UI and install triggers
Object: S_TCODE
TCD: /CELONIS/CLMAN_UI
To create/delete Change Log tables
Object: S_DEVELOP
ACTVT: *
DEVCLASS: ZCELONISCL
OBJNAME: *
OBJTYPE: TABL
To streamline the transfer of CL tables from DEV to either of QAS or PRD, the T code /CELONIS/CLMAN_UI allows the user to generate a transport that carries forward the setup configurations to the next system in the landscape.
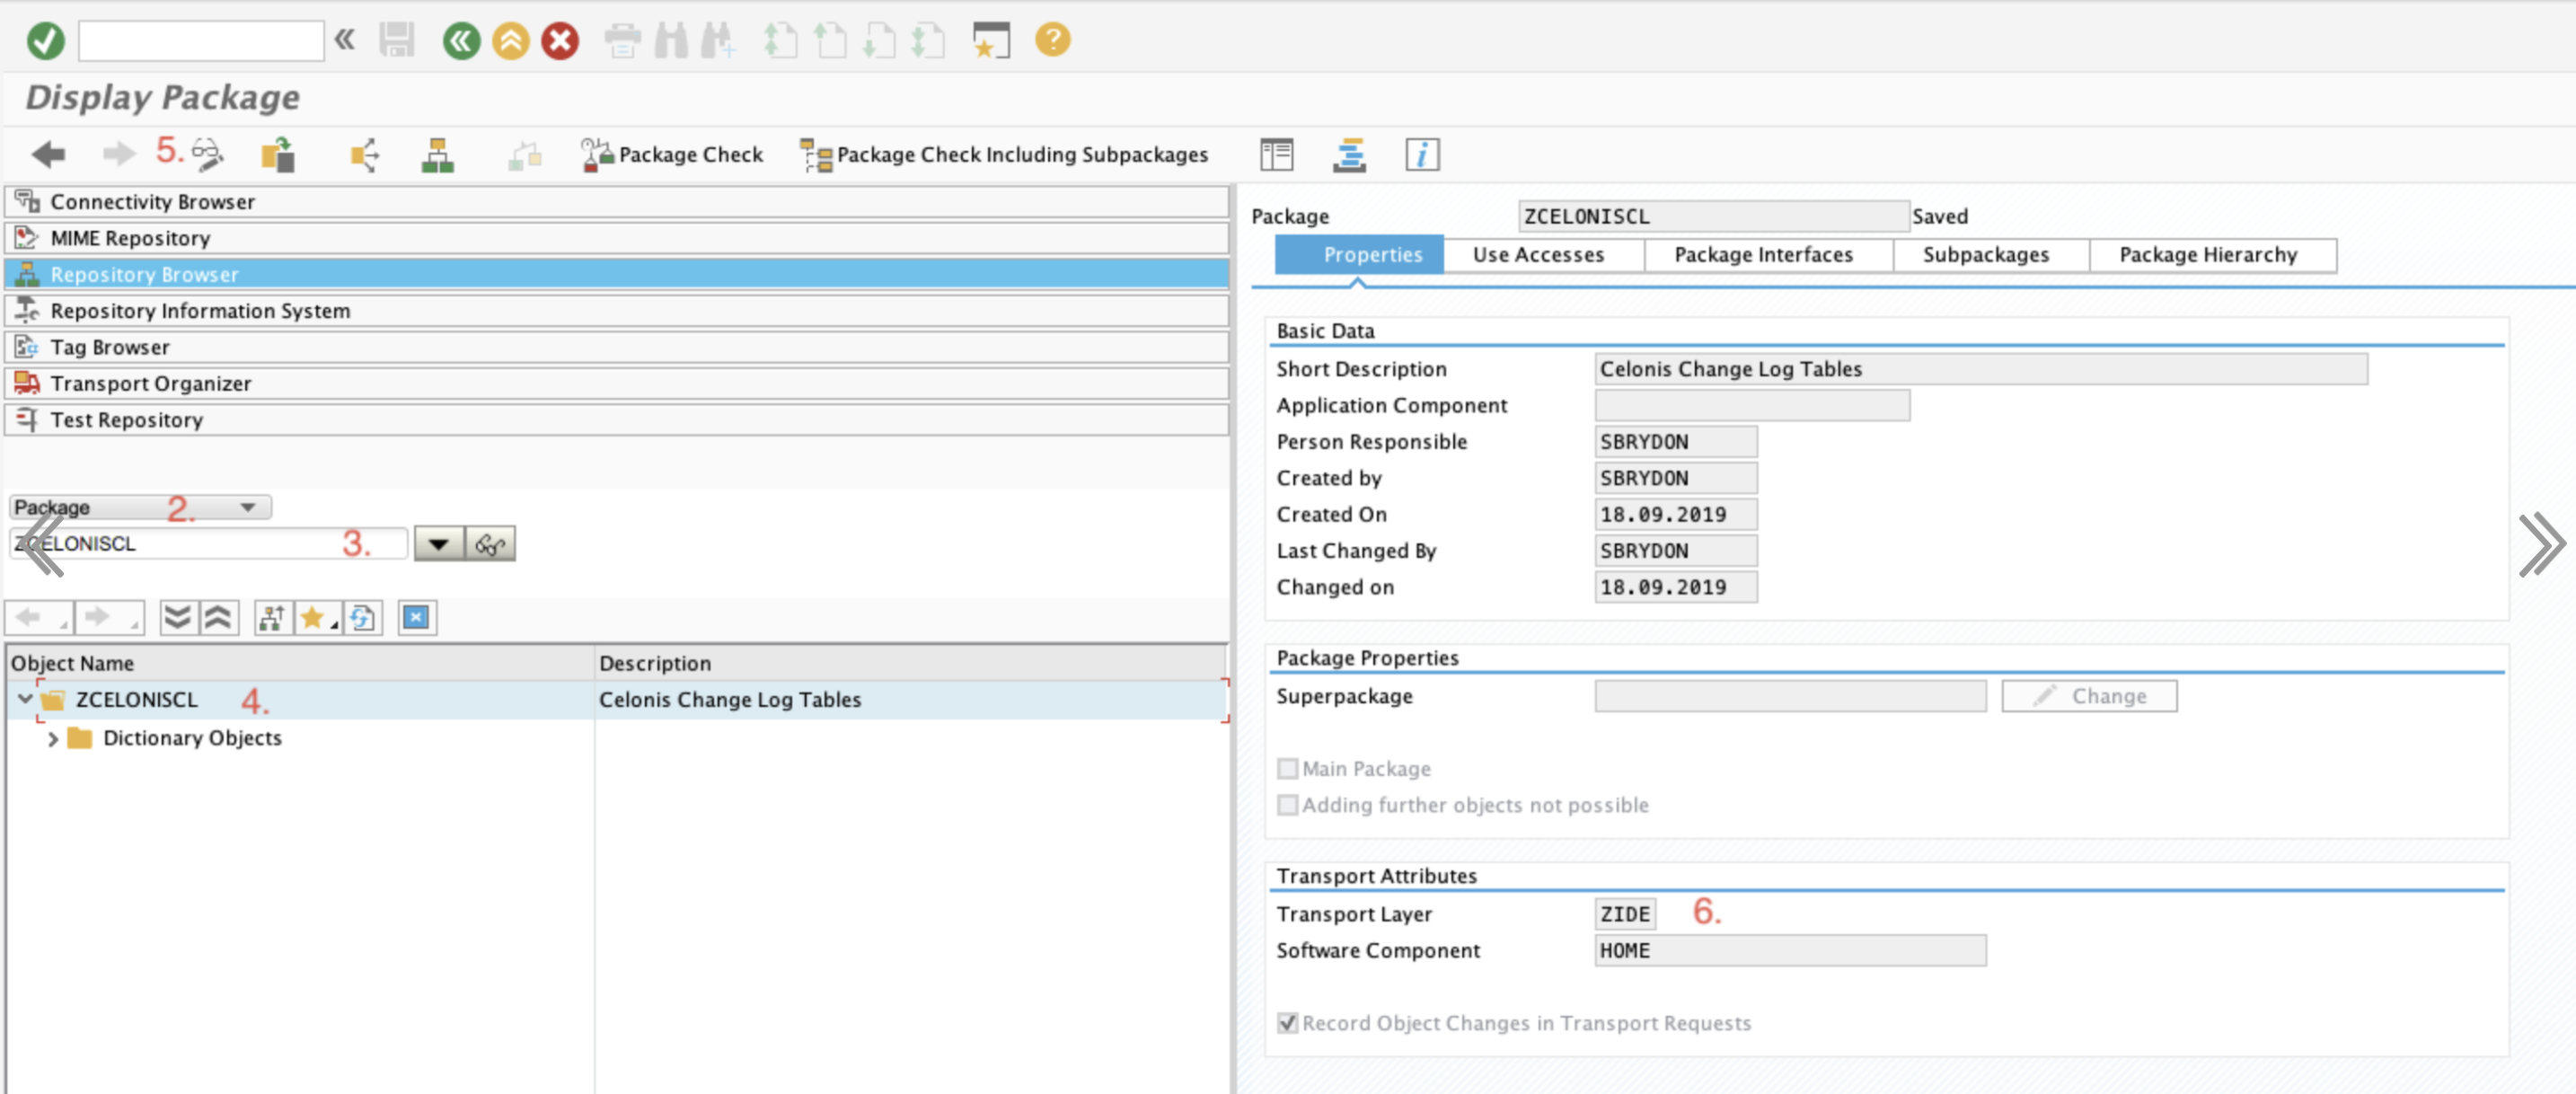
Before creating the transport in DEV, the SAP BASIS admin should change the Transport Layer of the package ZCELONISCL. Make sure to select a Layer that contains a Consolidation Route connecting DEV to QAS. This will ensure that the log tables can be assigned to a transportable request, and therefore, be pushed forward from DEV to QAS. To change the layer:
Call SE80 to open the Object Navigator.
In the object list selection, choose Package.
Enter ZCELONISCL and choose Display.
Double-click the name of the package.
Switch to edit mode.
Select a Transport Layer that contains a Consolidation Route connecting DEV to QAS.
 |
Tip
After saving the Transport Layer change, you may be prompted to transport that modification too. However, this change is not needed in QA/PRD so you don't need to transport it.
After performing the steps above, create a transport request for the Change Log tables:
Call the transaction code /CELONIS/CLMAN_UI
Select the Change Log tables that you want to transport forward and click Transport.
You will be prompted to select or create a transport.
The selected tables will be added to the transport request, which you can release to the next system.
A trigger should be installed to track the changes in the source tables, and capture them in the respective Change Logs. To do that:
Log in into SAP and navigate to Transaction Code /CELONIS/CLMAN_UI.
Find the table(s) in the grid (check this section for the steps on how to add a table).
Click Install Trigger.
After the trigger is installed successfully, its name will be displayed in the “Trigger Name” column.
After these steps are completed successfully, the Delta Extractions for the specified tables will be executed in real time mode. The date and time of latest successful execution will be displayed in the column “Last Extracted Date”.
 |
Warning
Triggers cannot be transported. They should be installed in QA (for testing) and then subsequently in PRD (for productive use).
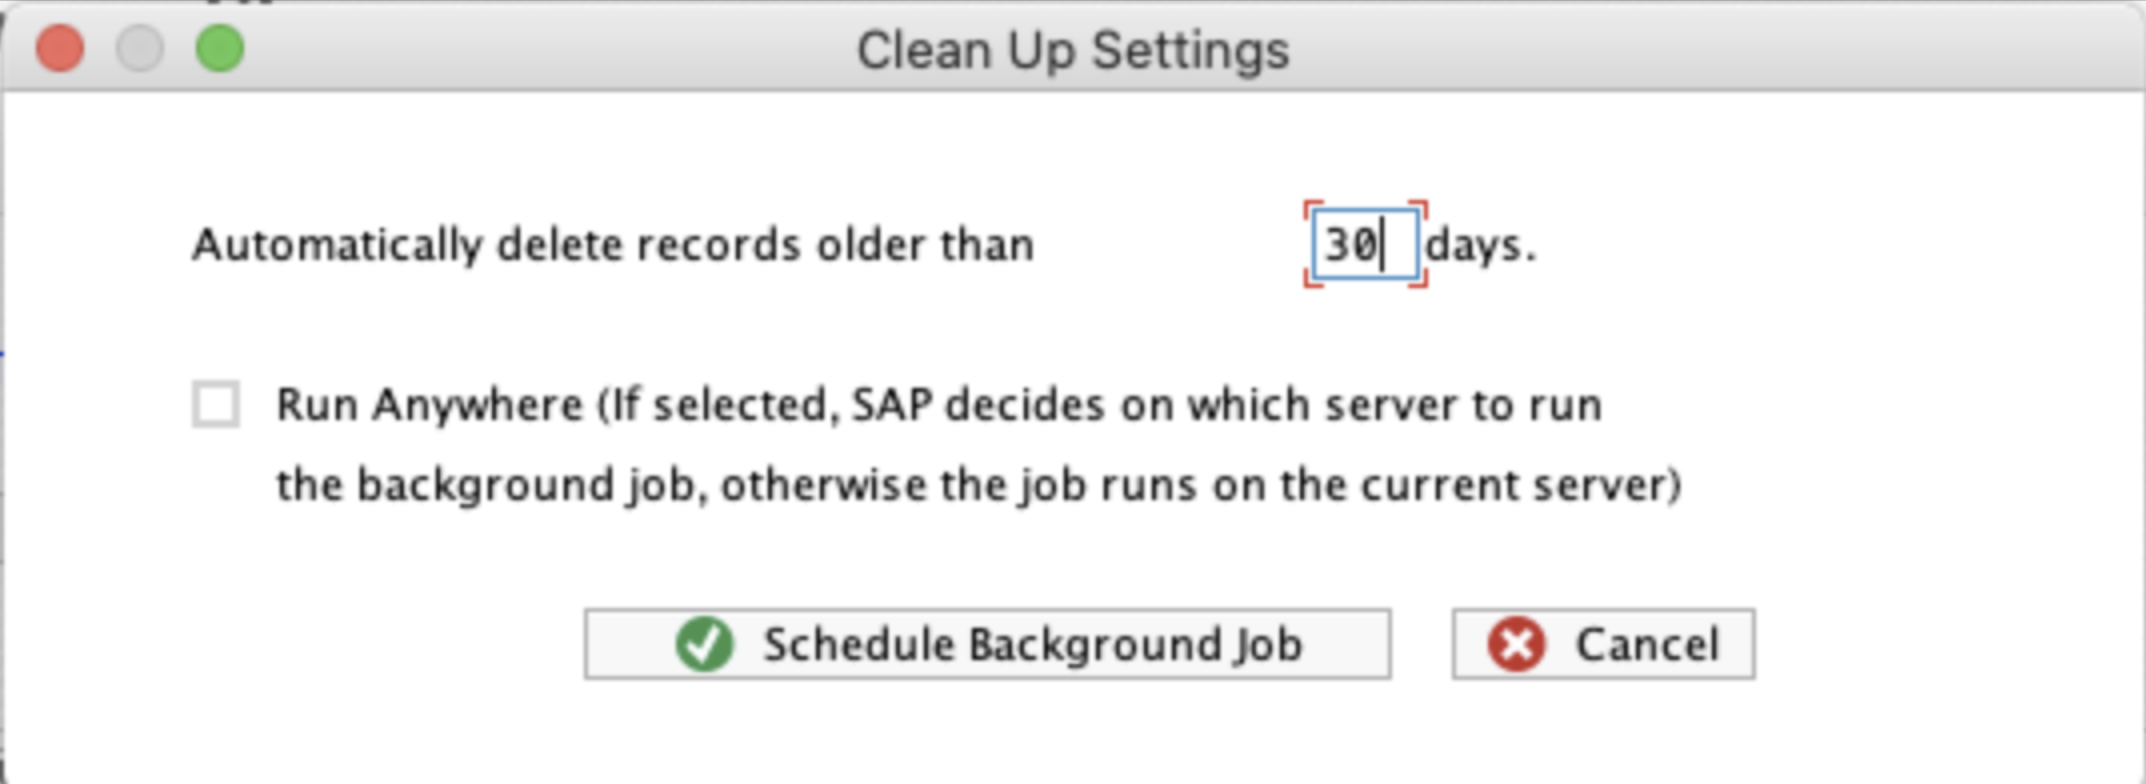
In the CL Management UI you can set up a recurring background job in SAP which will run on a daily basis and clean up the records from the Log tables.
To setup the job click the Clean Up Settings button.

A dialogue will pop up where you should define:
Number of days to keep records also called the retention period. All records older than the specified date will be removed from the log tables. The retention period value is displayed above the change view. If the value is "N/D", it means that that there is no background job configured.
Where to run the background job. If the "Run Anywhere" option is selected, SAP system will decide on which server to execute the job. Otherwise, the job will be run on the same server where the settings have been defined.
 |
Warning
The clean up background job is an important element to control the size of the Log tables. It prevents the tables from growing in case they are not being extracted.
In some scenarios you may need to add new tables to an existing setup or remove unnecessary on
In this scenario the goal is to remove tables from the production environment. The process involves two steps: remove the triggers and delete the change log tables.
The triggers are not DDIC objects, so you won't need to open the client for these changes. They can be removed directly in the production system using the /CELONIS/CLMAN_UI transaction code.
Once the triggers have been removed, you will also need to remove the change log tables. This step should NEVER be done directly in the production system. The tables need to be manually deleted in your development server and assigned to a transport. This transport will then be moved on towards production to remove the tables from that server as well.
Warning
Make sure that the development system is an exact copy of the production system. If you want to remove the change log tables X, Y and Z from production, then you need to have the exact same tables in the development system so that you can delete them from the development sever first.
Note
You will need a developer key to perform the deletion. This is a standard SAP rule and cannot be skipped.
Name the transaction code
/CELONIS/CLMAN_UI.Select the change log tables that you want to delete and then click Delete Change Log.
You will be prompted to select or create a transport. The deleted tables will be added to the transport request, which you can release to the next system.
Once the transport is moved to production, the change logs will be removed from the production server. You can verify that they have been deleted by opening the
/CELONIS/CLMAN_UIscreen.
Now that the SAP extension is active, you must configure the receiving end of the pipeline in the Celonis platform.
In this step, you will create a Data Connection within your chosen Data Pool, authenticate it, and add the tables or views you intend to stream.
In the Celonis Platform, go to Data Integration.
Select your target Data Pool.
Click Data Connections in the left-hand menu, then click Add Data Connection.
Select SAP ECC or SAP S/4HANA (on-prem + private cloud).
Enter your SAP system details (System ID, Client, RFC User credentials configured in Step 1, and routing via your Extractor).
Critical: In the connection configuration, you must locate and toggle on the switch for Enable Real-Time Extractions. Without this, the Replication Cockpit will not be available for this connection.
Click Save and test the connection.
Once the connection is saved, you need to add the SAP tables you want to replicate. You can do this by activating a pre-built process template, or by adding tables manually.
Navigate to the Replication Cockpit tab inside your Data Pool.
Select your newly created SAP Data Connection.
Click Add Table and search for the required tables (e.g.,
EKKO,BKPF).
Warning
You should ONLY add tables for which you have already generated Change Logs and activated triggers in SAP (done via /CELONIS/CLMAN_UI in Step 1). If you add a table without a trigger, the platform will display a warning. (Note: CDPOS and CDHDR are exceptions, but we strongly recommend creating change logs for them regardless).
If you are using Extractor v3.10.0+ and RFC Module v3.1.4+, you can also replicate Views from the SAP ABAP dictionary (e.g., CDS and Database views without parameters).
Because you cannot install a trigger directly on a View, you must map it to an underlying table:
Add the View using the Add Table button.
Enable the Override Changelog table switch.
Select the underlying SAP table that the View is based on. (This table must already have a trigger and Change Log set up in SAP). The Replication Cockpit will monitor the underlying table's Change Log to identify deltas in your View.
After adding your tables or views, you can click on them to define specific extraction configurations before initializing:
Select/deselect columns: Exclude fields you do not need in Celonis.
Pseudonymize columns: Mask sensitive PII/financial data.
Override target table name: Change the name of the table as it will appear in the Celonis Data Pool.
Apply a filter statement: Restrict the records being extracted based on specific criteria.
Define an Initialization Join: Define a join that will only be applied during the initial Full Load (Initialization), not during the continuous delta replication.
With the pipeline connected and your tables added, it is time to start moving data. Because the Replication Cockpit relies on incremental updates (deltas), you must first establish a baseline in the Celonis Data Pool.
After you have configured a table in the Replication Cockpit, you have two primary actions:
Initialize a table: Executes a Full Load of your table (this includes applying any
Initialization Joinyou defined in the previous step). After a successful Initialization, the continuous replication will automatically start.Replicate a table: Executes a Delta Load of your table.
Execution Conflicts
Make sure to remove any tables you have added to the Replication Cockpit from your existing Delta Data Jobs. There must be no conflict between the Replication Cockpit and traditional Data Jobs. The same table cannot be replicated via the Replication Cockpit and delta-loaded via a Data Job concurrently. Otherwise, execution conflicts will occur when both tools attempt to write data to the same Celonis table at the same time.
You can perform an initialization on a table-by-table basis, or in bulk across your entire connection.
Option A: Table Level (Individual)
In the Replication Cockpit tab, locate the specific table you want to sync in the list.
Click the three-dot menu (More Options) next to the table and select Initialize.
Wait for the status to change to
Initialized. Once initialized, the Replication status will automatically switch toActive.
Option B: Connection Level (Bulk)
In the Replication Cockpit tab, ensure your desired SAP Data Connection is selected.
Use the top-level connection controls to execute a bulk initialization for all newly added tables simultaneously.
By default, the Replication Cockpit runs continuously. However, enterprise environments require controlled resource management. The Replication Calendar allows you to define the operational parameters of your real-time extractions.
Using the calendar, you can set limits on how many concurrent extractions can run at once (to protect your SAP system's performance) and schedule maintenance windows. If you still use traditional Delta Data Jobs for certain tables, you must use the calendar to pause real-time replications during those jobs to prevent data conflicts.
In your Data Pool, navigate to the Replication Cockpit.
Click on the Calendar tab.
Here, you will see a weekly schedule view where you can define operational blocks for your active connections.
To ensure the real-time push does not overload your SAP system's dialog or background work processes, you must limit concurrent extractions.
Click Add Block or highlight a specific time range directly on the calendar interface.
In the configuration panel, set the Max Concurrent Extractions limit.
Best Practice: Work with your SAP Basis team to determine a safe limit for extraction threads. A common baseline is 3 to 5 concurrent extractions during business hours, which can be increased during off-hours.
Save the block.
If you run legacy batch Data Jobs overnight (e.g., from 1:00 AM to 3:00 AM) that touch the same underlying SAP tables, you must create a "blackout window" to pause the Replication Cockpit.
Click Add Block and select the specific timeframe for your scheduled Data Jobs.
Set the extraction limit to 0.
Click Save.
Note
What happens during downtime? Any changes made in SAP during a blackout window will safely queue up in the SAP change log tables. Once the blackout window ends, the Replication Cockpit will automatically resume and process the queued delta records.