Creating an HTML table from a Celonis Query Data output
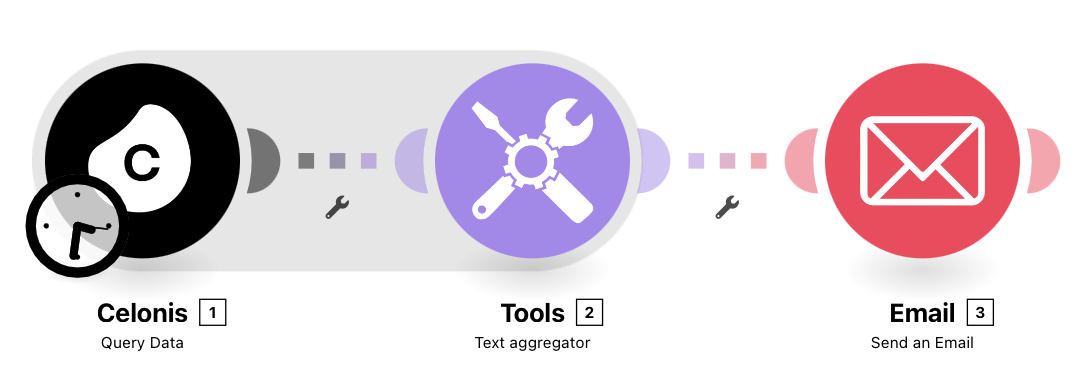
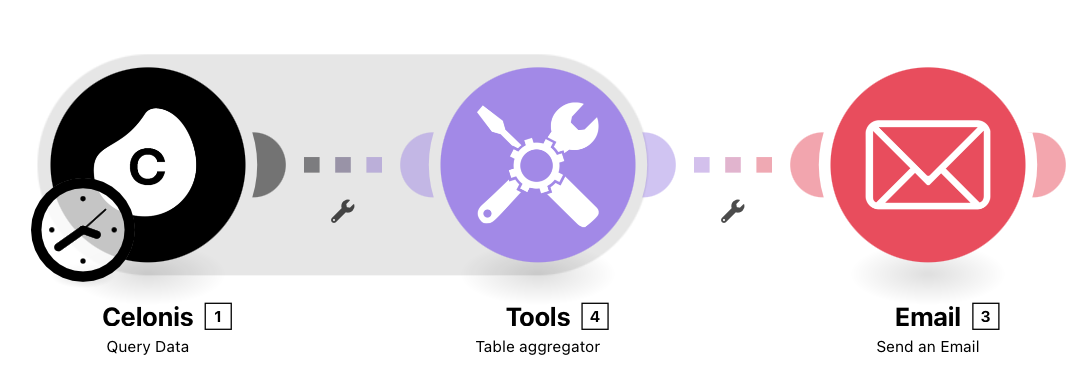
Use this solution to transform row-by-row Celonis query outputs into aggregated HTML tables. The documentation covers two methods: the Text Aggregator for date formatting and the Table Aggregator for high-column scalability. Both methods conclude with an Email module that wraps the aggregated data in a standard HTML <table> structure.
This section illustrates two primary methods for converting Celonis Query Data into a professional email report. Both workflows follow a three-stage logic: Extraction, Aggregation, and Delivery.
This approach is best when you need to apply custom logic or formatting to specific data fields during the aggregation process. | This approach is optimized for speed and simplicity when dealing with large datasets or high column counts. | ||
|
|
Below you will find the step-by-step guide for configuring each module of the above Action Flow.
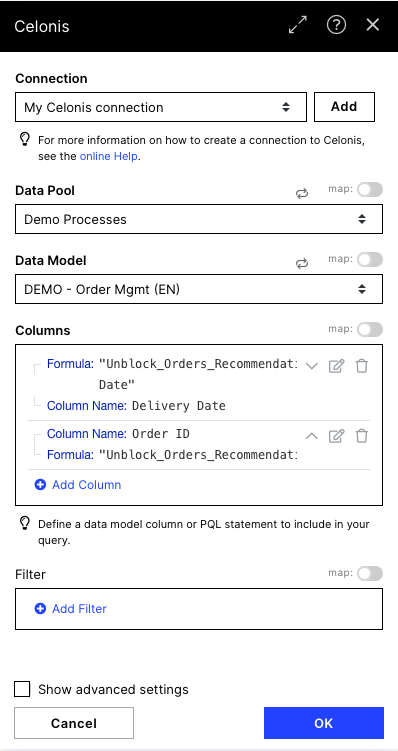
To get the data you want to use in the HTML Table, you must set up the Celonis Query Data Model. All information on how to do it can be found here. We use some Demo Data here, for example, getting Order IDs and the corresponding delivery dates.
 |
Configuration:
Action Flows Module: Celonis
Action: Query Data
 |
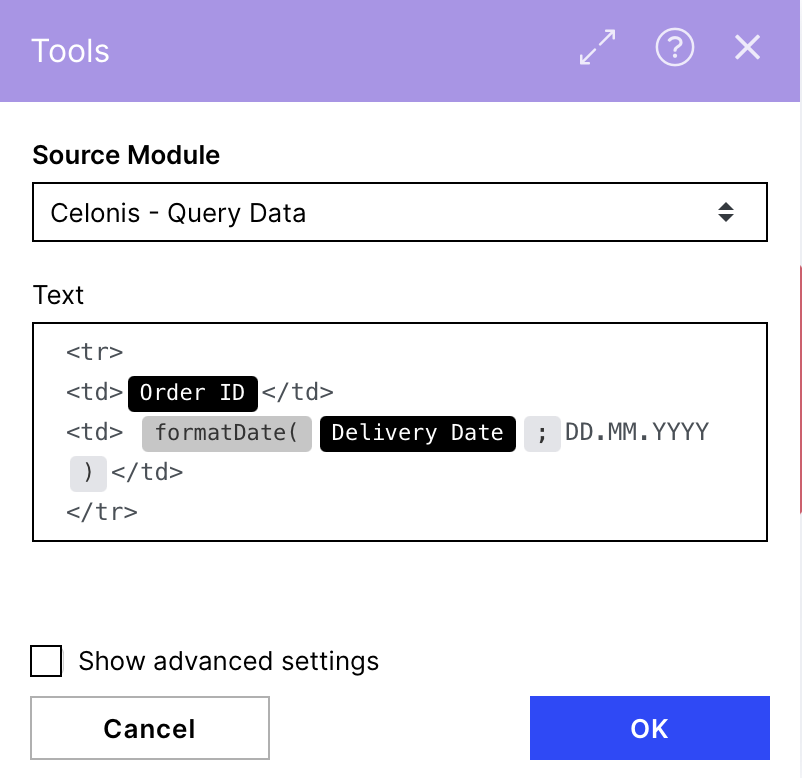
The Celonis Query Data Model outputs the data row by row, so to use that data for an HTML table, we have to aggregate it. We use the Text aggregator to concatenate the data.
Configuration: Action Flows Module: Tools Action: Text Aggregator The screenshot below shows how this module has been configured with our demo data.
To build up an HTML table, you have to define a structure with table rows (<tr>) and table cells (<td>) which will later be included in a table structure to get the right format. Here you have the chance to format dates as we show them with the Delivery Dates. Add for each column you want to have in your resulting table the structure <td> data of the column </td> Text: <tr> <td>{{1.`Order ID`}}</td> <td> {{formatDate(1.`Delivery Date`; "DD.MM.YYYY")}}</td> </tr> | The Celonis Query Data Model outputs the data row by row, so to use that data for an HTML table, we have to aggregate it. We use the Table aggregator to concatenate the data.
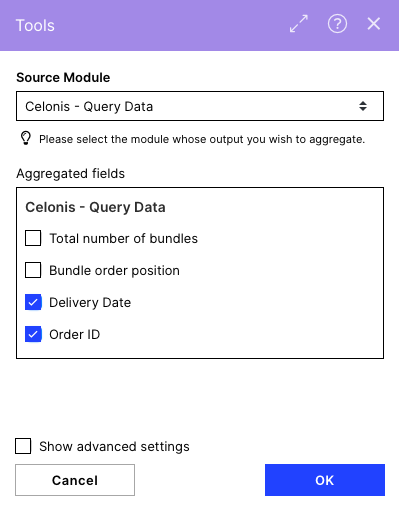
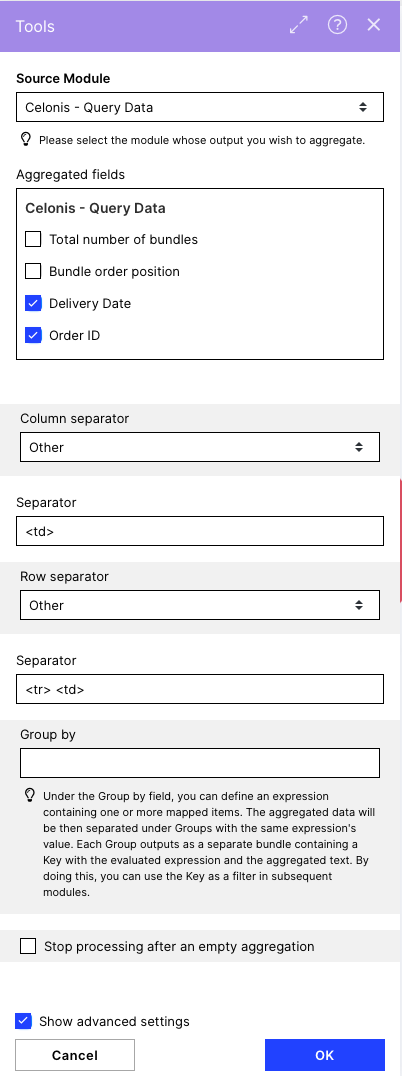
Configuration: Action Flows Module: Tools Action: Table Aggregator The screenshots below show how this module has been configured with our demo data.
Choose all columns you want to include in your HTML table in the 'Aggregated Items' section. Column Separator:Other Separator: <td> Row Separator:Other Separator: <tr> <td> Note The output of the Table aggregator is the same as if we use the Text aggregator, so it is concatenated Text including HTML tags but not an HTML table yet. The table will be built using that text in the Email module in the next step. |

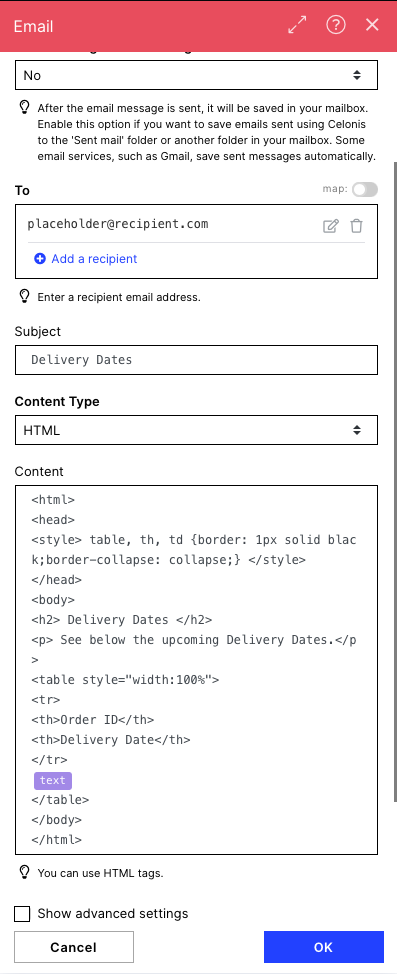
We use the Send an Email module to wrap the constructed HTML code in a table and send it via mail.
 |
Configuration:
Action Flows Module: Email
Action: Send an Email
The screenshot on the right shows how this module has been configured with our demo data.
To: You can choose a recipient of your choice
Subject: Define the subject of the mail
Content Type: HTML
Content: here, we will build the table. The content section is divided into the styling HTML code and the HTML code building up the table.
In the styling HTML code, you can change:
the heading of the mail (text in between the <h2> tags)
text you want to add in the mail (text in between the <p>tags).
In the table HTML code you have to:
add the 'text' item of the Table/Text aggregator at the right place (as shown in the screenshot) to make the table look right.
adapt the table headers to your needs (see info box below)
HTML code:
<html>
<head>
<style> table, th, td {border: 1px solid black;border-collapse: collapse;} </style>
</head>
<body>
<h2> Delivery Dates </h2>
<p> See below the upcoming Delivery Dates.</p>
<table style="width:100%">
<tr>
<th>Order ID</th>
<th>Delivery Date</th>
</tr>
{{2.text}}
</table>
</body>
</html>
Table Header
The tag <th> stands for a table header, so you need to replace the Text marked in red with the table headers you would like to have in the table/columns. IMPORTANT: you have to put them in the same order you used in the Table/Text Aggregator to ensure the right table header is in the right column.
Spaces
Be careful with using spaces between or after the tags, which can cause problems like adding empty columns or rows. New lines shouldn't cause problems.
 |
HTML Table Styling
If you want to customize the HTML Table but haven't got experience with HTML, you can use this website to style a table in a visual editor, which provides you with the HTML code. You can adjust or replace different snippet tags to style your table.