Open Order Processing Getting Started Guide
With Business Applications it is easier to deliver insights into your processes and drive actions that resolve inefficiencies and increase efficiency. The whole installation process for Open Order Processing takes just a few steps if you have your SAP ECC Order-to-Cash Data Model already installed.
Notice
To learn more about setting up the Open Order Processing app, please take a look at the technical enablement in the academy. Alternatively, this page guides you through all the steps.
Follow these steps in the video to get your Open Order Processing application running. You can also review the steps in detail after the video.
Search for the App on the Marketplace: Enter “Open Order Processing” in the search bar to locate the app. Open the App and then click the “Request Access” or “Install” button to begin the installation.
Choose a Space: During the initial installation of the App from the Marketplace, you can either create a new “Space” into which the App is downloaded (e.g. Order Management) or use a pre-existing space. Click “Confirm” to proceed.
This process guides you through the preparation of the Data Model. In addition, the first tab of the “Setup and Validation” view (General App Setup) within the app helps you to identify any missing data requirements.
Connect Data Model: After downloading the application you must assign a data model to the package. In the package settings, your data model must be assigned to the variable 'sap-ecc-order-to-cash-data-model'.
To use the Open Order Processing application, an SAP ECC Order-to-Cash data model must be in place. Please use this flow chart to find out if you still need to take action or if you can proceed.
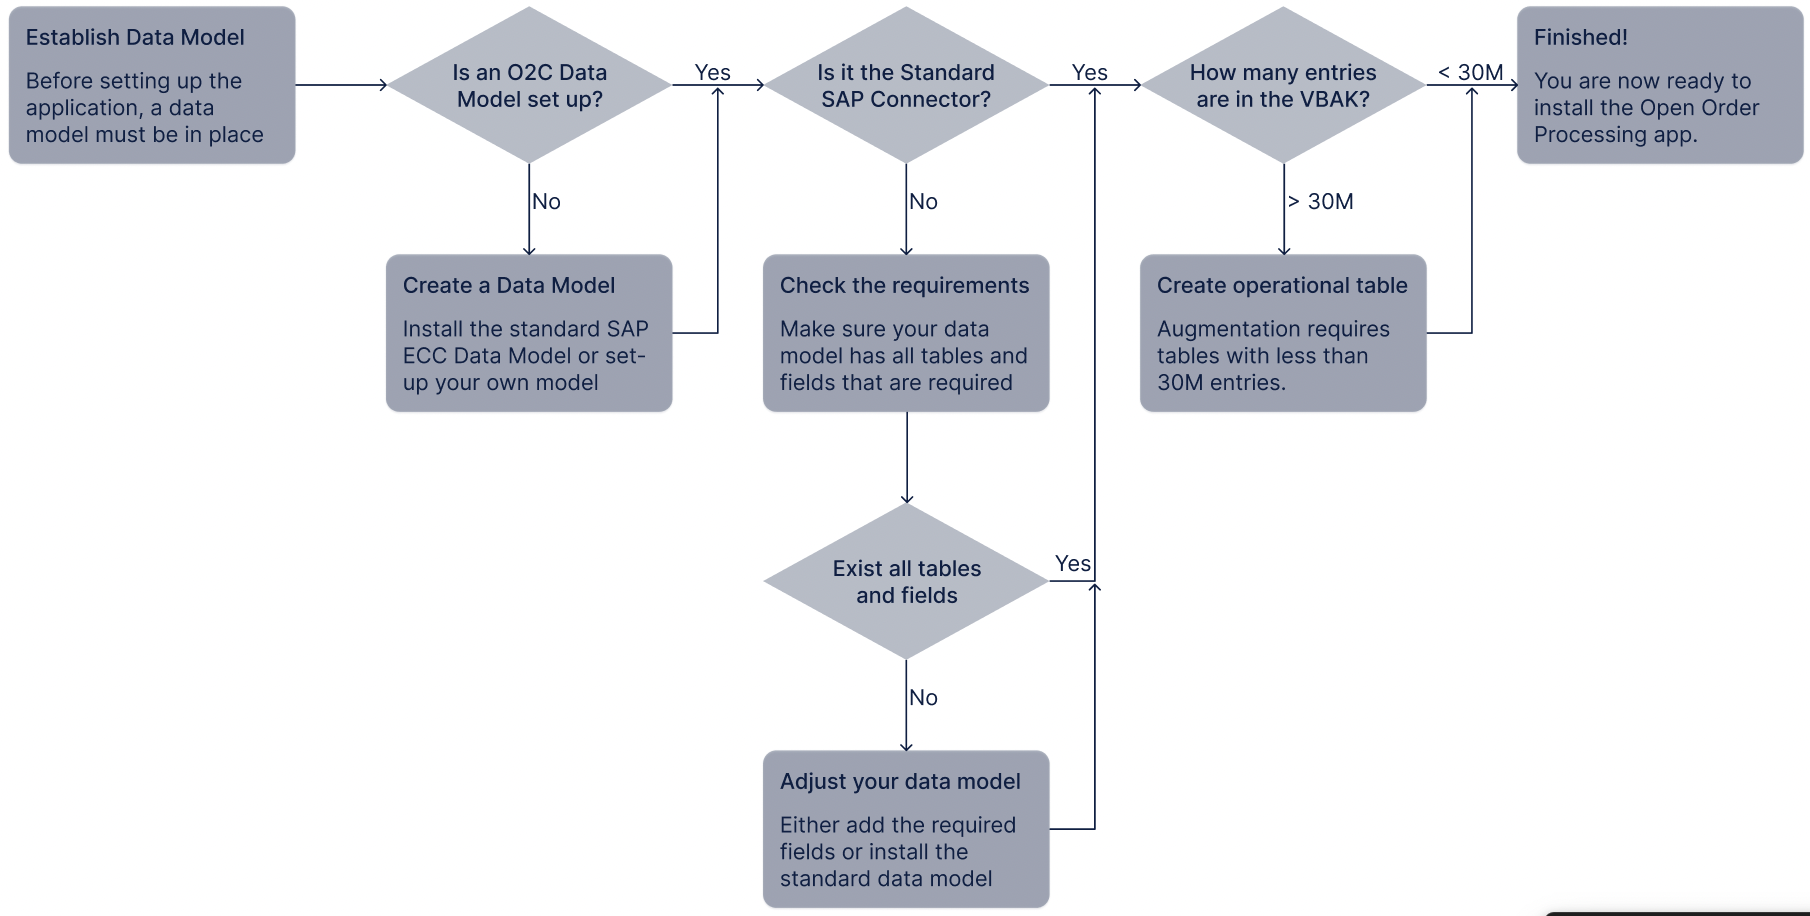
If you have no data model in place you can either create a custom one or install the SAP ECC connector for the O2C process. We would recommend this second option. For more information on this step, see Using process connector templates.
To enable augmentation of the order status and tasks, the VBAK is limited to 30M entries. If your data model exceeds this, please create an operational data model. This is explained in the Add-Ons Guide for Data Engineers in the section for a fast-loading data model.
Enter Knowledge Model Key: To ensure correct mapping of task augmentation for inefficiencies, the knowledge model key must be maintained in the knowledge model. Copy the knowledge model key and paste it into the VARIABLE_KNOWLEDGE_MODEL_KEY.
Publish the App: You can now publish the app which triggers the creation of inefficiency tasks and enables access for users in Celonis Apps.
After the first adjustments, it is still possible that there are some errors shown. Therefore, it is necessary to validate certain variables and KPIs. Please continue with the Configuration and Validation this should resolve all errors. For further explanations of the Knowledge Model and Views, and how to customize certain parts, please review the separate sections.
The validation of certain variables in the Knowledge Model is obligatory to ensure the correct mapping and calculation of dates and inefficiencies.
In the Setup and Validation View of the app you will find the tab.
Settings & Validation will guide you through the process of adjusting key parameters and validating important concepts of the app. It includes the following parts:
General Settings (e.g. activity names)
Open Order Definition
Order Due Date
Order Status Fields
Inefficiencies
Prioritization
The actions used in this section are predefined and included with the Order Management Execution App. To get started with extending these or building custom actions, see:
Add actions from the SAP Automation Package
Add actions using Action Flows
Add actions using Before you begin
Validation - Update Order Status
Select an order in the table.
Click Update Order Status.
Add a custom comment or note in the Order Status field.
Click Execute.
Check the comment displays for the order in the Order Status column.
Validation - Create Task
Select an order in the table.
Click Create New Task To User.
Add your colleague's email address in the Assignee field.
Click Execute.
Check the newly-created task displays when clicking on the KPI tile "Orders with Tasks".
Validation - Send Email
Select an order with an open task.
Click Send Email.
Check if the pre-populated email opens in your mail client.
After finishing the basic validation, you may have found some views, filters or KPIs that do not completely match your business needs. All parts of the App can be fully customized.
We recommend doing the technical enablement that guides through some customization examples.
Notice
If you have any questions, feedback or suggestions, get in touch with Celonis support.