Loading data permissions from permission tables
You can set data permissions by applying permission tables within your data pool. This approach provides scalable management and allows Data Model Managers to define permissions for large volumes of users, tables, and columns simultaneously.
Note
For granular, UI-based management of individual user assignments, you can manually configure permissions directly in your data pool. For more information, see Setting data permissions manually for users and groups.
This page provides best practices and the steps for managing permission tables.
Review the following configuration standards and data constraints to ensure your permission tables function as intended and remain secure.
If a user is a member of two groups, the higher permission level will apply to both groups. This means when applying manual permissions for a user, the manually granted permissions could supersede a user's overall Celonis Platform permissions.
For example, if a user has limited access to one group and is then given unlimited access to a second group, they will then automatically have unlimited access to both groups.
To set up data permissions involving multiple values or multiple table columns, see: Understanding data permissions.
When defining permissions across tables with a 1:N (One-to-Many) relationship, such as Orders (Parent) to Order Items (Child), it is highly recommended to apply the primary permission to the Parent table.
If you apply a permission strictly to a Child table:
The system filters out any rows that do not have a matching entry in the permission table.
If a Parent object has no corresponding Child entries, the Parent object may become invisible in Studio views.
Rows without a join partner are automatically removed when the permission filter cannot find a match.
To ensure Parent objects remain visible even when they have no associated Child entries, always apply the primary permission to the Parent table.
To ensure accurate filtering and data processing, permission tables must adhere to the following data type and value constraints.
When using permission tables, all inputted values are interpreted as STRING data types when the permission table is applied. This means existing table configurations are ignored for permission table columns; all data within these columns is automatically cast to STRING during the filter application process.
To ensure your permission table data is interpreted as you intended, we suggest formatting all columns intended for permission filtering as strings in your source file prior to upload.
NULL values are automatically skipped when the data model is loaded. This means when your data is loaded, users will not be able to see any row or values for columns with NULL values. When columns do not contain a value, it is critical that you do not use NULL values in either your data model or the Reference values in your permission table.
For values that are NULL , use '' (empty string) to represent them. Ensure you use '' (empty string) both in your data and your permission table.
Note
You can identify NULL values in your data model by checking for warning messages during a data model load.
There are two types of permission tables: value assignment tables and unlimited assignment tables. Value assignment tables allow granular permission control based on specific table, column, and value assignment. Unlimited assignment tables allow unlimited access to the data model.
Note
You can create and upload as many tables of both types as you need for your data pool.
When creating a value assignment permission table, include the following information:
Important
When your permission table is uploaded, existing table configurations are ignored, and all values are interpreted as STRING data types. For more information, see STRING data type requirement.
Reference user: A column in the permission table with user emails or the group names to be assigned permissions. Each entry must be on a separate row.
Note
You can only have either users or groups in a single permission table. If you need to configure permissions for both users and groups, create separate tables for each.
Reference table: A column in the permission table that lists the data tables you want to assign permissions for. When specifying a data table name in the permission table, choose either the real table name of the data table in the data model or the alias displayed in the data model graph. You can see the table name by selecting the Options (⋮) menu next to the alias name in the data model graph.
Reference column: A column in the permission table that lists the columns in the Reference tables you want to grant users access to.
Reference value: A column in the permission table that lists the values within Referenced columns you want to grant users access to see. The Reference value must be the same as the data type for the column in the data model that you're comparing it to.
Important
NULLvalues are not processed within the permission table. If a Reference Value is represented asNULL, the corresponding records will not be visible to users.For more information on how to handle
NULLvalues, see Handling NULL values in permission tables.
An example of a value assignment permission table:
Reference_User | Reference_Table | Reference_Column | Reference_Value | |
|---|---|---|---|---|
m.mustermann@celonis.com | O2C_VBAK | VKORG | 500 | |
m.musterfrau@celonis.com | O2C_VBAK | VKORG | 400 | |
When creating a unlimited assignment permission table, include the following information:
Important
Granting a user or group of users unlimited access to data in a table may cause privilege escalation and supersede their overall Celonis Platform permissions. For more information, see Avoiding permission escalations.
Reference user: A column in the permission table with user emails or the group names to be assigned permissions. Each entry must be on a separate row.
Note
You can only have either users or groups in a single permission table. If you need to configure permissions for both users and groups, create separate tables for each.
Reference unlimited A column in the permission table with a
TRUEorFALSEboolean for each user.
Example of an unlimited assignment permission table:
Reference_User | Reference_Unlimited |
|---|---|
m.mustermann@celonis.com | TRUE |
m.musterfrau@celonis.com | FALSE |
To apply your permission table within a data model, you must be either:
Include the permission table in a data integration extraction for the data pool.
Upload the permission table to the data pool using the file uploader.
Tip
For more information about uploading data files, see Uploading data files.
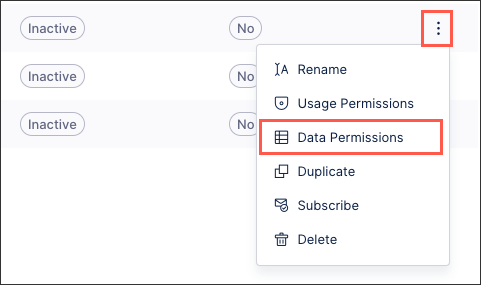
Once your permission table is uploaded, you will be able to select it from the Options (⋮) > Data Permissions menu.
Once you upload your permission table to your data pool, you can now apply the permission table within the data model:
Select Data Models.
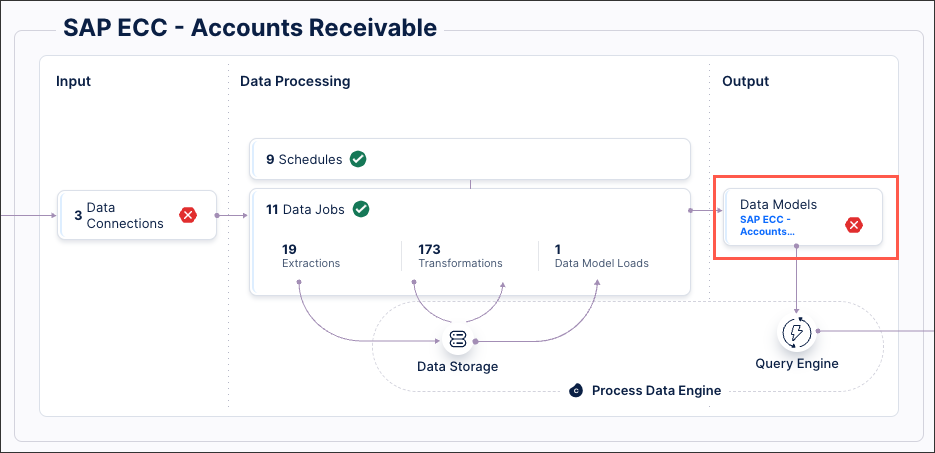
For the data model you want to load the permissions for, select Options (⋮) > Data Permissions.
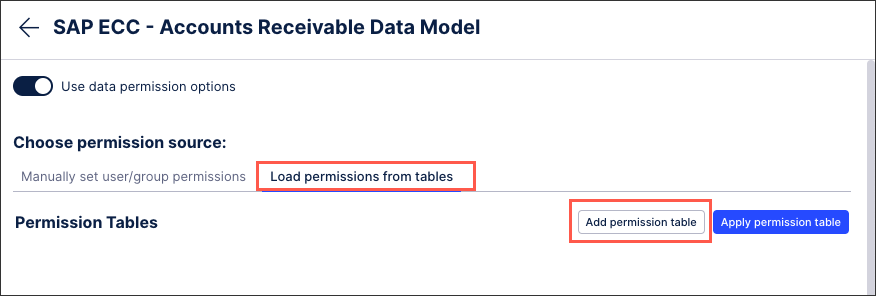
Select Load permissions from tables, and then Add permission table.
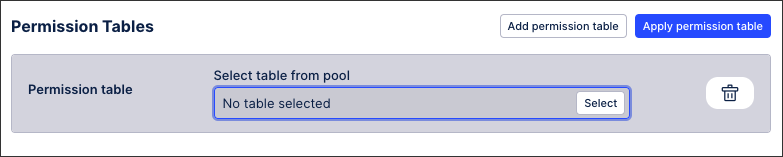
Select the permission table from the pool.
Configure the following options:
User/group reference: Select the column from your permission table that contains the user emails or group names.
Value assignment / Unlimited assignment: Select the corresponding option for your permission table.
Configure the permission table options:
If you selected Value assignment, provide the following details:
Reference table: Select the column from your permission table that contains the data tables you are assigning permissions for.
Reference table refers to table alias in the Data Model: Enable if you are using an alias for your data tables rather than the data table name.
Important
If you are using aliases, and you fail to select this, users will not have access, because no matching data table will be returned.
Reference column: Select the column from your permission table that contains the columns from the Reference table you are assigning permissions for.
Reference value: Select the column from your permission table that contains the values you are assigning permissions for.
Important
NULLvalues are not processed within the Data Permission table. If a Reference value is represented asNULL, the corresponding records will not be visible to the Reference user.For more information on how to handle
NULLvalues, see Handling NULL values in permission tables.
If you selected Unlimited assignment, for Unlimited assignment column, select the column in your permission table that contains the boolean values for users.
Select Apply permission table.
To enable the data permissions, select Use data permission options.
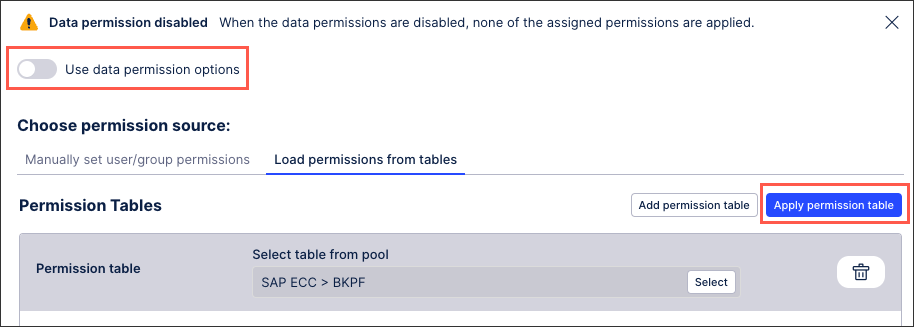
Important
If you do not select Use data permissions options, the permissions will not be applied.
Once you select Use data permission options, the data permissions are now active, without the need to reload your data model.
To update a permission table, you only need to update the permission table locally, ensuring to use the same file, and either:
Include the updated permission table in a data integration extraction for the data pool.
Upload the updated permission table to the data pool using the file uploader.
Tip
For more information about uploading data files, see Uploading data files.