Management Report
The Management Report Action Flow automates the end-to-end process of data extraction and KPI calculation. It delivers monthly performance snapshots—including Automation Rate and First Time Right ratios—directly to stakeholders based on their specific Country or Company Codes.
This Action Flow automates the end-to-end lifecycle of management reporting. It begins by retrieving accounts payable data and calculating core performance metrics. Using a logic-based router, the flow segments these insights by Company Code, ensuring that stakeholders receive a tailored KPI summary (including Automation Rate and First Time Right) directly in their inbox.
Initialization: Defines global variables (Timeframe, Currency, and Buffers) and schedules the execution.
Data processing: Iterates through defined Company Code sets and triggers a Celonis Data Model query to calculate specific KPIs.
Conditional routing: Applies filters to separate data packets based on organizational scope (e.g., Company Code 1000 vs. 3000).
Automated distribution: Dispatches customized HTML email reports to designated recipients with direct links to the Operational App.
Before configuring this Action Flow, you need access to a data model that includes accounts payable information.
See: Modeling your data.
For this Action Flow, only the modules listed below require configuration:
In this module you can define the running schedule by clicking on the clock icon and setting the following variables necessary for the Action Flow:
Timeframe: enter your time period of interest, e.g. MONTH or CALENDAR_WEEK
Currency: enter the currency for the calculations, e.g. EUR or USD
Late Payment Buffer: enter the buffer (in days) for what is considered a Late Payment, e.g. 25
Early Payment Buffer: enter the buffer (in days) for what is considered an Early Payment, e.g. 10
App Link: enter the link to your App that is going to be referred to in the body of the email, e.g.https://ap-operational-app-template.eu-3.celonis.cloud/package-manager/ui/studio/ui/assets/63ee65dc-ecb4-4ed3-8327-4e603197c7a0
In this module you can define the sets that will be used for aggregating your Invoices or KPIs.
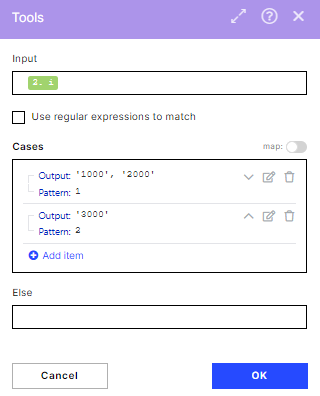 |
In the image, you can see two different outputs. In the first iteration, this module will output ‘1000’,’2000’ which means the KPIs will be calculated for invoices belonging to these Company Codes. In the second iteration, they will be calculated for invoices belonging to Company Code ‘3000’.
You can add as many rules as you want, including having Outputs with more than one Company Code (e.g. if your country is composed of Company Codes A and B, you can add a rule like “Pattern = 3, Output = ‘A’,’B’ “ .) You will also need to increase the maximum number of iterations in module 2.Loop for each new rule you add.
In order to get the Invoice details, you have to set up the Celonis Query Data Model. See Query Data.
Note
You don't have to change any fields or filters.
In this module, you can set up the filters that will be applied when displaying the data in the email. In our example, we will be passing information regarding the iteration that contained Company Code 1000 (and ‘2000’ since the list also contained a second Company Code) for the next module of the AF.
You can add as many routing paths as you would like. In the case you want the same recipient to receive the information about two different lists of Company Codes (defined in module3.Map Loop and Company Codes) you will need to set up 2 routes, one for each list.
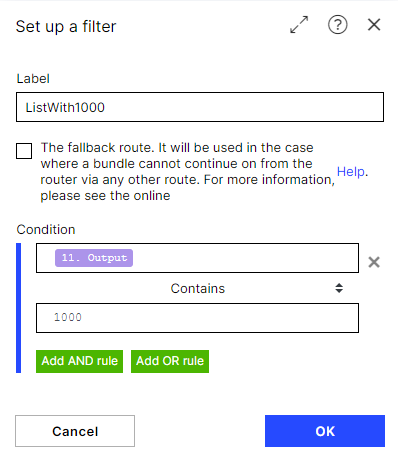 |
You need to set your desired Company Code value in the first condition, e.g.
Condition 1: “11.Output contains 1000”
In this module, you need to configure the email connection and define the recipient(s) of the email. Change the following settings:
Connection:connect to your mail account and grant Celonis permission to read and write emails.
To: define the recipient(s) you want to send the emails to, e.g. johndoe@domain.com