Connecting data sources
After creating a data pool, you must establish connections with your data sources. These are referred to as data connections, with these connections controlling where your data is extracted from and then transferred into the Celonis Platform. Your method of data connection depends on your source system, with both continuous and one-time connections available.
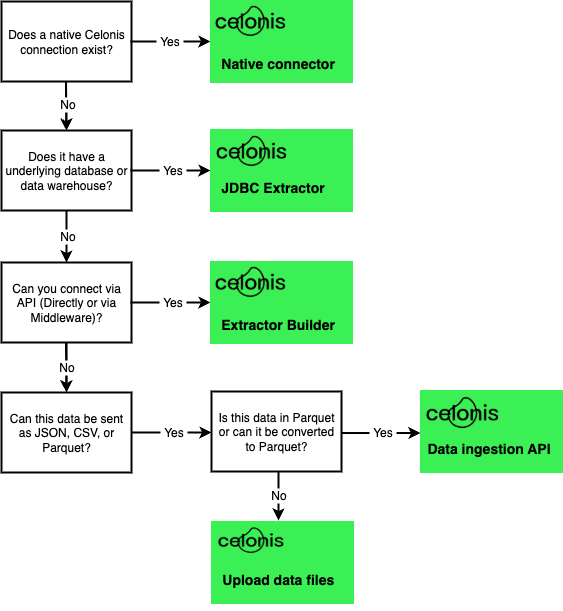
This page provides a reference for helping choose the correct extractor type (Choosing the correct connection type) for your use case and a basic overview of connection types (Data connection types).
Choosing the correct connection type
This section provides a decision tree to help guide you to the correct data connection type based on your requirements. Once you have the type, refer to Data connection types for more information.
Note
If you are trying to connect a on-premises SAP ECC or SAP S/4HANA source, see SAP ECC and S/4 HANA (on-prem + private cloud). Additionally, if you need to extract data from an on-premises database, see On-premise extractors.
Data connection types
When configuring and managing your data connections on the Celonis Platform, you have the following connection types available:
Native connectors
Using pre-built native connector, you can create data connections in your data pool, and then efficiently connect to the system to configure and execute your extraction and transformation tasks. For more information on available native extractors, see the Connection catalog.
JDBC Extractor
With the Celonis Platform you can connect to a number of SQL databases via a JDBC connector. For more information about the most common connections, see JDBC Extractor.
Extractor builder
Using the Extractor builder, you can extend pre-built extractors or create your own custom extractors to connect to your source systems. The Extractor builder supports GET requests to all REST and OData APIs that return a JSON or XML response, enabling you to continuously connect to a number of commonly used data sources.
For more information about using pre-built extractors or creating a custom extractor, see Extractor Builder.
Standard Data Ingestion API
The Standard Data Ingestion API allows you to push real-time data to the Celonis Platform using your existing IT systems. This AWS S3 compatible API operates on events/notifications that get triggered whenever a new file reaches the API and automatically picks it up and processes it to a data pool.
For more information, see the Standard Data Ingestion API documentation on the Celonis Developer Center.
Upload data files
You can add data to the Celonis Platform without establishing a connection to a source system by uploading files from the Celonis Storage Manager or your environment.
Note
While this method doesn’t need an active connection to your source system, it also means that the data will not automatically refresh.
For more information about uploading files, see Uploading data files.