Extractor Builder authentication methods
When connecting your source system to the Celonis Platform via the Extractor Builder, you have a number of authentication methods available. The method you choose should be based on your source system’s authentication options, so we recommend consulting their available API documentation before proceeding.
For each authentication method, the input required depends on whether you’re configuring the authentication method itself or creating a new data connection. The authentication method descriptions and inputs are detailed in the following table:
Authentication Method | Description | Input (when configuring the authentication method) | Input (when creating a new data connection) | Example Request |
|---|---|---|---|---|
API Key Authentication | To authenticate with the source system, this API Key will be sent in the "x-api-key" header of every request. API keys are created within an individual user profile in your Celonis Platform team, with the key’s permissions mirroring those of the user who created them. User inputs required in the data connection:
For more information about creating API keys, see: API keys. |
|
| Header: "x-api-key: YOUR-API-TOKEN” |
Application Key Authentication (select API Key Authentication) | Used when creating extractions from a Celonis API, such as when using audit log, login history, and Studio adoption APIs. Creating applications enables you to give access and permissions to any applications you create, either within your team or externally. Once created, an application must be granted the necessary permissions within your Celonis Platform team. By default, applications are created without any permissions set. For more information about creating Application Keys, see: Application keys. |
|
| AppKey XxxxxxAxxxxBxxxxCxxxXBBBB i.e. “AppKey” followed by a blank and the AppKey itself.  |
Basic Authentication | To authenticate with the source system, the username and password provided in the data connection is encoded with Base64. This encoded string is prefixed with User inputs required in the data connection:
|
|
| Header: "Authorization: Basic bG9sOnNlY3VyZQ==" |
Bearer Authentication | To authenticate with the source system, this token is prefixed with User inputs required in the data connection:
|
|
| Header: "Authorization: Bearer token" |
mTLS This feature is currently available as a Private Preview only During a Private Preview, only customers who have agreed to our Private Preview usage agreements can access this feature. Additionally, the features documented here are subject to change and / or cancellation, so they may not be available to all users in future. For more information about our Private Preview releases, including the level of Support offered with them, see: Feature release types. | You can enable mTLS for data connections that are based on a custom REST API Extractor (Extractor Builder), in the advanced settings of your data connection. | To configure mTLS you need to choose one of the supported mTLS formats:
Dependent of the chosen format, you need to provide the required certificates and/or passwords:
| ||
OAuth2 (Authorization Code) | To authenticate with the source system, the Client ID and Client Secret are passed to the authorization endpoint to request authorization to access the service resources in the browser (when saving the connection). If the user is authorized, an authorization grant is passed. Using this authorization grant an access token needs to be requested from the Get Token endpoint. The returned token is then used for all subsequent requests. The grant type User inputs required in the data connection:
|
|
| Header: "Authorization: Bearer token" For Access Token, we send a request to the Get Token Endpoint with content: “grant_type: <GRANT_TYPE>” “client_id: <CLIENT_ID>” “client_secret: <CLIENT_SECRET> → There is no test connection option, because you will get redirect to the UI of the source system for authentication. |
OAuth2 (Authorization Code + Refresh Token) | To authenticate with the source system, the Client ID and Client Secret are passed to the authorization endpoint to request authorization to access the service resources in the browser (when saving the connection). If the user is authorized, an authorization grant is passed. Using this authorization grant, an access token needs to be requested from the Get Token endpoint. The returned token is then used for all subsequent requests. As the token in that connection scenario is limited to a certain period of time, a new one is automatically recreated after the old one expires using the refresh token. The grant types authorization_code and refresh_token are being used. The client credentials can be sent as a Basic Auth header (default) or via the request body. User inputs required in the data connection:
|
|
| Header: "Authorization: Bearer token" To refresh the Access Token, we send a request to the Get Token Endpoint with content: “grant_type: refresh_token” “refresh_token: <REFRESH_TOKEN>“ And with Header (generated from client id and secret): "Authorization: Basic bG9sOnNlY3VyZQ==" → There is no test connection option, because you will get redirect to the UI of the source system for authentication. |
OAuth2 (Client Credentials) | To authenticate with the source system, the Client ID and Client Secret are passed to the Get token endpoint to get an access token. The returned token is then used for all subsequent requests. The grant type User inputs required in the data connection:
|
|
| Header: "Authorization: Bearer token" – For Access Token, we send a request to the Get Token Endpoint with content: “grant_type: client_credentials” “client_id: <CLIENT_ID>” “client_secret: <CLIENT_SECRET> |
OAuth2 (Resource Owner) | The Client ID, Client Secret, username, and password are passed to the Get token endpoint to get an access token to authenticate with the source system. The returned token is then used for all upcoming requests. The Grant Type User inputs required in the data connection:
|
|
| Header: "Authorization: Bearer token" – For Access Token, we send a request to the Get Token Endpoint with content: “grant_type: password” “username: <USERNAME>” “password: <PASSWORD>” “client_id: <CLIENT_ID>” “client_secret: <CLIENT_SECRET> Note: Client secret is used only if it is specified. |
OAuth2 (JWT Bearer with Private Key) | To authenticate with the source system, a JWT assertion is generated using the selected signature algorithm with the private key (required in non-encrypted PKCS 8 syntax), and optionally the audience, subject and issuer. The JWT assertion is then sent to the Get Token endpoint. The returned token is used for all upcoming requests. The respective Grant Type can be found in the API documentation of your source system. The audience, Issuer, Subject Label, and Private Key provided in the data connection are encoded with Base64. User inputs required in the data connection:
|
|
| Header: "Authorization: Bearer token" – For Access Token, we send a request to the Get Token Endpoint with content: “grant_type: <GRANT_TYPE>” “client_assertion: <JWT_ASSERTION>” → the JWT_ASSERTION: is the assertion generated from the Private Key and the selected Signature Algorithm |
OAuth2 via Proxy | The Client ID, Client Secret, username, and password are passed to the Get token endpoint to get an access token to authenticate with the source system. The returned token is then used for all upcoming requests. Client ID, Client Secret, username, and password provided in the data connection are encoded with Base64 into one string. User inputs required in the data connection:
|
|
| Header: "Authorization: Bearer token" – For Access Token, we send a request to the Get Token Endpoint with headers: “content-type: <CONTENT_TYPE>” “Authorization: <AUTH_STR>” → the AUTH_STR has the value of Base64 encoded credentials. The encoded part is generated from Client ID, Client Secret, Username and Password. |
OAuth2 (SAML 2.0 Bearer) | To authenticate with the source system, a SAML assertion is generated and encoded using the chosen encoding format (base64 or base64url). The assertion is generated based on the subject, audience, issuer, and the private key (provided in non-encrypted PKCS#8 format). Optionally, a certificate may also be included. The SAML assertion is then sent to the Get Token endpoint. The returned token is used for all upcoming requests. |
|
| |
Custom Authentication | The custom authentication type allows you to configure the authentication method based on your source system. This includes the following configurations: Note You must select Enable Request to Authentication Endpoint to configure the request and response options.
|
|
|
|
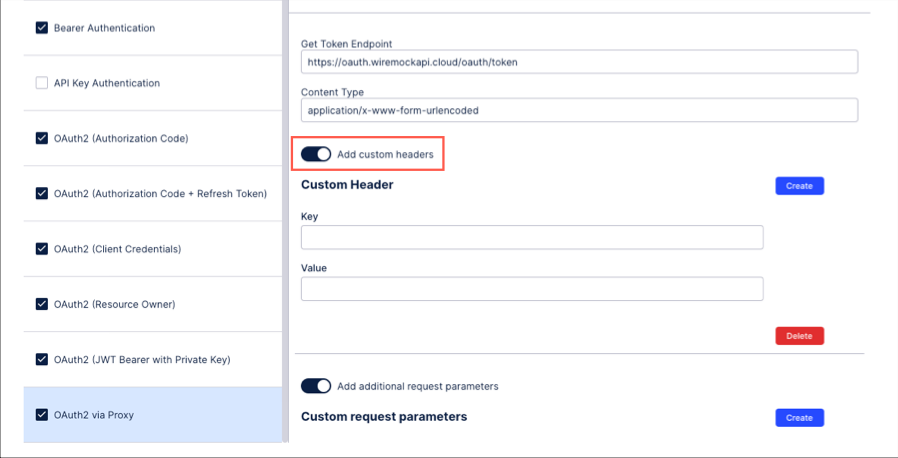
For OAuth 2.0 authentication, you can include extra metadata or parameters by configuring additional headers and request body keys.
Additional Request Header: Click + Add Additional Request Header to create a custom key-value pair for the HTTP header (e.g., X-Request-ID).
Additional Request Body: Click + Add Additional Request Body to include extra parameters in the request payload (e.g., audience).