Creating and embedding View modules
View modules are a package asset type that allow you to re-use configured View components across multiple Views within a Studio package. Instead of configuring each View from scratch, you can save time by centrally managing and then embedding a module to your View. And by editing a View module, all embedded instances of that module are automatically updated too.
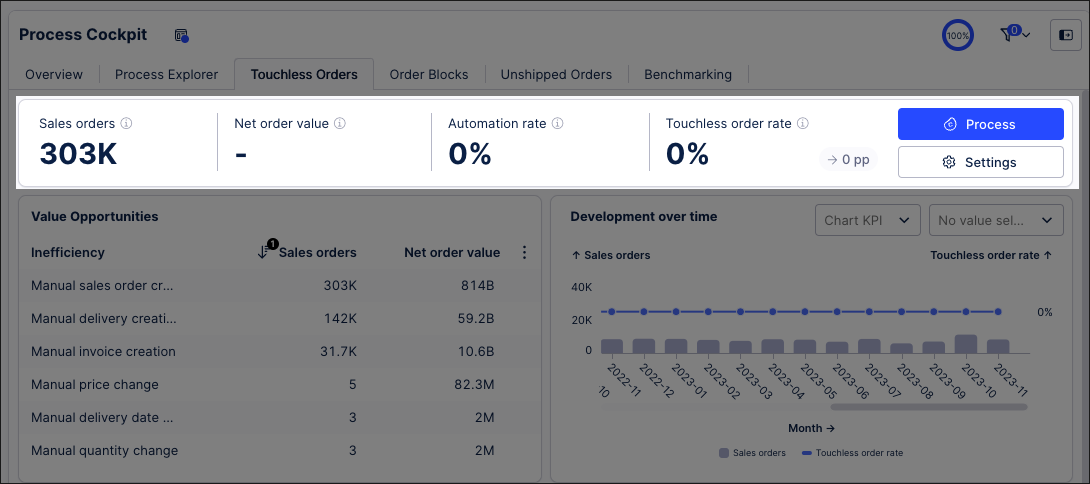
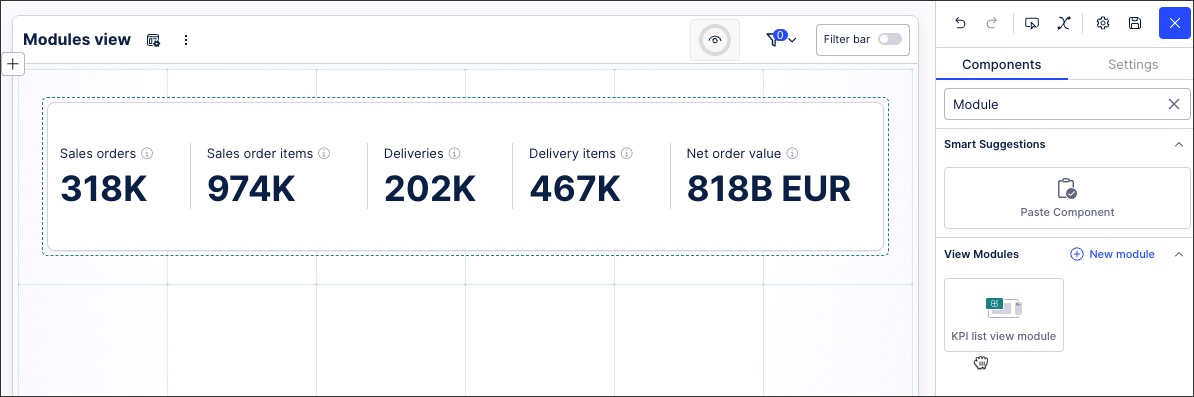
In this example, the highlighted container (including a KPI list and two buttons) has been saved and embedded as a View module. This View module can then be efficiently added to any Views created within the same package, with the component configurations persisting across all Views :
 |
When using View modules, you have the following options:
For a video overview showing how you create, edit, and embed View modules:
View modules can be created either from the package menu or directly in View editing mode, allowing you to conveniently save and then reuse your View content across your package.
You can create View modules in the following ways:
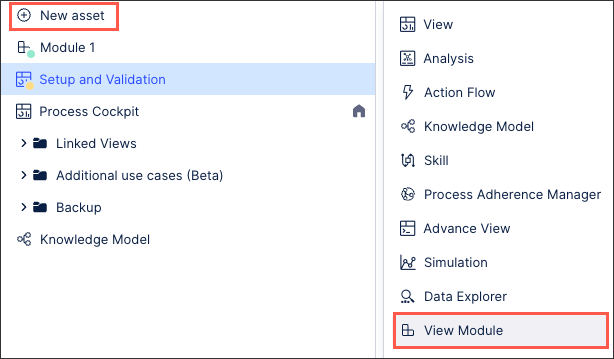
From the package menu: You can create a new View module from the package menu by clicking New Asset - View module.
This option creates an empty View module, with the standard View editing features available for you to configure the module with (such as components, variables, settings etc).
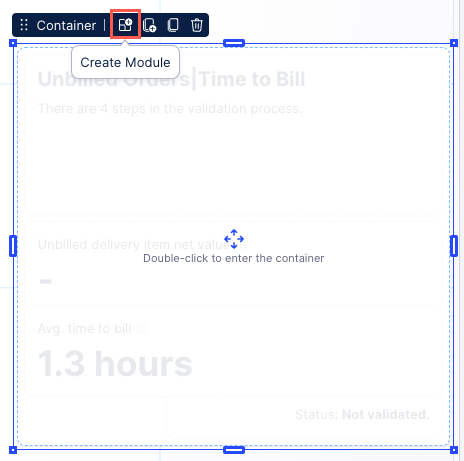
From existing View content: When editing a View, you can create a View module by clicking Create Module on any component within your View, including containers of multiple components.
While this option creates a View module from the existing content, you then have access to the standard View editing features to continue to configure the model.
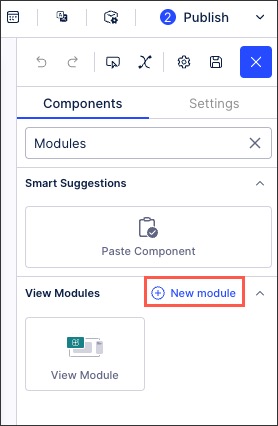
From the View settings sidebar: When editing a View where a View module already exists in the same package, you can create a View module by clicking View Modules and then New Module.
This option also creates an empty View module, with the standard View editing features available for you to configure the module with (such as components, variables, settings etc).
When creating a View module, you're prompted to enter or select the following:
Module name: This is an internal reference for the module and is not visible in published versions of the app.
Knowledge Model: Select a Knowledge Model from the same Studio package to use with the contents of this module.
To learn more about Knowledge Models, see: Knowledge Models.
Module type: Select from View or Filter Bar (limited availability only).
 |
View modules can be parameterized using View variables, allowing you to change the context of the data based on where the View module is embedded.
The benefits of parameterizing View modules include:
Contextual reuse: Instead of adding a single customer ID, date range, or business unit into the View, you can pass them as View Variables. This means that one View Module can be used across multiple Views and adjusted based on the context.
Dynamic filtering without duplicating Views: View Variables allow you to apply filters or adjust logic at runtime, rather than duplicating the View and adjusting it as need. This keeps the Data Model lean and avoids redundant maintenance.
Performance optimization: Variables can reduce the volume of data fetched by applying constraints early. For example, setting a variable for a specific fiscal year can limit data loaded when opening the View.
Maintainability and governance: Having one central, parameterized View module means that business rules stay consistent across different use cases.
For more information about creating and using View variables, see: Enhanced View variables.
Configuring a parameterized View Module
In a View Module, you can use View variables as parameters for properties that may change between instances/use cases.
In this example, we've created a View variable for material types and then mapped this to a module variable:
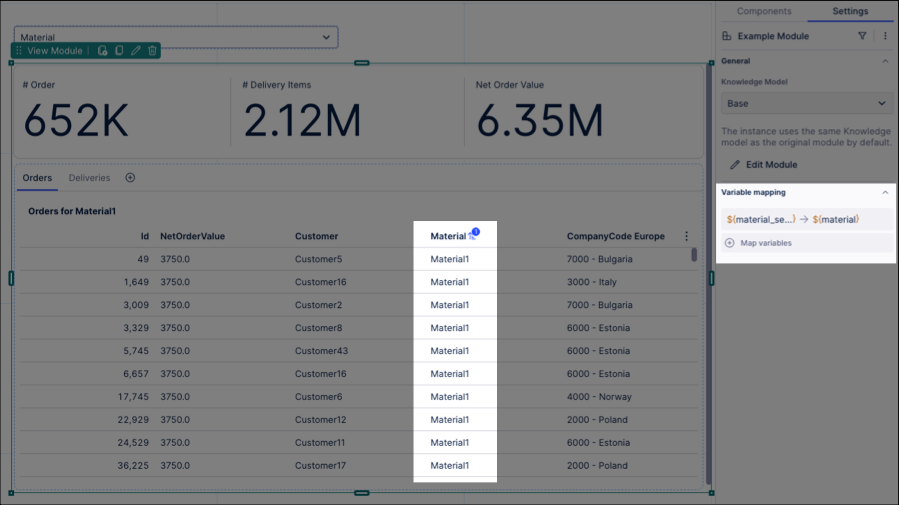
To configure a parameterized View Module:
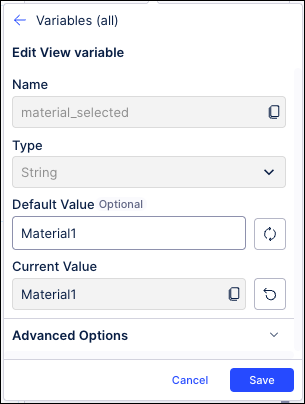
In the main View: Create a string View variable, including setting a default value (Material1 in this example).
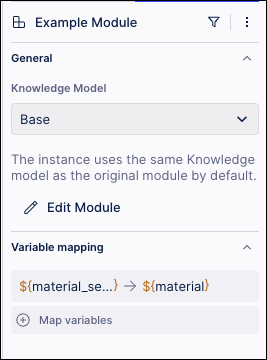
In the View Module: This variable is then mapped to the View Module using the configuration panel:
This includes selecting the Knowledge Model to use:
Knowledge Model: A Knowledge Model (KM) defines the data model and logic (KPIs, transformations, etc.) that the View Module is based on. As such, when you create and use a View Module, it needs to know which Knowledge Model it should use. The default KM is automatically selected, however you can also choose to manually choose a specific KM.
If you choose the default KM: Your instance stays dynamically linked to the current default KM of the View Module. When the base View Module changes its KM, your instance automatically updates to use the new one.
If you manually choose a specific KM: Your instance will stay tied to that specific KM version, even if the base View Module’s default changes later.
Variable Mapping: See step 3.

You can then chose the variable mapping, selecting from the following:
Default variable: Select the default variable, ensuring the variable resets to its default each time the View is reopened.
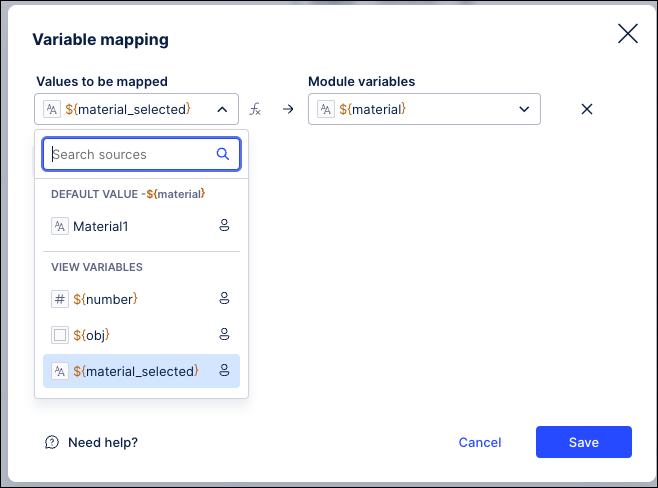
Main View variable: Select one of your Main View’s View variables, with changes based on the user inputs.
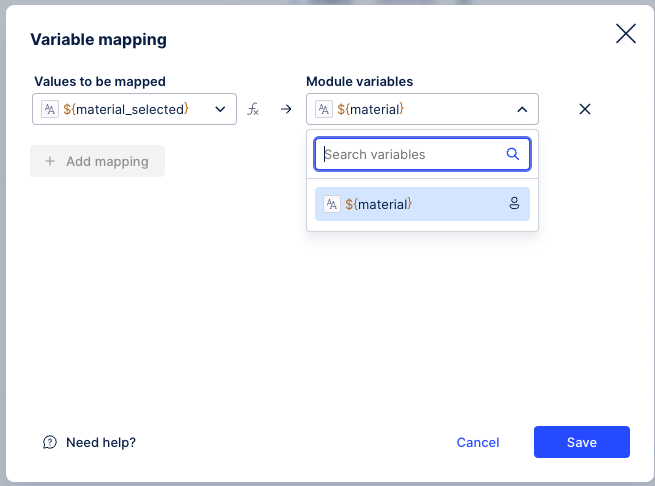
Static value: Enter a static value via the Smart Input button next to the dropdown.
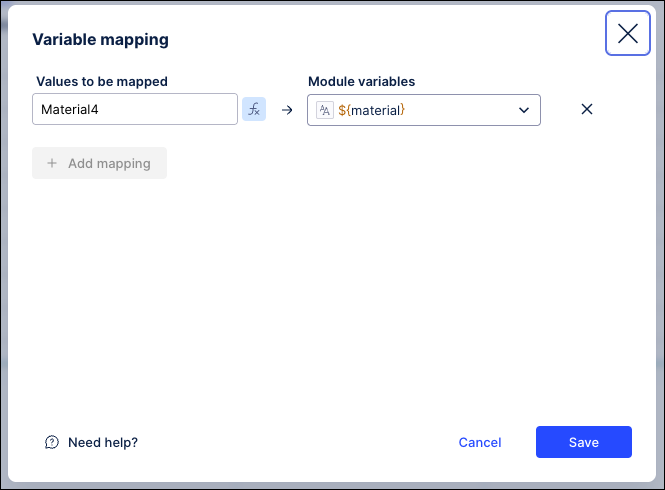
Static value and variable combination: Enter a combination of static value and variable via Smart Inputs

Use case example
You can create an object variable that stores all the data for a KPI. This variable can then be referenced in chart or table components within a View Module. By using variable mapping, you can replace the original object variable with a new one, allowing you to update all KPI metadata at once across any tables or charts where the KPI is used.
To set up this example:
In the main View, create an object variable that stores all the data of a KPI, e.g.main_kpi = {“id“: “KPI_ID“, “name“:”Example KPI”, “format“:”.1f”}.
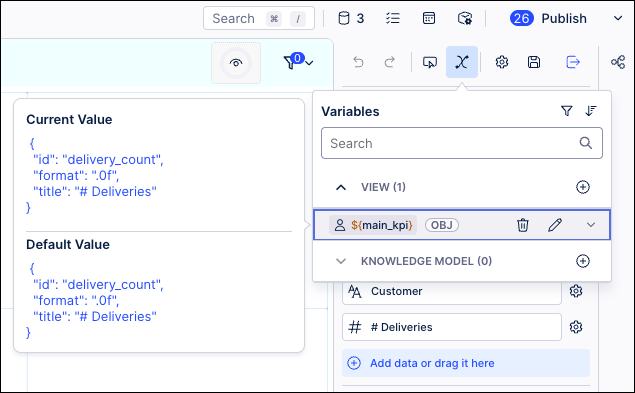
Use this KPI in a chart or table by referencing the object variable properties, e.g. in the PQL :
KPI(${main_kpi.id})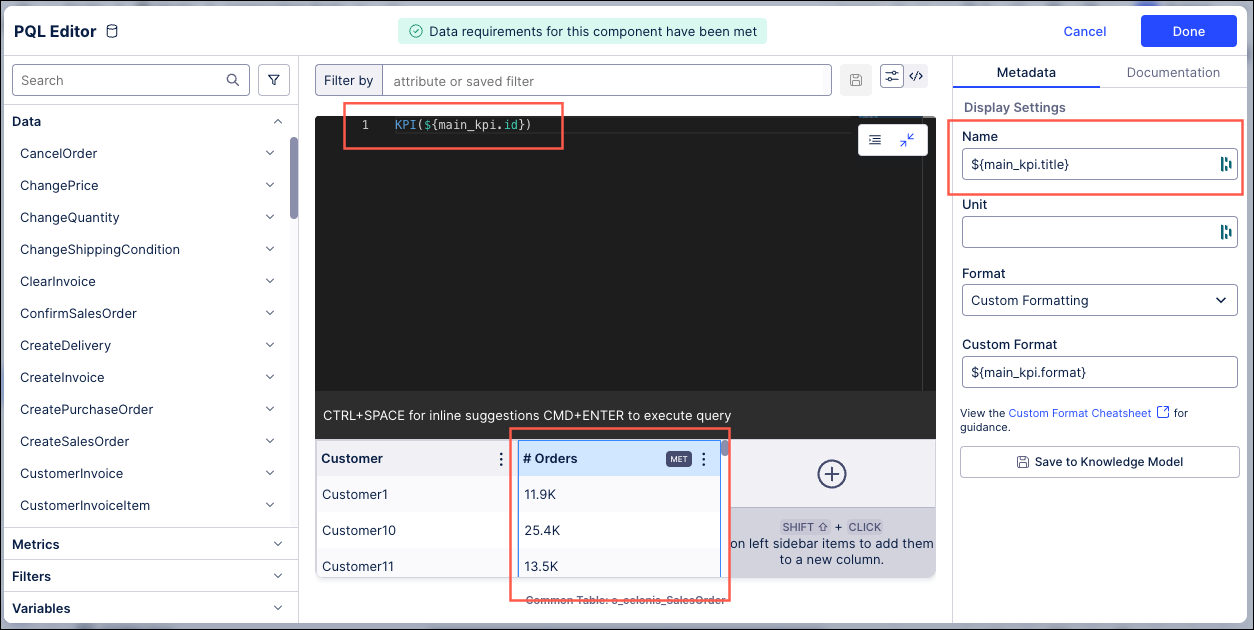
Through the variable mapping in a View Module, you can now assign a new object variable and update all the KPI metadata in one go if this specific KPI that is used in the table or chart.
You can also write the metadata of any KPI/attribute to the module’s object variable using smart inputs.

For example, you can return all the KPI metadata to the View Module's object variable using:
_context.km.kpis.MY_KPI_ID
Once created, View modules can be embedded in any Views in the same Studio package. When in Edit Mode, click View Modules and then drag and drop the module into the View:
When the View module is edited, all embedded instances of that module are automatically updated too.
You can use View modules from other Studio packages in your View. This means you don't need to recreate existing View modules in your package, giving extra flexibility when working with Views.
In your package, select Package Settings > Dependencies.
Select Add dependencies.
Add the package that includes the View module you want to reuse.
Add the View module to any View in your package.
Tip
When changes to the source View module are published, those changes will not be automatically applied to your package. You can control when those changes are applied by updating the source package version as required.
Once created, View modules can be edited and managed from the package menu.
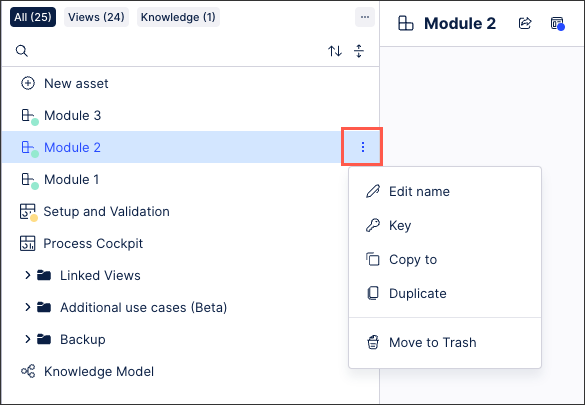 |
You have the following options for existing View modules:
Edit name: This allows you to rename the View module (but keep all existing configurations, settings and permissions).
Key: This key is a unique identifier to the View module and can be used within and outside the package to reference this specific asset.
Copy to: This wizard allows you to copy the View module (and all existing configurations, settings and permissions) to other teams or spaces that you hold permissions for. The original View module remains in the same location after it is copied.
Duplicate: This creates a copy of the View module (and all all existing configurations, settings and permissions) within the existing space. When duplicating a View module, you are prompted to enter a new package name and key.
Move to Trash: This moves the View module to your Trash area, allowing you to recover it back to its original location or delete it permanently.
Items are held in the trash for 180 days from the point of deletion and then automatically deleted permanently with no recovery possible. To access your Trash, you need admin permissions to your Studio space.