Connecting to Celonis Platform Adoption (extractor)
The Celonis Platform Adoption (CPA) extractor allows you to extract usage data from your Celonis Platform team, including usage logs, login histories, and user information. This extractor uses OAuth2 authentication, requiring you to set up an OAuth client in your Celonis Platform team. You can find a step-by-step guide to setting up an OAuth client in this topic.
If you previously configured this extractor using App Key authentication, we recommend transitioning to OAuth2. For more information, see: Transitioning from AppKey to OAuth2 authentication (Previous integrations)
Before you begin
Before configuring the CPA extractor, you need to complete the following prerequisites:
To track user login history and Studio usage, you first need to enable both services:
Select Admin & Settings > Platform Adoption.
Enable Login History.
Select Studio > Set up tracking service.
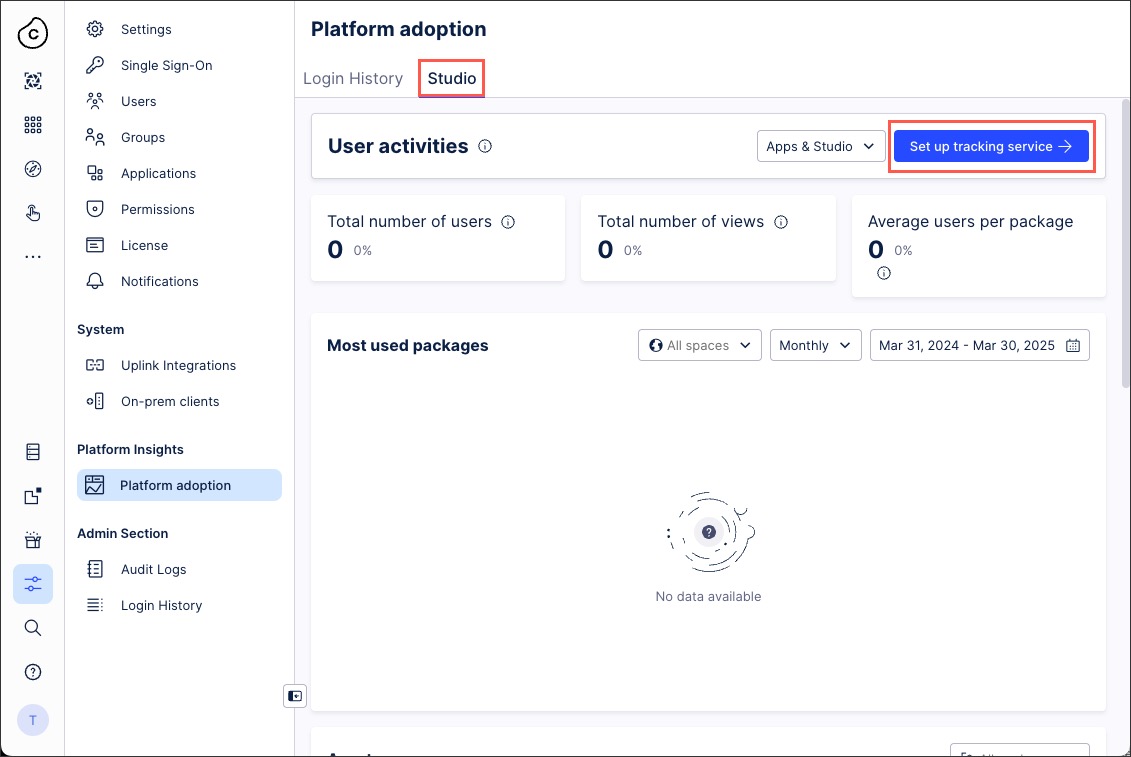
Enable Studio.
Select Close.
Your Celonis Platform team login history and Studio usage statistics are now recorded.
Before configuring the CPA extractor, you need to configure an OAuth client in your Celonis Platform team. This OAuth client can then be assigned permissions to access the Celonis public APIs required by the CPA extractor.
To create an OAuth client and assign it permissions:
Select Admin & Settings > Applications.
Select Add New Application > OAuth Client.
Configure the client using the following options:
Name: An internal reference for the client.
Note
This application name will be the reference later when assigning permissions.
Description: An optional and internal description.
Grant Type: By default, Client Credentials is selected and cannot be changed.
Authentication Methods: Select Client Secret Basic.
Select Define Scopes, and then select the following scopes:
platform-adoption.tracking-events:read
team.user-group-info:read
team.login-history:read
Select Create. The OAuth client is created, and the Client Credentials window opens.
In the Client Credentials, copy the ID and Secret values to a secure location.
Important
You can only view the client ID and Secret once. We recommend you save this information for future use. In case you fail to save or lose the client ID and Secret, you must generate a new one.
You must now assign the required permissions:
Navigate to Admin & Settings > Permissions.
In the Services section, select Team > Edit.
In the left column, find the name of the application you just created, and assign it the following permissions:
Use Login History API
Use Studio Adoption API
Use User Group Info API
Select Save.
You can now proceed to Configuring the Celonis Platform Adoption extractor.
If you have previously configured this extractor using AppKey authentication, we recommend transitioning to OAuth2 authentication.
To transition to OAuth 2:
Important
You can only view the client ID and Secret once. We recommend you save this information for future use. In case you fail to save or lose the client ID and Secret, you must generate a new one.
Create an OAuth client in your Celonis Platform team, providing you with a client ID and client secret. See: Configuring an OAuth client and assigning permissions.
Select Data Integration - Data Connections and open your existing Celonis Platform Adoption connection.
Select OAuth2 (client credentials) and enter your client ID and client secret from step 1.
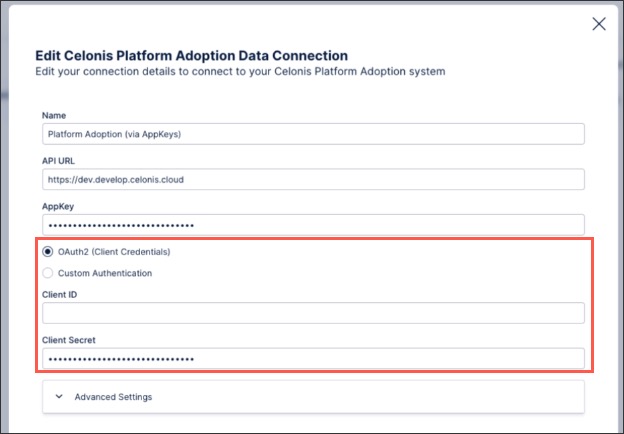
Select Test Connection, and correct any issues highlighted.
Select Save.
Your Celonis Platform Adoption extractor now uses OAuth 2 authentication and continues to run as previously configured.
To configure the extractor:
In the Celonis Platform left navigation, select Data > Data Integration.
On the Data Pools screen, select the data pool where you want to integrate the extractor. This opens the Data Integration window.
Note
If you have not yet configured a data pool for this data set, see Creating and managing data pools.
In the Input section, select the Connect to Data Source tile. This opens the Add Data Connection window.
Note
If this is not the data pool's first connection, the Data Connections window opens below. Select + Add Data Connection to add a new connection.
In the Add Data Connection window, select Connect to Data Source. This opens the in-tool connection catalog.
In the connection catalog, select the Celonis Platform Adoption extractor. This opens the configuration window.
In the configuration window, provide the requested data for each field:
Name: An internal reference for this data connection.
API URL: Use your Celonis Platform team URL in the following format. Don't include the forward slash (/) at the end:
https://(TEAM).(REGION).celonis.cloud
AppKey: Leave this field blank.
Client ID: Enter the client ID provided when configuring your OAuth client.
Client Secret: Enter the client secret provided when configuring your OAuth client.
(Optional) Toggle the Advanced settings option to open the advanced configuration options. Read through each option and update as needed.
Select the Test Connection button to confirm the extractor can connect to the host system. If the test fails, adjust the data in the configuration fields as needed.
Once the test connection passes, select the Save button to continue. This returns you to the Data Integration window.