Using the Extractor Builder to connect to your source system
Celonis Academy course available
If you're looking for a step by step overview of the Extractor Builder, try our Extractor Builder Basics course: Celonis Academy - Extractor Builder Basics.
You can use the Extractor Builder to connect to your source systems, either with pre-built extractor templates or by creating your own custom REST API extractor. The Extractor Builder supports GET and POST requests to all REST and OData APIs that return a JSON or XML response, enabling you to continuously connect to a number of commonly used data sources.
When using the Extractor Builder, you have the following options:
Creating a custom REST API extractor: This option utilizes the Extractor Builder wizard, guiding you through the configuration of variables, authentication methods, the data connections, and the required endpoints. See: Creating a custom REST API extractor / using a pre-built template.
Using a pre-built template: This option uses the same Extractor Builder wizard as the full custom rest API extractor. The difference is that you can select a pre-built template from support systems as your initial extractor content. This pre-built template then loads your extractor with the default configuration options, such as authentication methods and endpoints, for that system. You can then customize this to your instance, saving you from manually configuring individual fields. See: Step 3.
Exporting and importing existing extractor configurations: You can also export the configurations of existing extractors created or customized using the extractor builder, giving you a JSON file that can then be imported back into the Celonis Platform. This enables you to efficiently copy existing extractors between data pools or teams, as well as creating back ups if required. See: Exporting and importing existing extractor configurations.
You can use the Extractor Builder to connect to your source systems, either by creating your own custom REST API extractor or using a pre-built template. This option utilizes the Extractor Builder wizard, guiding you through the configuration of variables, authentication methods, the data connections, and the required endpoints. The following video demonstrates this process:
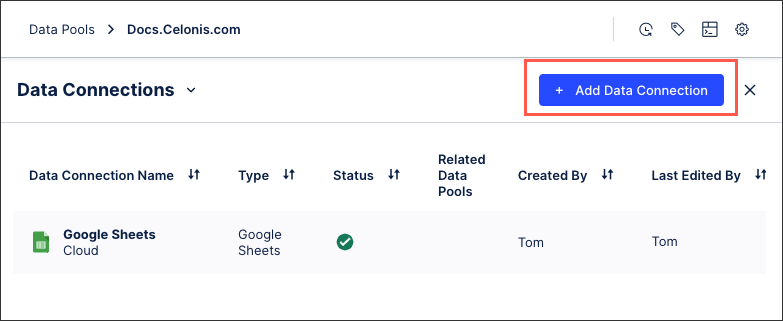
To create a custom REST API extractor or use a pre-built extractor template from your data pool diagram:
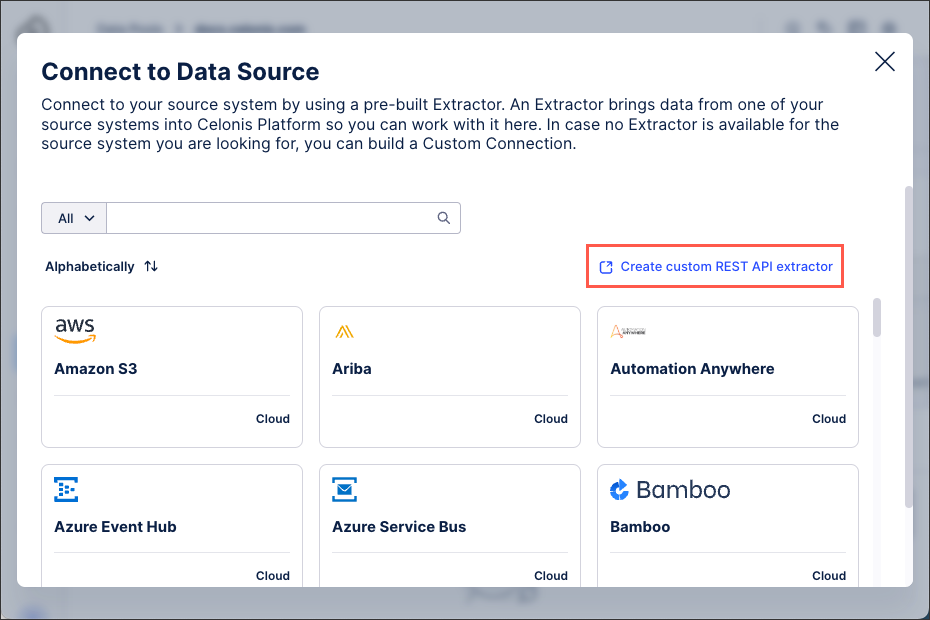
Click + Add Data Connection and select Connect to Data Source.
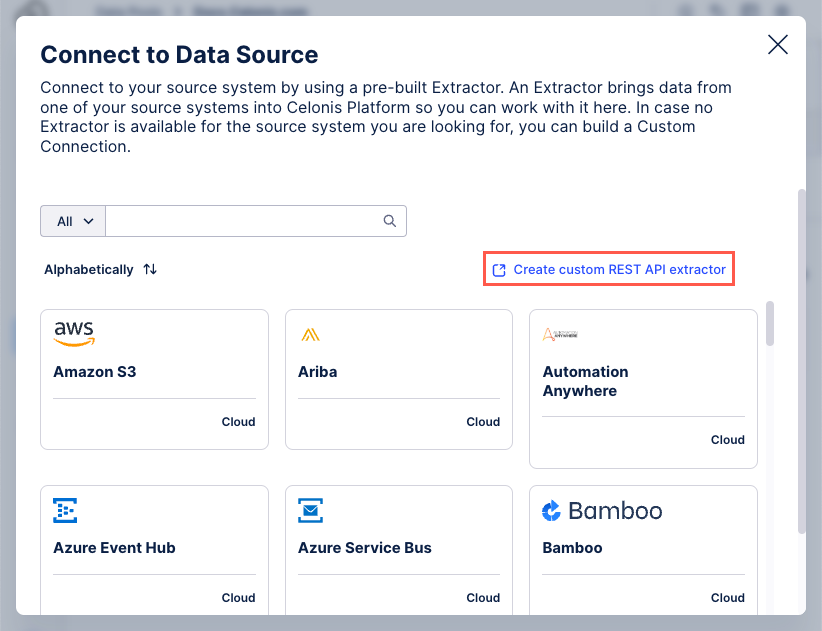
Click Create custom REST API extractor.
Configure the following fields or options:
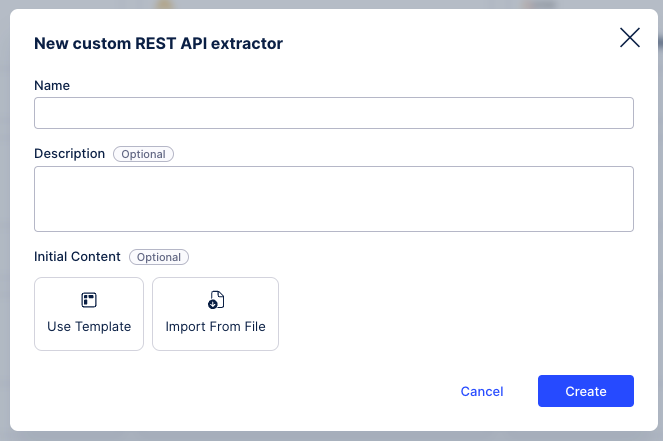
Name: An internal name for the data connection, visible only within your Celonis Platform team.
Description (optional): Enter further details about the connection.
Initial content (optional): These options allow you to customize existing extractor configurations, either by selecting from available templates or importing a JSON file:
Use Template: This pre-built template then loads your extractor with the default configuration options, such as authentication methods and endpoints, for that system. You can then customize this to your instance, saving you from manually configuring individual fields.
Import from File: This requires a JSON file of a previously configured data connection. For further information, see: Exporting and importing existing extractor configurations.
Click Create. The Extractor Builder wizard loads.
Note
After clicking Create, your custom connection is saved as a draft and can be accessed from the list of available extractors from Step 2. This allows you to return to your configuration at any time.
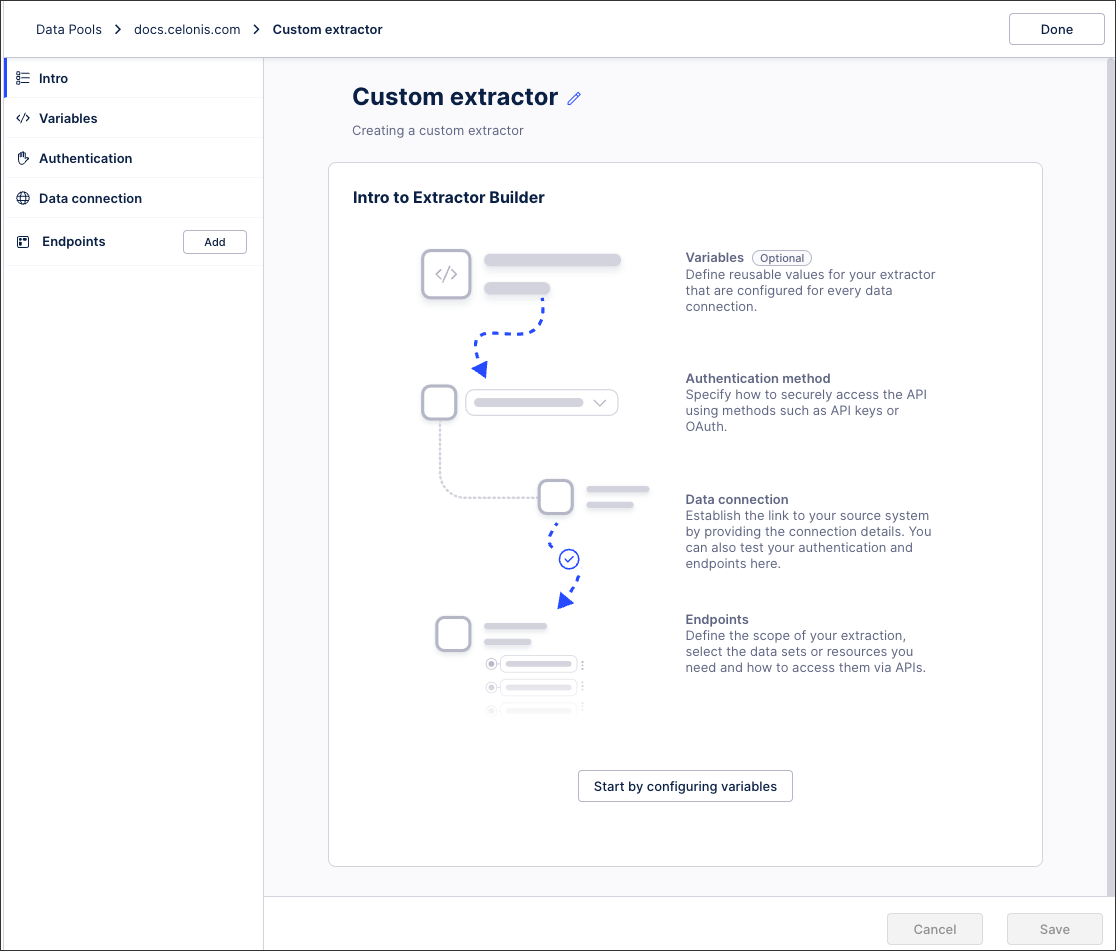
Configure the following options for your extractor:
Variables: Define reusable values for your extractor that are configured for every data connection. See: Extractor Builder variables (optional)
Authentication: Specify how to securely access the API using methods such as API keys or OAuth. See: Extractor Builder authentication methods
Data connection: Establish the link to your source system by providing the connection details. You can also test your authentication and endpoints here.
When configuring your data connection, you can click Test Connection to ensure that the connection is established as intended.
Endpoints: Define the scope of your extraction, select the data sets or resources you need and how to access them via APIs. See: Extractor Builder endpoints
Click Done.
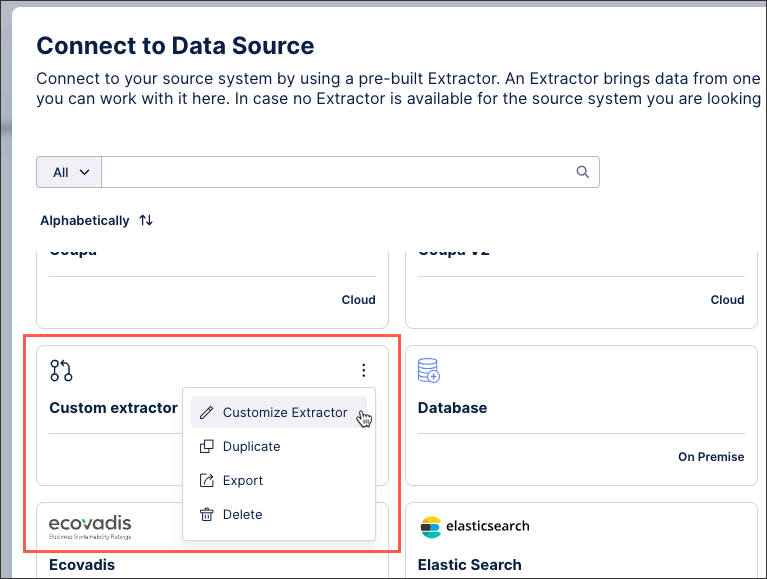
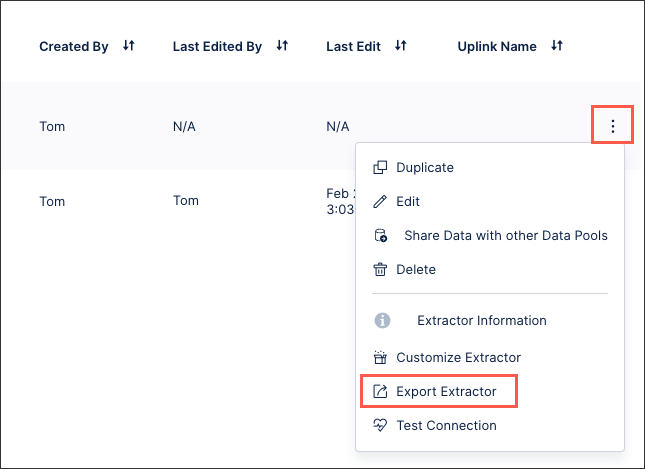
Your custom extractor is now added to your data pool. You can manage this connection at any time by clicking Options (⋮):
This feature is currently available as a Private Preview only
During a Private Preview, only customers who have agreed to our Private Preview usage agreements can access this feature. Additionally, the features documented here are subject to change and / or cancellation, so they may not be available to all users in future.
For more information about our Private Preview releases, including the level of Support offered with them, see: Feature release types.
The Extractor Builder AI Assistant generates configurations for custom REST API extractors from API specification files (OpenAPI, Swagger, or Postman Collection), speeding up connections to new source systems.
By uploading a JSON or YAML file, the AI assistant will identify the authentication methods and possible API endpoints, before then providing a confidence level in the connection. Then, once the extractor has been created, you can customize the connection as needed.
For a video demo of the Extractor Builder AI Assistant:
The Extractor Builder AI Assistant supports and can generate the following:
Identifying and configuring the right authentication methods
Configuring an endpoint request for GET requests
Configuring Request Parameters and define a static value or use them as filters
Configuring Request Headers
Identifying and configuring the right pagination method
Configuring the Response with a “basic” column structure
We recommended to use the Generate response function for each endpoint after creating a data connection to your system, to identify all available columns in your specific instance
However, the Extractor Builder AI Assistant doesn't support the following:
Configuring endpoints for POST requests
Configuring dependent endpoint requests
Configuring the correct response root (this should be manually selected)
Configuring a primary key (this should be manually selected)
You can use the Extractor Builder AI Assistant to connect to your source system by uploading one or multiple API specification files. This option populates the supported fields in the Extractor Builder wizard, guiding you through the configuration of variables, authentication methods, the data connections, and the required endpoints.
To create a custom REST API extractor using the Extractor Builder AI Assistant:
Click + Add Data Connection and select Connect to Data Source.
Click Create custom REST API extractor.
Configure the following fields or options:
Name: An internal name for the data connection, visible only within your Celonis Platform team.
Description (optional): Enter further details about the connection.
Initial content: Select Generate with AI Assistant.
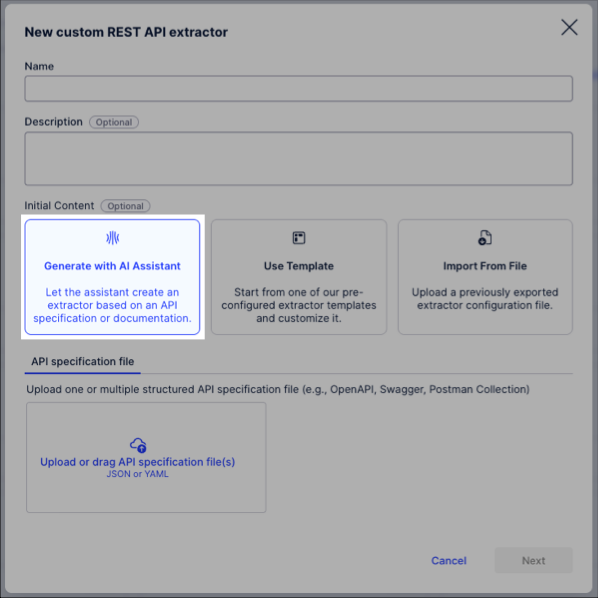
Upload or drag API specification file (in JSON or YAML format) to the wizard and then click Next.
The wizard then uses the API specification file to generate a list of available endpoints.
Select the endpoint that you want to use and then click Next.

The AI assistant then configures the authentication method and displays the confidence level of that and the endpoints you selected.
A 'High' confidence level indicates that the connection to your source system should be successful. If you receive a lower confidence level, we recommend checking the API specification file and available endpoints and trying again.
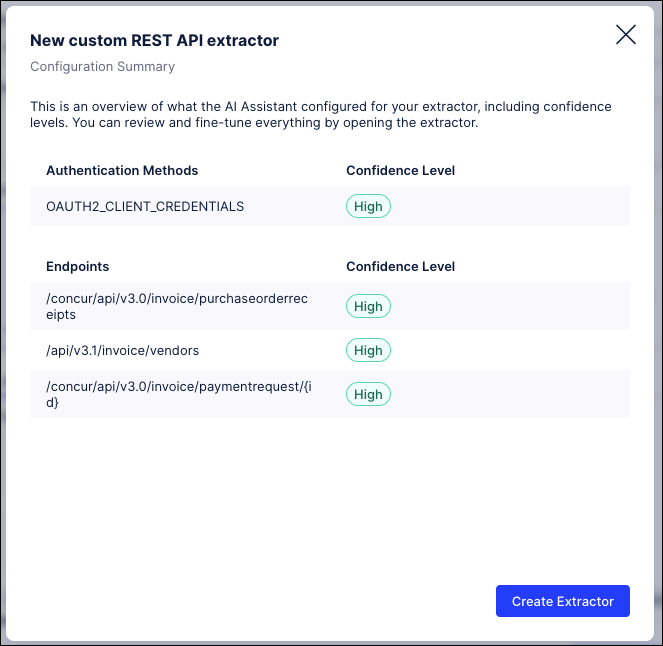
Click Create Extractor.
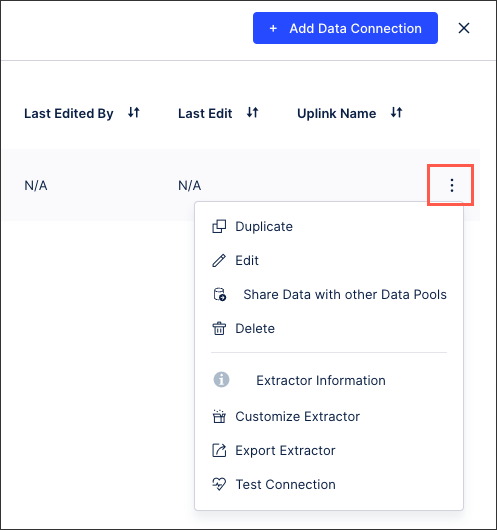
Your custom extractor is now added to your data pool. You can manage this connection at any time by clicking Options:
Configure the following options for your extractor:
Variables: Define reusable values for your extractor that are configured for every data connection. See: Extractor Builder variables (optional).
Authentication: Specify how to securely access the API using methods such as API keys or OAuth. See: Extractor Builder authentication methods.
Data connection: Establish the link to your source system by providing the connection details. You can also test your authentication and endpoints here.
When configuring your data connection, you can click Test Connection to ensure that the connection is established as intended.
Endpoints: Define the scope of your extraction, select the data sets or resources you need and how to access them via APIs. See: Extractor Builder endpoints.
You can also export the configurations of existing extractors created or customized using the extractor builder, giving you a JSON file that can then be imported back into the Celonis Platform. This enables you to efficiently copy existing extractors between data pools or teams, as well as creating back ups if required.
The steps provided below do not copy the data or the data job configuration.
Note
You also have the option to share data with another data pool, which includes the data connection and the table configuration.
For more information, see: Sharing data between data pools
Exporting an existing extractor configuration
To export an existing extractor builder configuration in JSON format from your data pool diagram:
Click Data Connections.
For the data connection you want to export, click Options (⋮) > Export Extractor.
The JSON file downloads.
Importing an existing extractor configuration
To import an existing extractor builder configuration JSON file from your data pool diagram:
Click Add Data Connection > Connect to Data Source.
Click Create custom REST API extractor.
Add an extractor name and an optional description and then click Import From File and select the exported JSON file.

Click Create.
The data connection configuration loads in the Extractor Builder wizard, allowing to you further configure and test your connection. For more information about your extractor configuration, see: Extractor configuration details.
Click Done.
Your imported custom extractor is now added to your data pool. You can manage this connection at any time by clicking Options (⋮):
Depending on your extractor, you may need or want to provide the following configuration details:
Extractor Builder variables (optional)
You can define the parameters that will be displayed in the user input fields of your data connection configuration using variable placeholders. These variables can then be used in your API requests, URLs, and headers, configured when defining your end points.
By default, the {Connection.API_URL} variable will be created as a mandatory parameter and usually contains the host.
To add a new variable, click Add variable.
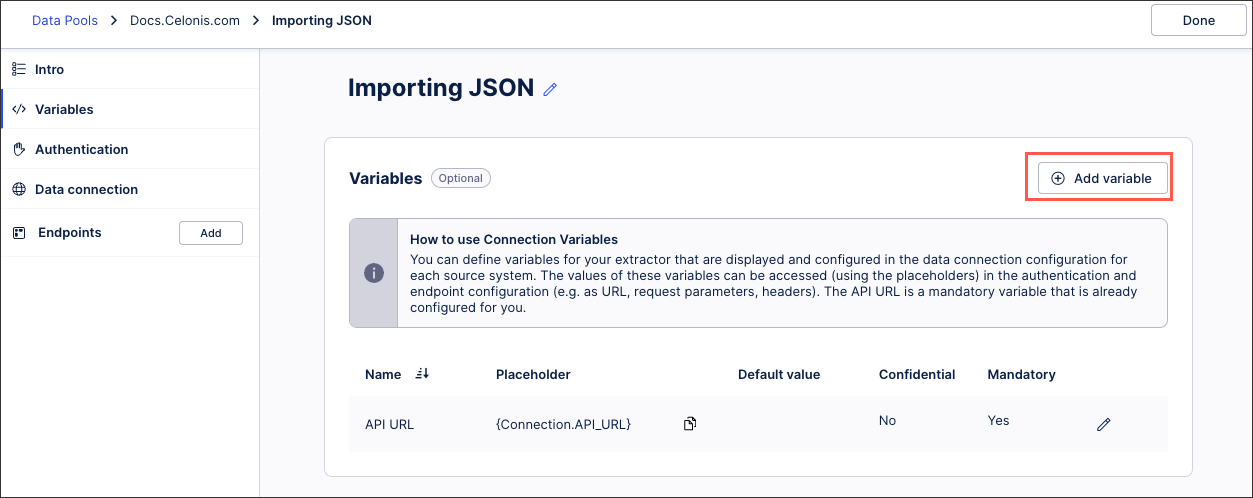 |
You can then configure the following connection parameter details:
Name: This is the label of the parameter in the connection form.
Placeholder: You will be able to access the value of this parameter by using this placeholder in your URL, request parameter or header
Default value (optional): The default value of the parameter will be effective unless the value is explicitly changed in the connection form.
Confidential: When selected, the parameter will be stored as a secret and it will be displayed as a password input.
Mandatory: When selected, this parameter must be populated.
Extractor Builder authentication methods
When connecting your source system to the Celonis Platform, you have a number of authentication methods available to you. The method you choose should be based on your source system’s authentication options, so we recommend consulting their available API documentation before proceeding.
For more information, see: Extractor Builder authentication methods.
 |
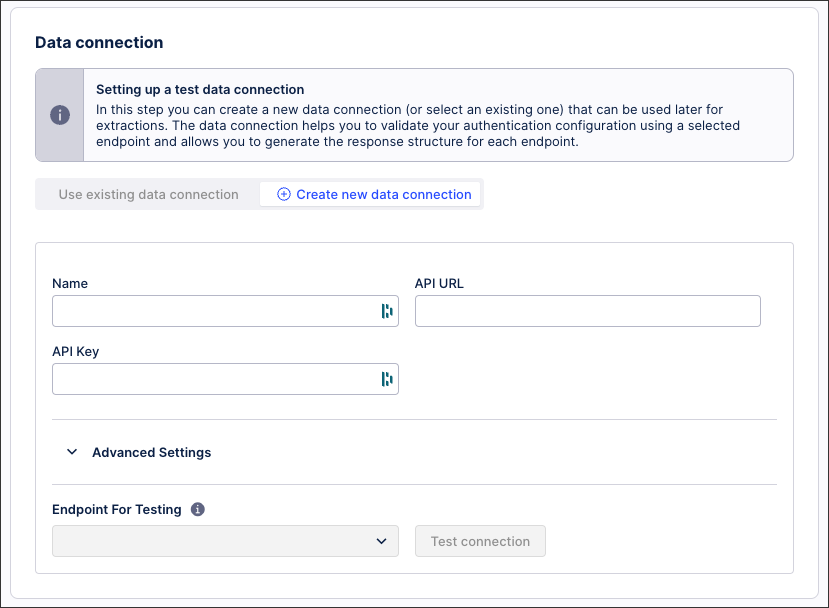
Extractor Builder data connection
In this step, you can create a new data connection (or select an existing one) that can be used later for extractions. The data connection helps you to validate your authentication configuration using a selected endpoint and allows you to generate the response structure for each endpoint.
This also creates a data connection in your data pool, with the connection itself not part of the extractor if it’s exported (only the variables, authentication, and endpoints are exported).
The data connection fields available to you depend on the authentication method you've configured.
 |
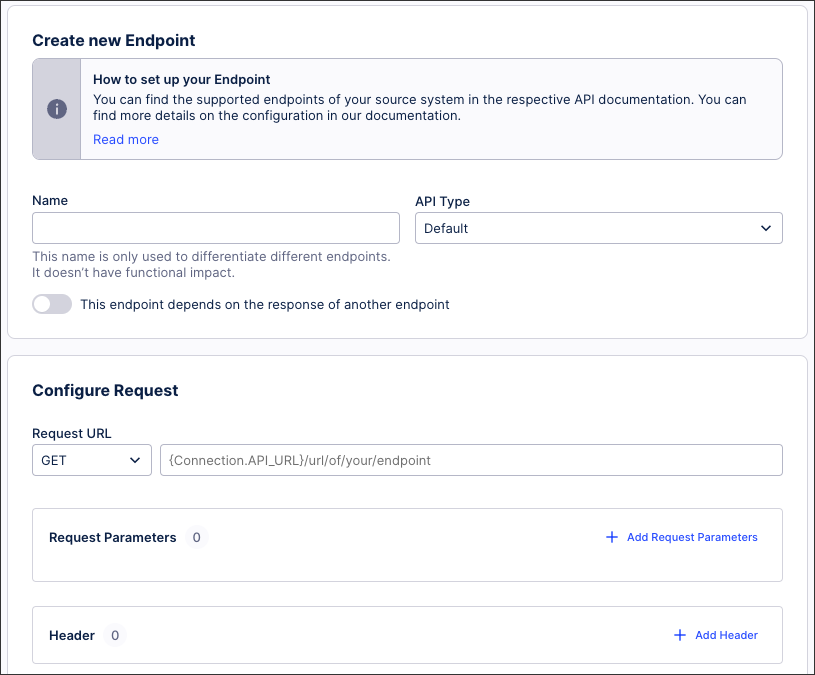
Extractor Builder endpoints
When configuring your data connection, you must define the API endpoints for your source system. This includes selecting your API type, configuring your requests, responses, and headers, and optionally managing your error handling.
For more information, see: Extractor Builder endpoints.
 |