Migrate analyses from Celonis 4 to Celonis Platform using content-cli
Important
Note that migration only supports CTP versions 4.6 and above. If you need help at any point reach out to your CSM.
Leverage Celonis content-cli to migrate analyses from Celonis 4 to the Celonis Platform platform. The content-cli command allows you to push CTP-files (Celonis 4 transports) to Studio.
Familiarize yourself with Celonis content-cli and then create a profile to use for pushing the CTP-files.
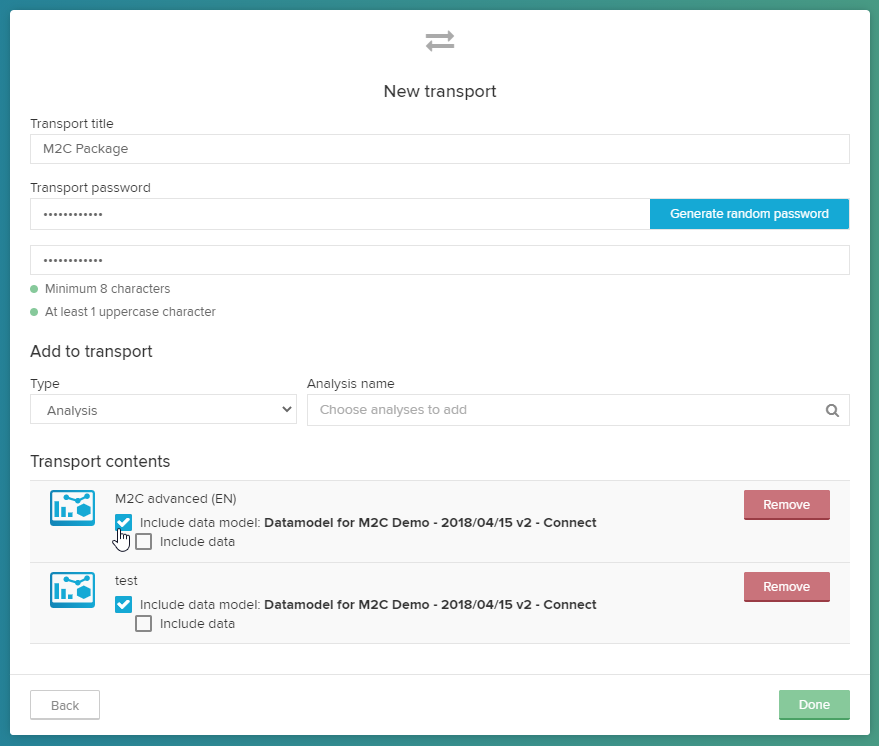
To create a Celonis 4 Transport (CTP file):
Log in to your Celonis 4 instance and create a transport (.ctp file).
Add all analyses you would like to group into one package in Studio.
Make sure to also select the check box to include the data model.
Note
Do not include the data itself. Data will not be migrated.
Make sure to remember the Transport password.
Note
The "Global Content Administrator" role of Celonis 4 is required to create transport files.
When creating the .ctp file, make sure to check include data-model when selecting the analyses. The data model metadata is used for creating the data model variable name in Studio. If you do not check this option then a variable with a default name ("data model default") will be created in Studio. The data model variable will be used to assign the data model. Note that the data model itself will not be migrated with this tool.
Any shared bookmarks will be included in the transport and will be owned by whoever runs the migrating command. Personal bookmarks will not be migrated as we do not have the user mapping. If you want to include personal bookmarks, share them before migrating.

Create a new Studio space.
To use the content-cli in the machine learning workbench, create a profile and then run this content-cli command:
Command
content-cli push ctp --profile <profile>--file <filepath> --password <password> --pushAnalysis

content-cli-push ctp: Command to push a .ctp (Celonis 4 transport file) to create a package

Options:
        -p, --profile <profile>   Profile which you want to use to push the analysis
        -s, --spaceKey <spaceKey> The key of the destination space where the analyses from .ctp file will be created.
        -f, --file <file>         The .ctp file you want to push
--password <password>         The password used for extracting the .ctp file
--pushAnalysis                The content you want to push to Celonis Platform - Analysis in this particular case.
Here's an example:
Command
content-cli push ctp --profile local --spaceKey my-cool-space --file ~/Downloads/CE_TRANSPORT_MigrationTestTransport.CTP --password Celonis4Demo --pushAnalysis
After the file is successfully pushed, a package with the name of the Transport file is created. Go to Package Settings > Variables and Assign a data model to the data model variable.
Notice
You will first need to create the data model to be able to assign it to the data model variable. Note that the data model migration is not part of this tooling.