Using external password providers for database connections
When extracting data from a database via JDBC, the connection is established using the credentials stored in the Celonis Platform to send requests. These credentials are encrypted, offering a secure connection between the database and the Celonis Platform. Despite this, you can also choose to use external password providers for your database connections.
The following external password providers can be configured:
Custom password provider: The custom password provider needs to be packaged as a jar file and added to the class path of the extractor application.
CyberArk: The CyberArk agent needs to be installed on the same on-premises extractor server in your network and provides the password for the database connection.
To use a custom password provider for the connection between your database and the Celonis Platform:
Step 1: Defining custom password provider
The first step to define your custom password provider is to implement a custom password provider. For this you will need our connector-external-clients.jar library.
With this library, you can implement a simple custom password provider like below:
package com.mycompany;

import cloud.celonis.connector.external.client.model.PasswordRequest;
import cloud.celonis.connector.external.client.model.PasswordResponse;
import cloud.celonis.connector.external.client.passwordprovider.CustomPasswordProvider;

public class MyConfidentialPasswordProvider implements CustomPasswordProvider {

    public PasswordResponse getPassword(PasswordRequest passwordRequest) {
        PasswordResponse passwordResponse = new PasswordResponse();
        passwordResponse.setPassword(myInternalPasswordProvider.getPassword());
        return passwordResponse;
    }
}
In this example, you have the following objects:
CustomPasswordProvider: This can be used for providing the source system password or proxy passwords. In addition to this, you can provide passwords for multiple source systems. In order to differentiate between different types of password requests, you can use the PasswordRequest object.
PasswordRequest.passwordType: An enum of type PasswordType, describing the type of password requested. Possible values are SOURCE_SYSTEM, PROXY, INTERNAL_PROXY.
PasswordRequest.host: This field will be populated with the Server Name you specified in the data connection if the passwordType is SOURCE_SYSTEM. If the passwordType is PROXY or INTERNAL_PROXY, this field will be populated with the host in the proxy configuration.
PasswordRequest.username: This field will be populated with the Username you specified in the data connection if the passwordType is SOURCE_SYSTEM. If the passwordType is PROXY or INTERNAL_PROXY, this field will be populated with the user in the proxy configuration.
PasswordRequest.password: This field will be populated with the Password you specified in the data connection if the passwordType is SOURCE_SYSTEM. If the passwordType is PROXY or INTERNAL_PROXY, this field will be populated with the password in the proxy configuration.
And a further example using the PasswordRequest object to retrieve data for proxy and different source systems:
package com.mycompany;

import cloud.celonis.connector.external.client.model.PasswordRequest;
import cloud.celonis.connector.external.client.model.PasswordResponse;
import cloud.celonis.connector.external.client.passwordprovider.CustomPasswordProvider;

public class MyConfidentialPasswordProvider implements CustomPasswordProvider {

    public PasswordResponse getPassword(PasswordRequest passwordRequest) {
        PasswordResponse passwordResponse = new PasswordResponse();
        if(passwordRequest.getPasswordType() == PasswordType.PROXY) {
            passwordResponse.setPassword(myInternalPasswordProvider.getProxyPassword());
        } else if (passwordRequest.getHost().equals("prod-server-01") && passwordRequest.getUsername().equals("celonis")) {
            passwordResponse.setPassword(myInternalPasswordProvider.getPasswordForProdServer01());
        } else if (passwordRequest.getHost().equals("prod-server-02") && passwordRequest.getUsername().equals("celonis")) {
            passwordResponse.setPassword(myInternalPasswordProvider.getPasswordForProdServer02());
        } else {
            passwordResponse.setPasswordResponseStatus(PasswordResponseStatus.FAILED);
        }
        return passwordResponse;
    }
}
Step 2: Registering your custom password provider
In order to register your custom password provider, you need to add the following configuration to your application-local.yml file:
credentialsProvider:
     enabled: true
     type: CUSTOM_CREDENTIALS_PROVIDER
     CUSTOM_CREDENTIALS_PROVIDER:
     passwordProviderImplementation: com.mycompany.MyConfidentialPasswordProvider
You then need to package your custom password provider to a jar file and add it to the class path of the JDBC Extractor Application. This can be achieved with the following command:
java -Dloader.path=mycustom-password-provider-1.0-SNAPSHOT.jar -Dspring.config.location=application-local.yml -jar connector-jdbc.jar
When using CyberArk as a password provider, the CyberArk agent needs to be installed on the same on-premises extractor server in your network and provides the password for the database connection. As the CyberArk password is constantly changing for security reasons, the database credentials are not stored in the Celonis Platform.
For the latest CyberArk documentation, see: CyberArk Docs.
To use CyberArk for the connection between your database and the Celonis Platform:
Step 1: Configure CyberArk requirements
A CyberArk string needs to be prepared for the password that needs to be fetched from CyberArk. As an example:
cyberark-sdk:appID=MY_APP_ID&safe=MY_SAFE&folder=MY_FOLDER&policyId=MY_POLICY_ID&Object=MY_OBJECT&reason=MY_REASON
In order for CyberArk integration to work, a CyberArk agent needs to be installed in the same server where the extractor server is installed
On Linux, the service can be checked with the command below:
sudo service aimprv start
sudo service aimprv status
The CyberArk agent needs to be able to resolve the CyberArk string that is going to be used. We recommend testing the CyberArk string with the local agent before testing with Celonis Platform.
On Linux, the password string for the example above can be retrieved with the command below:
/opt/CARKaim/sdk/clipasswordsdk GetPassword \
    -p AppDescs.AppID="MY_APP_ID" \
    -p Query="Safe=MY_SAFE;Object=MY_OBJECT"\
    -o Password
Step 2: Add CyberArk string to data connection
In the related database connection configuration, the CyberArk string needs to be provided in the password field.
Step 3: Update application-local.yml file
In the application-local.yml file of the extractor application, the following configuration needs to be added:
credentialsProvider:
  enabled: true
  type: CYBERARK_SDK
For example:
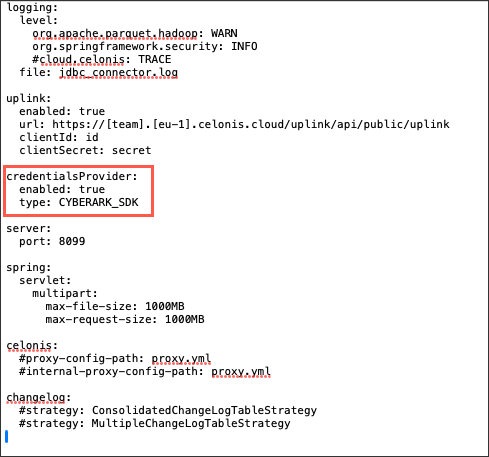 |
Step 4: Restart extractor
You now need to restart the extractor for the changes to be implemented.