Prerequisites for the Payment Terms Harmonizer app
Before you set up the object-centric version of the Payment Terms Harmonizer app, you’ll need to enable and configure the Procurement process from the Celonis catalog. Load the object-centric data model with your data, and validate that it’s all working in the standard Procurement perspective. Then publish it to the production environment.
To supply the Payment Terms Harmonizer app with information about the payment terms for your suppliers, you’ll need to create a custom object type, and add custom attributes to some Celonis object types. Then you’ll need to create an extension to the standard Procurement perspective, and use the extended perspective with the app.
Extending the Procurement process with payment terms
To provide the Payment Terms Harmonizer app with information about payment terms, you’ll need to create the custom object type VendorMasterPurchasingOrg, add the transformation for it, and extend the Celonis catalog Procurement perspective to add it. You’ll also need to add custom attributes to the Celonis object types Vendor and Contract, with transformations for them.
Important
The transformations in this topic are built for an SAP ECC source system. If you need transformations for another source system, ask your Celonis point of contact.
For an SAP ECC source system, check that your extractions include the following tables and columns to populate the new object type and attributes:
Table | Columns |
|---|---|
LFM1 | MANDT, EKORG, LIFNR, ZTERM, ERDAT, ERNAM |
T052 | MANDT, ZTERM, ZTAGG, ZMONA, ZFAEL, ZDART, ZPRZ1, ZPRZ2, ZTAG1, ZTAG2, ZSMN1, ZSMN2, ZSTG1, ZSTG2, ZTAG3, ZSMN3, ZSTG3, ZLSCH, ZSCHF, KOART |
T052U | MANDT, ZTERM, ZTAGG, SPRAS, TEXT1 |
TVZBT (only if T052U is not available) | MANDT, ZTERM, SPRAS, VTEXT |
Here’s how to extend the Procurement process:
From the Celonis navigation bar, select Data > Objects and Events, then select Objects in the top navigation bar.
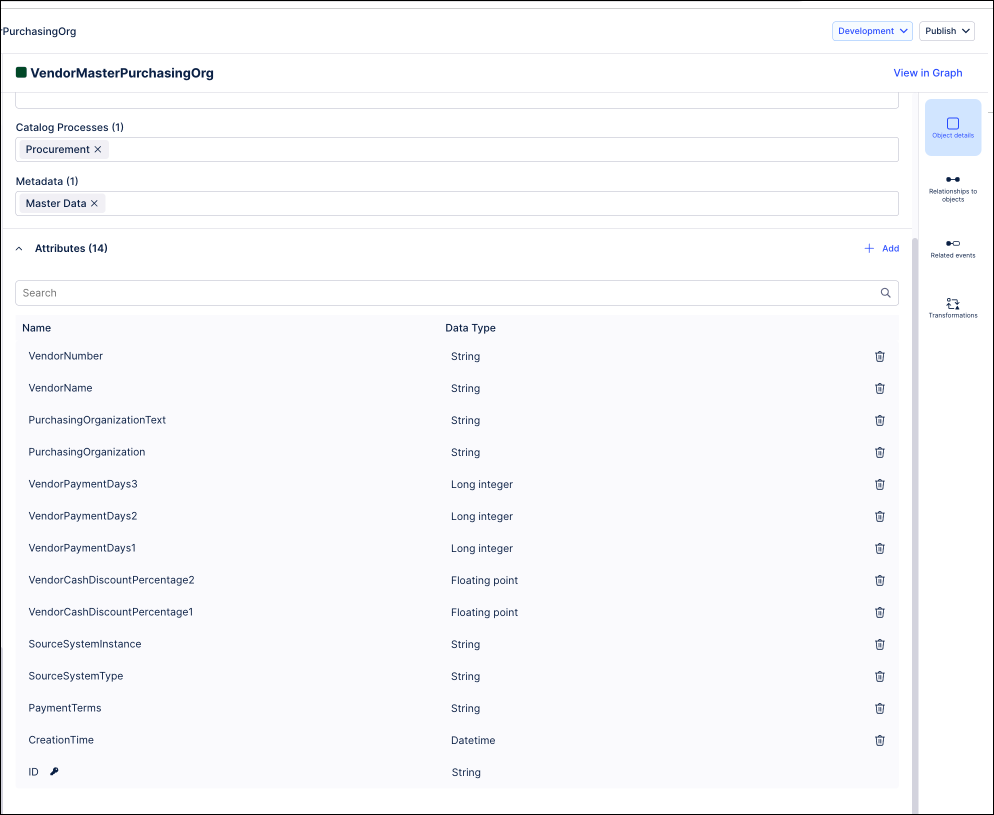
Create the VendorMasterPurchasingOrg object type. Here’s how:
Click the Create button on the list of objects. Select Model from scratch.
Name the new object type VendorMasterPurchasingOrg (with no spaces).
Add the description “Vendor Master for Purchasing Org”.
Add the tag Procurement from the Catalog Processes category, and the tag Master Data from the Metadata category.
Click Add attribute to add each of these attributes, selecting the appropriate data type from the Data type dropdown:
PurchasingOrganizationText (data type String)
PurchasingOrganization (data type String)
VendorPaymentDays1 (data type Long Integer)
VendorPaymentDays2 (data type Long Integer)
VendorPaymentDays3 (data type Long Integer)
VendorCashDiscountPercentage1 (data type Floating Point)
VendorCashDiscountPercentage2 (data type Floating Point)
SourceSystemInstance (data type String)
SourceSystemType (data type String)
PaymentTerms (data type String)
CreationTime (data type Datetime)
VendorNumber (data type String)
VendorName (data type String)
Click Save to create the VendorMasterPurchasingOrg object type. Here’s how it should look:
Create an object to object relationship between the new custom object type VendorMasterPurchasingOrg and the Celonis object type PurchaseOrder. Here’s how:
In the pane for the object type VendorMasterPurchasingOrg, select Relationships to objects.
Click Add, and add an incoming relationship to the Celonis object type PurchaseOrder. Make this a one to many (1:m) relationship with VendorMasterPurchasingOrg on the one side, and PurchaseOrder on the many side. Use the suggested name for the relationship.
Click Save to create the object to object relationship.
Add the transformation for the new custom object type VendorMasterPurchasingOrg. Here’s how:
In the pane for the object type VendorMasterPurchasingOrg, select Transformations.
In the transformation editor, click Add transformation.
Paste this SQL script into the SQL editor, replacing the generated suggestion:
WITH "CTE_T052_Intermediate" AS (SELECT "LFM1"."MANDT",
                                      "LFM1"."EKORG",
                                      "LFM1"."LIFNR",
                                      "T052"."ZPRZ1",
                                      "T052"."ZPRZ2",
                                      "T052"."ZTAG1",
                                      "T052"."ZTAG2",
                                      "T052"."ZTAG3",
                                      "T052"."ZTERM",
                                      ROW_NUMBER()
                                      OVER (PARTITION BY "LFM1"."MANDT", "LFM1"."EKORG", "LFM1"."LIFNR","T052"."ZTERM"
                                          ORDER BY "T052"."ZTAGG" ASC) AS "NUM"
                               FROM "lfm1" AS "LFM1"
                                        LEFT JOIN "T052" AS "T052"
                                                  ON "LFM1"."MANDT" = "T052"."MANDT"
                                                      AND "LFM1"."ZTERM" = "T052"."ZTERM")


SELECT <%=sourceSystem%> || 'VendorMasterPurchasingOrg_' || "LFM1"."MANDT" || "LFM1"."LIFNR" || "LFM1"."EKORG" AS "ID",
  CAST("LFM1"."ERDAT" AS DATE) + CAST('00:00:01' AS TIME)                          AS "CreationTime",
  "LFM1"."ZTERM"                                                                   AS "PaymentTerms",
  <%=sourceSystem%> || 'Vendor_' || "LFM1"."MANDT" || "LFM1"."LIFNR"                                    AS "Vendor",
  'SAP'                                                                            AS "SourceSystemType",
  "LFM1"."MANDT"                                                                   AS "SourceSystemInstance",
  CAST("T052_Intermediate"."ZTAG3" AS BIGINT) AS "VendorPaymentDays3",
      CAST("T052_Intermediate"."ZTAG2" AS BIGINT) AS "VendorPaymentDays2",
      CAST("T052_Intermediate"."ZTAG1" AS BIGINT) AS "VendorPaymentDays1",
      "T052_Intermediate"."ZPRZ2"  AS "VendorCashDiscountPercentage2",
      "T052_Intermediate"."ZPRZ1" AS "VendorCashDiscountPercentage1",
    "LFM1"."EKORG" AS "PurchasingOrganization",
    "T024E"."EKOTX" AS "PurchasingOrganizationText",
    "LFM1"."LIFNR" AS "VendorNumber",
    "LFA1"."NAME1" AS "VendorName"


    FROM "LFM1" AS "LFM1"
     LEFT JOIN "LFA1"
       ON "LFM1"."MANDT" = "LFA1"."MANDT"
           AND "LFM1"."LIFNR" = "LFA1"."LIFNR"
      LEFT JOIN "CTE_T052_Intermediate" AS "T052_Intermediate"
      ON "LFM1"."MANDT" = "T052_Intermediate"."MANDT"
          AND "LFM1"."EKORG" = "T052_Intermediate"."EKORG"
          AND  "LFM1"."LIFNR" =  "T052_Intermediate"."LIFNR"
          AND "LFM1"."ZTERM" = "T052_Intermediate"."ZTERM"
          AND "T052_Intermediate"."NUM" = 1
      LEFT JOIN "USR02" AS "USR02"
                 ON "LFM1"."MANDT" = "USR02"."MANDT"
                     AND "LFM1"."ERNAM" = "USR02"."BNAME"
      LEFT JOIN "T024E" AS "T024E"
                 ON "LFM1"."MANDT" = "T024E"."MANDT"
                     AND "LFM1"."EKORG" = "T024E"."EKORG"
      WHERE "LFM1"."MANDT" IS NOT NULL
Click Save to save and validate the transformation.
Add the change transformation. In the transformation menu, click on the Changes folder, and add a new transformation by pasting the following code:
SELECT <%=sourceSystem%>  || 'VendorMasterPurchasingOrg_' || "CDPOS"."TABKEY"    AS "ObjectID",
       <%=sourceSystem%>  || "CDPOS"."TABKEY" || "CDPOS"."TABNAME" || "CDPOS"."FNAME"
          || "CDPOS"."CHANGENR" || "CDPOS"."CHNGIND"                    AS "ID",
       CAST("CDHDR"."UDATE" AS DATE) + CAST("CDHDR"."UTIME" AS TIME)   AS "Time",
       CASE
           WHEN "CDPOS"."FNAME" = 'ZTERM' THEN 'PaymentTerms' END      AS "Attribute",
       "CDPOS"."VALUE_OLD"                                             AS "OldValue",
       CASE
           WHEN "CDPOS"."VALUE_NEW" LIKE '%-' THEN CONCAT('-', REPLACE(LTRIM("CDPOS"."VALUE_NEW"), '-', ''))
           ELSE "CDPOS"."VALUE_NEW"
       END                                                             AS "NewValue",
       'User_' || "CDHDR"."MANDANT" || "CDHDR"."USERNAME"              AS "ChangedBy",
       "CDHDR"."TCODE"                                                 AS "OperationType",
       "CDHDR"."CHANGENR"                                              AS "OperationID",
       CASE
           WHEN "USR02"."USTYP" IN ('B', 'C') THEN 'Automatic'
           ELSE 'Manual' END                                           AS "ExecutionType"
FROM "CDPOS" AS "CDPOS"
     LEFT JOIN "CDHDR" AS "CDHDR"
            ON "CDPOS"."MANDANT" = "CDHDR"."MANDANT"
            AND "CDPOS"."OBJECTCLAS" = "CDHDR"."OBJECTCLAS"
            AND "CDPOS"."OBJECTID" = "CDHDR"."OBJECTID"
            AND "CDPOS"."CHANGENR" = "CDHDR"."CHANGENR"
            AND "CDPOS"."TABNAME" = 'LFM1'
            AND "CDPOS"."CHNGIND" = 'U'
            --AND "CDPOS"."FNAME" ='ZTERM'
            AND "CDPOS"."OBJECTCLAS" = 'KRED'
     LEFT JOIN "LFM1" AS "LFM1"
            ON "CDPOS"."TABKEY" = "LFM1"."MANDT" || "LFM1"."LIFNR" || "LFM1"."EKORG"
     LEFT JOIN "USR02" AS "USR02"
            ON "CDHDR"."USERNAME" = "USR02"."BNAME"
            AND "CDHDR"."MANDANT" = "USR02"."MANDT"
WHERE "CDPOS"."MANDANT" IS NOT NULL
  AND "CDHDR"."MANDANT" IS NOT NULL
  AND "LFM1"."MANDT" IS NOT NULL
  AND "CDPOS"."FNAME" = 'ZTERM'
Go to the Events menu, create the following event:
ChangeVendorMasterDataAdd the following attributes:
TimeExecutedByChangedAttributeOldValueNewValue
Access the transformation menu, and paste the following code:
SELECT 'ChangeVendorPaymentTerms' || '_' || "c_o_custom_VendorMasterPurchasingOrg"."ID" AS "ID",
       "o_custom_VendorMasterPurchasingOrg"."ID"                                        AS "VendorMasterPurchasingOrg",
       "c_o_custom_VendorMasterPurchasingOrg"."Time"                                    AS "Time",
       "c_o_custom_VendorMasterPurchasingOrg"."ChangedBy"                               AS "ExecutedBy",
       "c_o_custom_VendorMasterPurchasingOrg"."Attribute"                               AS "ChangedAttribute",
       "c_o_custom_VendorMasterPurchasingOrg"."ExecutionType"                           AS "ExecutionType",
       "c_o_custom_VendorMasterPurchasingOrg"."OldValue"                                AS "OldValue",
       "c_o_custom_VendorMasterPurchasingOrg"."NewValue"                                AS "NewValue"
FROM "o_custom_VendorMasterPurchasingOrg"
     LEFT JOIN "c_o_custom_VendorMasterPurchasingOrg"
            ON "o_custom_VendorMasterPurchasingOrg"."ID" = "c_o_custom_VendorMasterPurchasingOrg"."ObjectID"
WHERE "c_o_custom_VendorMasterPurchasingOrg"."Attribute" IN ('PaymentTerms')
  AND "c_o_custom_VendorMasterPurchasingOrg"."Time" IS NOT NULL
Navigate to
VendorMasterPurchasingOrg, and access the the RelatedEvent menu. Select the Add button, and add the newly createdChangedVendorMasterData.Create the transformation for the custom relationship between the Celonis object type PurchaseOrder and the new custom object type VendorMasterPurchasingOrg. Here’s how:
In the Objects page of the Objects and Events environment, browse or search to find the Celonis object type PurchaseOrder in the list of object types, and select it.
In the pane for the PurchaseOrder object type, select Transformations, then click the name of the transformation you’re using for the object type.
Click the + icon next to the folder Custom Attributes to create a new transformation script, and name it VendorMasterPurchasingOrg.
Paste this SQL script into the SQL editor, replacing the generated suggestion:
SELECT <%=sourceSystem%> || 'PurchaseOrder_' || "EKKO"."MANDT" || "EKKO"."EBELN"                             AS "ID",
<%=sourceSystem%> || 'VendorMasterPurchasingOrg_' || "EKKO"."MANDT" || "EKKO"."LIFNR" || "EKKO"."EKORG"  AS "VendorMasterPurchasingOrg"
FROM "EKKO" AS "EKKO"
WHERE "EKKO"."MANDT" IS NOT NULL
AND "EKKO"."BSTYP" = 'F'
Click Save to save and validate the transformation.
Create the MasterPaymentTerm object type by:
Click the Create button on the list of objects. Select Model from scratch.
Name the new event type MasterPaymentTerm (with no spaces).
Add the Procurement tag from the Catalog Processes category and the Master Data tag from the Metadata category.
Add each of the following attributes by clicking Add attribute and then selecting the appropriate data type from the Data type dropdown:
DueDateDayFixed (data type Long integer)
DueDateMonthsForward (data type Long integer)
DueDateDays (data type Long integer)
DateLimit (data type Long integer)
PaymentTermCode (data type String)
DiscountPercentage1 (data type Floating point)
DiscountPercentage2 (data type Floating point)
DiscountDays1 (data type Long Integer)
DiscountDays2 (data type Long Integer)
DiscountMonthsForward1 (data type Long Integer)
DiscountMonthsForward2 (data type Long Integer)
DiscountDayFixed1 (data type Long Integer)
DiscountDayFixed2 (data type Long Integer)
BaselineDateType (data type String)
PaymentMethod (data type String)
AccountType (data type String)
Description (data type String)
PaymentBlock (data type String)
BaselineDateDayFixed (data type Long integer)
BaselineDateMonthsForward (data type Long integer)
Click Save to create the MasterPaymentTerm object type.
Add the transformation for the new custom object type MasterPaymentTerm:
In the pane for the object type MasterPaymentTerm, select Transformations.
In the transformation editor, select Add transformation.
Add the following parameters:
LanguageKey: Set as
EsourceSystem: Set as
‘’
In the SQL editor, replace the generated suggestion with the following script:
SELECT
   <%=sourceSystem%>  || 'MasterPaymentTerm_' ||  "T052"."MANDT" || "T052"."ZTERM" || "T052"."ZTAGG" AS "ID",
   "T052"."ZTERM"                                     AS "PaymentTermCode",
   CAST("T052"."ZTAGG" AS INT)                        AS "DateLimit",
   CAST("T052"."ZMONA" AS INT)                        AS "BaselineDateMonthsForward",
   CAST("T052"."ZFAEL" AS INT)                        AS "BaselineDateDayFixed",
   CASE
       WHEN "T052"."ZDART" = 'B' THEN 'Document date'
       WHEN "T052"."ZDART" = 'C' THEN 'Entry date'
       WHEN "T052"."ZDART" = 'D' THEN 'Posting date'
       WHEN "T052"."ZDART" IS NULL THEN NULL
       ELSE 'Other'
       END                                            AS "BaselineDateType",
   CAST("T052"."ZPRZ1" AS FLOAT)                      AS "DiscountPercentage1",
   CAST("T052"."ZPRZ2" AS FLOAT)                      AS "DiscountPercentage2",
   CASE
       WHEN CAST("T052"."ZPRZ1" AS FLOAT) > 0
           THEN CAST("T052"."ZTAG1" AS INT)
       ELSE 0
       END                                            AS "DiscountDays1",
   CASE
       WHEN CAST("T052"."ZPRZ2" AS FLOAT) > 0
           THEN CAST("T052"."ZTAG2" AS INT)
       ELSE 0
       END                                            AS "DiscountDays2",
   CASE
       WHEN CAST("T052"."ZPRZ1" AS FLOAT) > 0
           THEN CAST("T052"."ZSMN1" AS INT)
       ELSE 0
       END                                            AS "DiscountMonthsForward1",
   CASE
       WHEN CAST("T052"."ZPRZ2" AS FLOAT) > 0
           THEN CAST("T052"."ZSMN2" AS INT)
       ELSE 0
       END                                            AS "DiscountMonthsForward2",
   CASE
       WHEN CAST("T052"."ZPRZ1" AS FLOAT) > 0
           THEN CAST("T052"."ZSTG1" AS INT)
       ELSE 0
       END                                            AS "DiscountDayFixed1",
   CASE
       WHEN CAST("T052"."ZPRZ2" AS FLOAT) > 0
           THEN CAST("T052"."ZSTG2" AS INT)
       ELSE 0
       END                                            AS "DiscountDayFixed2",
   CASE
       WHEN CAST("T052"."ZTAG2" AS INT) = 0 AND
           CAST("T052"."ZSMN2" AS INT) = 0 AND
           CAST("T052"."ZSTG2" AS INT) = 0
           THEN CAST("T052"."ZTAG1" AS INT)
       WHEN CAST("T052"."ZTAG3" AS INT) = 0 AND
           CAST("T052"."ZSMN3" AS INT) = 0 AND
           CAST("T052"."ZSTG3" AS INT) = 0
           THEN CAST("T052"."ZTAG2" AS INT)
       ELSE CAST("T052"."ZTAG3" AS INT)
       END                                           AS "DueDateDays",
   CASE
       WHEN CAST("T052"."ZTAG2" AS INT) = 0 AND
           CAST("T052"."ZSMN2" AS INT) = 0 AND
           CAST("T052"."ZSTG2" AS INT) = 0
           THEN CAST("T052"."ZSMN1" AS INT)
       WHEN CAST("T052"."ZTAG3" AS INT) = 0 AND
           CAST("T052"."ZSMN3" AS INT) = 0 AND
           CAST("T052"."ZSTG3" AS INT) = 0
           THEN CAST("T052"."ZSMN2" AS INT)
       ELSE CAST("T052"."ZSMN3" AS INT)
       END                                           AS "DueDateMonthsForward",
   CASE
       WHEN CAST("T052"."ZTAG2" AS INT) = 0 AND
           CAST("T052"."ZSMN2" AS INT) = 0 AND
           CAST("T052"."ZSTG2" AS INT) = 0
           THEN CAST("T052"."ZSTG1" AS INT)
       WHEN CAST("T052"."ZTAG3" AS INT) = 0 AND
           CAST("T052"."ZSMN3" AS INT) = 0 AND
           CAST("T052"."ZSTG3" AS INT) = 0
           THEN CAST("T052"."ZSTG2" AS INT)
       ELSE CAST("T052"."ZSTG3" AS INT)
       END                                          AS "DueDateDayFixed",
   "T052"."ZLSCH"                                   AS "PaymentMethod",
   "T052"."ZSCHF"                                   AS "PaymentBlock",
   CASE
       WHEN "T052"."KOART" = 'K' THEN 'Vendor'
       WHEN "T052"."KOART" = 'D' THEN 'Customer'
       ELSE 'All account types'
   END                                              AS "AccountType",
   COALESCE("T052U"."TEXT1", "TVZBT"."VTEXT")       AS "Description"
FROM "T052" AS "T052"
        LEFT JOIN "T052U" AS "T052U"
                  ON "T052U"."MANDT" = "T052"."MANDT"
                      AND "T052U"."ZTERM" = "T052"."ZTERM"
                      AND "T052U"."ZTAGG" = "T052"."ZTAGG"
                      AND "T052U"."SPRAS" = <%=LanguageKey%>
       LEFT JOIN "TVZBT" AS "TVZBT"
                  ON "TVZBT"."MANDT" = "T052"."MANDT"
                      AND "TVZBT"."ZTERM" = "T052"."ZTERM"
                      AND "TVZBT"."SPRAS" = <%=LanguageKey%>
Click Save to save and validate the transformation.
Create the relationship between the object Purchase Order and the new created object:
Navigate to the PurchaseOrder object, and go to the Relationships to objects panels.
Click on the Add button and link the MasterPaymentTerm object.
Ensure the relationship is
n:m.
Create the transformation for the custom relationship between the Celonisobject type PurchaseOrder and the new custom object type MasterPaymentTerm:
Navigate to the Objects and Events environment.
in the Objects page, browse or search to find the Celonis object type PurchaseOrder in the list of object types, and select it.
In the pane for the PurchaseOrder object type, select Transformations, then click the name of the transformation you’re using for the object type.
Click the + icon next to the folder Custom Attributes to create a new transformation script, and name it
MasterPaymentTerm.In the SQL editor, replace the generated suggestion with the following script:
WITH "CTE_EKKO_FILTERED" AS (SELECT "MANDT" AS "MANDT",
                                   "BUKRS" AS "BUKRS",
                                   "EBELN" AS "EBELN",
                                   "EKORG" AS "EKORG",
                                   "LIFNR" AS "LIFNR",
                                   "ZTERM" AS "ZTERM",
                                   "KONNR" AS "KONNR"
                               FROM "EKKO" AS "EKKO"
                               WHERE "EKKO"."MANDT" IS NOT NULL
                               AND "EKKO"."BSTYP" = 'F'
                              ),


"CTE_Contract" AS (SELECT "EKKO"."MANDT" || "EKKO"."EBELN"  AS "ID",
               "EKKO"."EBELN",
                "EKKO"."MANDT",
                "EKKO"."ZTERM",
                "EKPO"."WERKS",
                "EKKO"."WAERS",
                "EKPO"."MATNR",
                "EKKO"."LIFNR"


         FROM "EKPO" AS "EKPO"
                  LEFT JOIN "EKKO" AS "EKKO"
                            ON "EKPO"."MANDT" = "EKKO"."MANDT"
                                AND "EKPO"."EBELN" = "EKKO"."EBELN"
         WHERE "EKPO"."BSTYP" = 'K'),


   -- Creating relation between PurchaseOrder and its Payment Term as defined in the master data.
   "CTE_PurchaseOrderMasterData" AS (
       SELECT
           "EKKO"."MANDT" || "EKKO"."EBELN"
                       AS "ID",
           "T052"."MANDT" || "T052"."ZTERM" || "T052"."ZTAGG" AS "MasterPaymentTerms_ID"
       FROM "CTE_EKKO_FILTERED" AS "EKKO"
       INNER JOIN "T052" AS "T052"
           ON "EKKO"."MANDT" = "T052"."MANDT"
          AND "EKKO"."ZTERM" = "T052"."ZTERM"


   ),
-- Creating relation between Purchase Order and its vendor Payment Term as defined in the Contract.

   "CTE_ContractMasterData"
        AS (SELECT "EKKO"."MANDT" || "EKKO"."EBELN" AS "ID",
                   "T052"."MANDT" || "T052"."ZTERM" || "T052"."ZTAGG" AS "MasterPaymentTerms_ID"
            FROM "CTE_EKKO_FILTERED" AS "EKKO"
                     INNER JOIN "CTE_Contract" AS "CTE_Contract"
                               ON "CTE_Contract"."MANDT" = "EKKO"."MANDT"
                                 AND "CTE_Contract"."EBELN" = "EKKO"."KONNR"
                     INNER JOIN "T052" AS "T052"
                               ON "CTE_Contract"."MANDT" = "T052"."MANDT"
                                   AND "CTE_Contract"."ZTERM" = "T052"."ZTERM"),


    -- Creating relation between Purchase Order and its vendor Payment Term as defined in the PurchasingOrg  master data.
    "CTE_VendorMasterPurchasingOrgMasterData"
        AS (SELECT "EKKO"."MANDT" || "EKKO"."EBELN" AS "ID",
                   "T052"."MANDT" || "T052"."ZTERM" || "T052"."ZTAGG" AS "MasterPaymentTerms_ID"
            FROM "CTE_EKKO_FILTERED" AS "EKKO"
                     INNER JOIN "LFM1" AS "LFM1"
                               ON "LFM1"."MANDT" = "EKKO"."MANDT"
                                 AND "LFM1"."LIFNR" = "EKKO"."LIFNR"
                                  AND "LFM1"."EKORG" = "EKKO"."EKORG"
                     INNER JOIN "T052" AS "T052"
                               ON "LFM1"."MANDT" = "T052"."MANDT"
                                   AND "LFM1"."ZTERM" = "T052"."ZTERM"),


    -- Creating relation between Purchase Order and its vendor Payment Term as defined in the Company Code master data.
    "CTE_VendorMasterCompanyCodeMasterData"
        AS (SELECT "EKKO"."MANDT" || "EKKO"."EBELN" AS "ID",
                   "T052"."MANDT" || "T052"."ZTERM" || "T052"."ZTAGG" AS "MasterPaymentTerms_ID"
            FROM "CTE_EKKO_FILTERED" AS "EKKO"
                     INNER JOIN "LFB1" AS "LFB1"
                               ON "LFB1"."MANDT" = "EKKO"."MANDT"
                                 AND "LFB1"."LIFNR" = "EKKO"."LIFNR"
                                  AND "LFB1"."BUKRS" = "EKKO"."BUKRS"
                     INNER JOIN "T052" AS "T052"
                               ON "LFB1"."MANDT" = "T052"."MANDT"
                                   AND "LFB1"."ZTERM" = "T052"."ZTERM"),


    "CTE_PaymentTerms" AS (SELECT *
                           FROM "CTE_PurchaseOrderMasterData"
                           UNION
                           SELECT *
                           FROM "CTE_ContractMasterData"
                           UNION
                           SELECT *
                           FROM "CTE_VendorMasterPurchasingOrgMasterData"
                           UNION
                           SELECT *
                           FROM "CTE_VendorMasterCompanyCodeMasterData")


SELECT <%=sourceSystem%> || 'PurchaseOrder_' || "PaymentTerms"."ID" AS "ID",
   <%=sourceSystem%> || 'MasterPaymentTerm_' || "PaymentTerms"."MasterPaymentTerms_ID"            AS "MasterPaymentTerm"
FROM "CTE_PaymentTerms" AS "PaymentTerms"
Extend the Celonis object type Vendor to add the VAT code as an attribute, and add the transformation script for it:
In the Objects page of the Objects and Events environment., browse or search to find the Celonis object type Vendor in the list of object types, and select it.
Select Object details.
Click Add to add a new attribute, and add an attribute named VATCode (with no spaces) with the data type String.
Click Save to apply the extension to the Vendor object type.
In the pane for the Vendor object type, select Transformations, then click the name of the transformation you’re using for the object type.
Click the + icon next to the folder Custom Attributes to create a new transformation script, and name it VATCode.
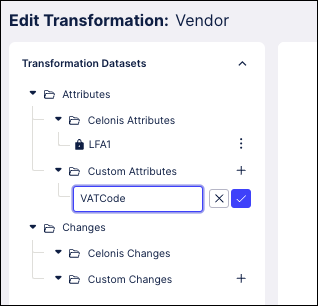
Paste this SQL script into the SQL editor, replacing the generated suggestion:
SELECT <%=sourceSystem%> || 'Vendor_' || "LFA1"."MANDT" || "LFA1"."LIFNR"             AS "ID",
      "LFA1"."STCEG"                                            AS "VATCode"


FROM "LFA1" AS "LFA1"
Click Save to save and validate the transformation.
Extend the Celonis object type Contract to add the Payment Days and Cash Discount as attributes, and add the transformation script for it. Here’s how:
Browse or search to find the Celonis object type Contract in the list of object types, and select it.
Select Object details.
Click Add to add each of these attributes:
PaymentDays1 (data type Long Integer)
PaymentDays2 (data type Long Integer)
PaymentDays3 (data type Long Integer)
CashDiscountPercentage1 (data type Floating Point)
CashDiscountPercentage2 (data type Floating Point)
Click Save to apply the extension to the Contract object type.
In the pane for the Contract object type, select Transformations, then click the name of the transformation you’re using for the object type.
Click the + icon next to the folder Custom Attributes to create a new transformation script, and name it PaymentTerms.
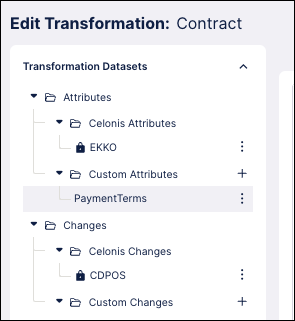
Paste this SQL script into the SQL editor, replacing the generated suggestion:
WITH "CTE_Changes" AS (
   SELECT "CDPOS"."MANDANT",
   "CDPOS"."TABKEY",
   "CDHDR"."UDATE",
   "CDHDR"."UTIME",
   "CDHDR"."USERNAME",
   ROW_NUMBER() OVER(PARTITION BY "CDPOS"."TABKEY" ORDER BY "CDHDR"."UDATE", "CDHDR"."UTIME" desc) as rn
   FROM "CDPOS" AS "CDPOS"
   LEFT JOIN "CDHDR" AS "CDHDR"
                  ON "CDHDR"."MANDANT" = "CDPOS"."MANDANT"
                      AND "CDHDR"."CHANGENR" = "CDPOS"."CHANGENR"
                      AND "CDHDR"."OBJECTCLAS" = "CDPOS"."OBJECTCLAS"
                      AND "CDHDR"."OBJECTID" = "CDPOS"."OBJECTID"
   WHERE "CDPOS"."OBJECTCLAS" = 'EINKBELEG'
   AND "CDPOS"."TABNAME" = 'EKKO'
   AND "CDPOS"."FNAME" = 'KEY'
   AND "CDPOS"."CHNGIND" = 'I')
SELECT <%=sourceSystem%> || 'Contract_' || "EKKO"."MANDT" || "EKKO"."EBELN"     AS "ID",
      "EKKO"."BUKRS"                                                           AS "CompanyCode",
      "EKKO"."ZBD1T"                                                                   AS "PaymentDays1",
      "EKKO"."ZBD2T"                                                                   AS "PaymentDays2",
      "EKKO"."ZBD3T"                                                                   AS "PaymentDays3",
      "EKKO"."ZBD1P"                                                                   AS "CashDiscountPercentage1",
      "EKKO"."ZBD2P"                                                                   AS "CashDiscountPercentage2"
FROM "EKKO" AS "EKKO"
        LEFT JOIN "CTE_Changes" AS "Changes"
                  ON "EKKO"."MANDT"= "Changes"."MANDANT"
                      AND "EKKO"."MANDT" || "EKKO"."EBELN" = "Changes"."TABKEY"
                      AND "Changes"."rn" = 1
        LEFT JOIN "USR02" AS "USR02"
                  ON "EKKO"."MANDT" = "USR02"."MANDT"
                      AND COALESCE("Changes"."USERNAME", "EKKO"."ERNAM") = "USR02"."BNAME"
WHERE "EKKO"."MANDT" IS NOT NULL
 AND "EKKO"."BSTYP" = 'K'
Click Save to save and validate the transformation.
Extend the Celonis catalog perspective for the Procurement process to add the VendorMasterPurchasingOrg and MasterPaymentTerms object. The perspective already contains the other objects, so their new attributes will be added automatically. To extend the perspective:
Go back to the Objects and Events environment, and select Perspectives in the top navigation bar. Find the Celonis-supplied Procurement perspective (perspective_celonis_Procurement).
Click the Extend button, or go to the context menu (the three vertical dots) for the perspective and select Extend.
Type a name for the extension - we recommend
PaymentTermsHarmonizer- and click Next.In the Object list, search for the VendorMasterPurchasingOrg object type. Select it to see its details pane.
Select Linked objects in the sidebar.
Click Add, and start typing the name of the PurchaseOrder object type, and then click to select it.
Select the radio button for the VendorMasterPurchasingOrg relationship between the two object types.
Locate the PurchaseOrder object, and access the embedded objects menu.
Click on Add and add the MasterPaymentTerm object. Click on Save to add the object.
In the Object list, search for the MasterPaymentTerm object type. Select it to see its details pane. Add it without any link to any other object.
Click Save to save the extension.
Select Publish > Publish to development to publish all your changes to the development environment.
Follow the instructions in Running transformations to run test:ocpm-data-job to create objects and events in the development environment. Check that there are no errors.
In the data pool where you’re working with objects and events, carry out a full load of the data model for the extended perspective PaymentTermsHarmonizer (or your chosen name for the custom perspective).