Using Iceberg REST catalog zero-copy connections
This feature is currently available as a Private Preview only
During a Private Preview, only customers who have agreed to our Private Preview usage agreements can access this feature. Additionally, the features documented here are subject to change and / or cancellation, so they may not be available to all users in future.
For more information about our Private Preview releases, including the level of Support offered with them, see: Feature release types.
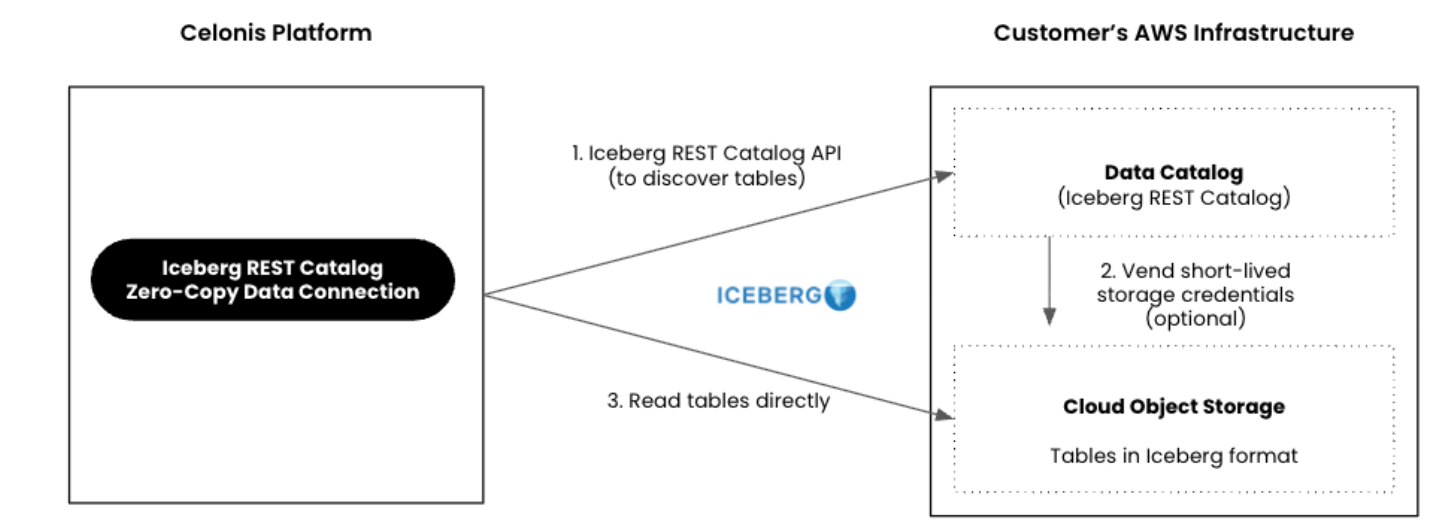
Establish native, zero-copy connectivity between the Celonis Platform and AWS S3 Iceberg REST Catalog endpoints. With this connection, updates to your Iceberg tables are immediately discoverable and accessible in your data pool without extraction lag or storage duplication.
Important
To use this connection, your data records must be stored in Amazon S3 using the Iceberg table format specification.
Zero-copy architecture delivers the following advantages:
Zero-copy data access: Query source data directly where it resides, eliminating traditional data extraction overhead and synchronization latency.
Eliminated data pipelines: Connect directly to your table catalog once to immediately consume data across your process models without building or configuring extraction schedules.
Centralized data governance: Retain transactional data within your secure cloud boundary, preserving your existing AWS IAM policies and compliance frameworks.
 |
Ensure your environment meets the following architecture and security requirements before establishing the connection.
Data requirements
The Iceberg REST Catalog zero-copy connection requires a data pool deployed on the ETL Engine. For more details, see ETL Engine.
The target Iceberg REST Catalog endpoint must accept connections from the Celonis Platform. Configure your firewalls to allowlist the relevant public IP groups found in Celonis IPs as origin .
Data records must be stored in Amazon S3 using the Iceberg table format specification, with matching object read permissions granted to the catalog engine.
Authentication methods
The connection gateway authenticates against the REST catalog using standard OAuth 2.0 Client Credentials flow (Client ID and Client Secret).
In the Celonis Platform left navigation, select Data > Data Integration.
On the Data Pools screen, select the data pool where you want to integrate the extractor. This opens the Data Integration window.
Note
Your Data Pool must be using the ETL Engine. For more details, see ETL Engine.
In the Input section, select the Connect to Data Source tile. This opens the Add Data Connection window.
Note
If this is not the data pool's first connection, the Data Connections window opens below. Select + Add Data Connection to add a new connection.
In the Add Data Connection window, select Connect to Data Source. This opens the in-tool connection catalog.
In the connection catalog, select the Iceberg REST Catalog tile. This opens the configuration window.
In the configuration window, provide the requested data for each field:
Name: Provide a unique name for the connection.
Iceberg REST Catalog URL: Provide the URL of your Iceberg REST Catalog.
Warehouse URL (optional): If a warehouse is not configured in your catalog, or if you want to override the default one, provide the URL of your target storage warehouse.
Client ID and Client Secret: Provide your client credentials.
Advanced Settings:
Token Endpoint (optional): If your catalog uses non-standard or custom token endpoints, provide your catalog token endpoint (Default
{Catalog-URL}/token).Custom Headers: Select the Add Header button to add custom HTTP headers (key-value pairs) required by your network infrastructure or catalog gateway. Use this to pass mandatory routing tags, API version constraints, or specialized security tokens with every request sent to your Iceberg REST server.
Select the Authenticate and Load Namespaces button to load the available shares.
Select the desired share.
Select Test Connection to ensure your configuration is valid. If the test connection fails, ensure the URLs and credentials entered are correct and retry the test.
Select Save.