Configuring Object Link
Important
For a guided configuration, enroll for our Celonis Academy course: Celonis Academy - Set up Object Link in Data Integration.
Object Link is a Celonis technology that helps you model and analyze complex relationships (or links) between objects. With it, you can build what we call "directed graphs" and networks. Setting up Object Link for your data model serves as the foundation for you to use the Network Explorer and special PQL functions in the Celonis Platform.
To enable following complex paths between objects, you must define a dedicated Mapping Table Object Type instead of relying on simple foreign-key relationships. This allows the system to treat every connection (edge) as a unique instance with its own attributes.
The Mapping Table structure: The foundation of an Object Link is a dedicated mapping table (often called an "Edge Table") that explicitly defines the transitions. This table must contain, at a minimum, the following columns:
Source ID (Mandatory): The unique identifier of the starting object (the "Out" node).
Target ID (Mandatory): The unique identifier of the destination object (the "In" node).
Link ID (Optional but recommended): A unique primary key for the link instance itself.
Other attributes: Add more attributes to your links.
Configuring the Linkage Object Type in OCDM: In the Objects & Events environment, you must register this mapping table as its own Object Type.
Create the Object Type: Define a new object type specifically for the linkage
Define the Primary Key: Use the Link ID or a concatenation of the Source and Target IDs.
Create Relationship: Create a relationship from the Mapping Table Object to the linked Object Type.
Add the objects to your perspective: Make sure both objects are added to your perspective. Next, you need to publish O&E and load your Data Model.
To configure the Object Link in your data model:
Click Data > Data Integration and open your object-centric data pool.
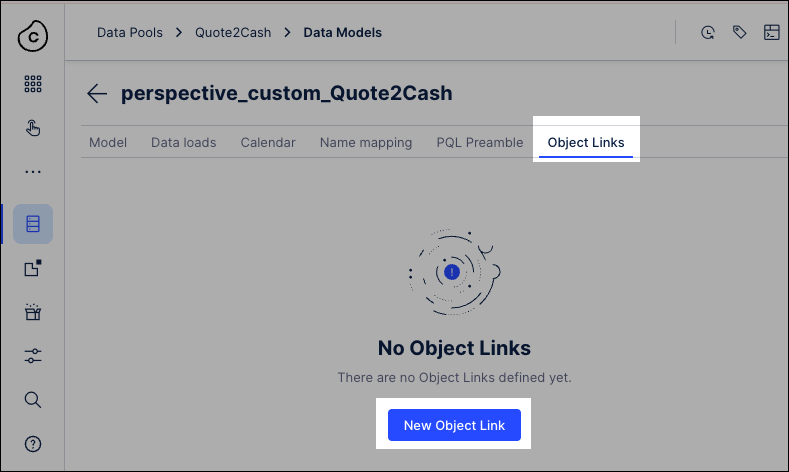
Click Data Models.
Open the data model you want to use and then click Object Links - New Object Link.
Select Objects and then select Mapping Table.
Choose the table from your Data Pool that contains the link definitions.
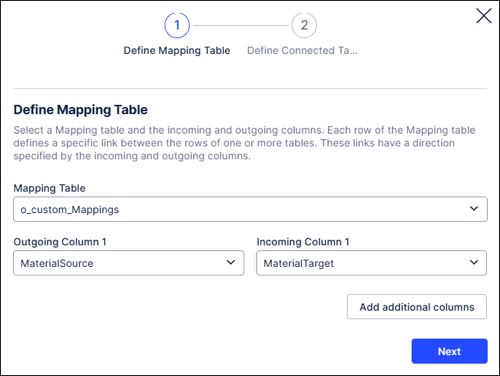
Assign directional columns:
Incoming column: Select the column containing the Source ID (the starting point of the link).
Outgoing column: Select the column containing the Target ID (the destination of the link).
Note
Each row in this table defines a directed edge between two objects. Ensure these IDs match the primary keys in your object tables.
Select the object table (e.g., "Material" or "Sales Order") that holds the master data for the IDs referenced in your mapping table.
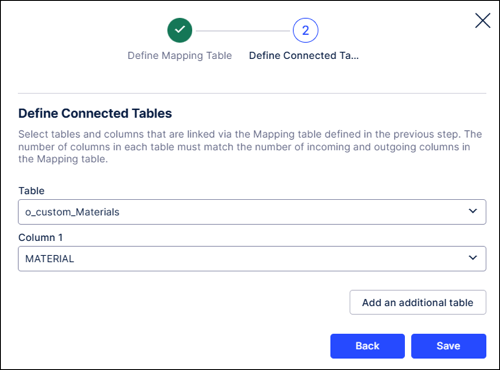
Choose the column in the object table that corresponds to the IDs in your mapping table (typically the Primary Key).
Click Save.
The configuration will now appear in your Object Link overview.
For the changes to take effect, you must execute the Data Job that reloads your Perspective. See: Executing data jobs.
Once the load is complete, the links will be accessible via PQL and visible within the Network Explorer in Studio.
When configuring your Object Link, the following issues are common:
Issue | Likely cause | Resolution |
|---|---|---|
Link not visible in Studio | Perspective not reloaded. | Run the Data Job associated with your Perspective after saving the Object Link. |
"Table not found" error | Mapping table missing from Data Model. | Ensure the table is not just in the Data Pool, but has been added to the Data Model and joined correctly. |
Empty Network Explorer | ID mismatch. | Verify that the IDs in your Mapping Table (Incoming/Outgoing) exactly match the Primary Keys in your Object Tables. |