Creating and consuming a vector store in Annotation Builder
Creating a vector store for your data allows you to perform RAG-based similarity searches on your data columns or documents using an Annotation Builder. This process involves creating a vector store using the Machine Learning Workbench (MLWB) via pycelonis + celo_vector_store, and then consuming that vector store inside the Annotation Builder (AB) to run your RAG-based similarity searches.
Caution
As of FY27, vector stores can only be created from MLWB / Python. The Annotation Builder is now a consumption-only layer, which allows you to select and use pre-existing vector stores, but no longer supports creating or configuring them.
Before you begin, ensure your users meet the requirements listed below:
Users need to be assigned “data access” (integration) to any Data Models where the table to vectorize is placed or where the Annotation Builder wants to look for similarities.
Use the instructions below to create a vector store using your Machine Learning Workbench:
Step 1: Install dependencies
Run the following in your MLWB notebook:
pip install --extra-index-url=<REDACTED> pycelonis --upgrade
pip install --extra-index-url=<REDACTED> celo_vector_store --upgrade
Step 2: Import libraries
from pycelonis import get_celonis
from celo_vector_store.client import VectorStoreClient
Step 3: Set environment variables
import os

os.environ["CELONIS_URL"] = "https://<team-domain>.<cluster>.celonis.cloud/"
os.environ["CELONIS_API_TOKEN"] = "your-token"
Note
Replace <team-domain>, <cluster>, and your-token with the corresponding values from your Celonis environment URL and API token.
Step 4: Configure the vector store
Define the connection and content details for your vector store:
# 1. Initialize the vector store client
cvs_client = VectorStoreClient()

# 2. Define the embedding model
model_id = "azure-openai-text-embedding-3-large"

# 3. Define your Data Model connection details
my_data_model_id = "<your-data-model-uuid>"
my_data_pool_id = "<your-data-pool-uuid>"

# Using the exact Table UUID from the Data Model
my_table_id = "<your-table-uuid>"

# 4. Define identifier columns (these will be the searchable IDs in AB)
id_cols = ["REQUISITION_NUMBER", "LINE_NUMBER"]

# 5. Define the text columns to embed for RAG
text_cols_to_embed = [["PRLINE_DESCRIPTION"]]
Key configuration fields:
Field | Description |
|---|---|
| The columns used to uniquely identify each record. Only these columns will be available as searchable fields in Annotation Builder. |
| The text columns whose content will be vectorized and used for similarity search. |
| The model used to generate embeddings (e.g. |
| The display name of the vector store. This value is what will show in the dropdown of your Annotation Builder. |
Step 5: Create the vector store
my_vector_store = cvs_client.create_vector_store(
data_model_id=my_data_model_id,
data_model_table_id=my_table_id,
identifier_columns=id_cols,
indexes=text_cols_to_embed,
name="Vector_Store_Name",
embedding_model=model_id
)

print(f"Vector store created successfully! Registered Table: {my_vector_store}")
Once this call executes successfully, the vector store is registered and synced for use in Annotation Builder.
You can check the progress and status using the following http request:
GET https://<team-domain>.<cluster>.celonis.cloud/vector-store/api/data-models/tables/{my_table_id}/syncsOnce a vector store has been created via MLWB, it automatically becomes available in the Annotation Builder interface under Context from similar items (RAG).
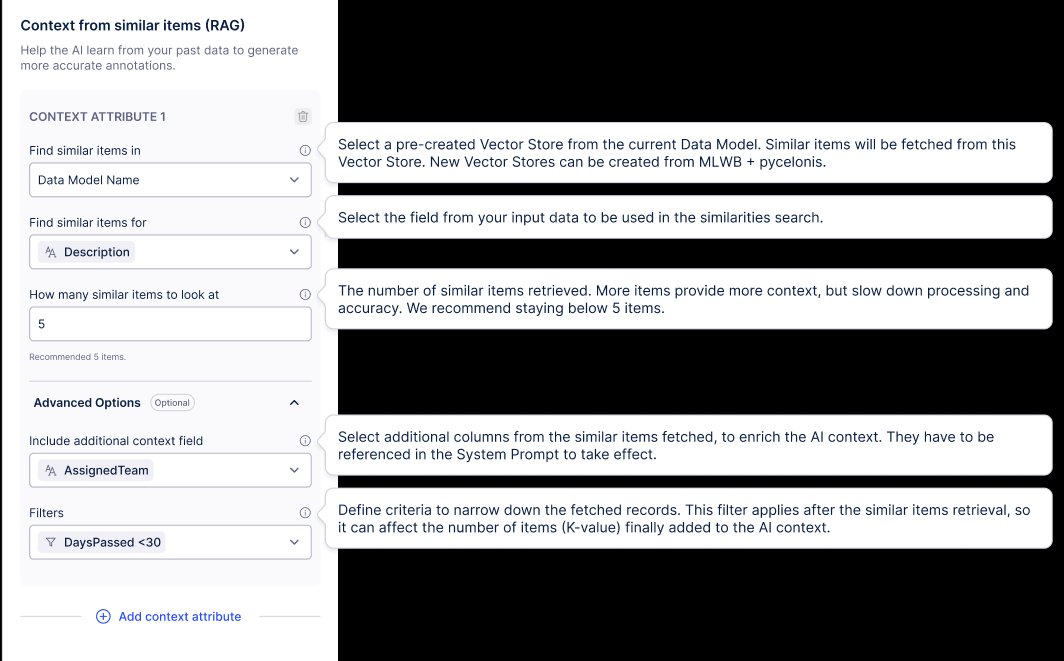 |
How a vector store works in Annotation Builder
The Context from similar items (RAG) panel in Annotation Builder lets you configure similarity-based context retrieval. Each configuration block is called a "Context Attribute".
Step 1: Find similar items in
Select a pre-created vector store from the current Data Model. Similar items will be fetched from this vector store. New vector stores can be created from MLWB + pycelonis.
The Find similar items in dropdown lists all vector stores previously created for the current Data Model.
Select the vector store you created in Part 1.
Note
Only columns defined as identifier_columns (id_cols) when creating the vector store will be available in this dropdown. In the example from Part 1, that means only REQUISITION_NUMBER and LINE_NUMBER are selectable.
Step 2: Find similar items for
Select the field from your input data to be used in the similarities search.
Choose the input field from your annotation data whose content will be used as the search query against the vector store embeddings.
Example:
Description
Step 3: How many similar items to look at (K-value)
The number of similar items retrieved. More items provide more context, but slow down processing and accuracy. We recommend staying below five items.
Default:
5Keeping this value low will provide better performance and accuracy.
Step 4: Advanced Options (Optional)
Include additional context field
Select additional columns from the similar items fetched, to enrich the AI context. These columns must be referenced in the System Prompt to take effect.
Filters
Define criteria to narrow down the fetched records. This filter is applied after the similar items retrieval, so it can affect the number of items (K-value) added to the AI context.
Example:
DaysPassed < 30
Step 5: Add more context attributes (optional)
Click + Add context attribute to add additional vector store lookups to the same annotation configuration.