Setting up Action Flows and writeback connection
There are 4 actions flows that need to be set up in the application, under the Automation folder.
Map opportunity
Map KPI (Action Based)
Map KPI (Rate Based)
Map KPI (Non Monetary)
The steps below explain how to create these flows manually. Alternatively, you can also choose to import the blueprints for these action flows from the Marketplace by searching for Map in the Search bar.
If you are using a downloaded blueprint, configure the module settings within the action flow so that it has the right references to the knowledge model and data pool IDs. In the following sections, you can skip any step marked This step can be ignored as these are only required for manual action flow creation.
Creating the Map Opportunity Action Flow
To set up the Map Opportunity Action Flow in Transformation Hub in Views:
In the Celonis navigation menu, select Studio.
In the Studio overview, find the Transformation Hub 2.0 app in the space where you installed it, and click its tile.
Click on New asset and then select Action Flow.
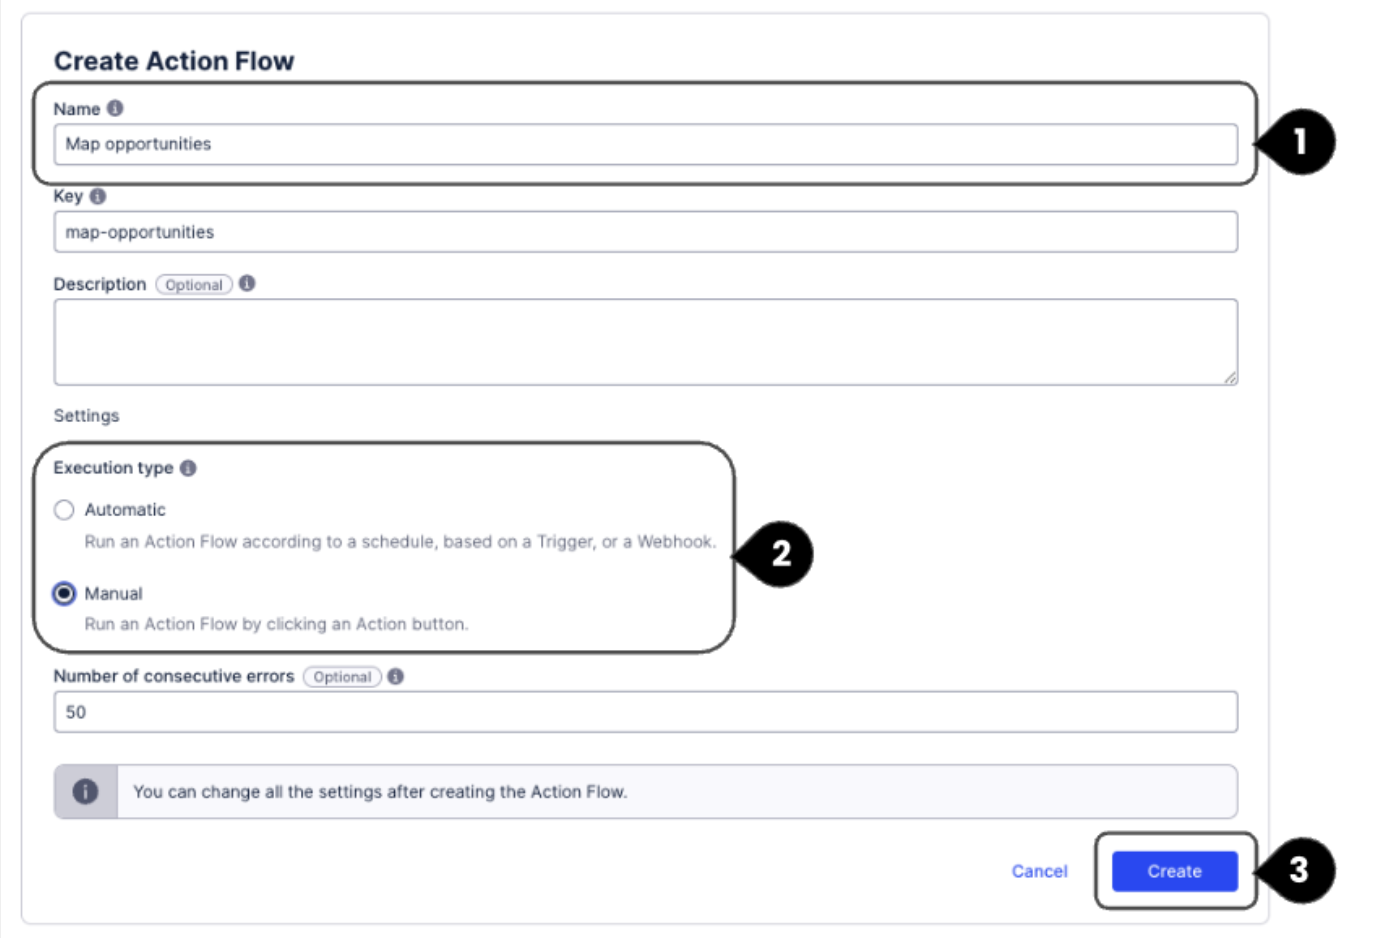
Set the Action Flow details as follows:
Name (1): Action Flow name of your choice. We suggest "Map opportunities".
Execution Type (2): Select Manual as all action flows will be triggered manually in the Admin Workbench. The remaining settings are optional and do not have to be filled or updated.
Click Create (3) to create the Action Flow.
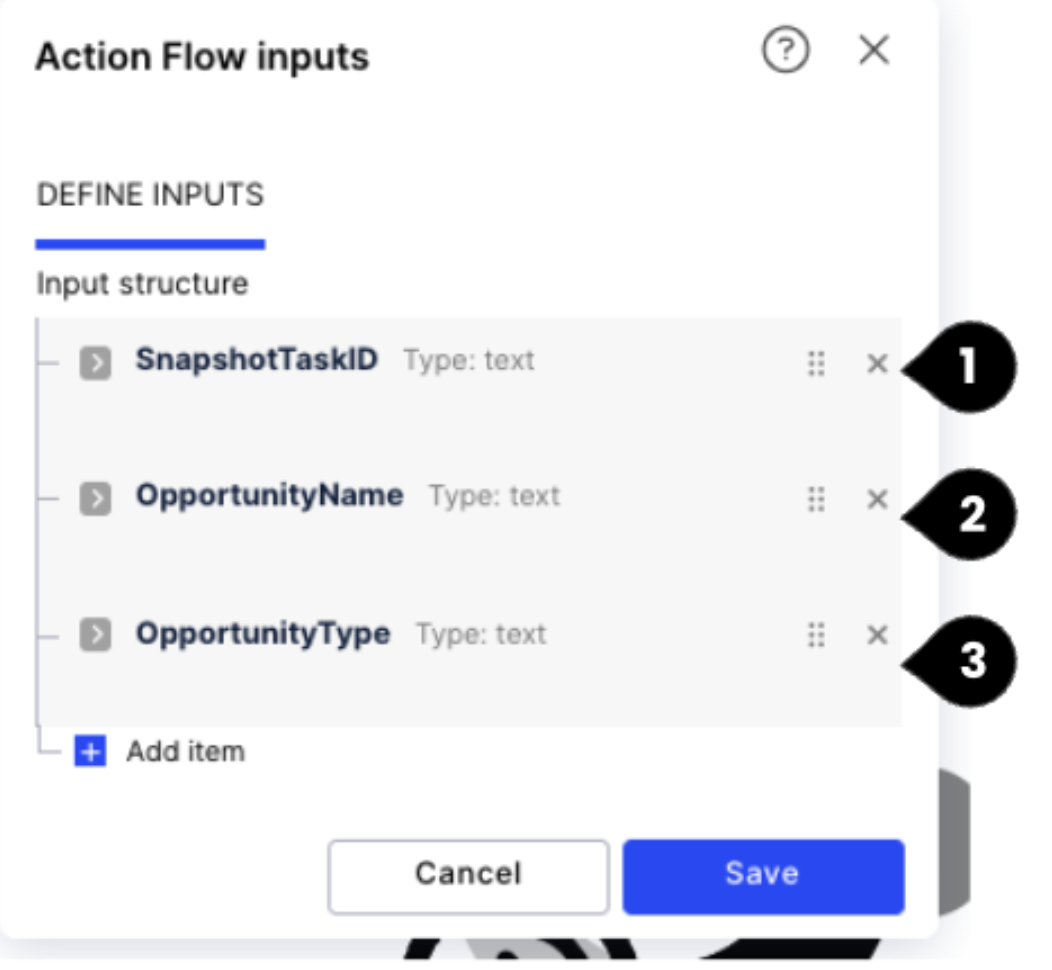
Next, navigate to Inputs and set them as follows: [This step can be ignored if you have already imported the Map Opportunity blueprint from Marketplace]

SnapshotTaskID (1): Provide the Name as SnapshotTaskID, Type as Text and click on the option Yes for Required.
OpportunityName (2): Provide the Name as OpportunityName, Type as Text and click on the option Yes for Required.
OpportunityType (3): Provide the Name as OpportunityType, Type as Text and click on the option Yes for Required.
Click Save once done.
Create a module for Celonis - Update Augmented Attribute and configure it as follows:
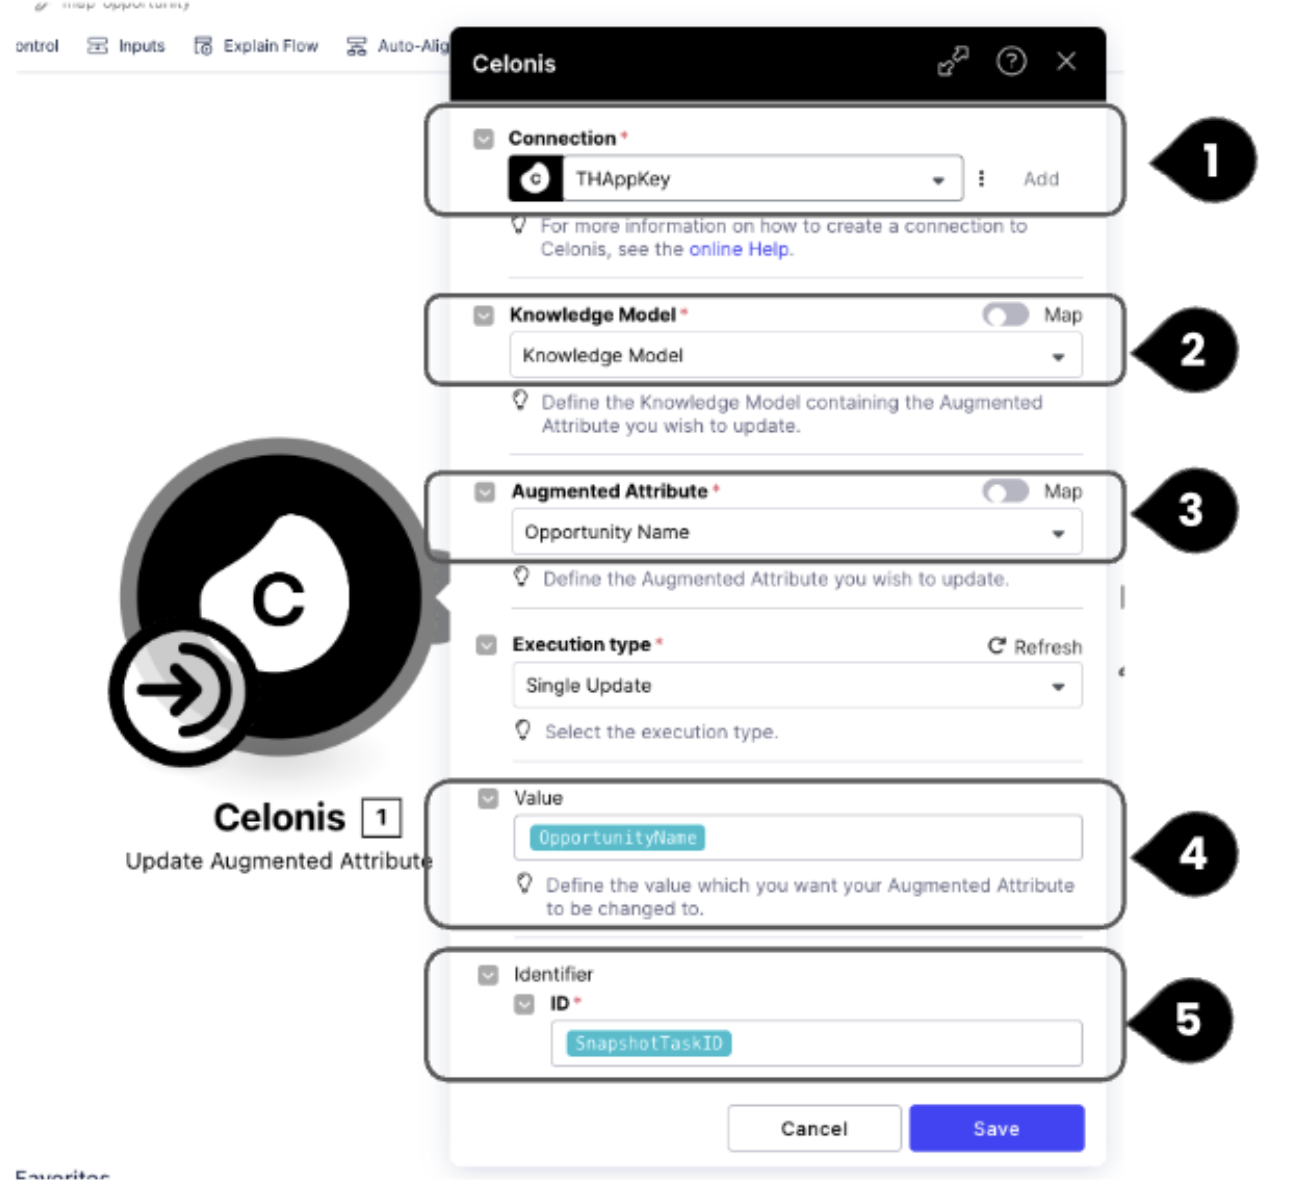
Connection (1): Select the created Application Key
Knowledge Model (2): Select the knowledge model in which the app is set up.
Augmented Attribute (3): Enter Opportunity Name as the Augmented Attribute. This name should precisely match the name of the Augmented Attribute in the knowledge model.
Value (4): Select OpportunityName from the input
Identifier (5): Select SnapshotTaskID from the input
Create another module for Celonis - Update Augmented Attribute connection and configure it as follows:
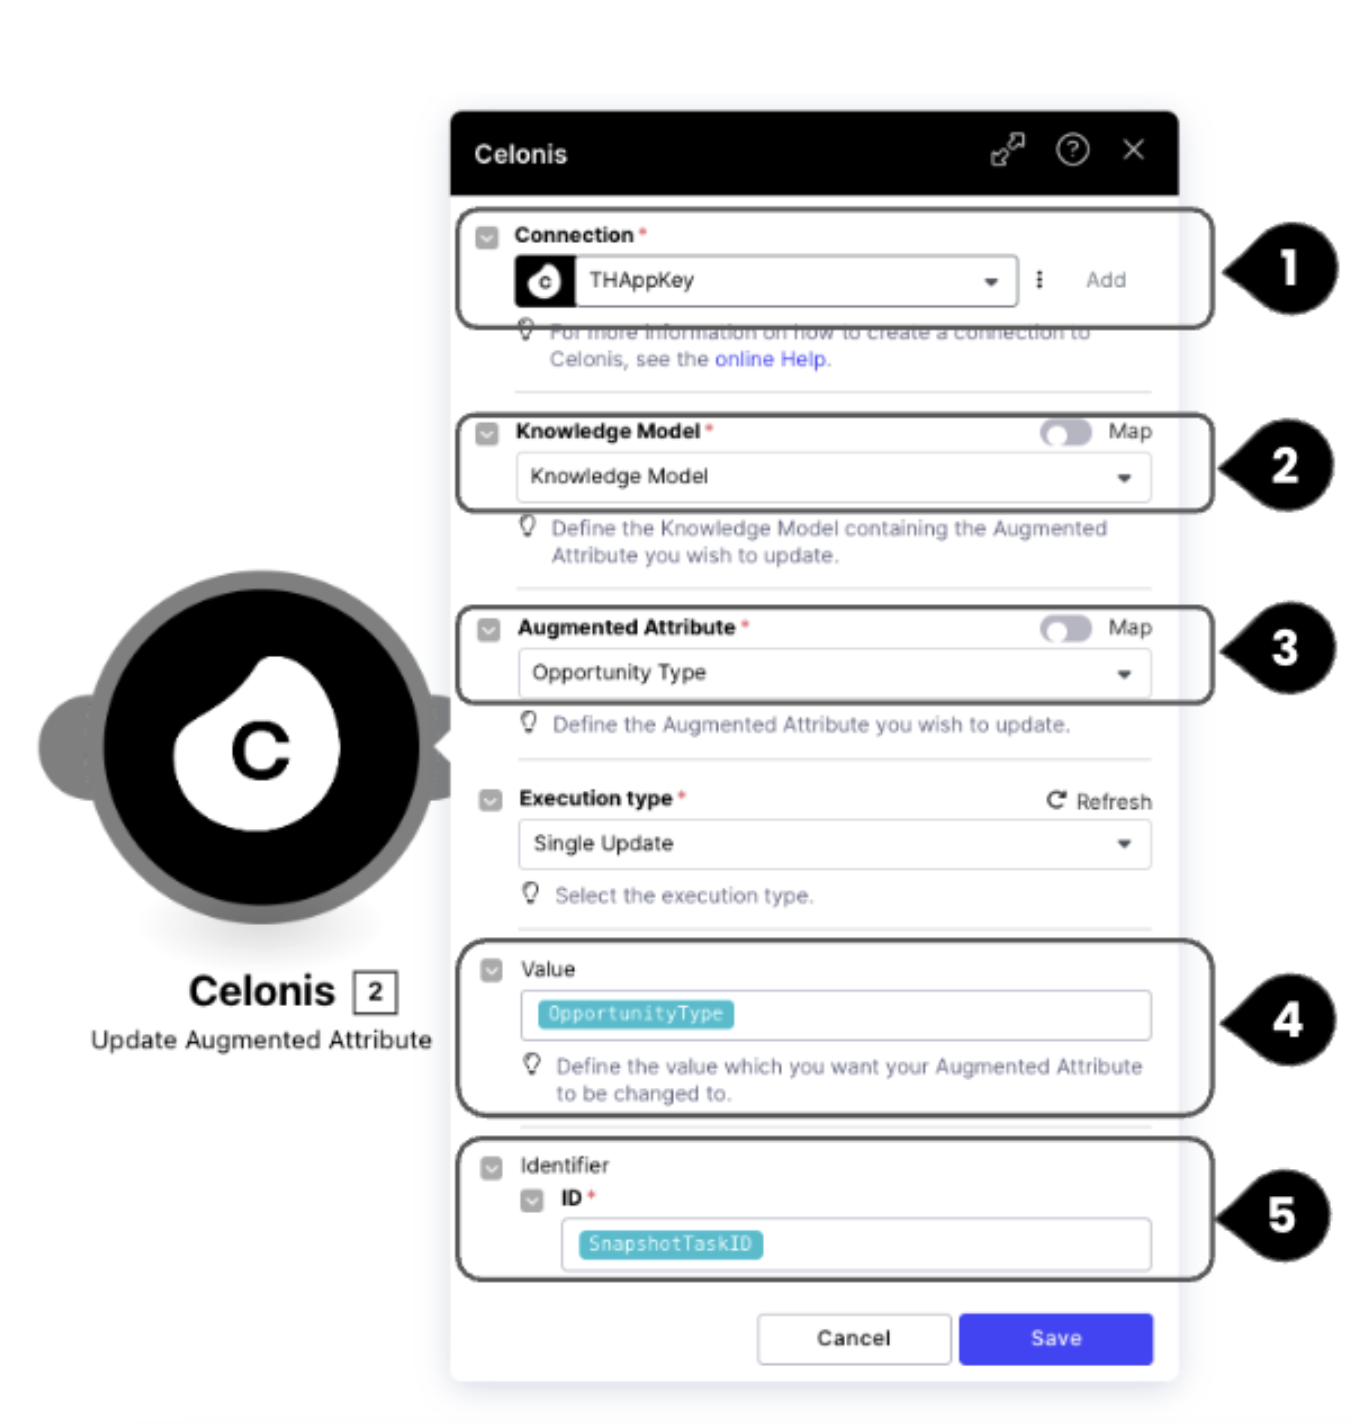
Connection (1): Select the created Application Key
Knowledge Model (2): Select the knowledge model in which the app is set up.
Augmented Attribute (3): Enter Opportunity Name as the Augmented Attribute. This name should precisely match the name of the Augmented Attribute in the knowledge model.
Value (4): Select OpportunityName from the input
Identifier (5): Select SnapshotTaskID from the input
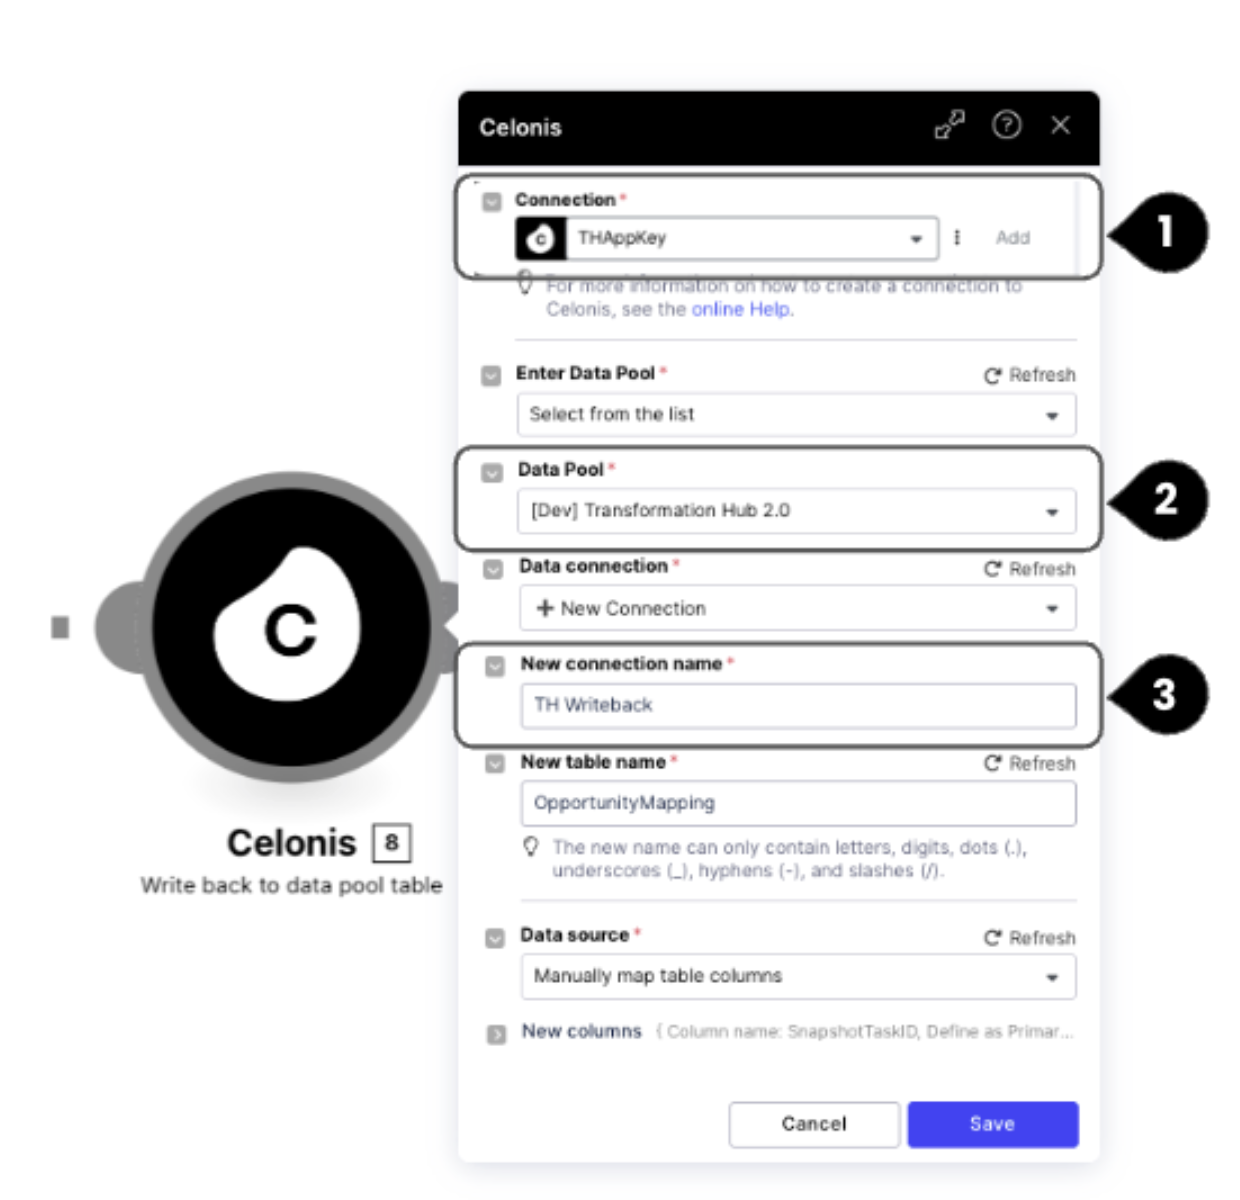
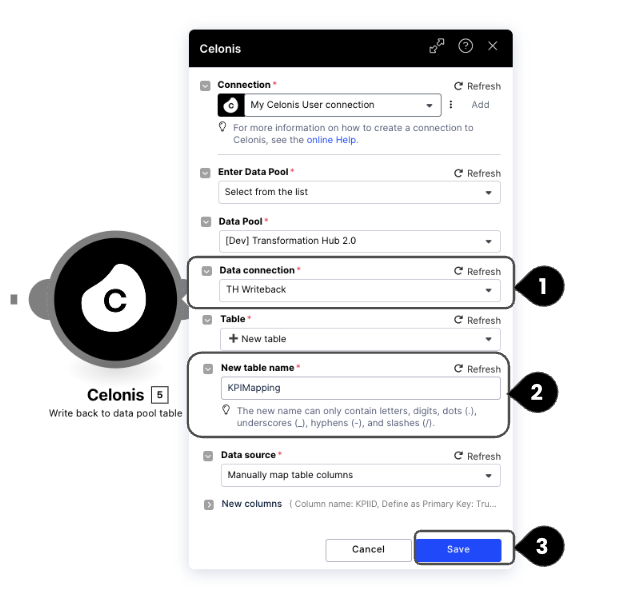
Create another module for Celonis - Write back to data pool table and configure it as follows
:
Connection (1): Select the created Application Key
Data Pool (2): Select the right data pool where the TH2.0 DM is set up. If you have not renamed the data pool after installation, it should start with ‘marketplace installed pool’
New Connection Name (3): Provide the connection name ‘TH Writeback’. Use the same name, as the backend object transformations reference this name.
Create a new table name - ‘OpportunityMapping’
Data Source: Select Manually map table columns [This step can be ignored if you have already imported the Map Opportunity blueprint from Marketplace]
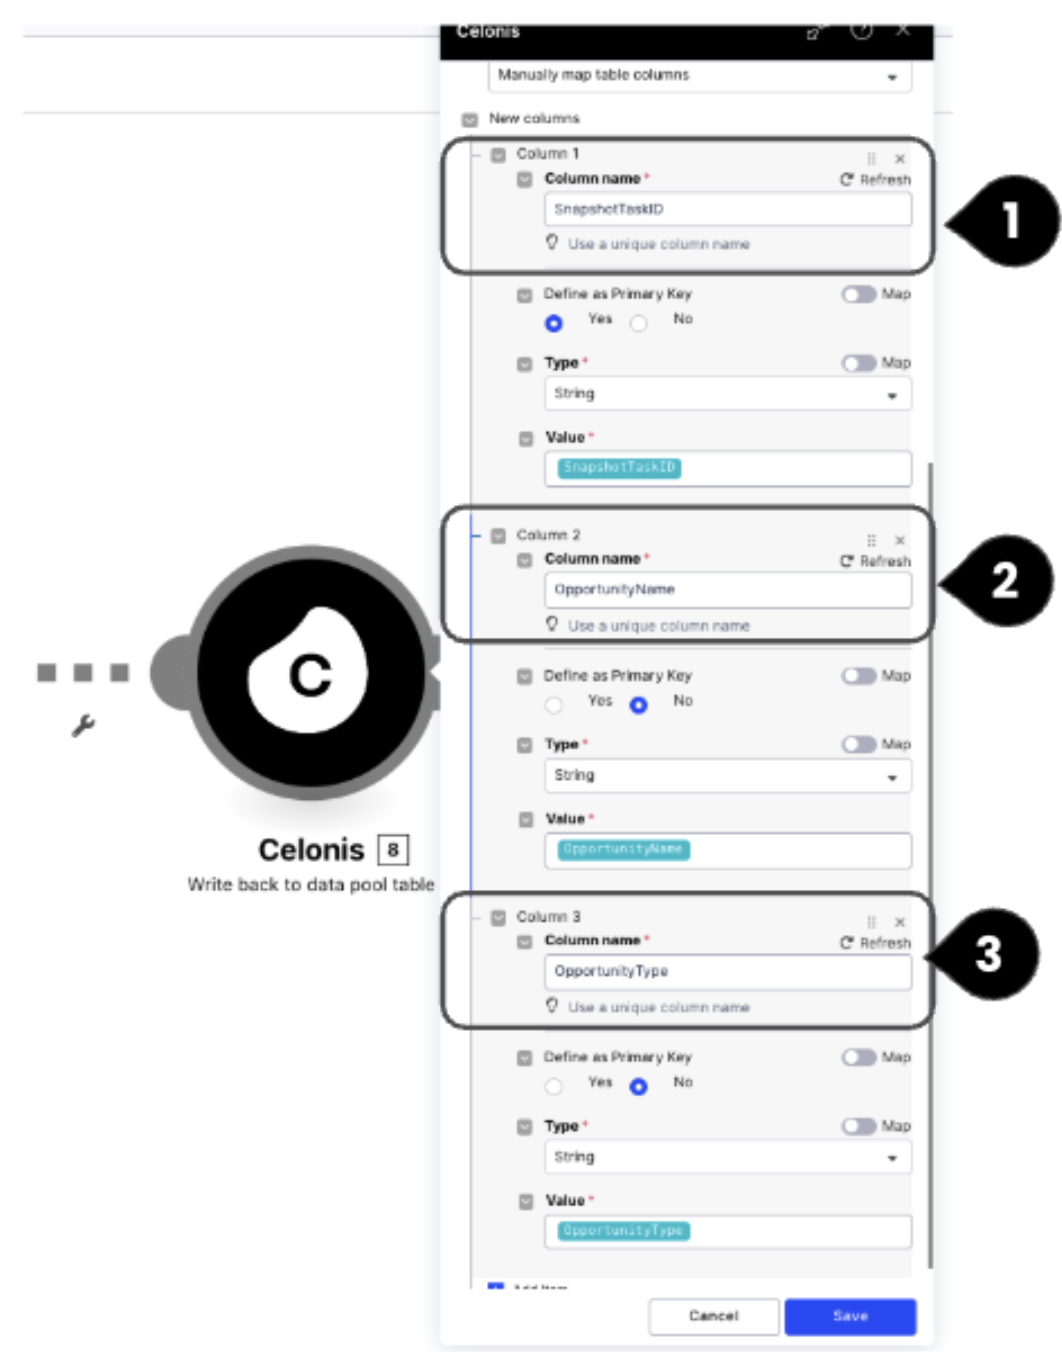
SnapshotTaskID (1): Provide the name as ‘SnapshotTaskID’, define it as a primary key, and select the value from the variable input.
OpportunityName(2): Provide the name as ‘OpportunityName’, and select the value from the variable input.
OpportunityType(3): Provide the name as ‘OpportunityType’, and select the value from the variable input. Once done, save the module.
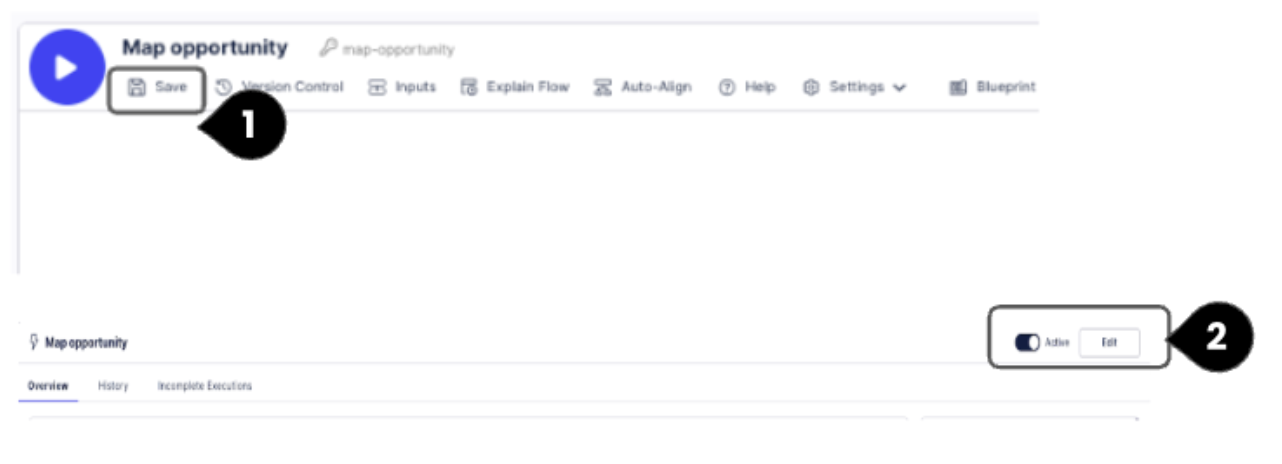
Use the Save button at the top left to save the Action Flow once the modules are saved. Publish the Action Flow and ensure to set the status to Active in the toggle at top right.
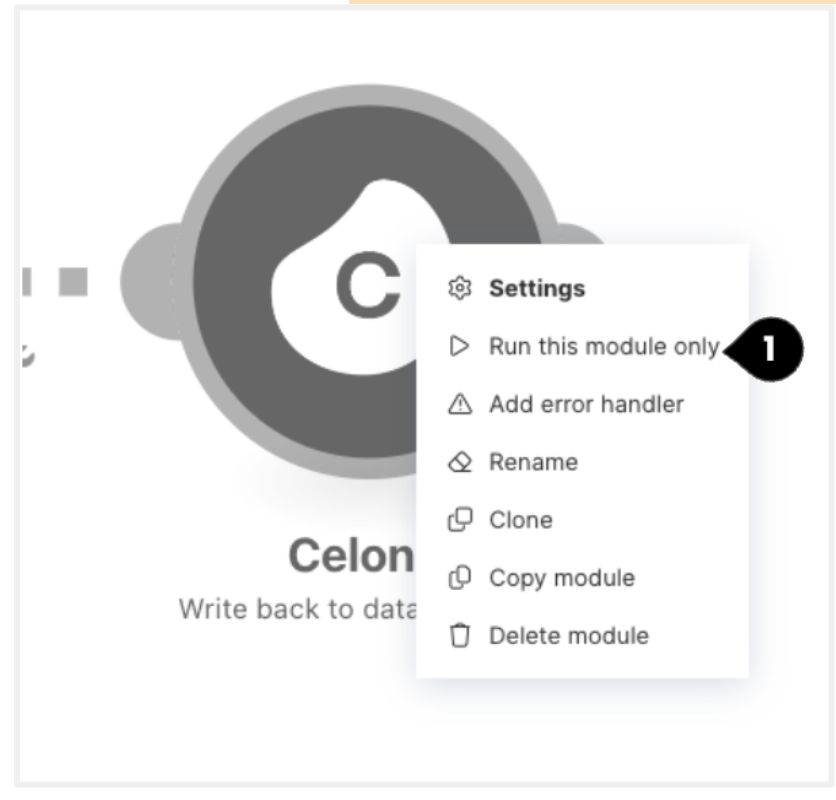
In order to establish the writeback connection, run the Write back to the data pool table module separately. Right click on the ‘Write back to data pool table’ module and select the option to ‘Run this module only’ .
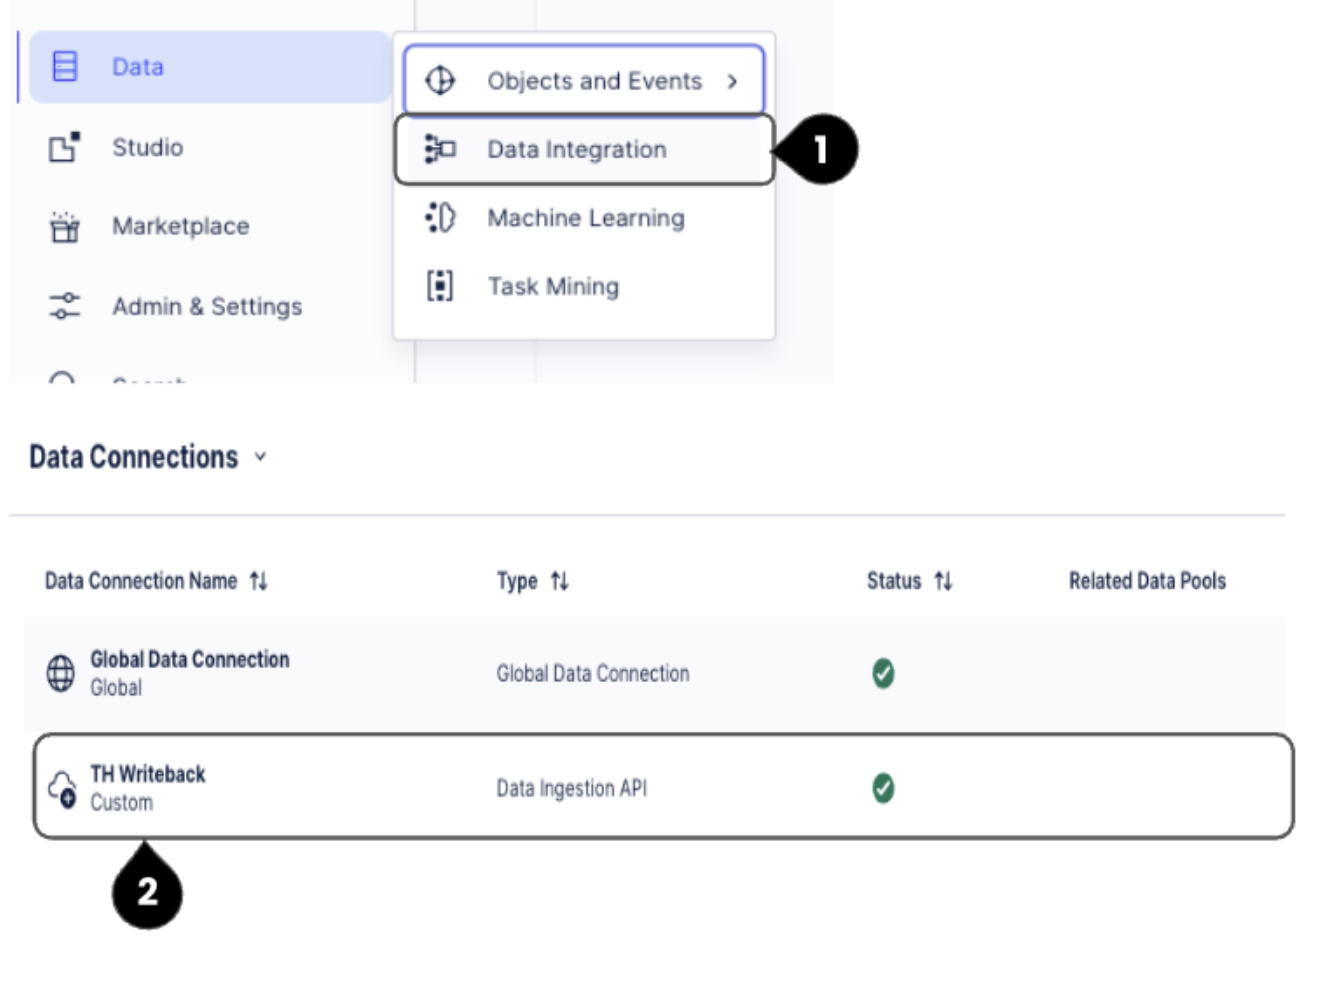
Access your data pool via ‘Data Integration’ option (1). Check if ‘TH Writeback’ connection (2) is created as a custom connection in your data pool. On clicking on the Connection, you should be able to view the OpportunityMapping table that was created by the Action Flow.
Creating the Map KPI Action Flow
Set the second Action Flow - Map KPI (Action Based) as follows:
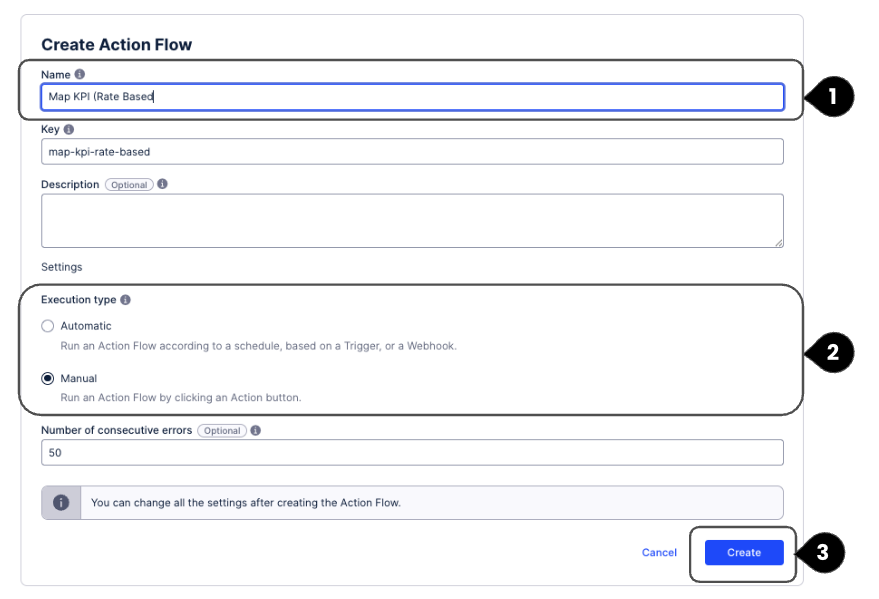
Name (1): Action Flow name of your choice. We recommend "Map KPI (Action Based)"
Execution Type (2): Select Manual as all action flows will be triggered manually in the Admin Workbench. The remaining settings are optional and do not have to be filled or updated.
Click on Create (3) to create the Action Flow.
Set up the inputs for the Action Flow [This step can be ignored if you have already imported the Map KPI (Action Based) blueprint from Marketplace] as follows:
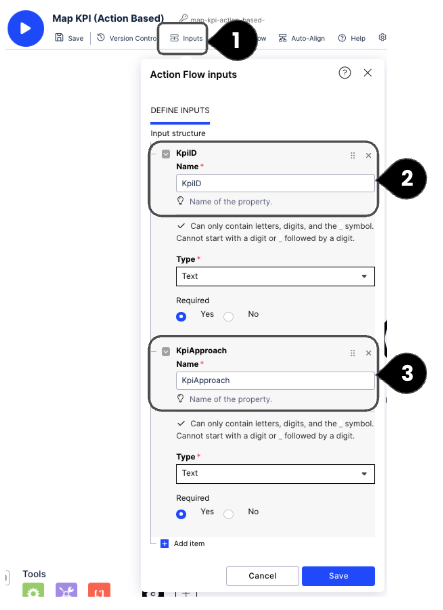
KpiID (1): Provide the Name as "KpiID", Type as Text and click on the option Yes for Required.KpiApproach
(2): Provide the Name as ‘KpiApproach’, Type as Text and click on the option Yes’for Required.
Click on Save once done.
Create a module for Celonis - Update Augmented Attribute as follows:
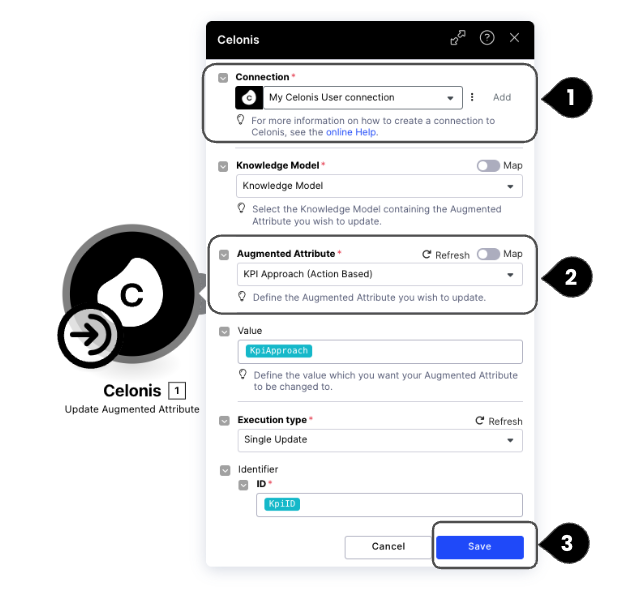
Connection (1): Select the created application key
Knowledge Model: Select the KM in which the app is set up.
Augmented Attribute (2): Enter ‘KPI Approach (Action Based)’ This name should precisely match the name of the Augmented Attribute in the Knowledge Model.
Value: Select from the input, ‘KpiApproach’ Identifier: Select from the input, ‘KpiID’
Click on Save (3) to save the module
Create a module for Celonis - Write back to data pool table as follows:
Connection: Select created application key Data Pool: Select the right data pool where the TH2.0 DM is setup
Data Connection (1): Select from the dropdown the connection name ‘TH Writeback’. As we have already created the TH Writeback Data Connection via the Action Flow, we do not need to create a new Data Connection.
Create a new table name (2): Enter ‘KpiMapping’
Click on Save (3) to save the module
For the Data Source field : Select ‘Manually map table columns’ [This step can be ignored if you have already imported the Map KPI (Action Based) blueprint from Marketplace]
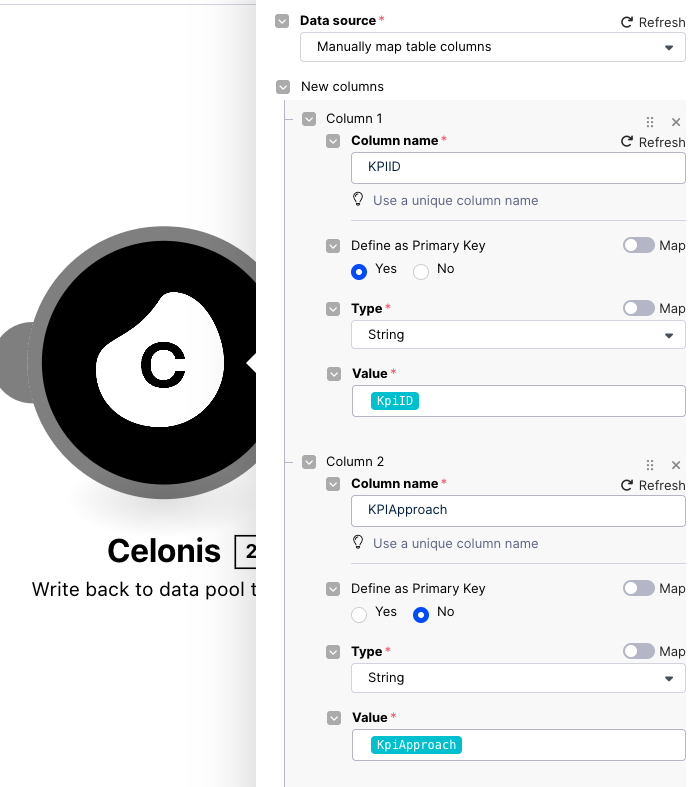
KPID (1): Provide the name as ‘KPIID’, define it as primary key, and select the value from the variable input.
KpiApproach(2): Provide the name as ‘KPIApproach’,, and select the value from the variable input.
Once done, save the module
Use the Save button at the top left to save the Action Flow once the modules are saved. Publish the Action Flow and ensure to set the status to Active in the toggle at top right.
You can test out the execution of this Action Flow in the same way as the first action flow, by running the module ‘Write back to the data pool table’ separately. Check if the table ‘KpiMapping’ is generated in the ‘TH Writeback’ Connection’.

The setup of the remaining two action flows, Map KPI (Rate Based) and Map KPI (Non Monetary), follow the same steps as that of Map KPI (Action Based).
Note
When configuring these two action flows in the Write back to data pool table module settings, select the previously created KPIMapping table. Do not create a new table. The only difference is that the Data Connection is the existing Data Connection you used for the previous two action flows instead of creating a new one.
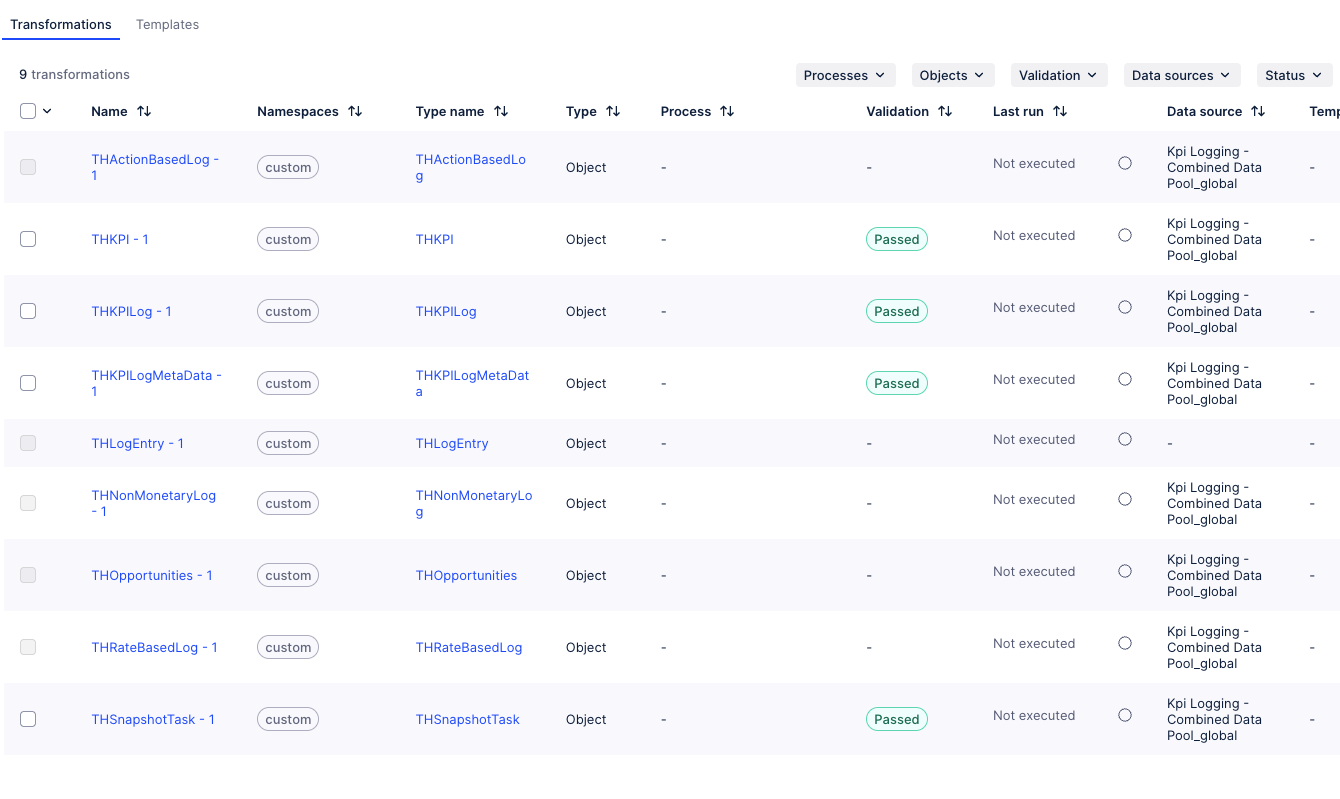
Once done you should be able to view the KPI Logging Combined Data Pool as the data source for all the objects except THLogEntry, which should be blank.
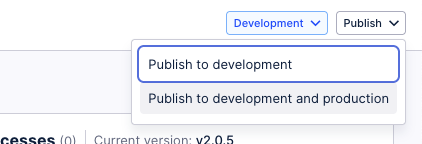
Enable all the transformations and publish the OCDM to development (or) development and production.
Access the Data Jobs, and execute the data job (all transformations, full load). This should typically take 1 to 2 minutes, but it can take up to 8 minutes.