Connecting to Google BigQuery using OAuth authentication
You can connect your Google BigQuery account to the Celonis Platform using OAuth authentication, allowing you to integrate data stored in your BigQuery warehouse. This requires you to enable Google APIs, configure the OAuth client to retrieve the client ID and client secret keys.
To connect your Google BigQuery account, you can use either a direct connection or an uplinked extractor. For more details about the uplinked extractor, see: On-premise extractors.
Step 1: Enabling Google APIs
Log in to your Google Cloud Platform (GCP) account and enable the following APIs
BigQuery API
BigQuery Storage API
Step 2: Configuring OAuth client IDs
Set up OAuth 2.0 Client IDs for the project in which your database is hosted:
Click Create Credentials.
Select OAuth Client ID.
Select Application Type to be "Web Application".
Define a name for the Web Application and add the following authorized redirect URI:
https://auth.redirect.celonis.cloud/bigquery_redirect
Save the Client ID.
Reopen the Client and copy the client ID and client secret, to be used when configuring the connection in the Celonis Platform.
Step 3: Modifying your network settings
The next step is to modify your network settings to allow the database extractor to communicate with Google BigQuery and the Celonis Platform.
The settings here are based on the connection type you are using:
Network settings for direct connections
The following network settings apply for direct connections:
Source system | Target system | Port | Protocol | Description |
|---|---|---|---|---|
Celonis Platform | Google BigQuery | 443 | TCP | JDBC connection from the Celonis Platform to the database. The port is the one you normally use to connect to the database. The IPs of the Celonis Platform depending on the cloud cluster (which can be seen in the URL). |
Network settings for uplinked connections
The following network settings apply for uplinked connections (via the on-premise extractor):
Source system | Target system | Port | Protocol | Description |
|---|---|---|---|---|
On-premise extractor server | Google BigQuery | 443 | TCP | JDBC connection from on-premise extractor server to the database. The port is the one you normally use to connect to the database. |
On-premise extractor server | Celonis Platform | 443 | TCP | HTTPS connection from on-premise extractor server to Celonis cloud endpoint. The IPs of the Celonis Platform depending on the cloud cluster (which can be seen in the URL). |
Celonis Platform IP addresses depending on the cluster
The respective clusters use multiple IPs each, so you need to enable all three of them in your firewall configuration to connect the on-premise extractor server and the cloud endpoint.
For a complete list of inbound and outbound Celonis Platform IP addresses to be allowlisted if needed, see: Allowlisting domain names and IP addresses
Step 4: For uplinked extractors only
When using an uplinked extractor only:
Download the latest JDBC package from the Celonis Download Portal: Updating the on-premise JDBC extractor
Download the Google BigQuery Jar.
Start the uplink using the following command:
java -Dloader.path=google-bigquery.jar -jar connector-jdbc.jar serve
Step 5: Creating a connection between Google Big and the Celonis Platform
You can now create the connection between Google BigQuery and the Celonis Platform from your data pool diagram:
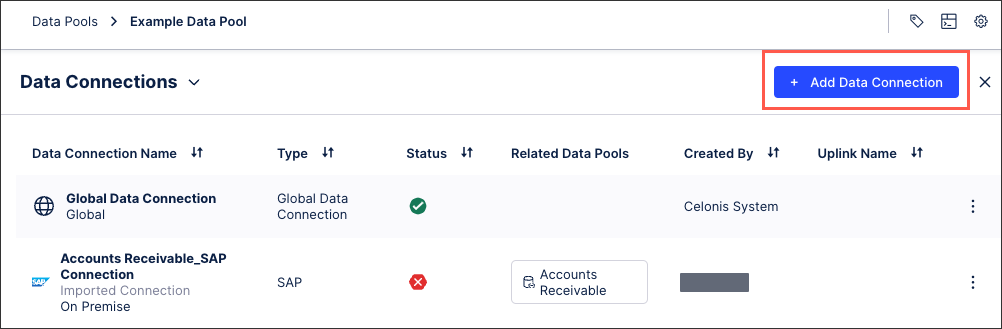
Click Data Connections.
Click Add Data Connection and select Connect to Data Source.
For direct connections, select Cloud - Google BigQuery.
For uplinked connections, select: On-Premise - Database and then select your uplink extractor.
Configure the following connection details, with the options here depending on your choice of uplinked or direct connection:
Name: An internal reference for the data connection.
Uplink Connections: The name of the Uplink Extractor Server installed on your end.
Configuration type: Select standard
Host: Enter https://bigquery.googleapis.com
Port: Enter 443 (this is the default)
Database Name: The name of the project in your Google cloud platform.
Credentials: Select either OAuth or Application default.
If you're using OAuth, enter the client ID and client secret provided in step 2.
Click Save.
The OAuth workflow starts, asking you to sign into your Google account and authorize the connection.