Microsoft 365 Email (Action Flow)
Important
Any references to third-party products or services do not constitute Celonis Product Documentation nor do they create any contractual obligations. This material is for informational purposes only and is subject to change without notice.
Celonis does not warrant the availability, accuracy, reliability, completeness, or usefulness of any information regarding the subject of third-party services or systems.
With Microsoft 365 Email modules in Celonis platform, you can watch for, search for, retrieve, create and send, update, forward, reply, move and delete messages, create and send draft messages, and retrieve, add, and download attachments.
To use the Microsoft 365 Email modules, you must have a Microsoft Office account. You can create an account at office.com.
Refer to the Microsoft 365 Email API documentation for a list of available endpoints.
See the changelog for the Microsoft 365 Email App
Connect Microsoft 365 Email to Celonis platform
To establish the connection using your Microsoft account:
Log in to your Celonis platform account, add a Microsoft 365 Email module to your Action Flow, and click Create a connection.
Optional: In the Connection name field, enter a name for the connection.
Optional: Click Show advanced settings and enter your custom app client credentials.
For more information, see the Connect Microsoft 365 Email With Custom App and Client Credentials section.
Click Save.
If prompted, authenticate your account and confirm access.
You have successfully established the connection. You can now edit your Action Flow and add more Microsoft 365 Email modules. If your connection requires reauthorization at any point, follow the connection renewal steps here.
Connect Microsoft 365 Email With Custom App and Client Credentials
Before you begin:
Make sure you have Client ID and Client Secret ready.
If you haven't created your credentials yet, you need to create a custom app in your Azure account to generate the Client ID and Client Secret. See Generating credentials in Azure.
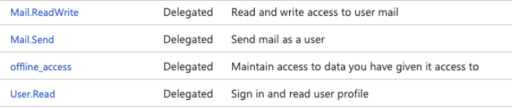
Make sure the Microsoft 365 Email application has the following permissions assigned in the Azure portal:
Build Microsoft 365 Email Action Flows
After connecting the app, you can perform the following actions:
Watch Messages
Required Permissions: Mail.Read
Search Messages
Required Permissions: Mail.Read
Keyword Query Language
Use Keyword Query Language (KQL) search syntax to build your search queries in Microsoft modules. For more information, see Microsoft Graph help.
Get a Message
Required Permissions: Mail.Read
Create and Send a Message
Required Permissions: Mail.Send, Mail.ReadWrite
Forward a Message
Required Permissions: Mail.Send
Reply to a Message
Required Permissions: Mail.Send, Mail.ReadWrite
Move a Message
Required Permissions: Mail.ReadWrite
Delete a Message
Required Permissions: Mail.ReadWrite
Create a Draft Message
Required Permissions: Mail.ReadWrite
Send a Draft Message
Required Permissions: Mail.ReadWrite, Mail.Send
Update a Message
Required Permissions: Mail.ReadWrite
List Attachments
Required Permissions: Mail.Read
Add an Attachment
Required Permissions: Mail.ReadWrite
Download an Attachment
Required Permissions: Mail.Read
Make an API Call
Required Permissions: Mail.ReadWrite
Change log between Microsoft 365 Email [v2] and Microsoft 365 Email [v1]
New modules - Search Messages, Get a Message, Update a Message, List Attachments, Download an Attachment, and Make an API Call