Action Flow - Configuration changes
Similar to Skills, the Action Flow (AF) is another automation tool used in Celonis to implement some action-related functionalities in the AR credit App. Below is the list of AFs that are available upon installation.
Action Flow (AF) Name | Used To |
|---|---|
Approver Matrix Edit | Create an “Edit record” of the credit review approval matrix |
Approval Matrix - New | Used for the Create a “New record” of the credit review approval matrix |
Edit/ New Score Card Parameter Value | Used for Create or update “Scorecard parameter value” records. |
Edit / New Score Card Parameter | Used for Create or update “Scorecard parameter” records. |
These AFs will need some updates to ensure they have the correct permissions and targets for the Celonis environment. Changes required in each Action flow step are listed below:
Action Flow: Approver Matrix Edit
Step 5: Get Approver Email
Connection: Select the Application Key connection to interact with Celonis. If you do not have an existing connection then you can create one by clicking the “Add” button.
Data Pool: Select the Data Pool that you created in Step 1.
Data Model: Select the Accounts Receivable Data Model as the data model.
Step 6: Update Approver Email
Connection: Select the Application Key connection to interact with Celonis. If you do not have an existing connection then you can create one by clicking the “Add” button.
Knowledge Model: Select AR Credit as the knowledge model.
Record: Select Credit Review Approval Matrix as the record from the knowledge model.
Augmented Attribute: Select Approver Email from the list.

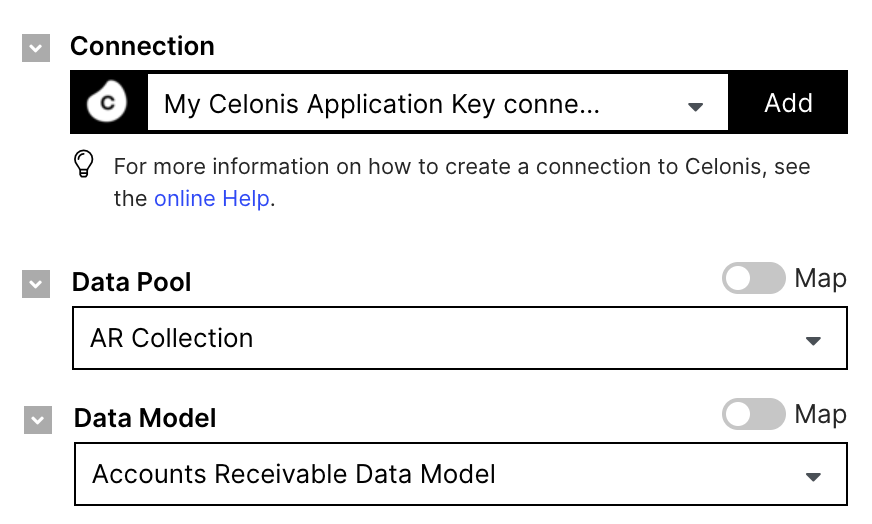
Step 7: Get Approver Manager Email
Connection: Select the Application Key connection to interact with Celonis. If you do not have an existing connection then you can create one by clicking the “Add” button.
Data Pool: Select the Data Pool that you created in Step 1.
Data Model: Select Accounts Receivable Data Model as the data model.
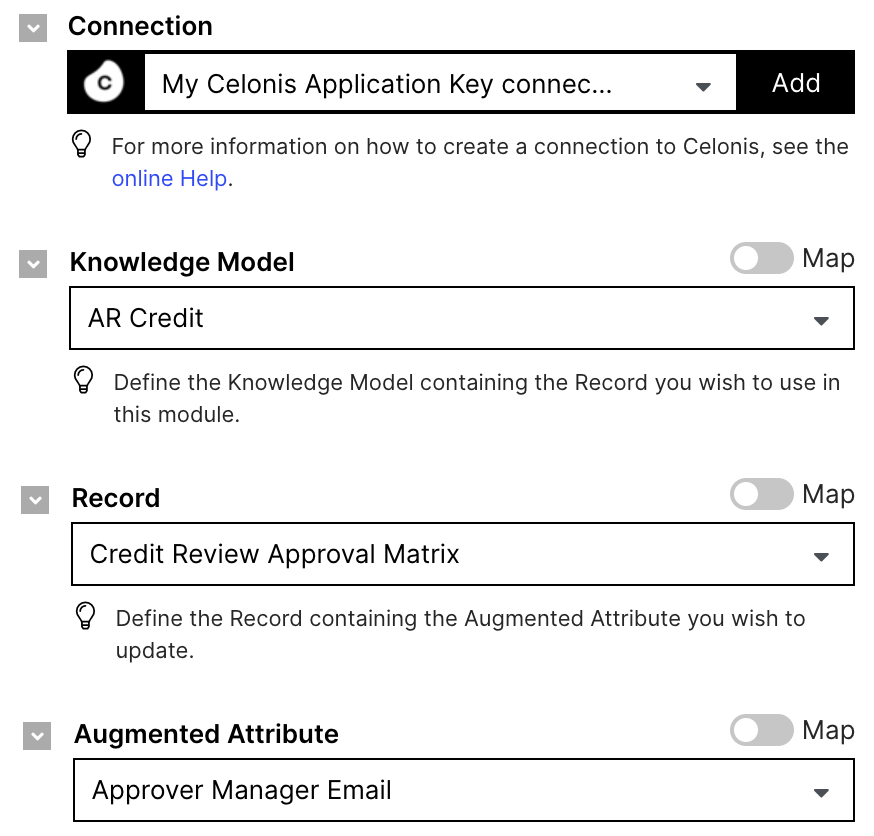
Step 8: Update Approver Manager Email
Connection: Select the Application Key connection to interact with Celonis. If you do not have an existing connection then you can create one by clicking the “Add” button.
Knowledge Model: Select AR Credit as the knowledge model.
Record: Select Credit Review Approval Matrix as the record from the knowledge model.
Augmented Attribute: Select Approver Manager Email from the list.
Step 9: Get Threshold Amount
Connection: Select the Application Key connection to interact with Celonis. If you do not have an existing connection then you can create one by clicking the “Add” button.
Data Pool: Select the Data Pool that you created in Step 1.
Data Model: Select Accounts Receivable Data Model as the data model.
Step 10: Update Threshold Amount
Connection: Select the Application Key connection to interact with Celonis. If you do not have an existing connection then you can create one by clicking the “Add” button.
Knowledge Model: Select AR Credit as the knowledge model.
Record: Select Credit Review Approval Matrix as the record from the knowledge model.
Augmented Attribute: Select Threshold Amount from the list.

Step 11: Is Active?
Connection: Select the Application Key connection to interact with Celonis. If you do not have an existing connection then you can create one by clicking the “Add” button.
Data Pool: Select the Data Pool that you created in Step 1.
Data Model: Select Accounts Receivable Data Model as the data model.
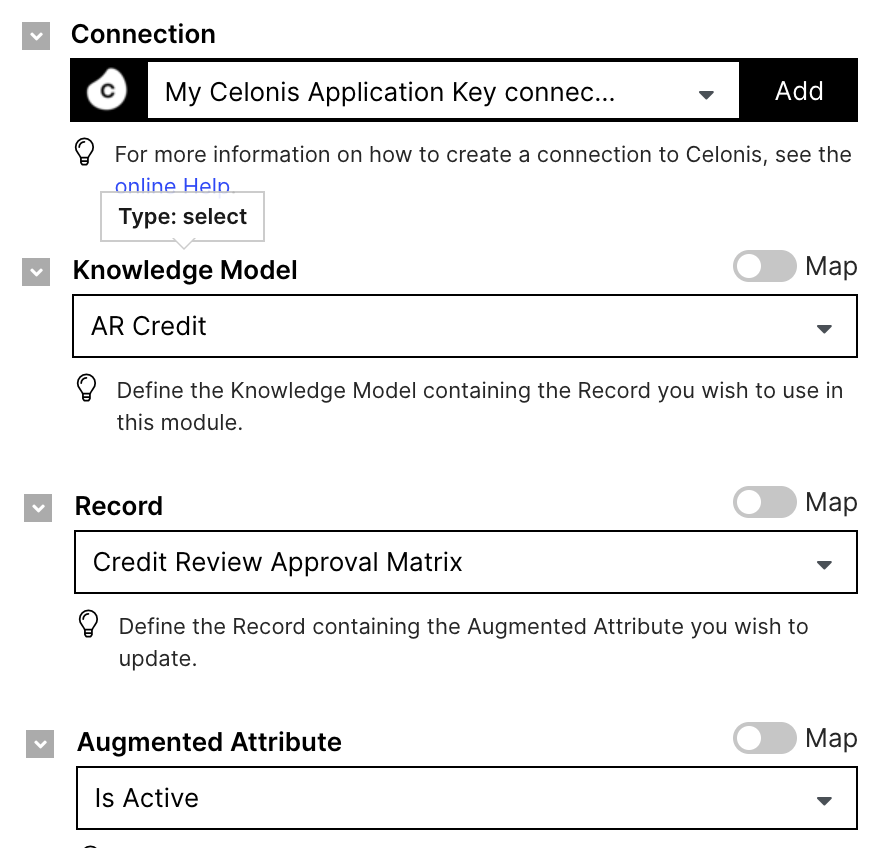
Step 12: Update Is Active
Connection: Select the Application Key connection to interact with Celonis. If you do not have an existing connection then you can create one by clicking the “Add” button.
Knowledge Model: Select AR Credit as the knowledge model.
Record: Select Credit Review Approval Matrix as the record from the knowledge model.
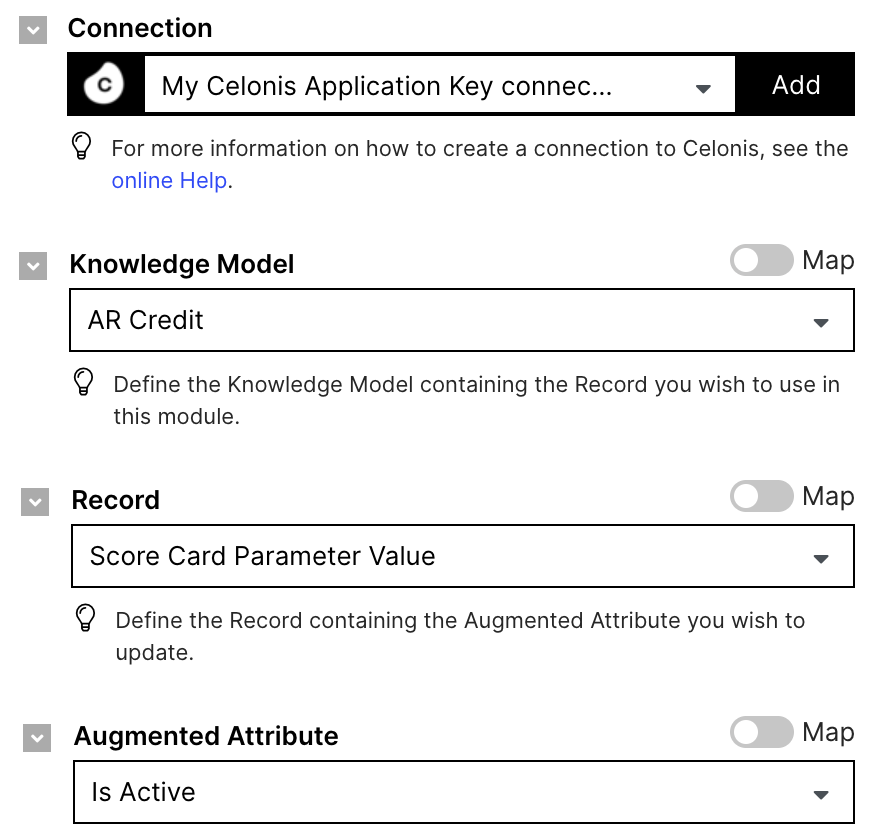
Augmented Attribute: Select Is Active from the list.
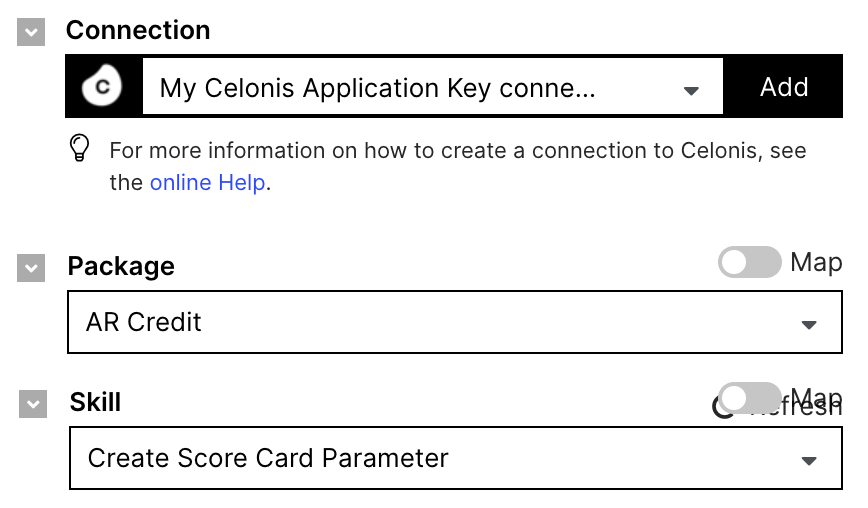
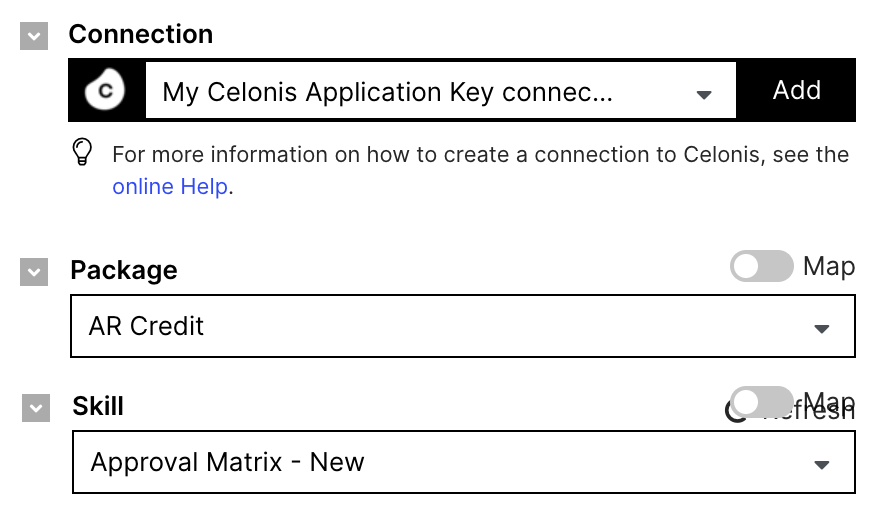
Action Flow: Approval Matrix - New
Step 2: Celonis
Connection: Select the Application Key connection to interact with Celonis. If you do not have an existing connection then you can create one by clicking the “Add” button.
Package: Select the Studio Package that you installed from the Marketplace.
Skill: Select Approval Matrix - New skill from the list.
Action Flow: Edit/ New Score Card Parameter Value
Step 4: Get Start Range
Connection: Select the Application Key connection to interact with Celonis. If you do not have an existing connection then you can create one by clicking the “Add” button.
Data Pool: Select the Data Pool that you created in Step 1.
Data Model: Select Accounts Receivable Data Model as the data model.
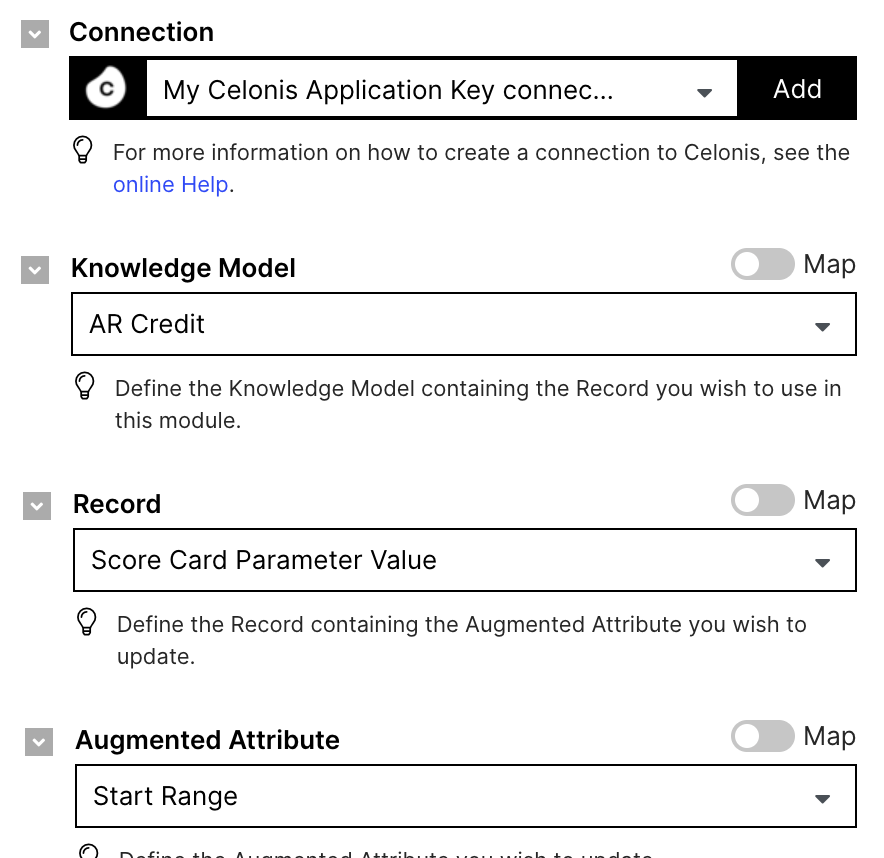
Step 5: Update Start Range
Connection: Select the Application Key connection to interact with Celonis. If you do not have an existing connection then you can create one by clicking the “Add” button.
Knowledge Model: Select AR Credit as the knowledge model.
Record: Select Score Card Parameter Value as the record from the knowledge model.
Augmented Attribute: Select Start Range from the list.
Step 6: Get End Range
Connection: Select the Application Key connection to interact with Celonis. If you do not have an existing connection then you can create one by clicking the “Add” button.
Data Pool: Select the Data Pool that you created in Step 1.
Data Model: Select Accounts Receivable Data Model as the data model.
Step 7: Update End Range
Connection: Select the Application Key connection to interact with Celonis. If you do not have an existing connection then you can create one by clicking the “Add” button.
Knowledge Model: Select AR Credit as the knowledge model.
Record: Select Score Card Parameter Value as the record from the knowledge model.
Augmented Attribute: Select End Range from the list.

Step 8: Get Text Value
Connection: Select the Application Key connection to interact with Celonis. If you do not have an existing connection then you can create one by clicking the “Add” button.
Data Pool: Select the Data Pool that you created in Step 1.
Data Model: Select Accounts Receivable Data Model as the data model.
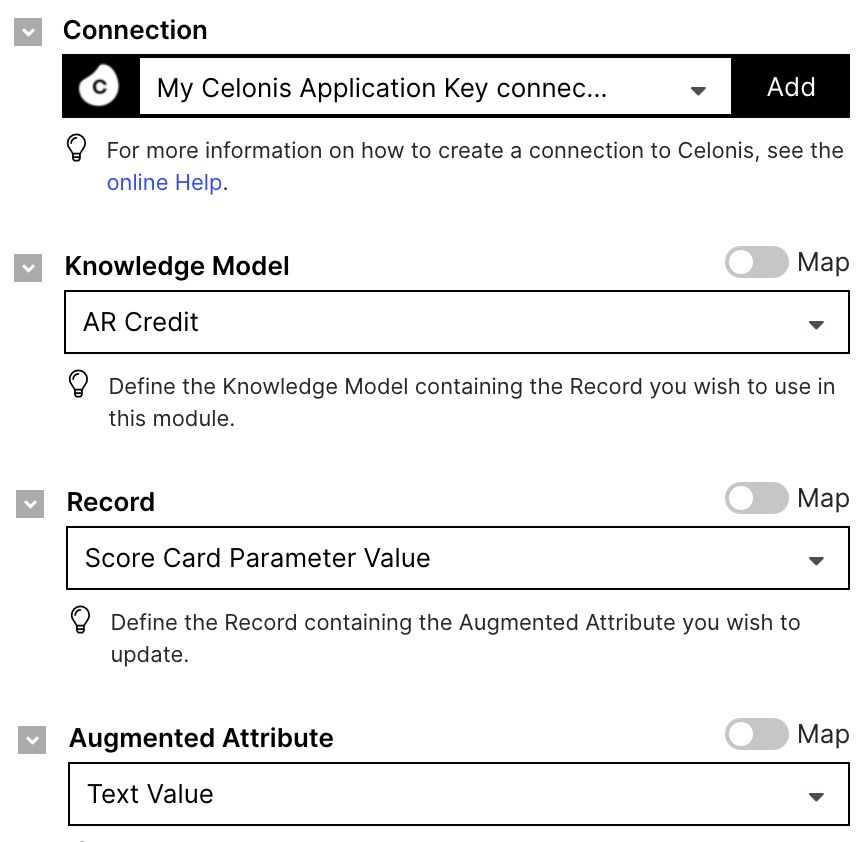
Step 9: Update Text Value
Connection: Select the Application Key connection to interact with Celonis. If you do not have an existing connection then you can create one by clicking the “Add” button.
Knowledge Model: Select AR Credit as the knowledge model.
Record: Select Score Card Parameter Value as the record from the knowledge model.
Augmented Attribute: Select Text Value from the list.
Step 10: Get Score
Connection: Select the Application Key connection to interact with Celonis. If you do not have an existing connection then you can create one by clicking the “Add” button.
Data Pool: Select the Data Pool that you created in Step 1.
Data Model: Select Accounts Receivable Data Model as the data model.
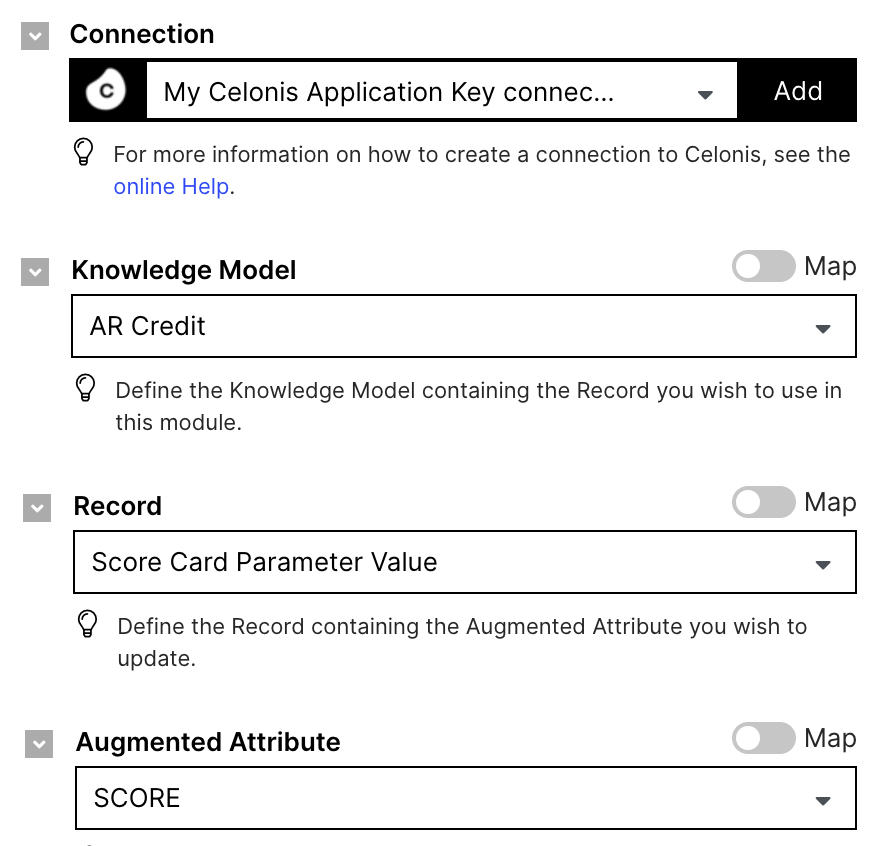
Step 11: Update Score
Connection: Select the Application Key connection to interact with Celonis. If you do not have an existing connection then you can create one by clicking the “Add” button.
Knowledge Model: Select AR Credit as the knowledge model.
Record: Select Score Card Parameter Value as the record from the knowledge model.
Augmented Attribute: Select SCORE from the list.
Step 12: Is Active?
Connection: Select the Application Key connection to interact with Celonis. If you do not have an existing connection then you can create one by clicking the “Add” button.
Data Pool: Select the Data Pool that you created in Step 1.
Data Model: Select Accounts Receivable Data Model as the data model.
Step 13: Update Is Active
Connection: Select the Application Key connection to interact with Celonis. If you do not have an existing connection then you can create one by clicking the “Add” button.
Knowledge Model: Select AR Credit as the knowledge model.
Record: Select Score Card Parameter Value as the record from the knowledge model.
Augmented Attribute: Select Is Active from the list.
Step 14: Celonis
Connection: Select the Application Key connection to interact with Celonis. If you do not have an existing connection then you can create one by clicking the “Add” button.
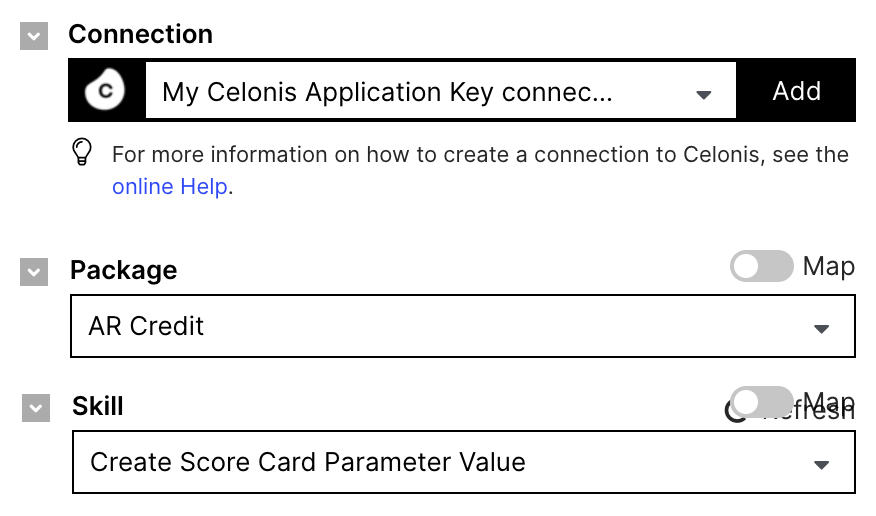
Package: Select the Studio Package that you installed from the Marketplace.
Skill: Select Create Score Card Parameter Value skill from the list.
Action Flow: Edit / New Score Card Parameter
Step 5: check Is Active
Connection: Select the Application Key connection to interact with Celonis. If you do not have an existing connection then you can create one by clicking the “Add” button.
Data Pool: Select the Data Pool that you created in Step 1.
Data Model: Select Accounts Receivable Data Model as the data model.
Step 3: Is Active
Connection: Select the Application Key connection to interact with Celonis. If you do not have an existing connection then you can create one by clicking the “Add” button.
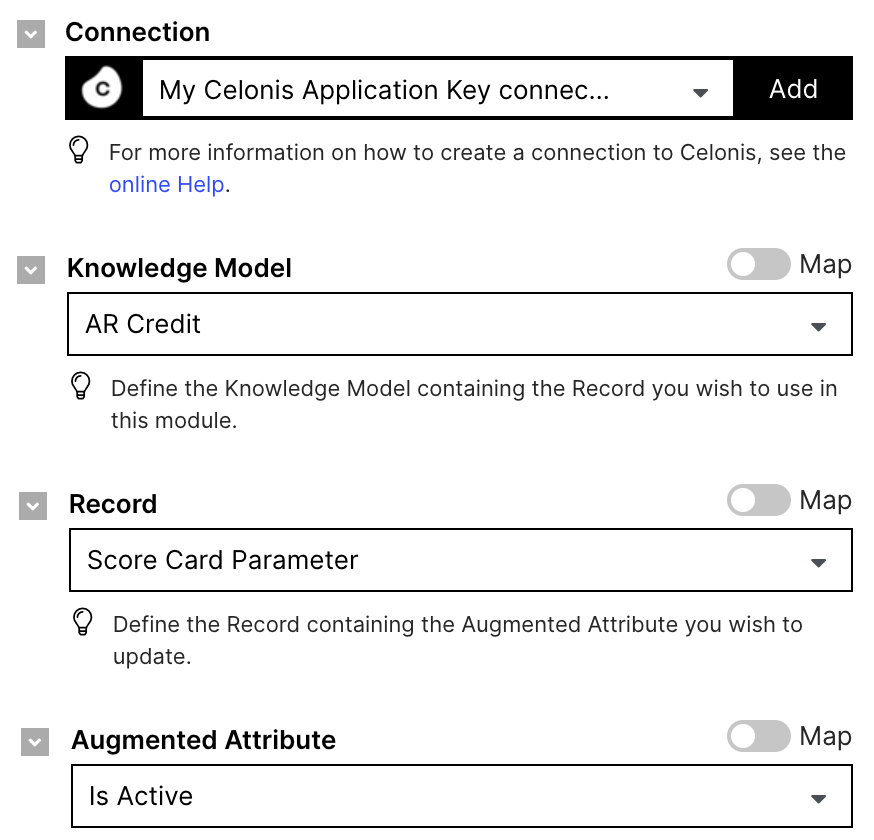
Knowledge Model: Select AR Credit as the knowledge model.
Record: Select Score Card Parameter as the record from the knowledge model.
Augmented Attribute: Select Is Active from the list.
Step 8: check Internal Calculation
Connection: Select the Application Key connection to interact with Celonis. If you do not have an existing connection then you can create one by clicking the “Add” button.
Data Pool: Select the Data Pool that you created in Step 1.
Data Model: Select Accounts Receivable Data Model as the data model.
Step 6: Internal Calculation
Connection: Select the Application Key connection to interact with Celonis. If you do not have an existing connection then you can create one by clicking the “Add” button.
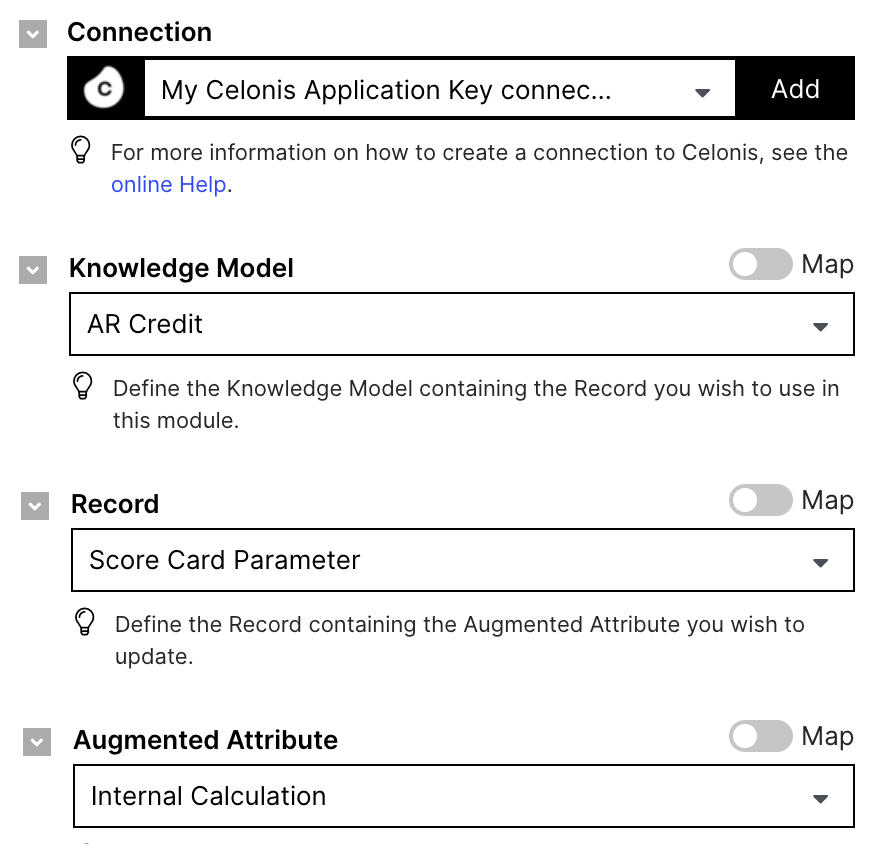
Knowledge Model: Select AR Credit as the knowledge model.
Record: Select Score Card Parameter as the record from the knowledge model.
Augmented Attribute: Select Internal Calculation from the list.
Step 9: check Exclude if missing
Connection: Select the Application Key connection to interact with Celonis. If you do not have an existing connection then you can create one by clicking the “Add” button.
Data Pool: Select the Data Pool that you created in Step 1.
Data Model: Select Accounts Receivable Data Model as the data model.
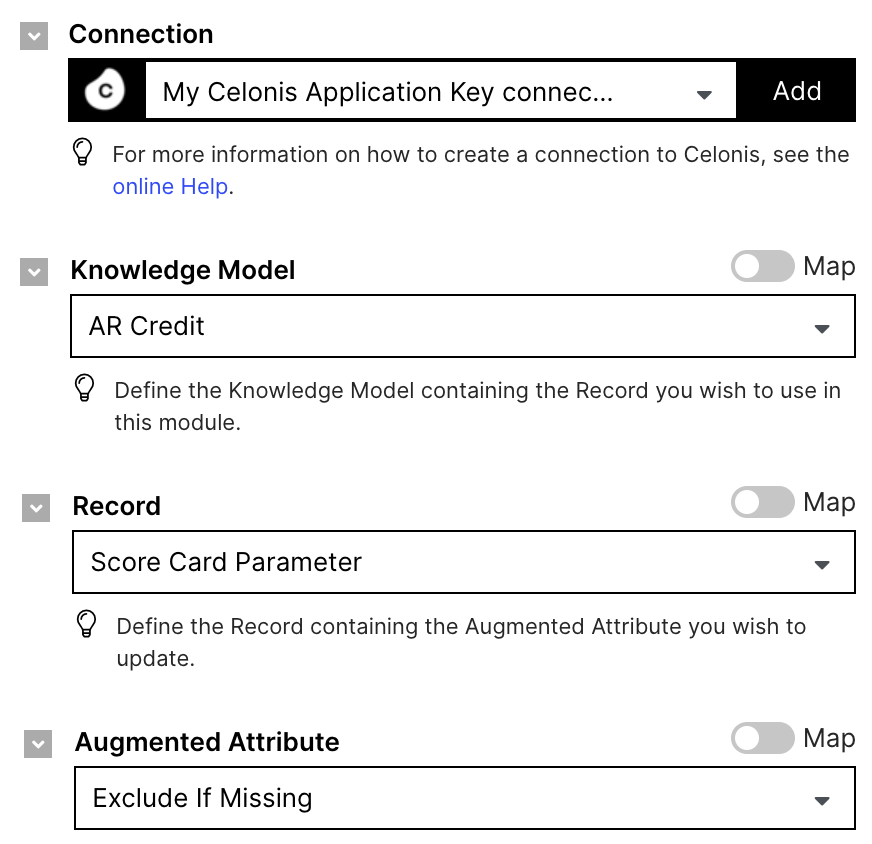
Step 10: Exclude if missing
Connection: Select the Application Key connection to interact with Celonis. If you do not have an existing connection then you can create one by clicking the “Add” button.
Knowledge Model: Select AR Credit as the knowledge model.
Record: Select Score Card Parameter as the record from the knowledge model.
Augmented Attribute: Select Exclude If Missing from the list.
Step 11: check Score is missing
Connection: Select the Application Key connection to interact with Celonis. If you do not have an existing connection then you can create one by clicking the “Add” button.
Data Pool: Select the Data Pool that you created in Step 1.
Data Model: Select Accounts Receivable Data Model as the data model.
Step 12: Scored is missing
Connection: Select the Application Key connection to interact with Celonis. If you do not have an existing connection then you can create one by clicking the “Add” button.
Knowledge Model: Select AR Credit as the knowledge model.
Record: Select Score Card Parameter as the record from the knowledge model.
Augmented Attribute: Select Exclude If Missing from the list.

Step 13: check Weight
Connection: Select the Application Key connection to interact with Celonis. If you do not have an existing connection then you can create one by clicking the “Add” button.
Data Pool: Select the Data Pool that you created in Step 1.
Data Model: Select Accounts Receivable Data Model as the data model.
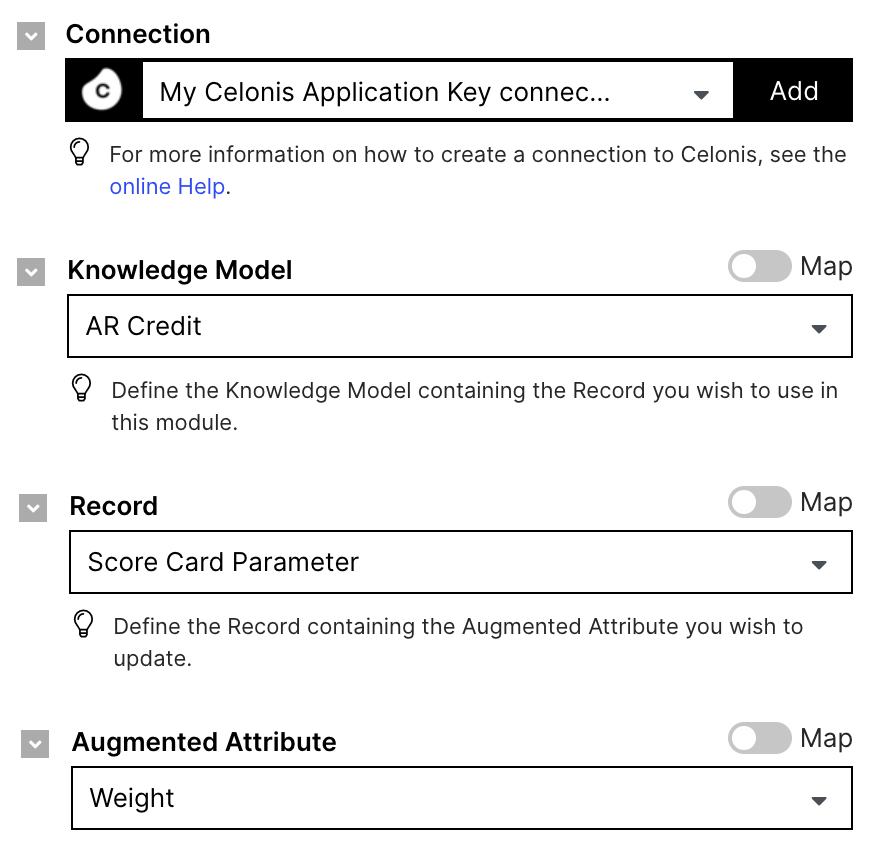
Step 14: Weight
Connection: Select the Application Key connection to interact with Celonis. If you do not have an existing connection then you can create one by clicking the “Add” button.
Knowledge Model: Select AR Credit as the knowledge model.
Record: Select Score Card Parameter as the record from the knowledge model.
Augmented Attribute: Select Weight from the list.
Step 15: check Parameter Type
Connection: Select the Application Key connection to interact with Celonis. If you do not have an existing connection then you can create one by clicking the “Add” button.
Data Pool: Select the Data Pool that you created in Step 1.
Data Model: Select Accounts Receivable Data Model as the data model.
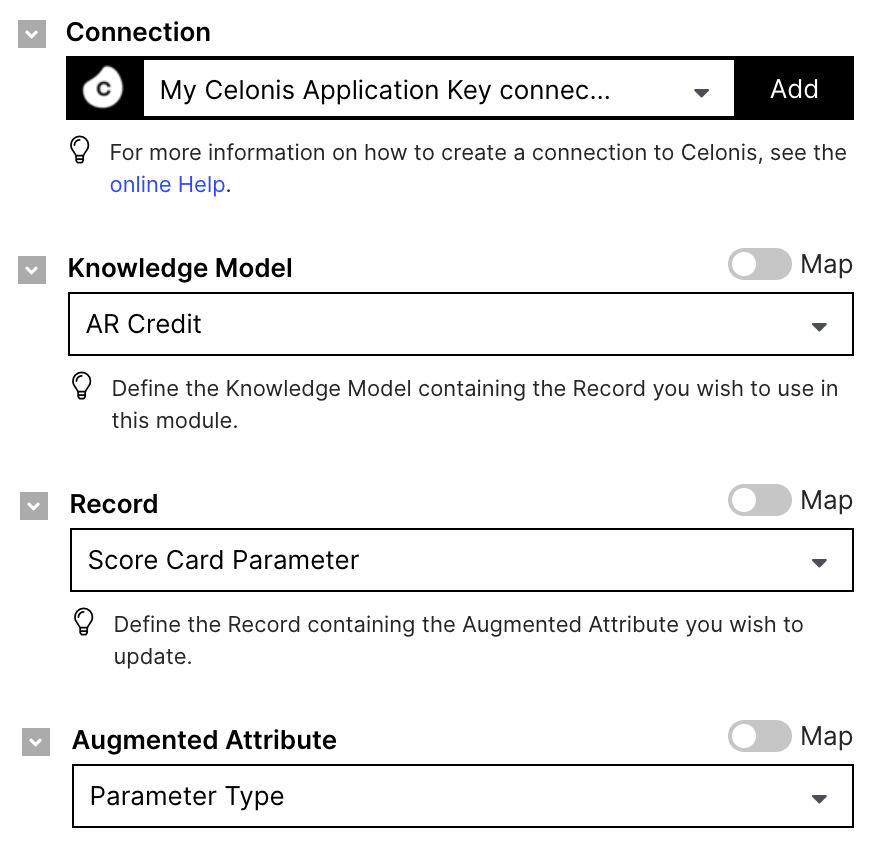
Step 16: Parameter type
Connection: Select the Application Key connection to interact with Celonis. If you do not have an existing connection then you can create one by clicking the “Add” button.
Knowledge Model: Select AR Credit as the knowledge model.
Record: Select Score Card Parameter as the record from the knowledge model.
Augmented Attribute: Select Parameter Type from the list.
Step 17: check Model Type
Connection: Select the Application Key connection to interact with Celonis. If you do not have an existing connection then you can create one by clicking the “Add” button.
Data Pool: Select the Data Pool that you created in Step 1.
Data Model: Select Accounts Receivable Data Model as the data model.
Step 18: Model type
Connection: Select the Application Key connection to interact with Celonis. If you do not have an existing connection then you can create one by clicking the “Add” button.
Knowledge Model: Select AR Credit as the knowledge model.
Record: Select Score Card Parameter as the record from the knowledge model.
Augmented Attribute: Select Model Type from the list.

Step 21: check Additional Attribute
Connection: Select the Application Key connection to interact with Celonis. If you do not have an existing connection then you can create one by clicking the “Add” button.
Data Pool: Select the Data Pool that you created in Step 1.
Data Model: Select Accounts Receivable Data Model as the data model.
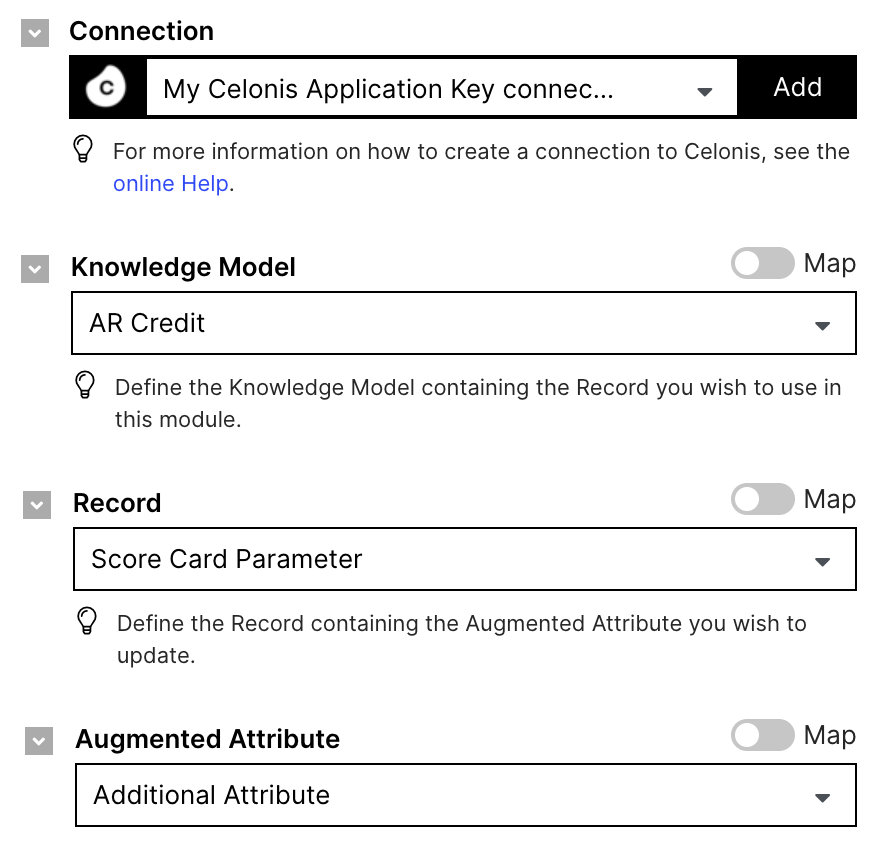
Step 22: Additional Attribute
Connection: Select the Application Key connection to interact with Celonis. If you do not have an existing connection then you can create one by clicking the “Add” button.
Knowledge Model: Select AR Credit as the knowledge model.
Record: Select Score Card Parameter as the record from the knowledge model.
Augmented Attribute: Select Additional Attribute from the list.
Step 19: Create Score Card Parameter
Connection: Select the Application Key connection to interact with Celonis. If you do not have an existing connection then you can create one by clicking the “Add” button.
Package: Select the Studio Package that you installed from the Marketplace.
Skill: Select Create Score Card Parameter skill from the list.