Migrate Data Model objects from Celonis 4 to Celonis Platform using Celonis Content-CLI
With this functionality you use the standard Transport (CTP) file format and Content-CLI push command to migrate Data Model objects from Celonis 4 to the Data Integration in the Celonis Platform. You perform the Data Model migration then some post-migration steps.
Data Model migration
Set up the Content-CLI and create a profile.
Create a Transport file that includes the Data Model(s) to be migrated.
Use the Content-CLI push command to create the Data Pool(s) with the Data Model(s) in Data Integration.
Post-migration steps
Set up the Data Sources, Extractions and Transformations.
Connect the Data Model tables to the respective Data Scope / Schema.
Disclaimer
This migration is only supported with an on-premise version of 4.6 and above. If you need help at any point reach out to your CSM.
Migrating the Data Models
Make yourself familiar with the Celonis Content-CLI and create a profile which you will use for pushing the CTP-files.
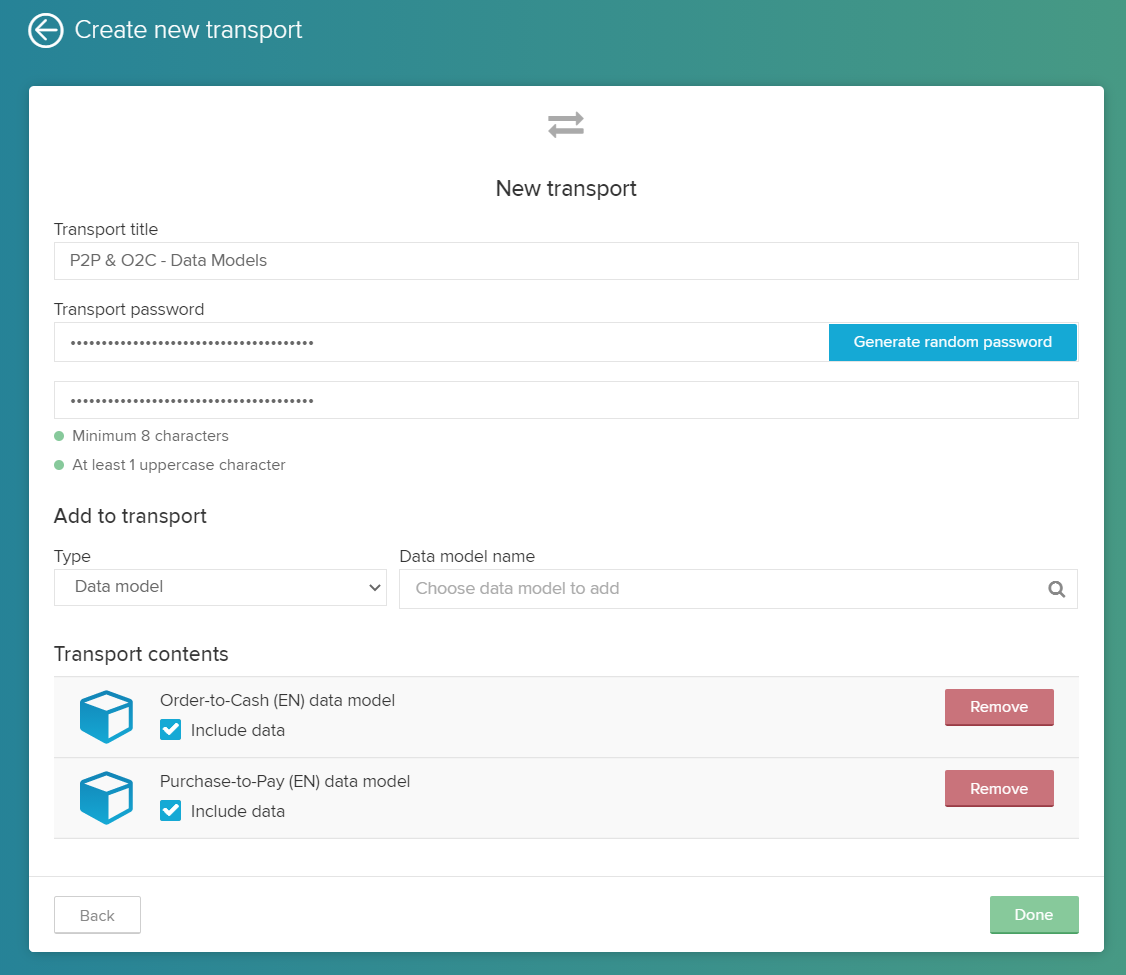
Create a Celonis 4 Transport (CTP file):
Log in to the desired Celonis 4 instance.
Navigate to the Transport creation screen.
Add all Data Models you want to migrate to the Transport.
Make sure to remember the specified password.
Note
The Global Content Administrator role of Celonis 4 is required to create Transport files
When creating the CTP file, make sure to only include the Data Models.
Use the Content-CLI push command to create the Data Pool(s) with the Data Model(s) in Data Integration:
Upload the transport file to the Machine Learning Workbench (not required for local Content-CLI installations).
Execute the push command for ctp files. The following syntax must be used:
content-cli push ctp -p <profile> -d -f <file> --password <password>
To get more information, use the following command:
content-cli push ctp --help

Command to push a .ctp (Celonis 4 transport file) to create a package

Options:
  -p, --profile <profile>            Profile which you want to use to push the analysis
  -a, --pushAnalysis                 Specify this option if you want to push analysis from the CTP file
  -d, --pushDataModels               Specify this option if you want to push data models from the CTP file
  --globalPoolName <globalPoolName>  Specify this option if you want to push all Data models into one newly created pool along with value to set the name of the pool to be created (default: null)
  --existingPoolId <existingPoolId>  Specify this option if you want to push all Data models into one already existing pool with provided ID (default: null)
  -s, --spaceKey <spaceKey>          The key of the destination space where the analyses from .ctp file will be created. (default: "")
  -f, --file <file>                  The .ctp file you want to push
  --password <password>              The password used for extracting the .ctp file
  -h, --help                         display help for command
Note
Either the Admin or Analyst role is required to run the command successfully. Users with the Member role require additional permissions to Data Integration and the Machine Learning Workbench.
Make sure to use the
ctpand-doptions if you want to push Data Models.By default, the tool will create one new Data Pool per Data Model in the Transport. Instead, you could also:
Create one shared Data Pool for all Data Models by using
--globalPoolName <globalPoolName>Push all Data Models to an existing Data Pool by using
--existingPoolId <existingPoolId>
It is possible to migrate analyses and Data Models at the same time by using
-da. Keep in mind that the analyses will not yet be connected to the migrated Data Models in this case.
Example:
content-cli push ctp -p cpm2ems -d --existingPoolId somePool -f CE_TRANSPORT_CPM2Celonis Platform___P2P.CTP --password somePasswordAfter sending a successful push request, the Data Model objects are automatically migrated into the respective Data Pool(s) into the Global Scope. The migration currently includes:
The tables of the Data Model.
The foreign key relationships of the Data Model.
The "General Mapping" from manually uploaded name.
Post-migration steps
Set up the Data Sources, Extractions and Transformations.
In case the standard push or the
--globalPoolNameoption were used, the Data Pools are empty apart from the Data Model object itself:Establishing a connection to the source system(s)
Setting up the Extraction Jobs
Creating the Transformation Jobs
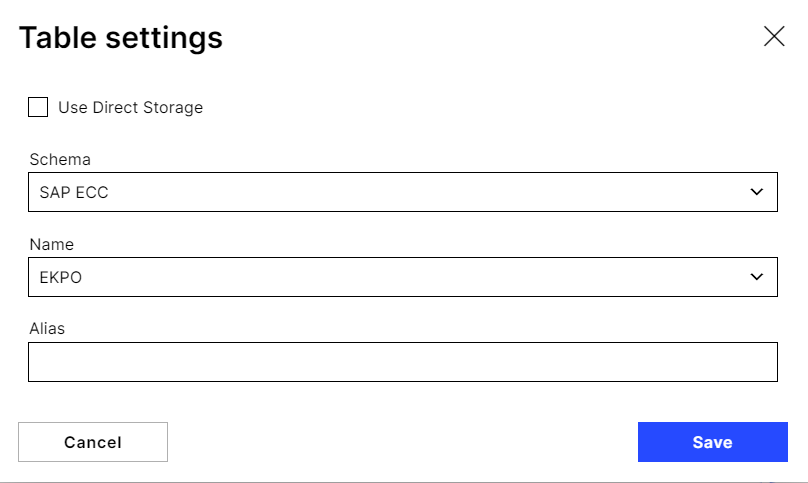
Connect the Data Model tables to the respective Data Scope / Schema and map the Data Model tables to the Vertica tables of the respective Data Scope / Schema.
Go to the Edit screen of every Data Model table.
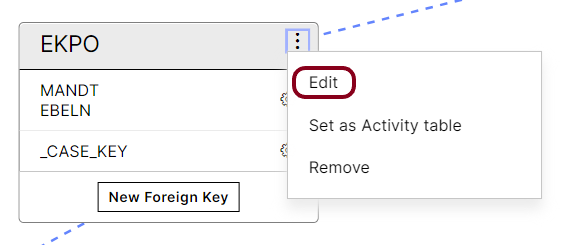
Select the Schema Table Name
Once all tables are mapped to respective Vertica tables, the Data Model can be loaded.