Studio App Building Guidelines - Detailed case overview
A detailed case overview is a linked view, usually opened in overlay mode from the Action table in the Action View. It allows the user to direct its attention to the corrective actions required for a specific case. This view outlines all information related to the specific object that can accelerate the step from insight-to-action. The main users of the detailed case overview are the personas working in the day-to-day operations, so are usually not Celonis experts / analysts. Thus these views have to be simple, and provide an easy way to access information.
Before making a corrective action, the users need to understand from the information provided in the View what action is required to be taken, and who needs to perform the Action. What contributes to this decision are the quantitative insights (metrics), case information (attributes, detailed information, history related to that case), information about related objects, and Celonis Suggestions (tasks and predefined actions).
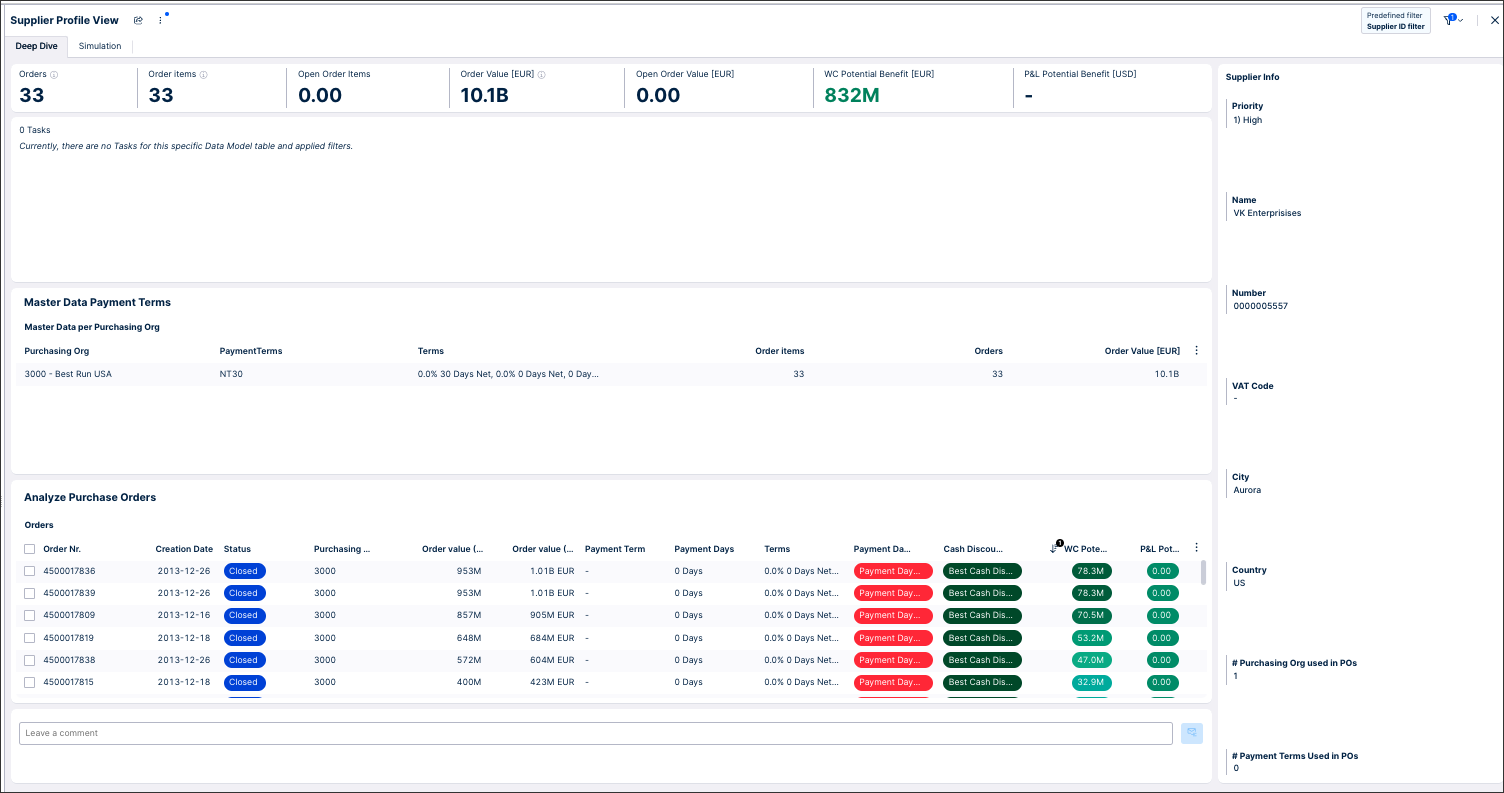
Examples of detailed overview for a specific case case level can be found in Apps developed by the Celonis team available in the Marketplace, such as: Open order Processing, Duplicate Checker, Open PO Management. This screenshot is from the Payment Terms Harmonizer (object-centric) App.
 |
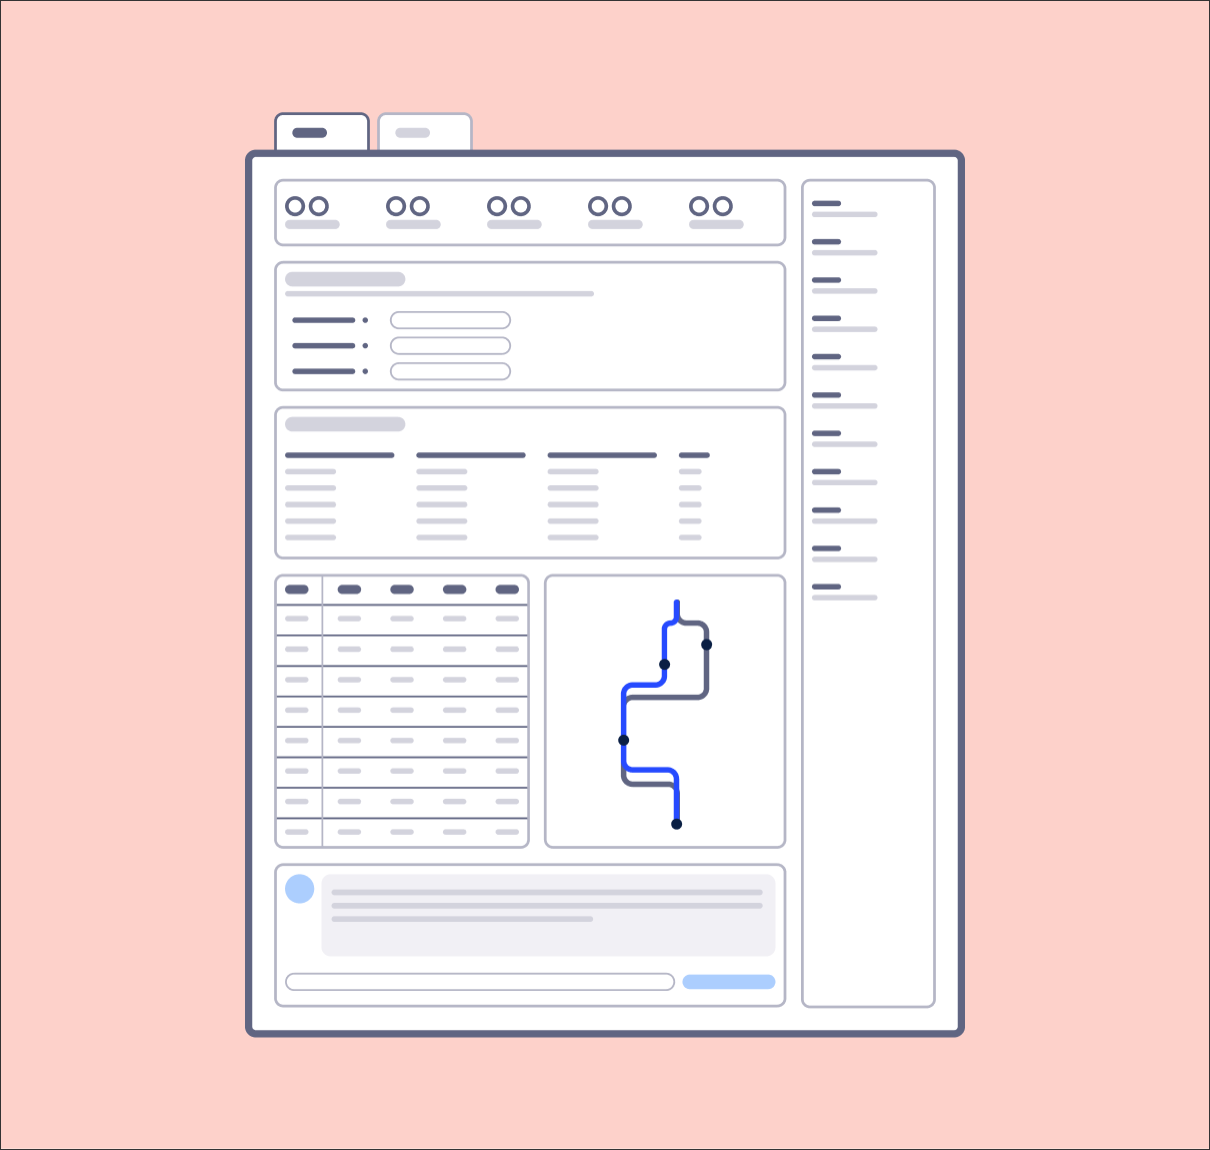
A detailed case overview is composed of 6 main sections:
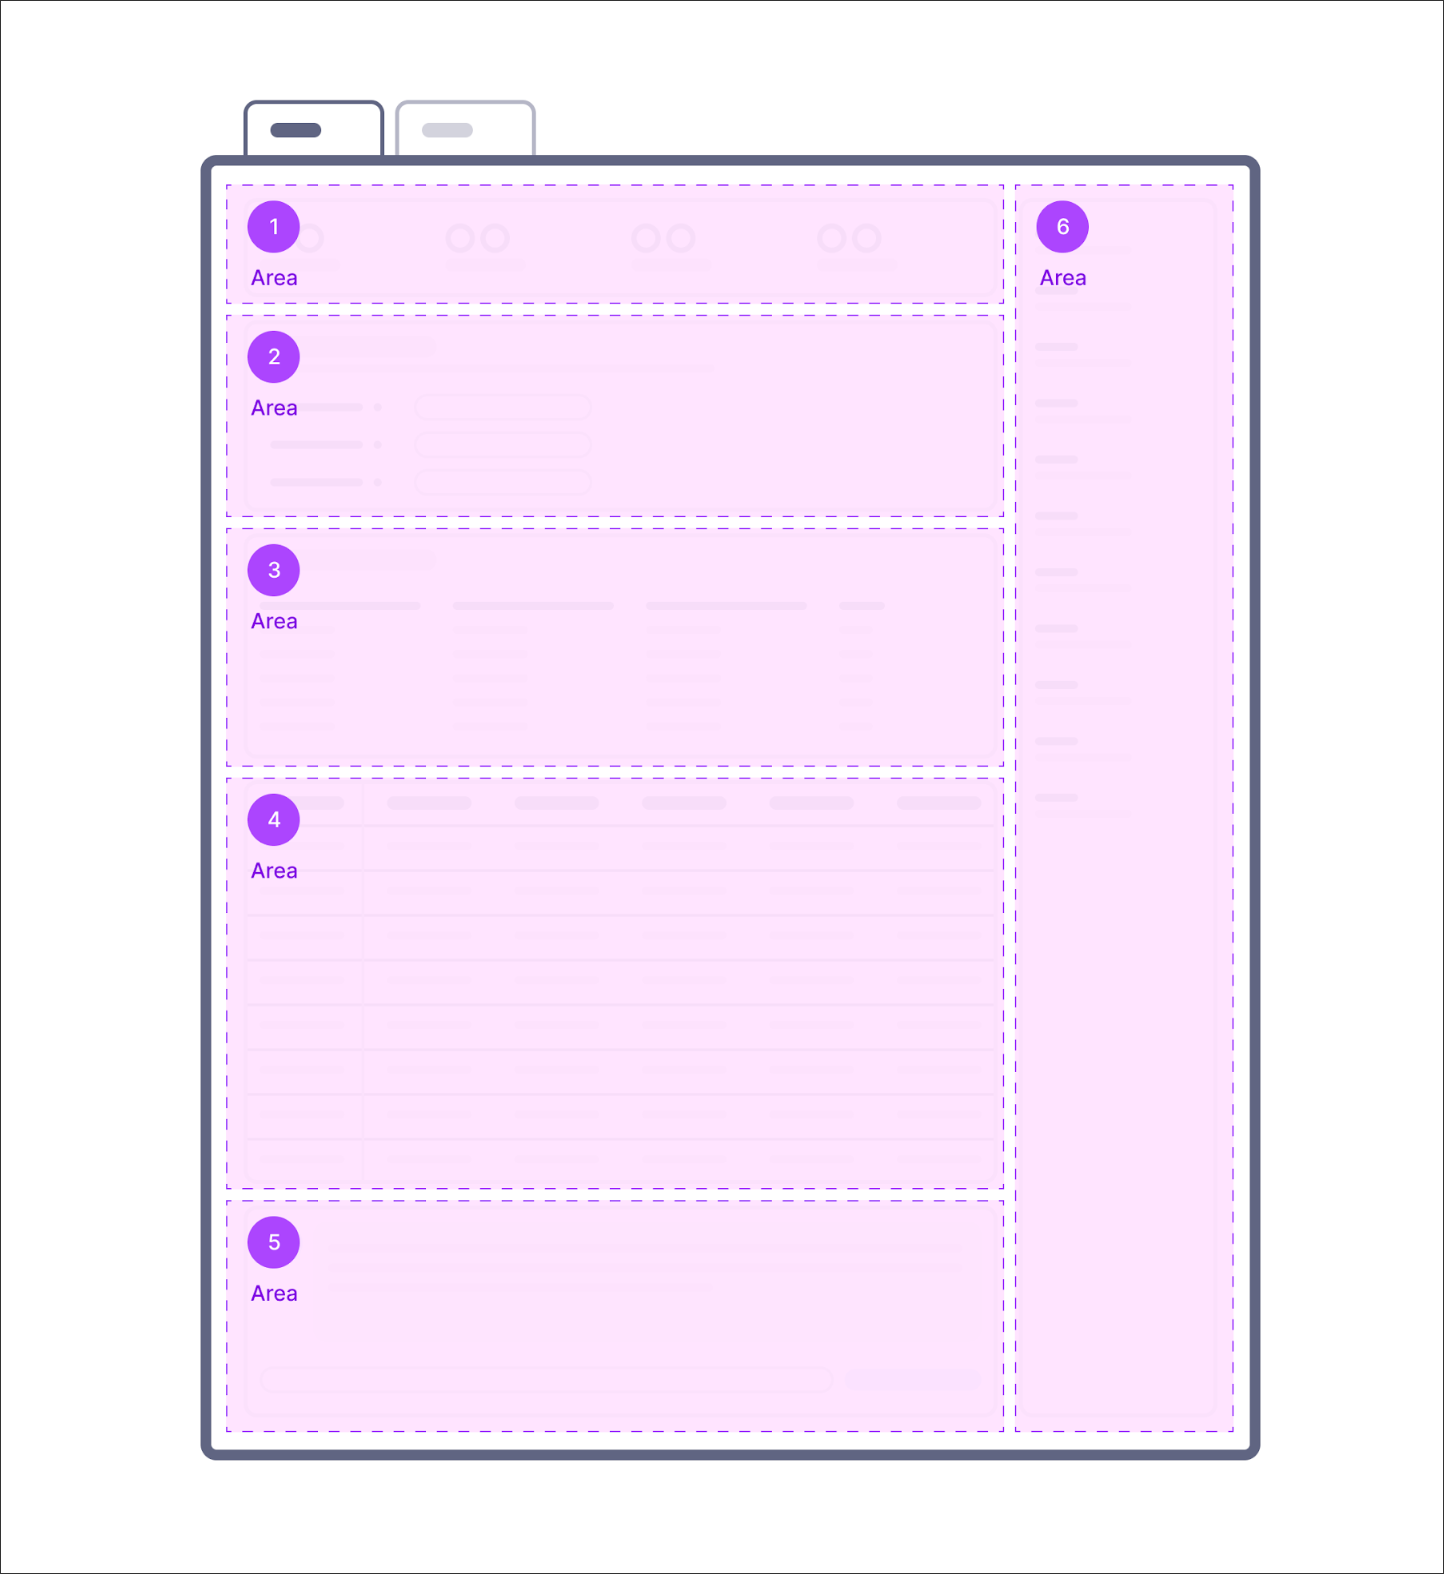 |
This view can then be created using a combination of Studio components:
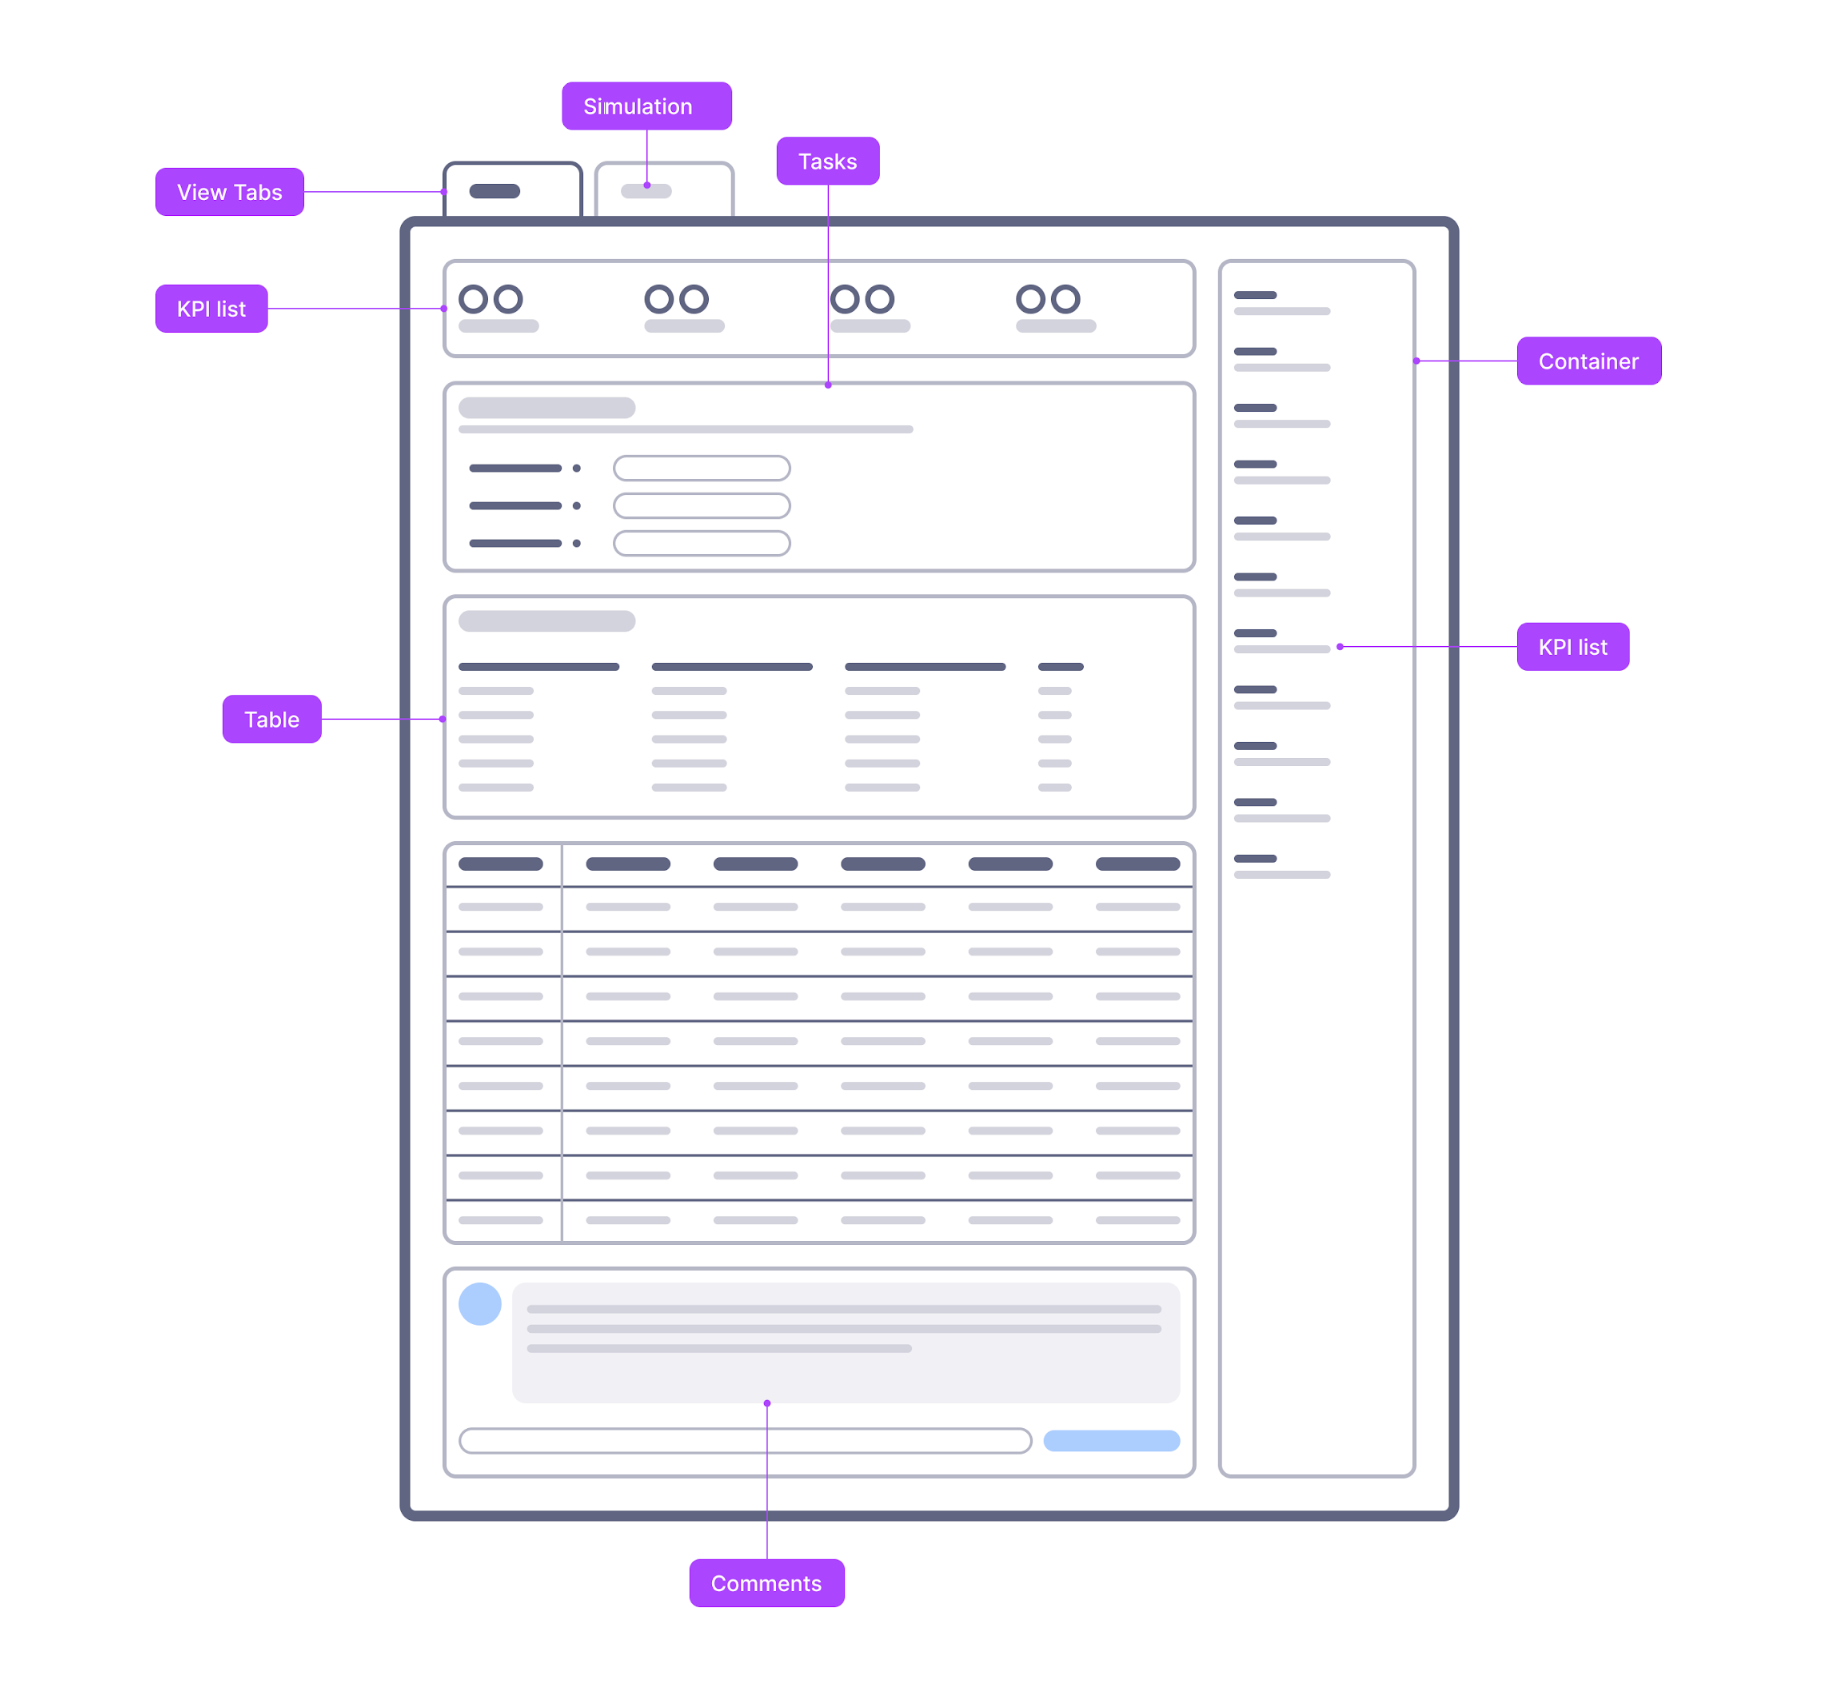 |
Case attributes (1)
Case attributes include the relevant dimensions that help the user to understand if the case is in the right scope and who is processing that specific case. This component helps the user answer the question “Am I the right owner of this case? If not, who is responsible for the cases related to a specific attribute (e.g. city, plant, organization)?”
This section is created using of an Attribute List. To learn more about Attribute Lists, see: Available Studio components.
Case insights (2)
The case insights area enables the user to quickly know how the specific case is performing with respect to the main metrics. For instance, for monitoring the average days late, the case insights help the user understand how many days late the singular case is.
As this is the most prominent component, you should also include scope metrics with respect to the specific case. Examples of good scope metrics to include: total associated amount, count of related objects such as number of items with respect to an order.
Case insights are shown using a KPI List. To learn more about KPI Lists, see: Available Studio components.
Tip
Always include the scope metrics on the left and the performance metrics (rates/KPIs) to the right.
Suggested actions (3)
The suggested actions area enables the users to know which actions are recommended for that specific case. These suggested actions are defined based on the process knowledge of who first deployed the use case.
To showcase these actions we use a Task List. Each task is associated with specific related actions. Moreover, each specific case can be associated with one or more tasks if the conditions are applied. Thus, for each case meeting the conditions, the user can see the suggested actions.
Suggested actions guide the user to answer the question “what do I need to do to correct the issues related to this case?”
To learn more about the Task List component, see: Task List.
Tip
If you’re building this View for a template App, you will see that some actions, such as writebacks, cannot be set during the prototyping of the App directly. However, leaving such action as a template only can help users understand the capabilities of Celonis.
Related objects (4)
The related objects area includes all objects related to the specific case that may influence its current or future state. For instance, for a sales order, you want to include information about the delivery item object. This is relevant when a field comparison is required between different objects. So, if I consider the sales order, I need to check if the quantity sold has been delivered. To do so, I need to retrieve the information from multiple objects, such as Schedule Lines and Delivery Items.
Comparing related objects allows users to retrieve information in one single access point, reducing the time from accessing information, to getting insights and taking an action.
Related Objects guide the user to answer the question: “why is my case having this issue? What impact have the other objects had on my case?”.
To showcase these related objects we suggest using a table for every related object. This table should include the unique identifier of the object, the fields that need comparing or are related to the main case, a classification and the most relevant field to that object.
Tip
In case of multiple related objects, use a container with tabs to optimize the View layout.
Case details (5)
The case details area includes the detailed information about a case. The details enable the user to have a deep dive in the specific case, uncover information not present at case level, and showcase the case history. If you are building a view for a case that is at header level, you should include in this area a table with the line items and the activity history (or include a unique case explorer directly). If you are building a view for a case that is at item level, you should include the activity history only.
Case details guide the user to answer the questions: “what is happening within the specific case? What happened in the past that led to this status?”.
Helpful components to answer these questions are then the activity history, the table and the case explorer.
Activity History: This component allows users to gather information about the past behavior of the case, what were the activities, their order and when they happened.
To know more about the Activity History component, see: Activity History.
Table: The table component allows users to access case details. This table should include the unique identifier of the items/details, the fields not included at case level, the status and a classification. Users can be enabled to perform actions at case level as well. Actions include: status update, information sharing via email or exporting the details table.
To know more about the table component, see: Tables.
Case explorer: This component can be considered an alternative to the combination of the table and activity history components as it allows to view activities directly related to a line item, with detailed information. However, the downside is that the case explorer doesn't allow for field customization.
To know more about the case explorer component, see: Case Explorer.
Comments (6)
The comment component enables users to leave remarks and notes. This allows collaboration between multiple users and grants the possibility to leave notes on the action taken or specific details of the case.
To learn how to configure your comments component, see: Comments.
When creating your detailed case overview Views, we recommend the following:
Keep the view simple, do not add insights or components that aren't needed.
Limit the number of tasks that can be associated to a case, simplicity is key to not overwhelm business users with a high amount of options.
Highlight important dimensions with coloring in the tables.
If you need to include more capabilities to the Detailed Overview add them in separate tabs.
 |
We'd also discourage the following:
Including the Process Explorer in the View, it may overload information.
Mix non-filterable with filterable KPIs, as this may confuse users.
Including too many KPIs and stacking information, potentially overcrowding the View.
 |