Schedules
New data integration content available
You're currently viewing a data integration topic that has been replaced and will eventually be removed from our documentation.
For the latest data integration content, see: Data Integration.
Schedules are used to automatically execute Data Jobs on a pre-defined basis. In the default scenario, schedules allow for sequential processing which means that all the Data Jobs within one schedule are executed one after another. If one Data Job in the schedule fails, all remaining Data Jobs will be canceled automatically.
Additionally, for these frequency-based schedules, you can also define trigger-based schedules to define dependencies (please create a ticket through the Support portal to activate this functionality in your team). That means that the successful execution of one schedule automatically triggers another schedule. This also allows for self-triggering of Schedules, such as directly re-trigger a schedule once it finishes.
Time zone
To unify schedules for different users across time zones, we use the server time, which in the Celonis Platform is UTC+0. Please take this into account when configuring a schedule.
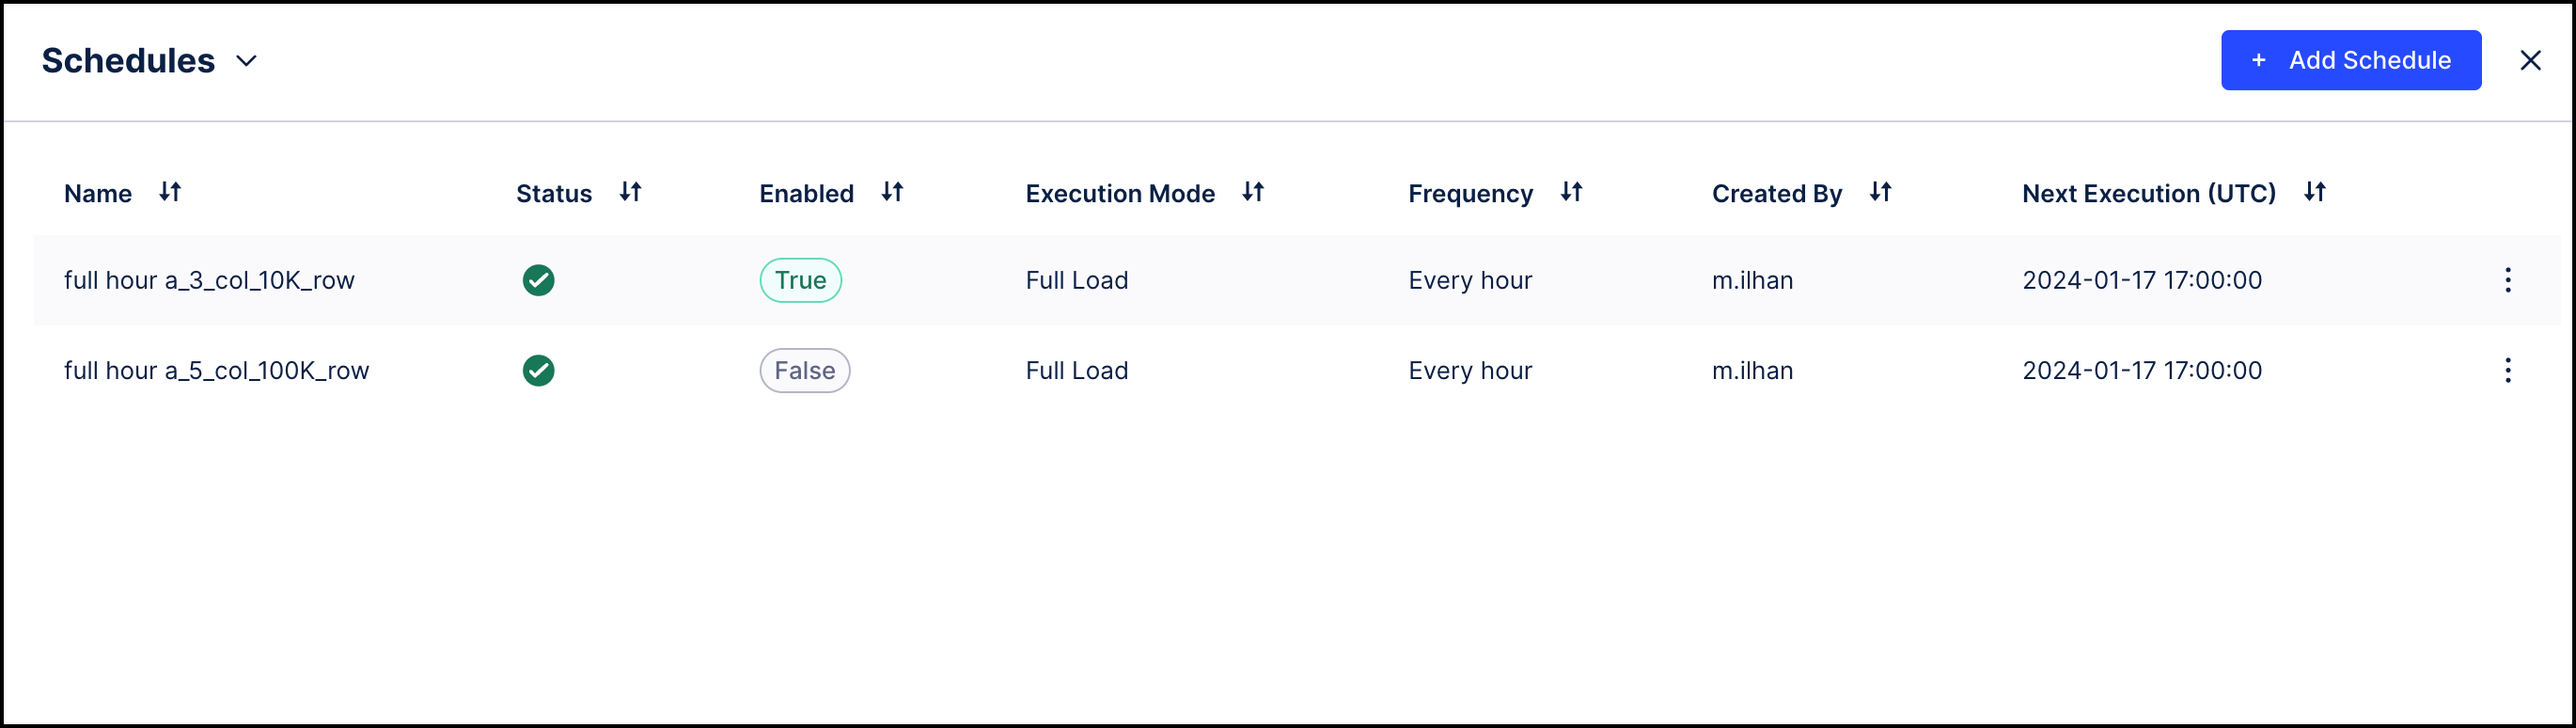 |
Clicking on the + Add Schedule button allows you to create a new schedule.
The table displays the following information about each schedule:
Name: The name of the schedule which is also shown in the logs.
Status: Shows the current status of the data pool used for this schedule.
Enabled: Indicates which schedules are enabled and will be executed and which are disabled.
Execution Mode: Indicates if this schedule will run a Full Load or a Delta Load.
Frequency: How often this schedule gets executed, such as "Every hour", "At 2:00", or "At 30 minutes past the hour, every two hours".
Created By: ID of the user who created the schedule.
Next Execution: Indicates when the next execution will happen.
By clicking on the context menu to the right of any schedule will provide the following actions:
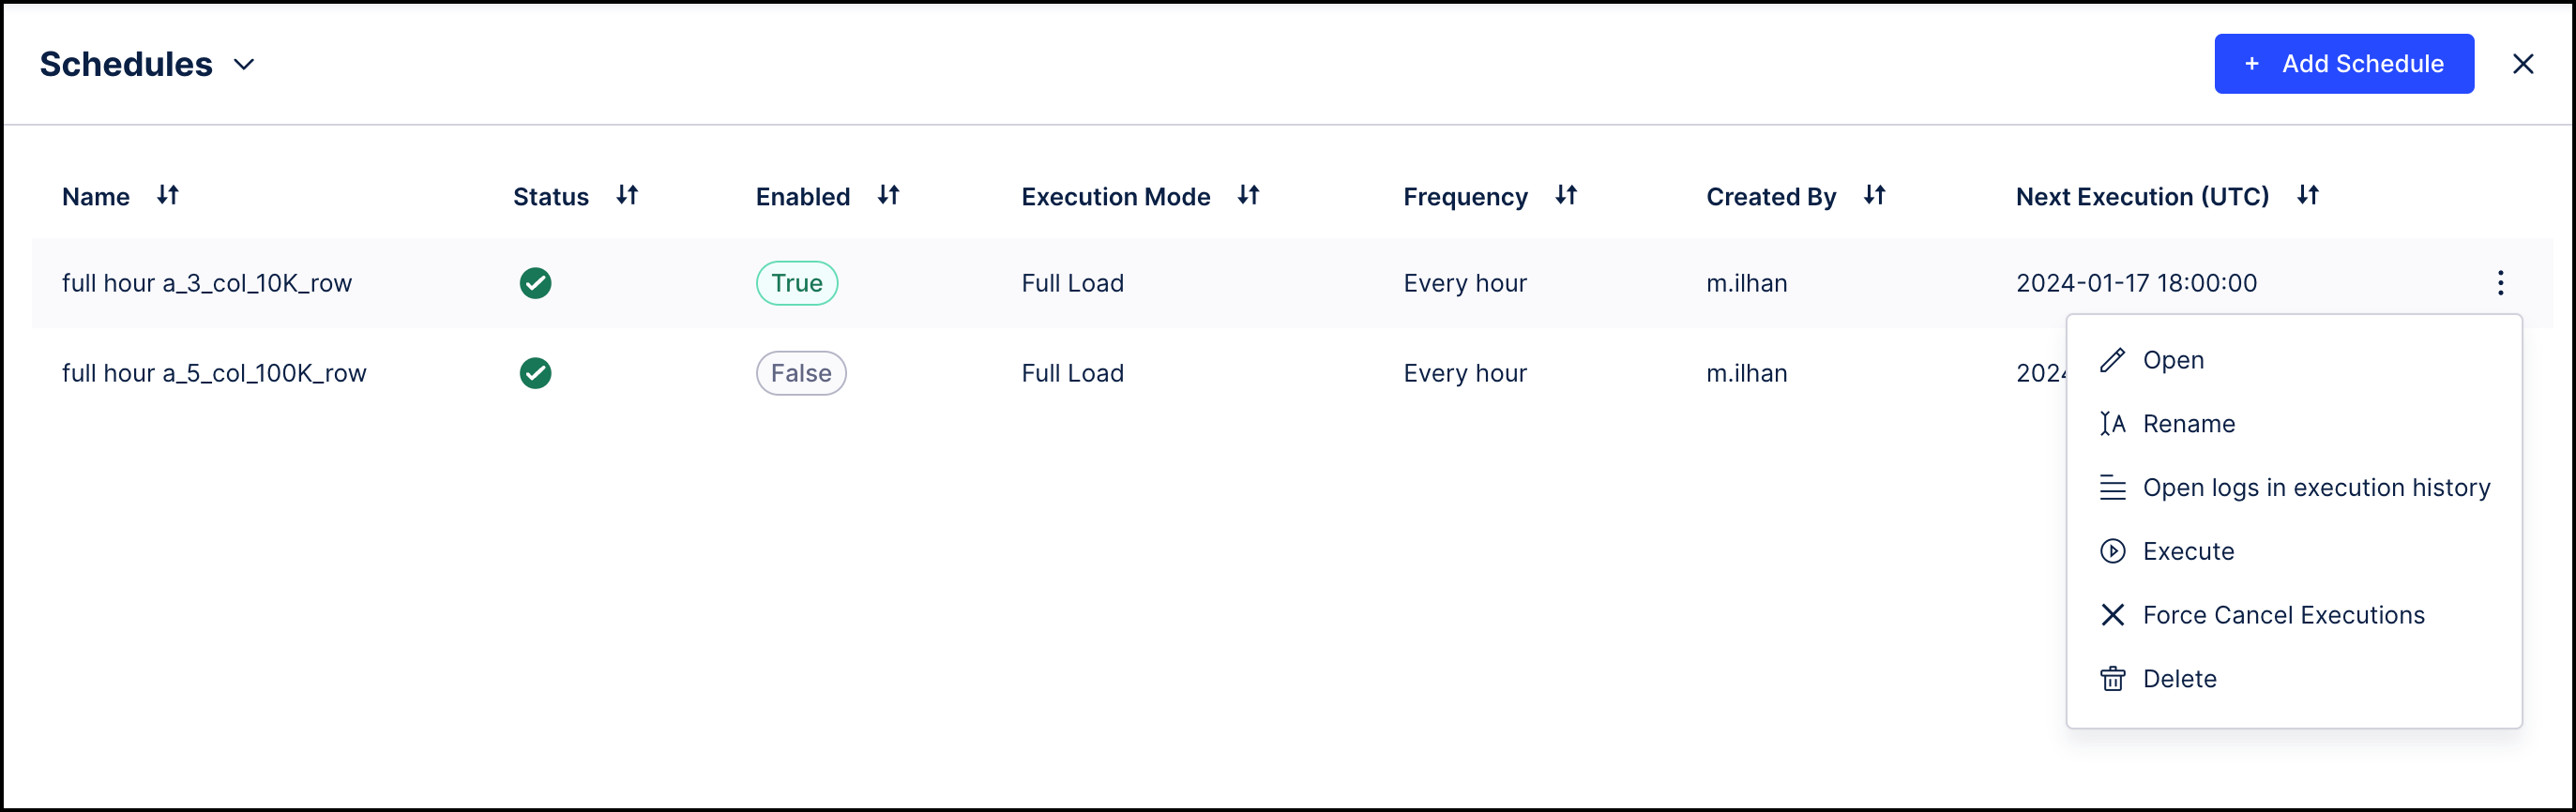
Open: Opens the configuration window for the specific schedule. A click on the row next to the context menu achieves the same.
Rename: Use the rename dialog to change the name of the schedule.
Open logs in execution history: A shortcut to the Execution History where you can investigate the logs of a specific schedule.
Execute: Manually execute the configured Data Jobs of this schedule.
Force Cancel Executions: Manually stops an schedule from executing.
Delete: After a confirmation dialog, you can delete the schedule. This only deletes the schedule and does not remove the Data Jobs within the schedule.
Configuring a schedule
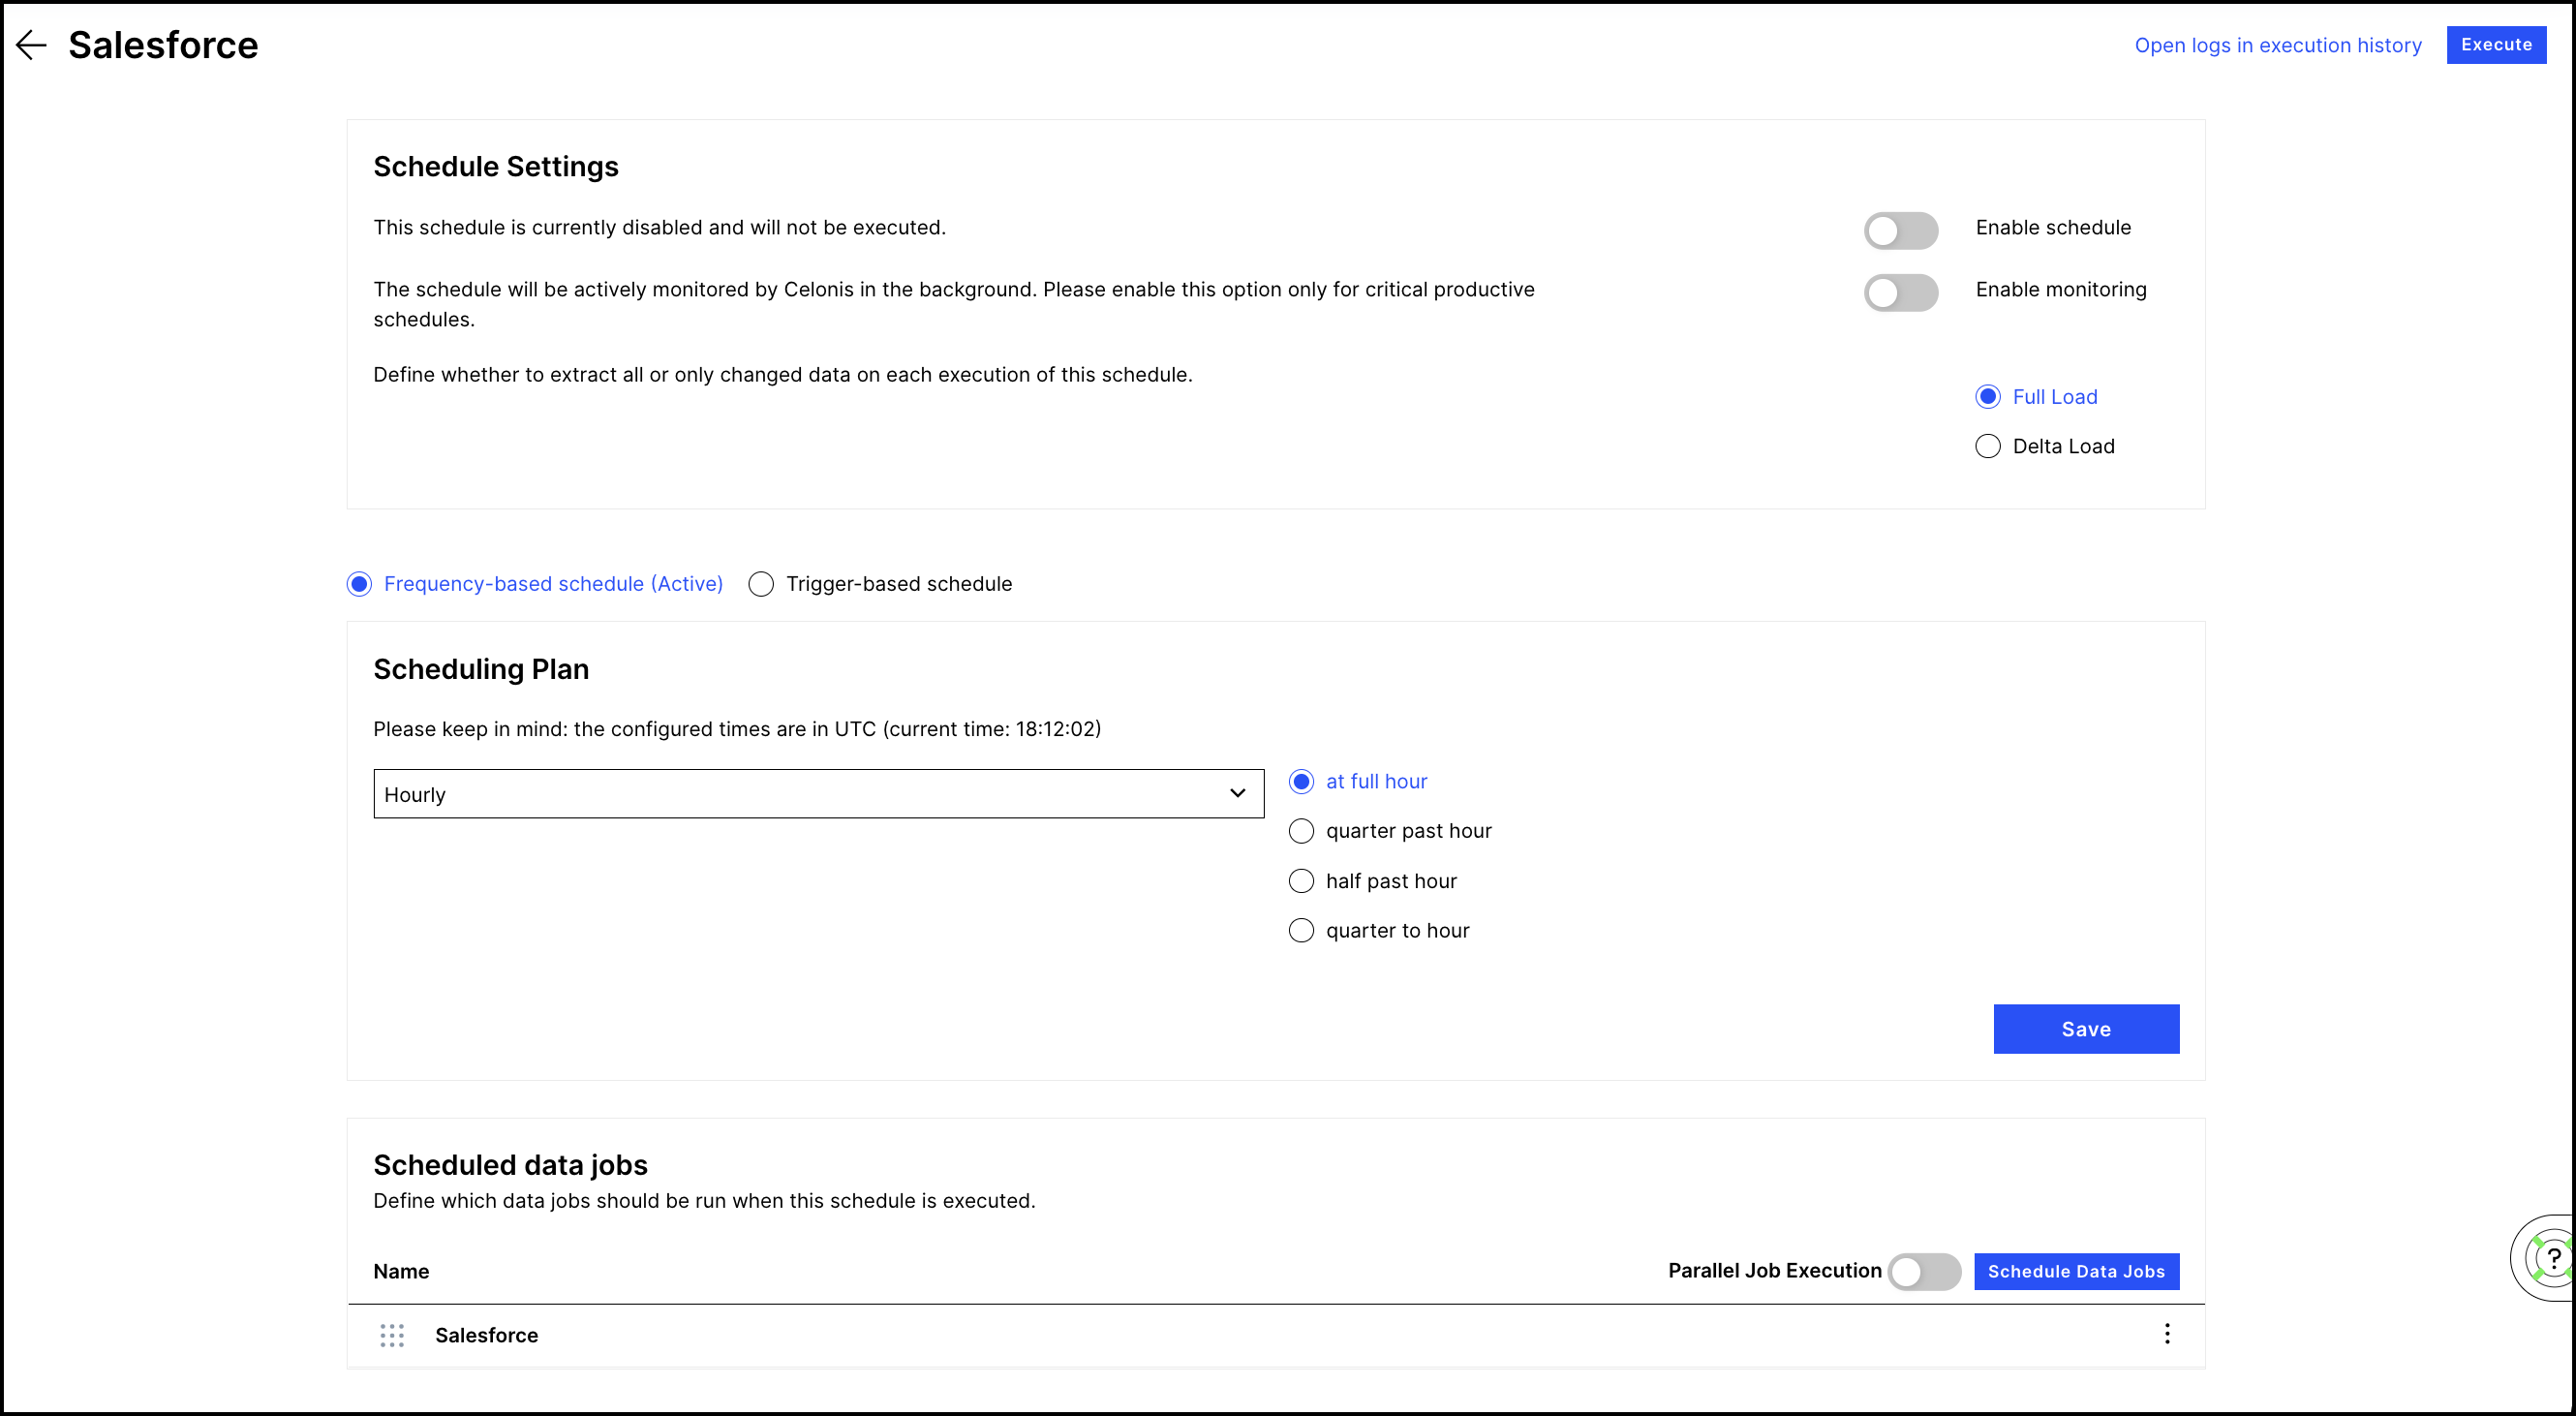 |
At the top of the screen, click the "Open logs in execution history" link to check past loads. Click the Execute button to manually execute the configured Data Jobs for testing purposes.
After confirmation, you can enable the schedule. Make sure that both the scheduling plan as well as the Data Jobs are correctly set up before enabling it.
You can decide whether all the Data Jobs should be executed as full or as delta loads. See Data Jobs for details.
There are multiple scheduling plans available:
Important
If you make any changes to a scheduling plan, you need to save it before making any further changes such as enabling the schedule or adding Data Jobs.
Hourly: The schedule is executed every hour at 0, 15, 30, or 45 minutes after the full hour
Every few hours: Similar to hourly, but you can specify an interval in hours between executions.
Daily: Specify a specific time of the day on which the schedule gets executed.
Weekly: Specify one or more weekdays and a time on which the schedule gets executed.
Monthly: The schedule is executed on a specific day of the month and at a specific time.
Custom cron: Define a scheduling plan with a cron syntax (see below)
Click on the Schedule Data Jobs button to see a list view of the Data Jobs which allows you to add Data Jobs to the schedule. You can reorder the Data Jobs in the schedule by dragging on the handles to the left of the schedule names. Additionally, you can reorder the Data Jobs by using the up and down options in the context menu. You can also use the context menu to remove a Data Job from the schedule. This does not delete the Data Job - it only removes it from the current schedule.
Details on the custom cron syntax
Note
You can use the following online tool for help with a custom cron string: https://www.freeformatter.com/cron-expression-generator-quartz.html
The cron syntax allows you to precisely define a custom scheduling plan. The syntax is composed of six elements. Each element is either a number or an asterisk for "every":
second: 0-59 or *
minute: 0-59 or *
hour: 0-23 or *
day of the month: 1-31 or */?
month of the year: 1-12 or JAN-DEC or *
day of the week: 1-7 or SUN-SAT or */?
Examples:
Cron syntax | Explanation |
|---|---|
0 0 0 1 * ? | The schedule will be executed at midnight on the first day of every month. |
0 * * 1 * ? | The schedule will be executed every minute, but only on the first day of the month. |
Smart schedules
Smart schedules bring the smart ETL functionality from the Data Job to the schedule level, meaning it automatically changes the execution order of all Data Jobs within a schedule from sequential execution to parallel orchestration. That means:
Before each execution of a schedule, the optimal execution order based on the dependencies across all Data Jobs and their related Extractions, Transformations and Data Models gets automatically calculated in the background.
A Directed Acyclic Graph (DAG) representing the most efficient execution order of the schedule to optimize for parallelism gets created.
The DAG is used as a basis to automatically trigger all Data Jobs and their related Tasks based on the optimal execution order. This means once a table has been extracted, we are automatically starting the related Transformations (while independent tables might still be extracted).
To use the smart schedules functionality, users don’t have to adjust any of their configurations meaning no manual migration is needed.
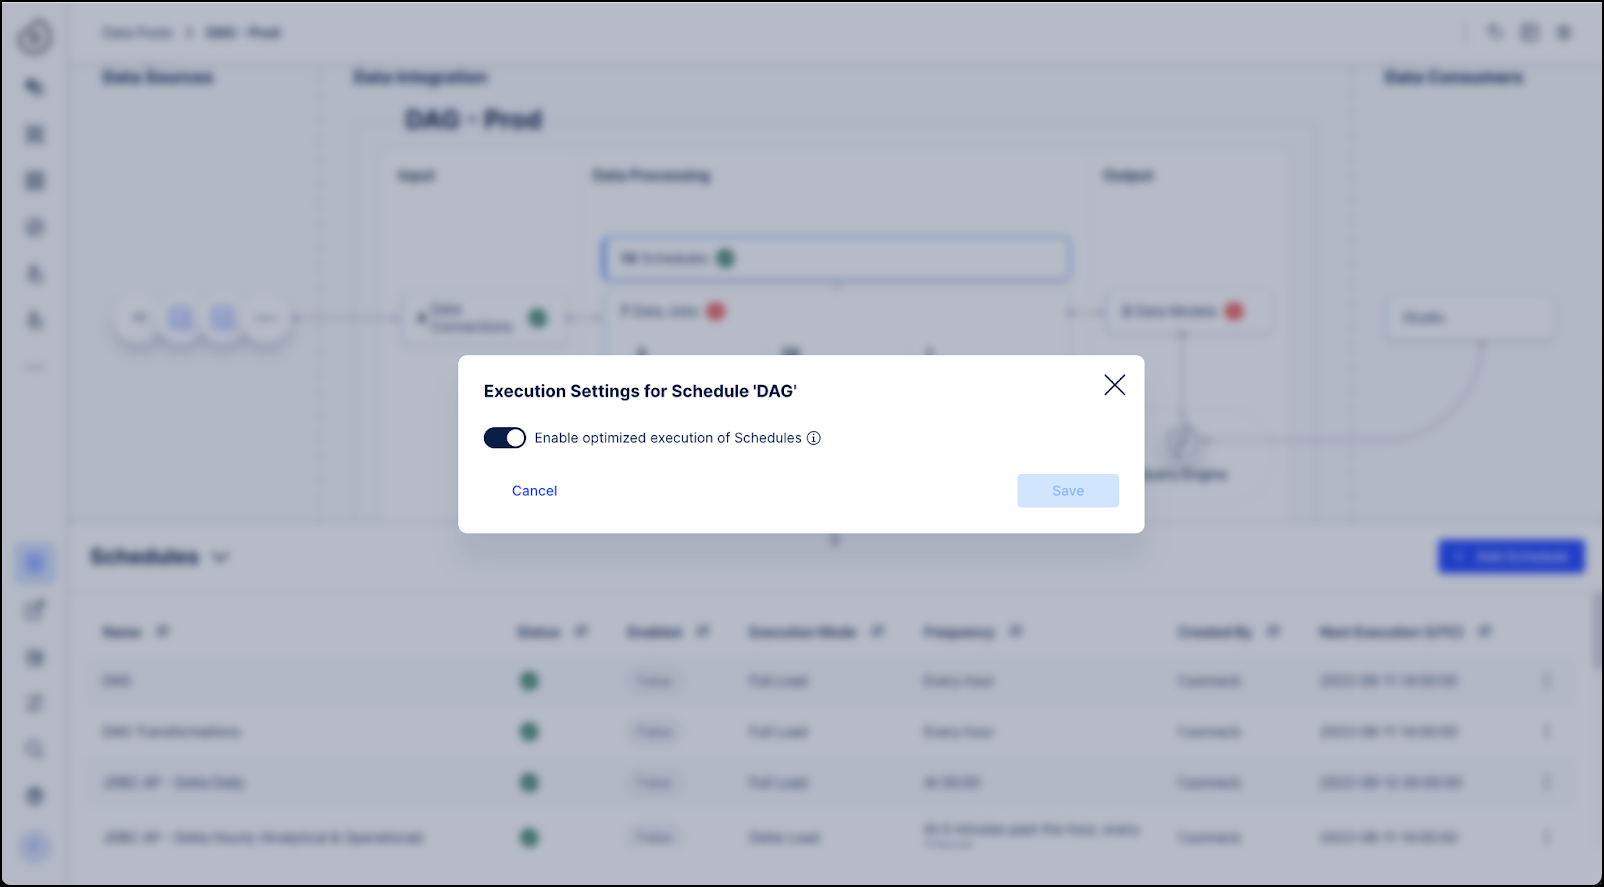
Activate smart schedules
Enabling smart schedules is configured via the Celonis Platform on the schedule level by going to the three-dot menu of a schedule. Then click “Execution Settings” and activate the “Enable optimized execution of Schedules” toggle. This functionality it can be activated or deactivated by users at any point by following the same steps to disable the toggle.
 |
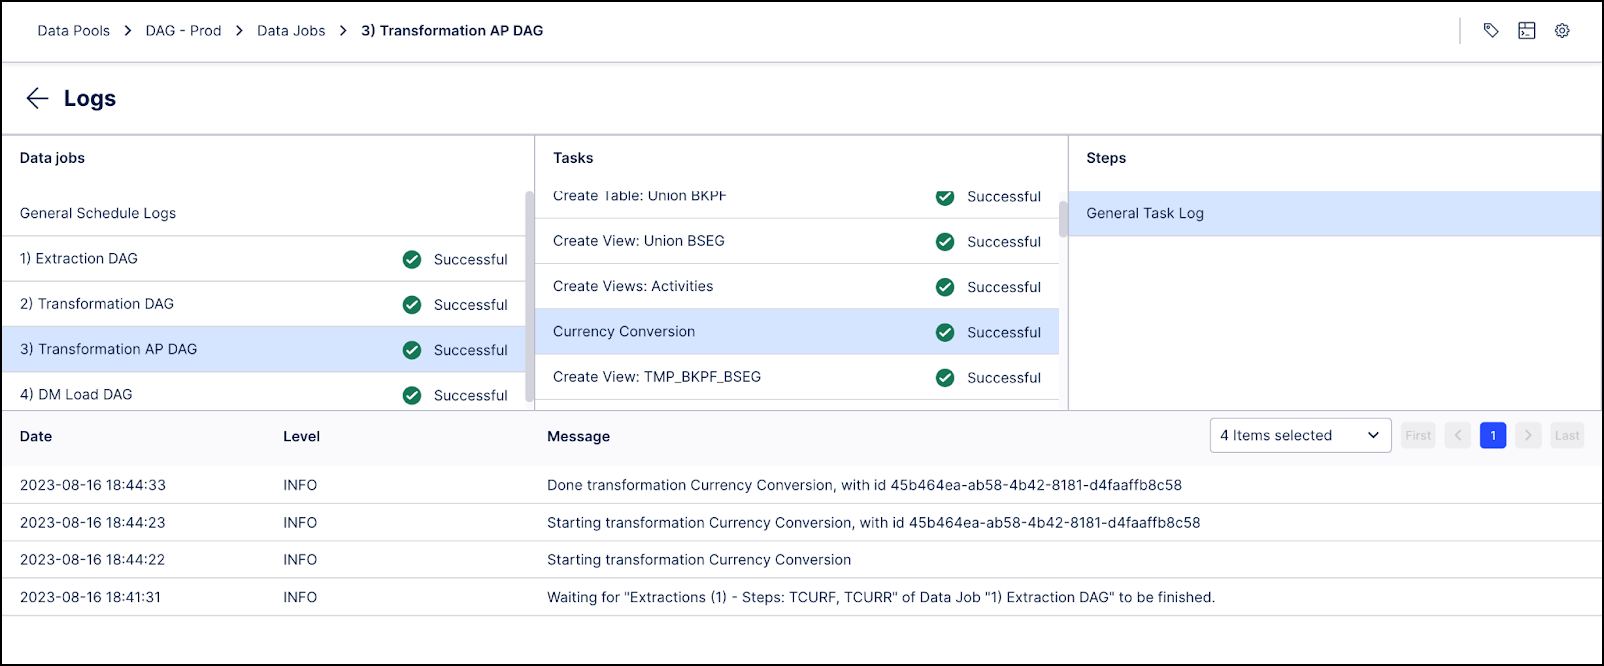
When starting a schedule with the functionality described above enabled, you will see that multiple Data Jobs will be running in parallel in the Logs section. For each individual Task per Data Job, you will also see log lines indicating which other Tasks need to be executed first due to their dependencies.
In the example below you can see in the messages that the extraction for tables “TCURF” and “TCURR” need to be completed before the “Currency Conversion” task can start.
 |
Trigger-based schedules
Note
Trigger-based schedules are available upon request. If you want to activate this functionality in your environment, contact our support.
Trigger-based schedules allow you to choose a schedule to serve as a trigger from any Data Pool within your Celonis Platform team and then select a target schedule to be triggered. This allows you to orchestrate schedules across Data Pools.
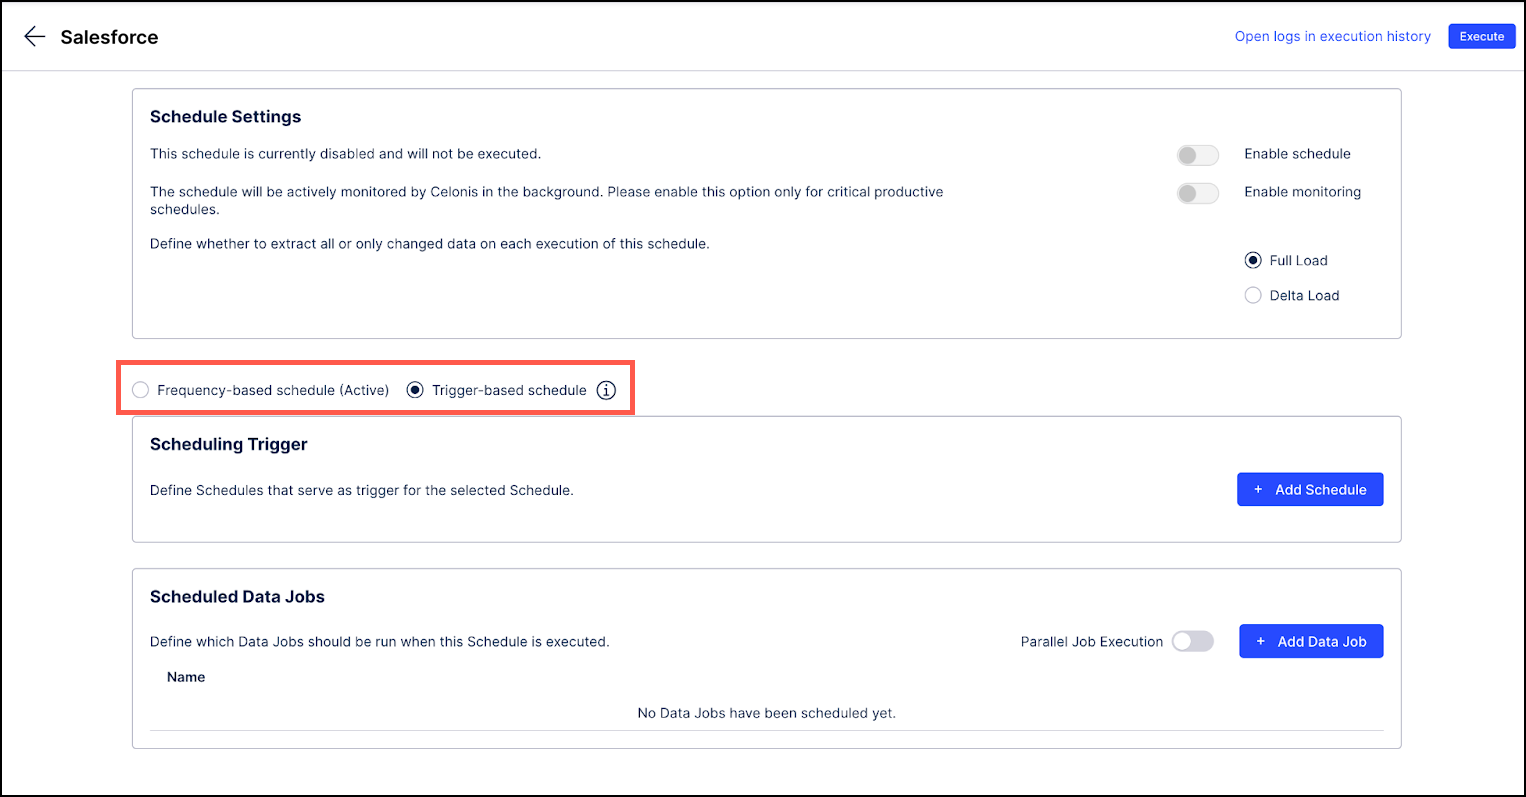
Open the schedule to be triggered and select the Trigger-based schedule radio button.
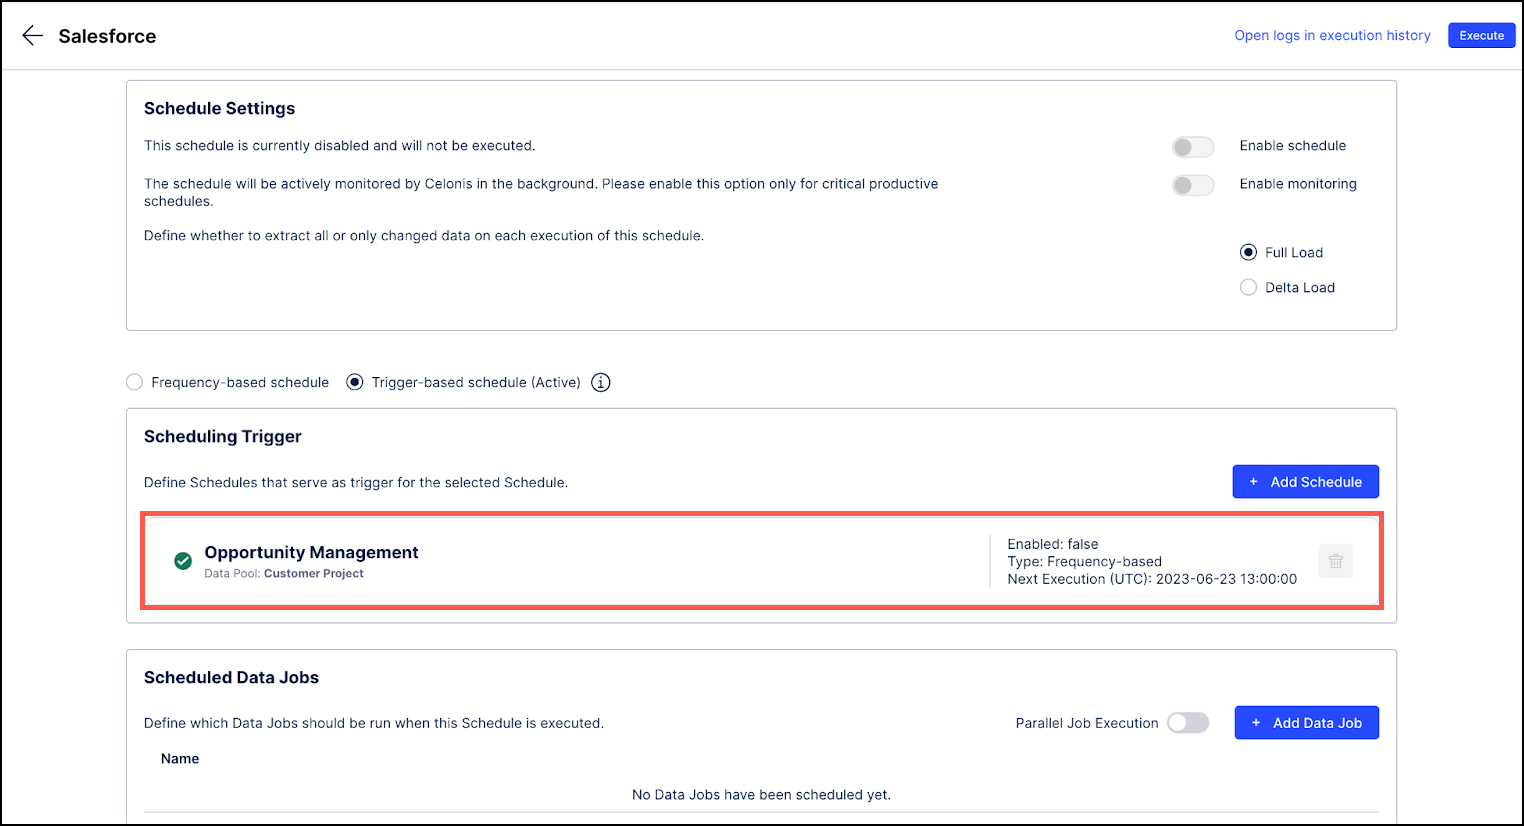
In the Scheduling Trigger section, click the + Add Schedule button and then select the schedule to use as a trigger.

Click Save. The new trigger-based schedule displays in the Scheduling Trigger section and shows additional information such as the current status and the next scheduled execution.
Once the trigger schedule is successfully executed, the target schedule will be automatically triggered.