Sending Data from Orchestration Engine to Celonis Platform
When your digital process is completed, you can send post action feedback to Celonis with the results gathered in the process context. To send the data, you need an extractor that brings data from Orchestration Engine to the Celonis Platform. For Orchestration Engine, you can customize the extractor so that it shares the data that you want to send to the Celonis Platform.
Prerequisite
To extract the data from Orchestration Engine to the Celonis Platform, you have to create a Data Pool on your account.
Celonis uses Data Pools to collect and cluster information to set up an integration flow. To learn about the details, check out Data Pools.
Extracting data from Orchestration Engine digital processes
Creating a data connection
You can create your own data extractor or use the one prepared by Emporix. The steps below show how the Emporix Process Context by Template data connection works.
To get the Process Context by Template extractor, contact the support team.
To create a data connection:
Go to Data Pools and choose Add Data Connection.
This creates a connection to your Celonis Data Pool that links to Orchestration Engine as the Data Source.
Choose Connect to Data Source.
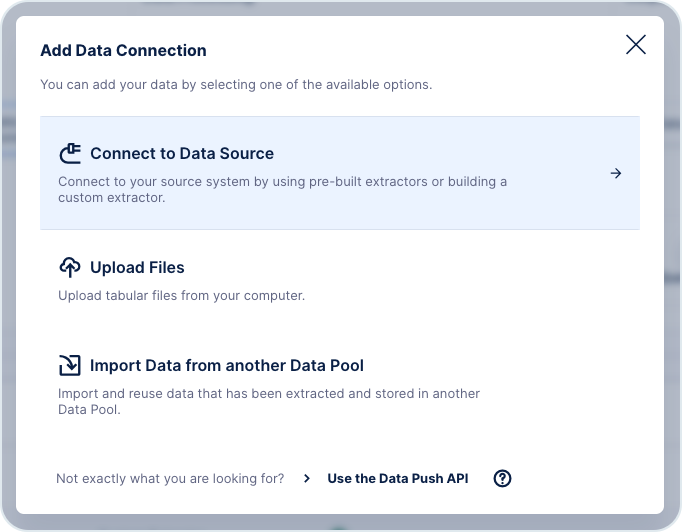
Choose the Emporix Process Contexts by Template as a custom connector.
Enter the required data:
Name: enter a unique name for your new data connection.
API URL: https://api.emporix.io
AUTH_URL: https://api.emporix.io
Digital Process ID: Click the selected digital process. You can find the ID of your digital process in Orchestration Engine > Digital Processes.
The ID appears in the URL.

Client ID and Client Secret: you can find the ID and the secret in the Emporix Developer Portal, in the Manage API Keys section -> Orchestration Engine API data.
The new connection will be created and visible in the Data Connections list.
Customizing the Extractor Builder
If you build your own extractor from scratch, you can customize the connection in the Celonis Data Pool connections. However, using the Emporix extractor, the basic setup is already prepared. The only thing to customize is the process context data coming from your digital process.
These steps show how Emporix prepares the setup:
Choose the three-dots icon next to you connection in Data Pools and click Customize.
Optionally, add a description for your new connection.
Add or edit the parameters for the connection.

Check the authentication method. It should be the OAuth2 (Client Credentials) method with the these endpoint and type details:
Get Token Endpoint: {Connection.AUTH_URL}/oauth/token
Grant Type: client_credentials
Don't modify this configuration.

Check the process context endpoint configuration.

The response that is visible, is the part that can be customized:

Make sure the context$processId is checked as a Primary Key. Without the context$processId, it is not possible to link the child tables back to the parent.
Go to Orchestration Engine > Digital Processes and choose the digital process that you have configured the connection with Celonis for.
In the digital process, add a Post Action Feedback as a process step.

You can configure the post action feedback event to send only the data that you want to share with Celonis. To do that, you need to configure and map the JSON string in the completion event of the post action feedback scenario in Make. In this example, it's the product ID, stock, and quotes information. All the other data gathered in the process context is ignored when sending the context to Celonis.

As a result of such a configuration of the Make scenario, the data imported by the extractor changes and is limited to the information that we chose to send. In this quotes example, you can see a new nested table created by the extractor: execution_context$context&celonis_postaction_feedback$quotes

If you want to limit the date from when you load the post action feedback data, you can use the createdSince filter.
In Celonis, go to Data Pools and open Transformations of the Data Processing.
You can set the filter in Data Pools > Your extractor > Data Jobs > Load Context:
Choose the data jobs for which you want to modify the load.
Go to Time Filter, configure the filter, and customize the creation period.

For more details and instructions on how the Celonis data model and transformation look, see the Data Jobs documentation.
It's recommended to create additional filters to set some limitations on the load context and its content.
To get the data only from the finished digital process runs (and to exclude gathering the data for digital processes that are running), you can add a filter that fetches data only from digital processes with a finished status.
You can set the filter in Data Pools -> Your Extractor -> Data Jobs -> Load Context.
In the Filter Statement section add status = 'finished'.
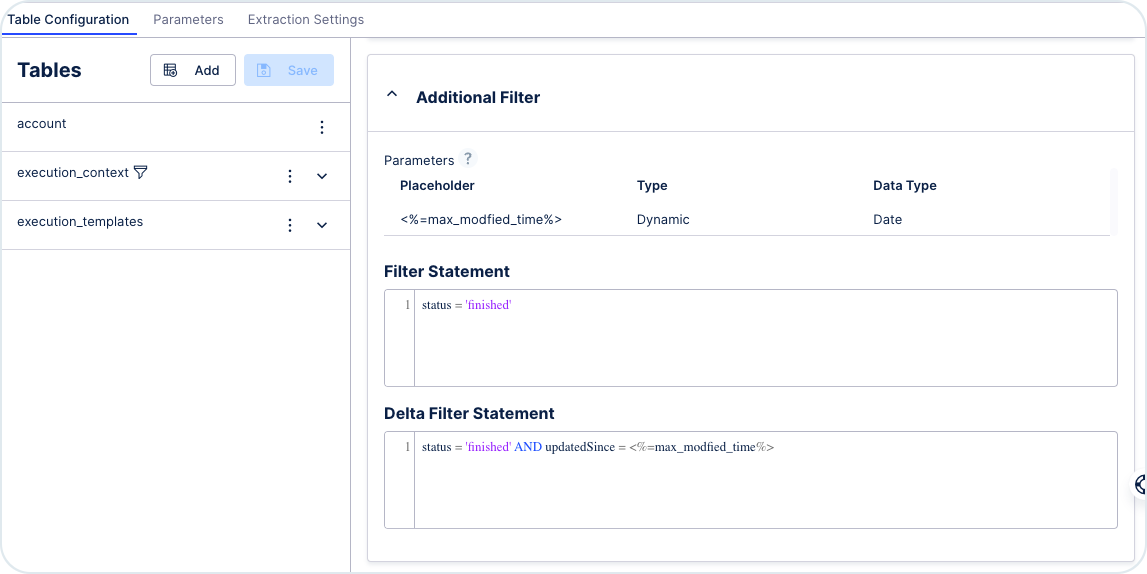
To get the data only from the finished digital process runs and to make sure only the changed data is loaded, you can use a filter for the finished status and modified time.
You can set the filter in Data Pools -> Your Extractor -> Data Jobs -> Load Context.
In the Delta Filter Statement section add status = 'finished' AND updatedSince = <%=max_modfied_time%>.
The <%=max_modfied_time%> is a customer extractor parameter that is created in the Parameters tab.

Provide these values in the fields:
type: dynamic
table: process_context
column: metadata$updatedAt
operation type: FIND_MAX
data type: date
default date: past date

To generate logs, go to Data Pools > Your Extractor > Data Jobs > Extract Event Log.
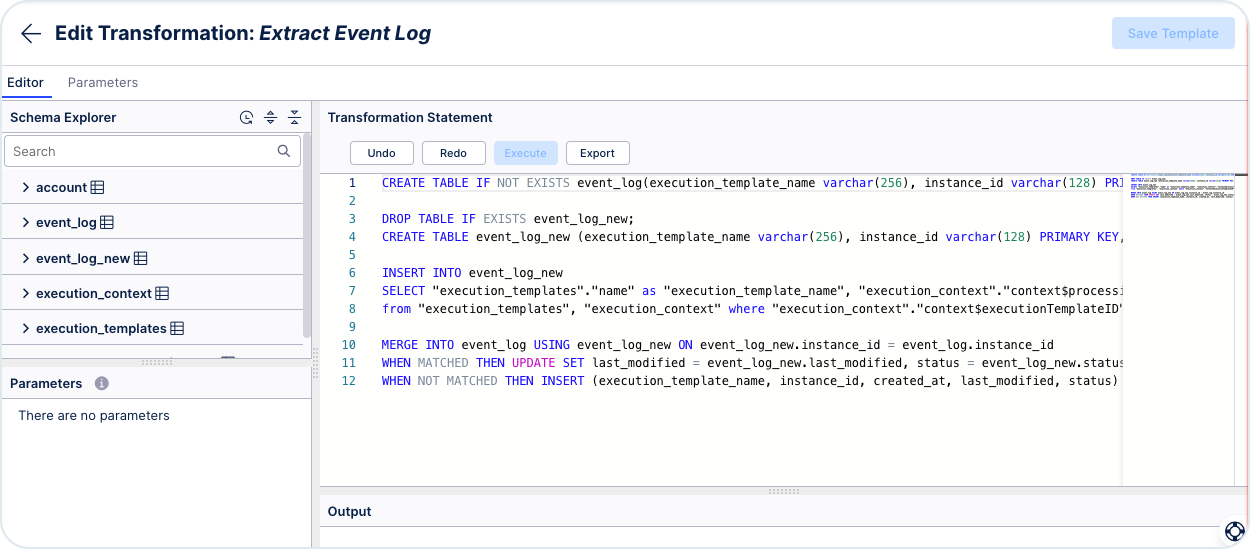
The script that is prepared creates an event logs table based on the name of the digital process. It supports delta tables. The script creates a single event for each digital process.
Use this script:
CREATE TABLE IF NOT EXISTS event_log(execution_template_name varchar(256), instance_id varchar(128) PRIMARY KEY, created_at TIMESTAMP, last_modified TIMESTAMP, status varchar(64));

DROP TABLE IF EXISTS event_log_new;
CREATE TABLE event_log_new (execution_template_name varchar(256), instance_id varchar(128) PRIMARY KEY, created_at TIMESTAMP, last_modified TIMESTAMP, status varchar(64));

INSERT INTO event_log_new
SELECT "execution_templates"."name" as "execution_template_name", "execution_context"."context$processid" as "instance_id", "execution_context"."metadata$createdAt" as "created_at", "execution_context"."metadata$updatedAt" as "last_modified", "execution_context"."status" as "status"
from "execution_templates", "execution_context" where "execution_context"."context$executionTemplateID" = "execution_templates"."id";

MERGE INTO event_log USING event_log_new ON event_log_new.instance_id = event_log.instance_id
WHEN MATCHED THEN UPDATE SET last_modified = event_log_new.last_modified, status = event_log_new.status
WHEN NOT MATCHED THEN INSERT (execution_template_name, instance_id, created_at, last_modified, status) VALUES (event_log_new.execution_template_name, event_log_new.instance_id, event_log_new.created_at, event_log_new.last_modified, event_log_new.status);
The activity table with the data gathered as per the script, with the digital process name, ID, creation time, last modification time, and status:
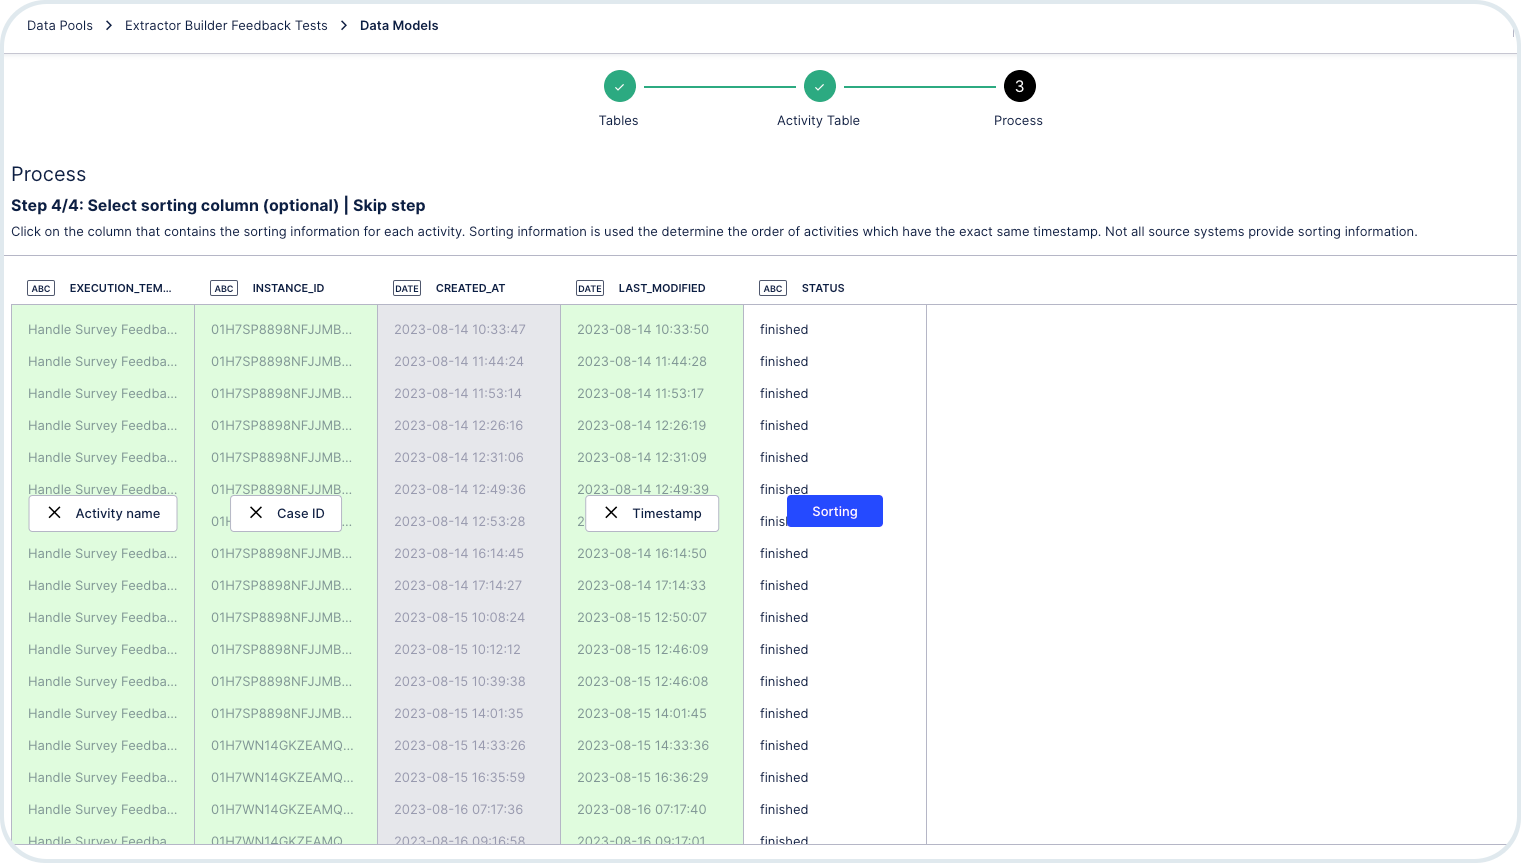
Set up the Data Model to establish relations between all of the extractor's components. Go to Data Models -> Open the model -> Choose New Foreign Key.
To create the connections, use the elements from the Dimension table and the Fact table.
Mandatory relations:
Link Process Context (Dimension) with Event Log (Fact) by linking event_log.instanceid and execution_context.context$processid.
execution_templates.id and exection_context.context$executionTemplateID.
Recommended relations:
Use Event Log as activity table
Link Process Context (Dimension) with the additional tables (Fact) using execution_context.context$processid to load any additional data as a part of your post action feedback event
Optional relations:
Link Execution Template (Dimension) with Execution Template Triggers (Fact) by linking execution_templates.id and execution_templates$trigger.execution_templates_id.
If you want Orchestration Engine multi-tenant separation of data, link Account (Dimension) with Execution Template (Fact) by linking account.id and execution_templates.tenant.

Here's an example of a configured data model:
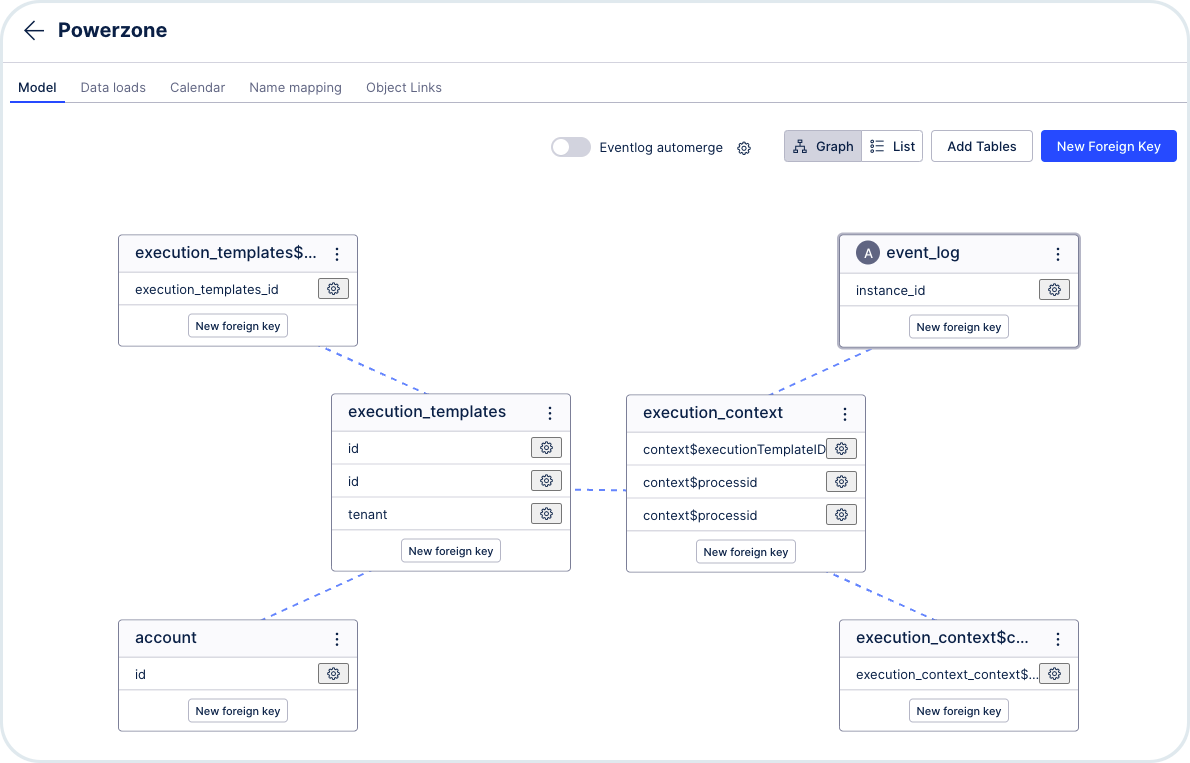
Execution context: it's the central component, it belongs to one digital process.
digital process: it can have many process contexts and many digital process's trigger events, but it can have only one account.
Event log: it's a 1:1 relationship with the process context.
Account: means the Orchestration Engine tenant, it can have many digital processes.
To learn more about the configuration of Data Models in Celonis, see the Data Model Definition documentation.
It's possible to load all the data that you have in your digital process's process context. However, we recommend that you send only the data used by Celonis.
The mapping of process context data with can also be done manually, instead of creating a Make scenario for that.
However, this can be error prone as the digital processes can be edited at any time by different users and the mapping is not reflected automatically.