Overview and structure
Knowledge Model and View Configuration
Studio allows you to combine functional expertise with the power of Celonis Process Mining, Action Engine Skills and more to create Apps on scale. Celonis Studio is your one-stop development platform to build, test, and edit Execution Apps and Instruments in a single, low code interface.
Important
When creating apps, it is important you make sure that the structure of the Knowledge Model and the Views is set up correctly. The most important building blocks of a knowledge model and a view are shown below. Also, the dependencies between these two assets are defined in more detail.
Introducing the fundamentals
Data Model: The Data Model is built upon the predefined Data Connection and contains all important tables that store extensive information about your process. Based on this data Celonis performs its process mining to identify Execution Gaps. This Data Model (setup in Data Integration) is the first building block and backbone for an insightful Execution App.
Knowledge Model: The KM is linked to the Data Model and surfaces the data records and some pre-calculated process KPIs to the app builder. You can define the record types you want to build your app on, like an invoice or a production item. Also, KPIs are defined here.
View Configuration: The View Configuration builds the front end of our setup as it holds the layout and the component configurations showing in our App. The records and KPIs from our Knowledge Model are reused.
Below you can see an extensive overview of the setup of the Knowledge Model and the View Configuration.
In this image, you can find all important building blocks for your Knowledge Model and your View. Keys/ IDs that are used to link to elements are illustrated with blue lines.
Dependencies within a configuration are shown with dotted lines. 
Dependencies connecting the Knowledge Model on the left and the View Configuration on the right are shown with solid lines. 
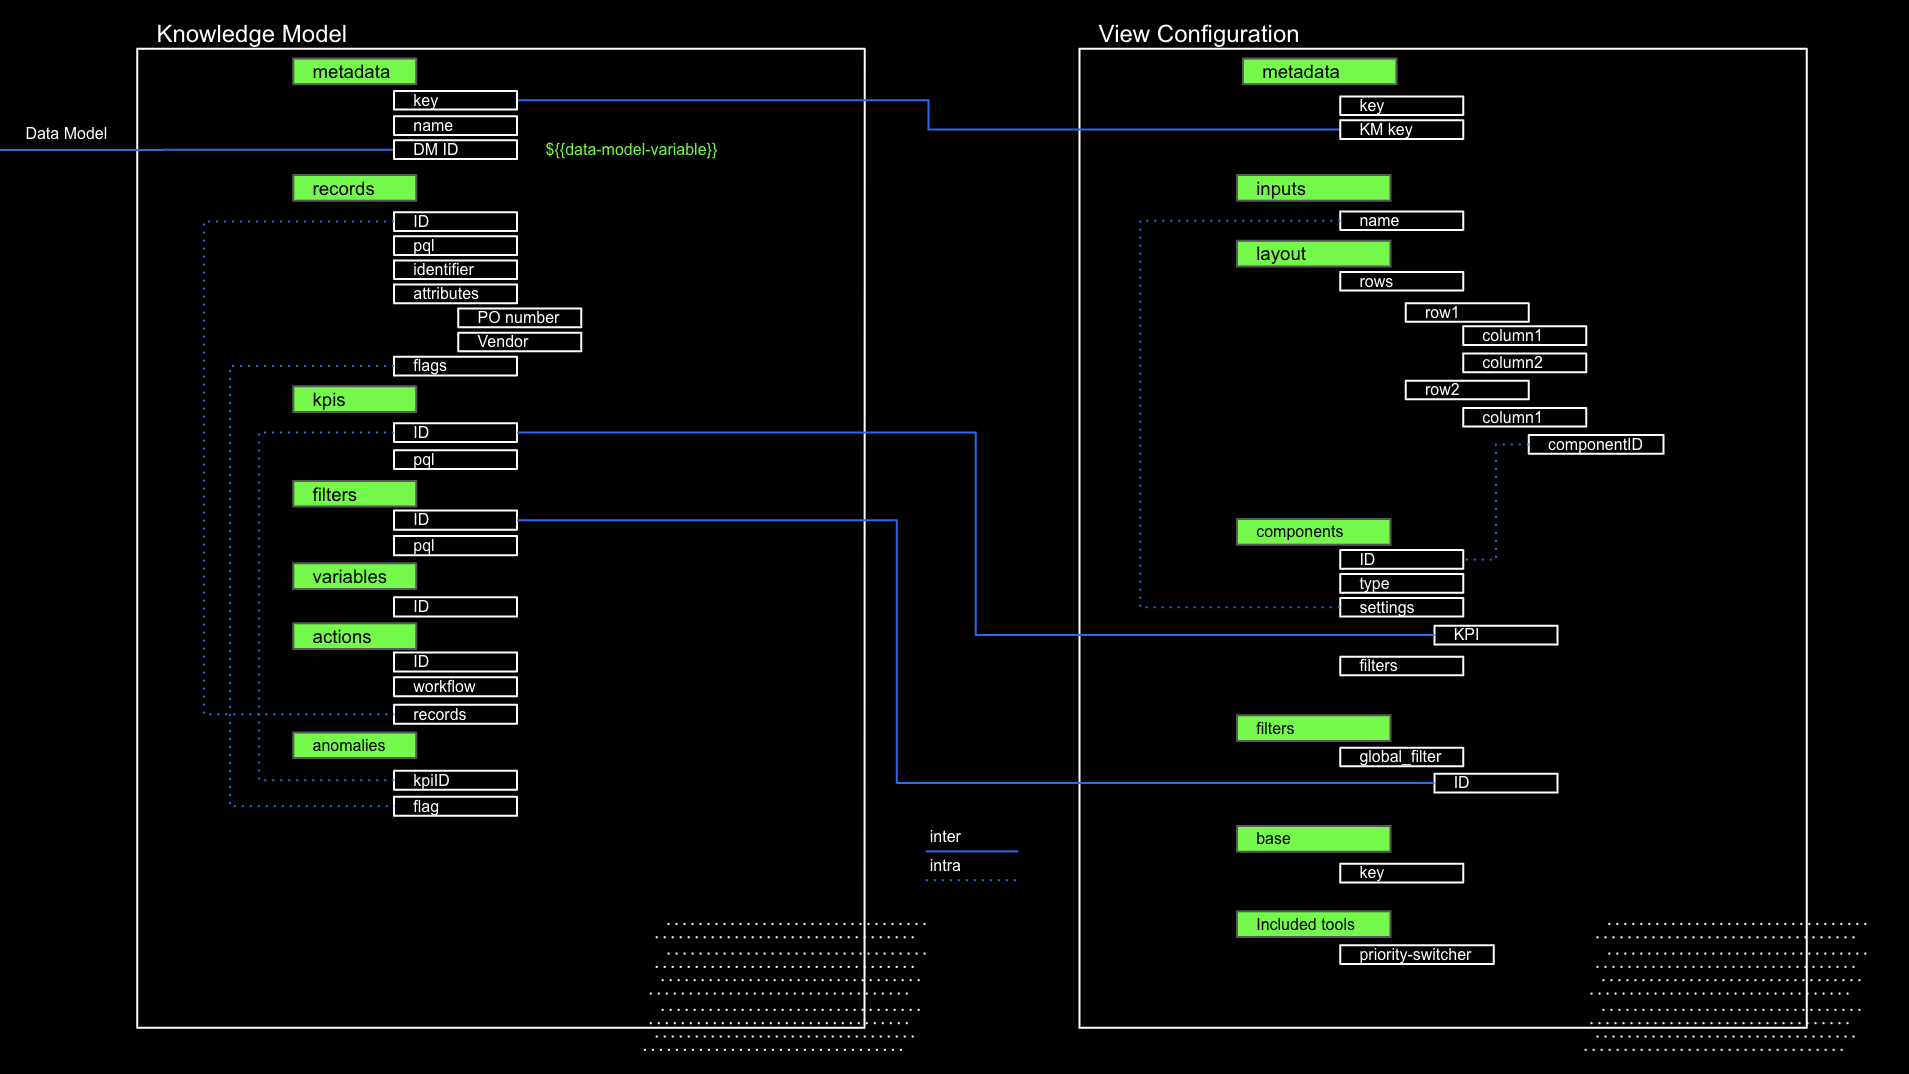 |
Connecting the Knowledge Model to a Data Model
The Data Model to use has to be defined in the metadata of your Knowledge Model. You can use a variable with the syntax ${{variable}}. To create a Data Model variable go to the app settings.
You can now reference the tables and columns of the data model in the Knowledge Model as records and their attributes by addressing them with their respective abbreviation, e.g. BKPF for the Accounting Document Header (SAP) or AR_ADJUSTMENTS_ALL (Oracle).
You can also define your own records or add custom attributes. You can now access the fields within your Data Model
Every Process Query Language (PQL) formula now defined in the Knowledge Model references this Data Model.
Connecting the fields within the Knowledge Model
One of the most important parts of the KM (Knowledge Model) is the records section. There you define the fundamental building blocks/ fields you are working within the View.
The ID of a specific record (e.g. INVOICE) can then be used in other parts of the file. In our case, we reused this record in the actions section and the sensors section.
Within the KPI section, you can preconfigure complex KPI calculations to reuse them later on at different parts of your View. This functionality supports the concept of encapsulation which makes your code more readable and maintainable, as you only define the PQL formula once and reuse it whenever needed, opposed to defining a KPI several times. In case of any changes you only need to adapt the one definition.
Connecting a View Configuration to a Knowledge Model
The most important connection between Knowledge Model and View Configuration is the Knowledge Model key. This key ensures that your View Configuration retrieves the information (records, KPIs, filters, etc.) from the right Knowledge Model and respectively also the right Data Model.
You can then also access the before-mentioned preconfigured KPIs from your Knowledge Model. Therefore you just reuse the respective KPI ID used in the Knowledge Model.
Another application of referencing Knowledge Model entities can be used in the filters section of your View Configuration.
Connecting the fields within the View Configuration
The basic building blocks of the View Configuration are the metadata section, the layout section, and the record section.
In the metadata section, you have already defined the Knowledge Model key. In the layout section, you can define the spacial setup of your App.
The component section holds all different components like KPI Lists, Tables or Charts. When displaying one of these components in your App you have to specify the components via its ID in the layout section.
Another interesting functionality is provided by the inputs section. Here you can define variables, that can take any value and be used throughout your View. Some common applications are the selection of a KPI within your KPI List, which gets then propagated throughout your View and every component adjusts to this KPI.
Profile View Configuration
Use Case Example:
You have created an Action View to display information about multiple invoices. Now you want to create a detailed view that shows more information and possible actions on a single invoice.
Introducing the fundamentals
Profile Views can be used to display a profile of a specific record item like an invoice or production item. They allow building drill-downs, e.g. by clicking on an invoice number in a table.
You have to specify a Profile View in its respective View Configuration. (
metadata.profileView: trueandknowledgeObjectId: INVOICE)
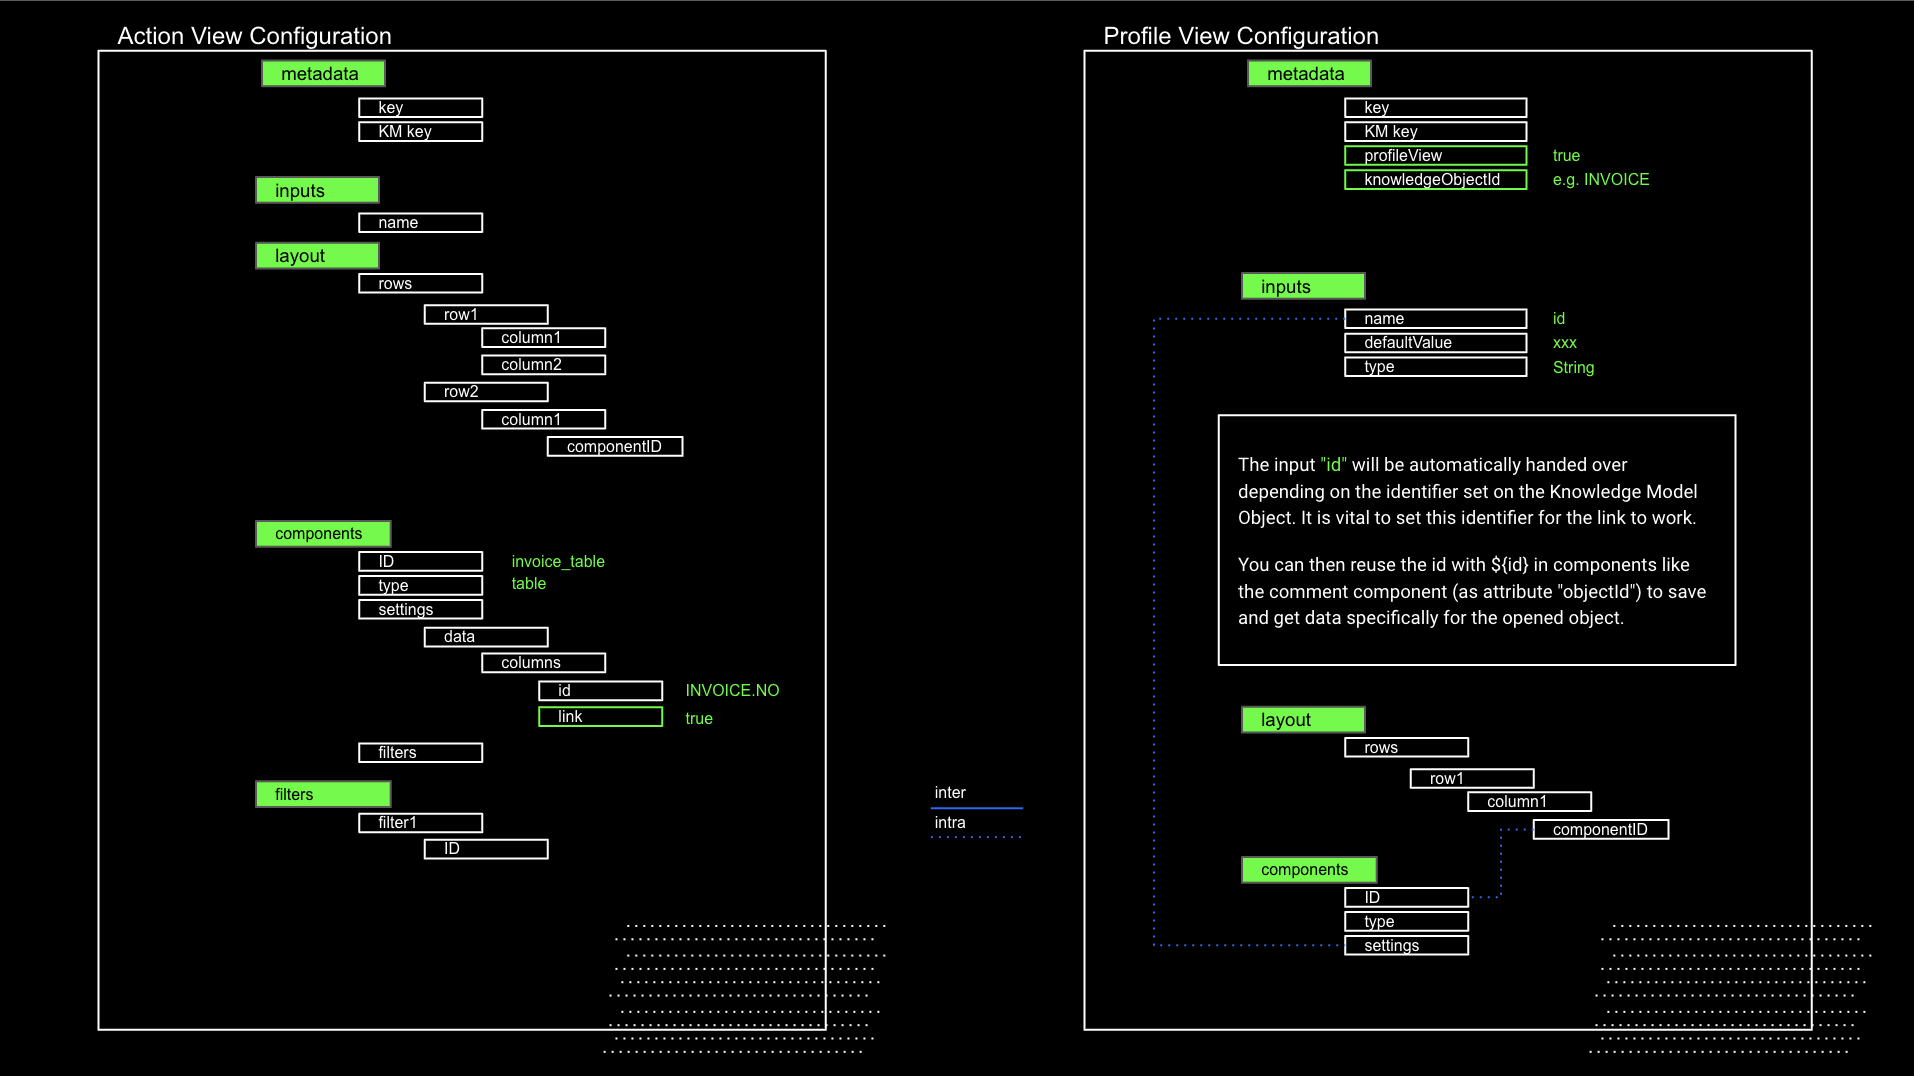
Configuring the Profile View
Configure the metadata in the Profile View Configuration. You have to declare the following “key: value” pairs:
profileView: true
knowledgeObjectId: INVOICE (as written in the Knowledge Model)
Building an input: The input "id" will be automatically handed over depending on the identifier set on the Knowledge Model Object. It is vital to set this identifier for the link to work.
Configuring a component to open a Profile View
Configuring the component that opens the Profile View. You have to define the "link: true" value pair within a component (like tables) for the Profile View to work.
You can read more about the setup of a Profile View here.
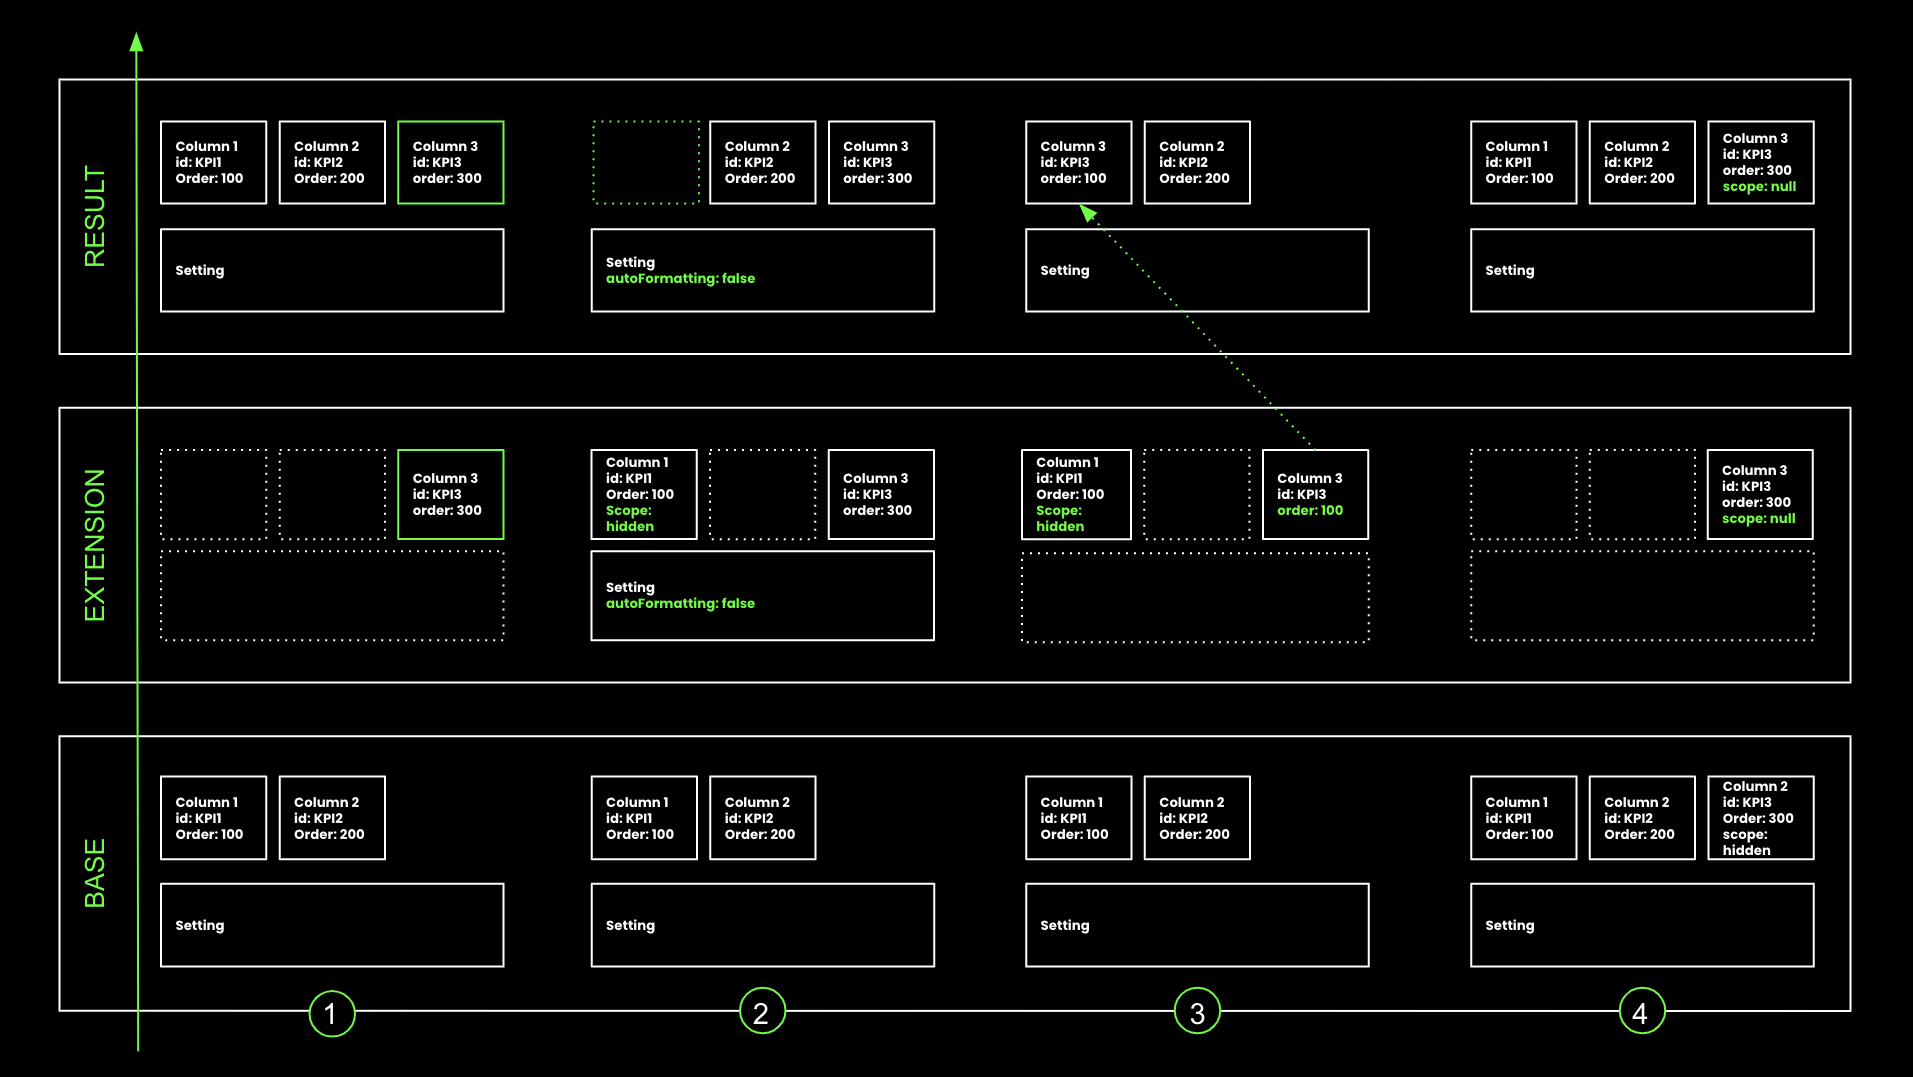
Base and Extension
There are three different ways of how to set up a new View. Firstly you can build one from scratch, secondly, there is the option of using a template and thirdly you can extend an already existing View.
The following overview specifies the third option of building an Extension to further define a View. What is important to remember is that specifications in the Extension configuration are based on the respective Base and therefore inherit those definitions, but they can be changed or extended. In case a particular entity is described in the Base as well as in the Extension the latter overrides the former description.
Use Case Example:
You have created a view to display information about a country. Now you want to create more views that are very similar for other countries but do differ in some configurations like additional components, table columns or filters.
Below you can see an extensive overview of how the Base and Extension functionality interact on your resulting View.
You should interpret this image by starting at the bottom with an exemplary Base setup. The middle section represents the Extension that is based on the Base beneath. In the top section, you can see the resulting setup.
Exemplary Extensions
Adding another entity to your Base: You can add another entity to your Base by just stating it in the Extensions part. To do so, you just have to reference in the extensions to what you refer to by defining the id (e.g. components.id: table)
Specifying the settings more precisely: You can extend the core settings within your Extension by just adding further "key: value" pairs.
Changing the Order of your Base components: The order defines the appearance within your View. You can use this to define entities with higher or lower orders in the Extension for them to show before or after the Base entities.
Overwriting your Base specification: The specification you have used in the Base configuration can be completely overwritten or set out of scope (scope: hidden in any list element).
More specific examples can be found on the working with extensions page.
FAQs about Views
Q: In which order should I build Knowledge Model and View Configuration?
A: You should set up the Knowledge Model first as it stores your basic entities like invoice or production items and also calculations like KPIs. On top of this Knowledge Model, you then can build your View Configuration.
Possible order:
Knowledge Model: metadata, records, KPIs
View Configuration: metadata, layout, components
Note
It can be more intuitive to define the components in the View Configuration first and then think about where you want to see them in your layout.
Q: Which other parts can be configured in the View Configuration?
A: As you can see in the top image on this help page you can further define the subsection filters, base or included tools.
Q: How is the components section and the layout section connected?
A: Within the components section you define the general setup of a component. This component can then be used in the layouts section by stating the components ID. Only after that, the component is visible in the App.