Setting up Network Explorer
There are two ways to set up Network Explorer:
Using the visual editor
Defining the setup in a YAML file
Each approach has its own advantages. The visual editor is easy to use but it does not allow you to use all of the features available in Network Explorer. If you use a YAML file, you can access all of the features in Network Explorer, but YAML requires more technical familiarity.
Using the visual editor
The visual editor allows you to add existing components or create new components.
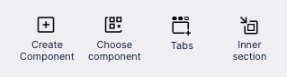
To add an existing component:
Click Choose component.
Select a component from the dropdown list.
To create a new component:
Click Create component.
Select a component from the dropdown list.
Using YAML
Note: you need to edit the YAML for the component, not the entire view.
Editing the YAML code for an existing component
To edit the YAML code for an existing component:
Click Edit Mode.
Click the Switch to Code Editor icon.
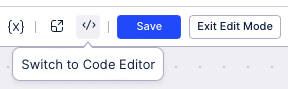
Make your edits.
Click Save.
Click Exit Edit Mode.
Creating the YAML code for a new component
Creating the YAML code for a new component is for advanced users. It is easier to use the visual editor to begin to create a new component, and then edit the YAML once you've created the component.
Understanding the YAML
This YAML definition illustrates the main elements:
type: signal-link-explorer
settings:
defaultNodes: CASE_TABLE.PLANT
nodes:
   - attribute: CASE_TABLE.COUNTRY
     order: 0
   - attribute: CASE_TABLE.PLANT
     order: 1
   - attribute: CASE_TABLE.MATERIAL_GROUP
     order: 2
layout: SPRING_FDP
edgeLabels:
   - field: KPI_DUMMY
nodeLabels:
   - field: KPI_DUMMY
Element | Description |
|---|---|
defaultNodes: | Allows you to define which of the dimensions/ breadcrumbs is selected by default. If none is defined the first one is taken. |
nodes: | Allows you to define multiple nodes (which will appear in the breadcrumbs). |
order: | Defines the order of the breadcrumbs. If no order is given, it defaults to 0. If there are multiple orders with the same number, the order of the attribute in this list is respected. |
layout: | Chooses the layout of the graph. We've described the layouts in the next section. |
edgeLabels: | An edge label from a Knowledge Model KPI. Needs to be defined with context of wanting to display it in the Network Explorer. You can configure more edgeLabels, but only the first one will be shown. |
nodeLabels: | A node label from a Knowledge Model KPI. Needs to be defined with context of wanting to display it in the Network Explorer. You can configure more nodeLabels, but only the first one will show on the node. The others will appear in the context menu. |
Understanding the Layouts
The layout: element in the YAML has a one-to-one correspondence with the values in the Layout dropdown in the visual editor.
What you see in the Layout dropdown in the YAML | What you see in the Graph Layout dropdown in the visual editor | Description |
|---|---|---|
Top to Bottom Hierarchy | HIERARCHY | Hierarchical layout: top to bottom. |
Bottom to Top Hierarchy | HIERARCHY_BT | Hierarchical layout: bottom to top. |
Right to Left Hierarchy | HIERARCHY_RL | Hierarchical layout: right to left. |
Left to Right Hierarchy | HIERARCHY_LR | Hierarchical layout: left to right. |
Edges with Minimum Crossing | SPRING_FDP | Based on spring force algorithms. Use for larger networks. |
Edges with Equal Length | SPRING_NEATO | Based on spring force algorithms. Use for smaller networks. |
Circular | CIRCLE | Circular layout. |