Configuring an execution gap list in legacy views
Legacy view component
You're currently viewing a topic about a legacy view component in Studio. This component can still be used in legacy Studio views, however we recommend using the visual view editor in the new Studio experience. The updated interface includes drag and drop capabilities, allowing you to easily add components and configure your views.
For more information, see: Views.
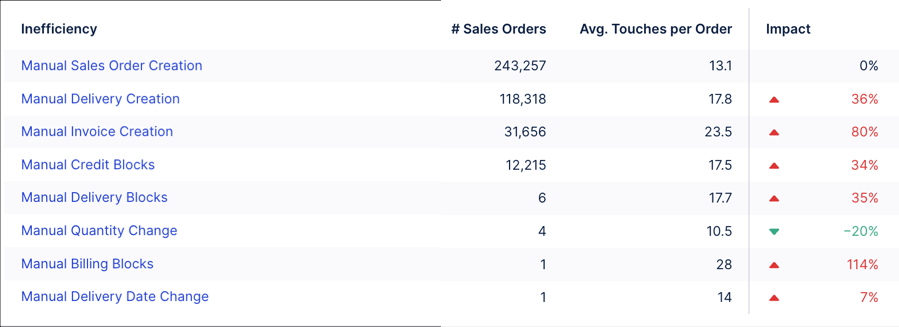
View an automatically generated list of all anomalies detected in your system, including defined KPIs, occurrences, and the current impact. These anomalies can then be analyzed on a profile view level.
 |
Basic execution gap list configuration
The components need to be set up using the following steps:
1. Set up KM KPI
First, we will start to set up a KPI. This KPI will serve as an input for the execution-gap component since we want to render multiple Anomalies which impact a certain KPI.
For this go to the KM and add a new KPI:
Potential pitfalls
When setting up the KPIs in the Knowledge Model, make sure they have the attribute "desiredDirection" defined. It is important for the correct display of the impact.
Knowledge Model
kpis:
  - id: KPI_TOTAL
    displayName: Total count
    description: Total count
    pql: COUNT_TABLE("VBAK")
    desiredDirection: INCREASE                                                # Make sure they have the attribute "desiredDirection" defined
    format: .3s
2. Set up KM Anomaly
In this set, you connect the KPI with Anomaly and provide the required information for rendering the Anomaly in the execution gap component.
You connect the KPI with the flag, which is used for the impact calculation.
Using the Visual Editor
In the Visual Editor, Flags can be created from inside the Records tab in the Knowledge Model or within the Flag specific tab in the Knowledge Model Main Listing. The Flag section within the Record contains all the Flags that exist for this Record, whereas the individual Flag Tab contains all the Flags that exist in the Knowledge Model. You can create a Flag from inside a Record by clicking on the plus button on the Flag section:
 |
If you want to create a Flag from inside the Flag Tab in the Knowledge Model Main Listing, you can click on the Create Flag button on the top right corner of the Flag Main List:
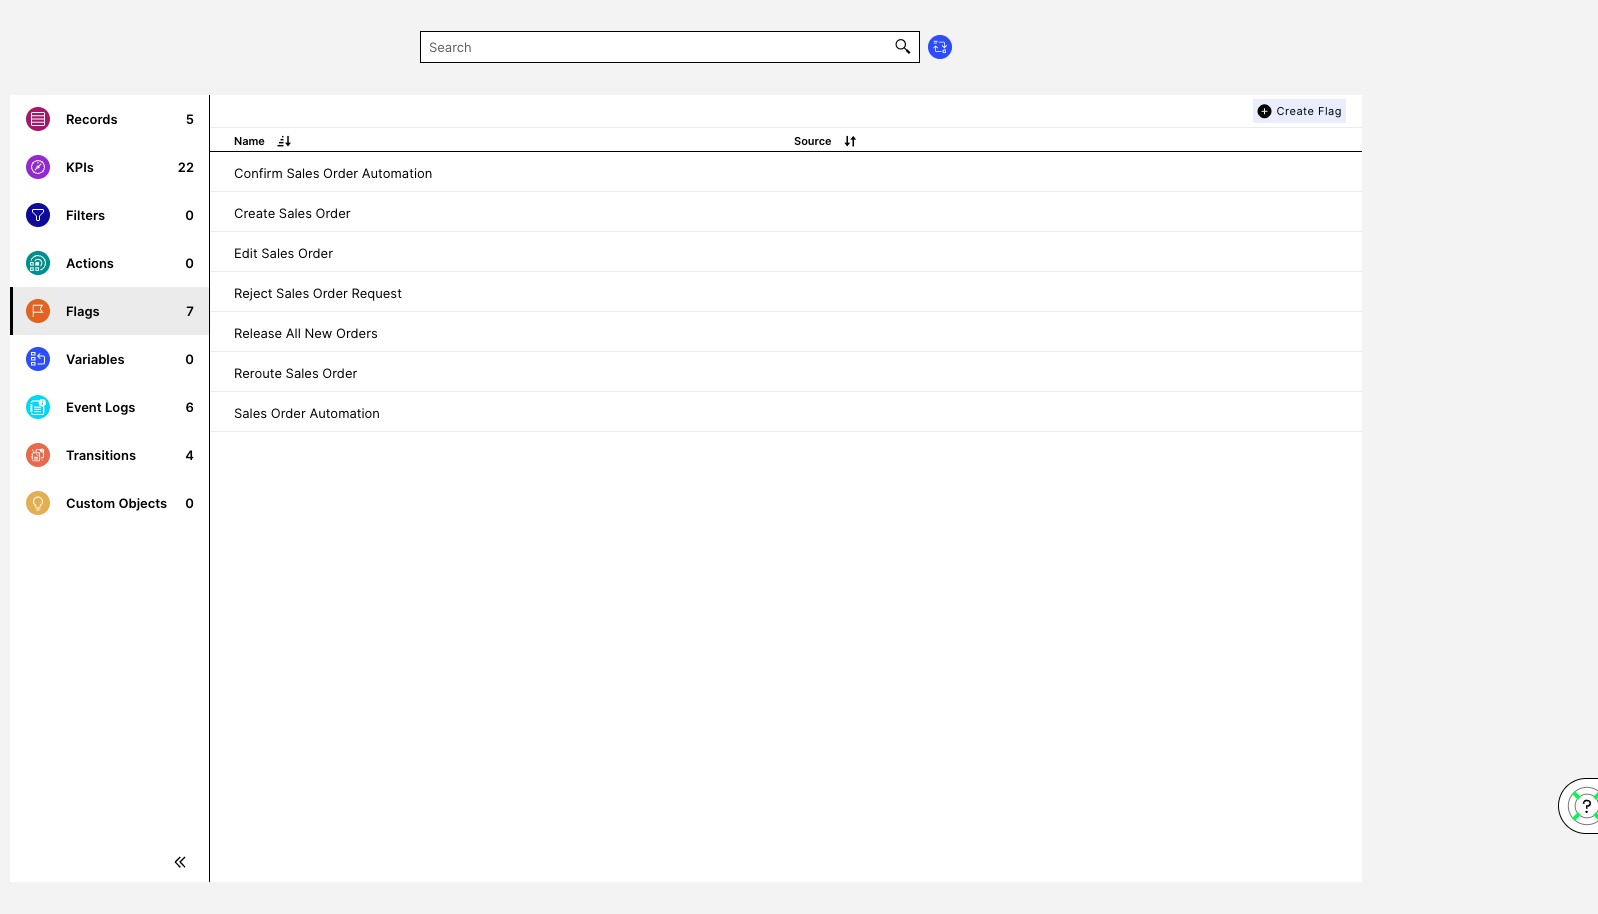 |
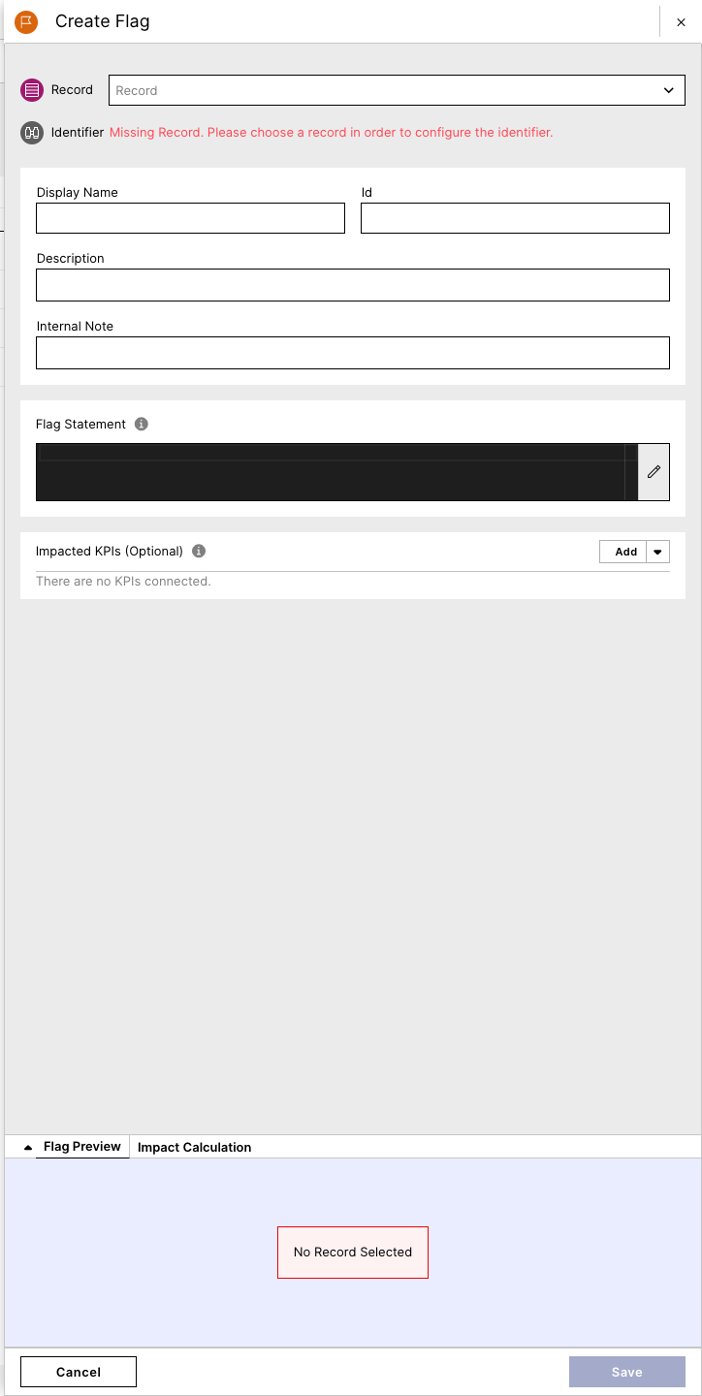
Both of these options will lead you to the Flag Creation window, which contains all Flag associated value assignments. These associated value assignments are the following:
Prerequisite Fields:
Record Dropdown: Shows the Record that will contain the Flag. This field is auto populated if the Flag is created from inside the Record in the Knowledge Model.
Identifier: Shows the name of the Identifier for the Record that will contain the new Flag. Studio reminds you to add an Identifier for your Record if you try to build a Flag on a Record that does not already have an Identifier.
General Settings:
Display Name: A human-readable label used in the user interface.
ID: A unique technical identifier used to reference this Flag. Must be unique within all Flags in the Record.
Description: A human-readable description for the Flag.
Internal Note: A field only visible within the Knowledge Model.
Flag Settings:
Flag Statement: Contains the PQL query that will flag specific rows of your Record if they meet the condition described in this field. Once a valid PQL query is written inside the Flag Statement, the Flag Preview will update to show which of the first 50 rows in your Record meet the condition on this field. Studio will also show you how many of the first 50 rows in your Record were flagged by the statement in this field.
Impacted KPIs: Lists the KPIs on which the Flag will be applied. Once a KPI is added to the list and selected, the preview will show the Impact Calculation for the KPI. This Impact Calculation Preview has the global value for the KPI, the resulting value for the KPI once the Flag Statement is applied to it and the difference between the global KPI and the flagged KPI.
Once you select a KPI you can also choose whether to use a default or a custom impact calculation.
Knowledge Object ID: Discloses the ID of the Record that contains the Flag. Is first shown and automatically populated once a Flag is saved with an Impacted KPI. This Record ID is used to link the Execution Gap List to a profile view.
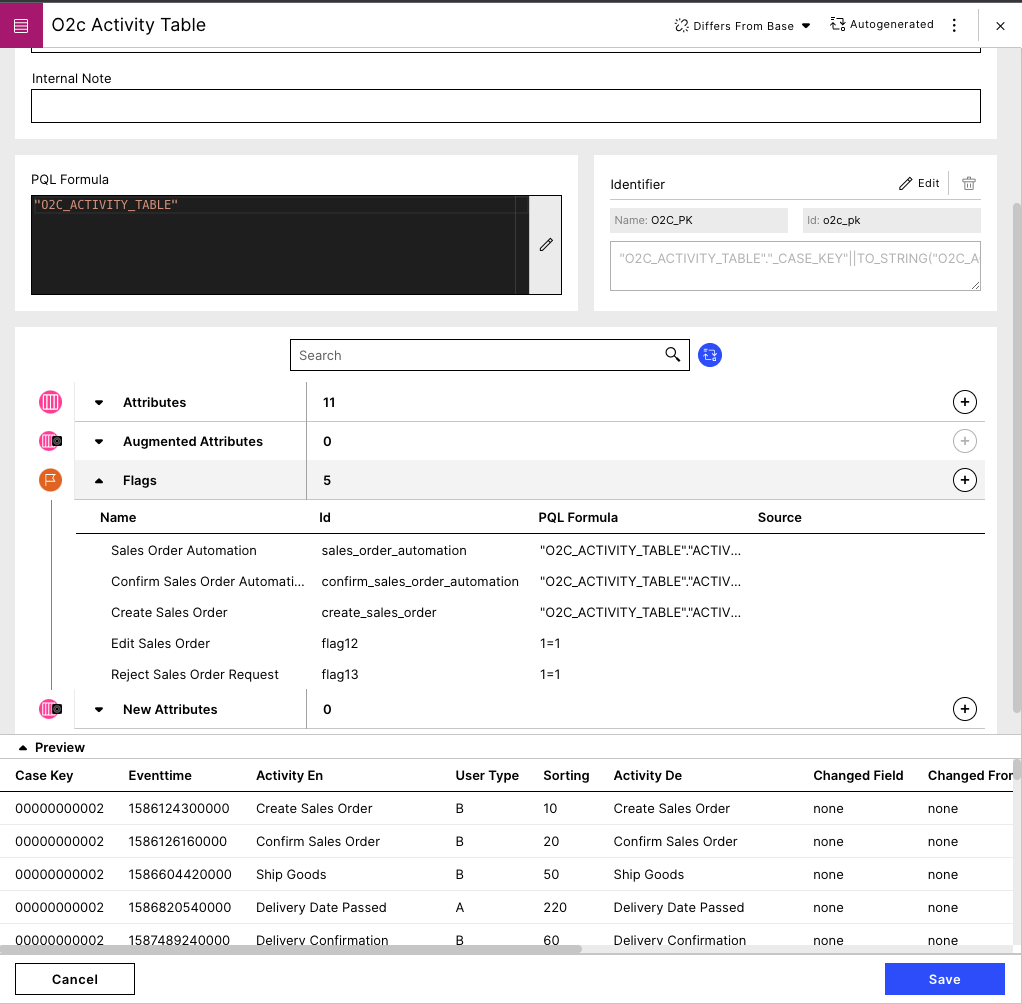
Let's assume you are using Studio to improve an Order Management process. You heard from a colleague that a lot of manual tasks need to be completed in order to create a new sales order. To verify this, you want to see the impact the 'Create Sales Order' Activity has on the O2C Automation Rate KPI that contains the automation rate for this process. To see the impact this Activity has in the Automation Rate, you add a Flag for all 'Create Sales Order' activities within your process and relate it to the O2C Automation Rate KPI. You do this with the Visual Editor, which results in the following:
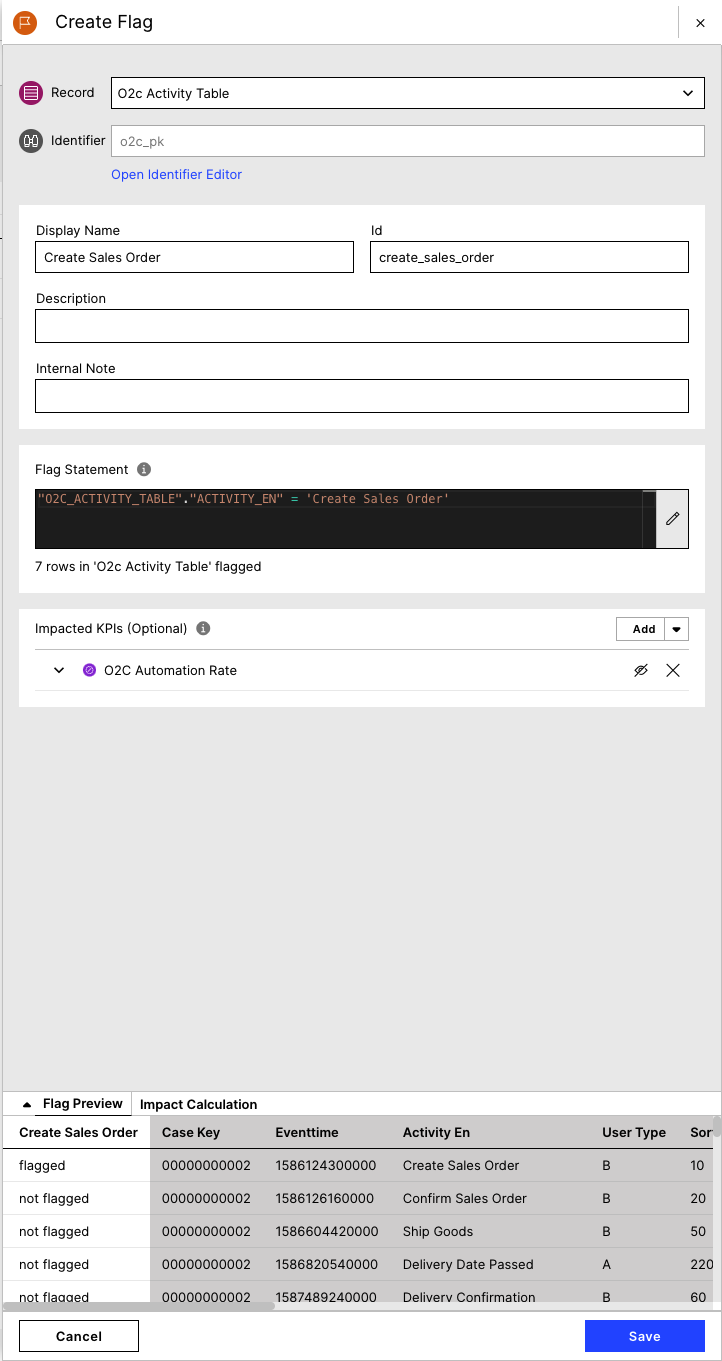 |
You now want to see how your Automation Rate is impacted by only selecting the 'Create Sales Order' activities, so you click on the O2C Automation Rate KPI in your Impacted KPI List. This switches the preview to the Impact Calculation Preview, which shows you the following values:
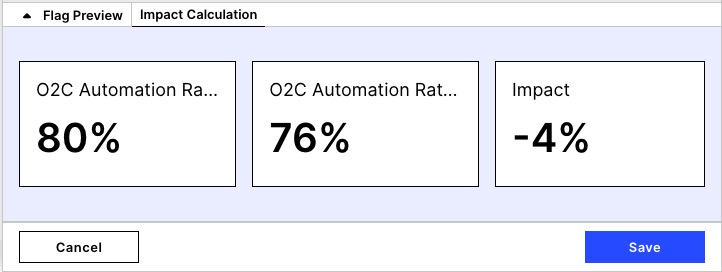 |
By looking at the updated Impact Calculation, you see that while the overall Automation Rate for your process is 80%, the Automation Rate for your 'Create Sales Order' Activity is only 76%. This indicates a difference of 4% between your global Automation Rate and your flagged Automation Rate. With this you can conclude that your 'Create Sales Order' Activity requires more manual input than the rest of the Activities in the process.
Using YAML
anomalies:
  - id: ANOMALY_EXPRESS_1
    displayName: Anomaly Express delivery 1                                                  # Defines the display name of the anomaly in the execution gap component
    description: Anomaly Express delivery 1
    flag: FLAG_EXPRESS_1                                                                     # Reference a flag definition from a record. Make sure this record has an identifier defined (record.identifier.pql). It is needed to calculate the number of occurrences.
    kpis:                                                                                    # References a list of KPIs in the Knowledge Model. Make sure those KPIs have the attribute "desiredDirection" defined. It is important for the correct display of the impact.
      - kpiId: KPI_TOTAL
        #impactCalculation: IMPACT_FOR_PERCENTAGES                                      optional - reference a kpi definition as your custom impactCalculation for this kpi and anomaly
    knowledgeObjectId: ANOMALY                                                               # The knowledge model object will be used when creating the Profile View
    #customAttributes:                                                                         optional - allows to pass custom attributes to the Profile View
      #prop1: anomaly_express_1_customattribute1
      #prop2: anomaly_express_1_customattribute2
  - id: ANOMALY_EXPRESS_7
    displayName: Anomaly Express delivery 7
    description: Anomaly Express delivery 7
    flag: FLAG_EXPRESS_7
    kpis:
      - kpiId: KPI_TOTAL
    knowledgeObjectId: ANOMALY
    #customAttributes:
      #prop1: anomaly_express_7_customattribute1
      #prop2: anomaly_express_7_customattribute2
3. Set up KM Flags in Record
To flag cases which impact our initially-defined KPI, go to Records and add flags. Please find below an example configuration of flags:
Knowledge Model
records:
  - id: VBAK
    displayName: Vbak
    pql: '"VBAK"'
#   ...
    flags:                                                          # Insert the following flag configuration
      - id: FLAG_EXPRESS_1
        displayName: Flag Express 1
        description: Flag Express 1
        pql: "\"VBAK\".\"VTWEG_TEXT\" = 'Express 1'"                # Defines the condition when a record.attribute should be flagged for calculating the impact on a KPI
      - id: FLAG_EXPRESS_7
        displayName: Flag Express 7
        description: Flag Express 7
        pql: "\"VBAK\".\"VTWEG_TEXT\" = 'Express 7'"
4. Set up View execution-gap component
Now go to the View where you want to place the execution-gap component. Here you can insert the following configuration:
Attribute | Required | Type | Description |
|---|---|---|---|
kpi | true | KPI Views Variable (containing KPI id) | References the KPI in the Knowledge Model. Also, a variable ${currentKpi} can be used. |
View
id: execution-gap-list-0d1ac17b-dd43-4e75-84f8-9bb669000d66
type: execution-gap-list
settings:
  kpi: KPI_TOTAL
5. Set up Profile View using Anomaly knowledgeObjectId
You cannot click on an Anomaly to retrieve more details. To do this, you must create a new Profile View:
Profile View
metadata:
  key: execution-gap-profile-view
  template: false
  name: Execution Gap Profile View
  knowledgeModelKey: knowledge-model
  knowledgeObjectId: ANOMALY                                                         # References the knowledgeObjectId (see Knowledge Model configuration) for the respective anomaly
  profileView: true                                                                  # Defines that the it's a profile view
variables:
  - name: id
layout:
Note
If you don't want to create separate Profile Views for each Anomaly:
Assign the Anomalies in the KM the same knowledgeObjectId.
Go to your Execution Gab component and enable forwardFilterToProfileView: true.
Lastly, you can make use of Object Variables in your Profile View. By this, you can then render the content dynamically based on the selected Anomaly.
metadata:
  key: execution-gap-profile-view
  template: false
  name: ${anomaly.displayName}                                                                   # Example of Object variable. It takes the displayName straight from the KM
  knowledgeModelKey: knowledge-model
  knowledgeObjectId: ANOMALY
  profileView: true
variables:
  - name: id
  - name: anomaly                                                                                                               # Defines an object variable of type anomaly
    defaultValue:
      id: ANOMALY_EXPRESS_1
layout:
  ...
components:
  - id: text-box-5a30b628-f9f1-4f30-9f05-a351cbaf99ae
    type: text-box
    settings:
      title: Object based values
      content: |
        <p><strong>id:</strong> ${anomaly.id} <p/>                                              # Displays the different object variables, which are available from the KM
        <p><strong>name:</strong> ${anomaly.displayName} <p/>
        <p><strong>description:</strong> ${anomaly.description} <p/>
        <p><strong>flag:</strong> ${anomaly.flag} <p/>
        <p><strong>prop1:</strong> ${anomaly.customAttributes.prop1} <p/>
        <p><strong>prop2: </strong> ${anomaly.customAttributes.prop2} <p/>
        <p><strong>prop3: </strong> ${anomaly.customAttributes.prop3} <p/>
Warning
If you make use of customAttributes in your Anomaly, please make sure that all Anomalies are configured with the customAttribute otherwise the Profile View will fail to render.
Advanced execution gap list configuration
Attribute | Required | Type | Possible values | Default Value | Description |
|---|---|---|---|---|---|
name | false | String | Defines the title displayed above the component. | ||
forwardFilterToProfileView | false | Boolean | true false | false | Defines whether to forward the blocker as a filter to associated profile views or not. |
hideEmptyOccurrences | false | Boolean | true false | false | Defines if anomalies with 0 occurrences should be displayed. |
sortBy | false | Enum | customColumn defaultColumn direction | Defines by which column the items should be sorted. Can be either one of the defaultColumn keys (issue, impact, kpi, or occurrences) or a customColumn kpi reference. | |
customColumn | false | ||||
defaultColumn | false | ||||
direction | false | Enum | DESC ASC | Defines the directions of the sorting. | |
tableView | false | Boolean | true false | false | |
limit | false | Integer | 8 | Defines the limit on how many Execution Gaps should be displayed per page. | |
columns | false | Enum | issue, occurrences, kpi, impact secondImpact | Rename column title or hide one of the standard columns. Note The second Impact can only be used if a second impact calculation is defined for that KPI in the Knowledge Model anomalies: - id: Late_Payment displayName: Late Payments flag: Late_Payment_Flag kpis: - id: On Time Payment kpiId: OTP impactCalculation: Impact_Calc1 secondImpactCalculation: Impact_Calc2 | |
issue, occurrences, kpi, impact secondImpact | false | Enum | title hide | Defines the column you want to modify. | |
title | false | String | Defines the table title of the column. | ||
hide | false | Boolean | true false | false | Defines if the column should be hidden. |
custom | false | List of KPIs | Defines a list of KPIs, which should be additionally added to the component. | ||
kpi | false | KPI | References a KPI from the Knowledge Model, which will be displayed in an additional column. |
View
id: execution-gap-list-0d1ac17b-dd43-4e75-84f8-9bb669000d66
type: execution-gap-list
settings:
  kpi: ON_TIME_PAYMENT
  name: Execution Gaps
  forwardFilterToProfileView: true
  hideEmptyOccurrences: true
  sortBy:
    # customColumn: CASH_DISCOUNT Sorting can only be applied to customColumn XOR defaultColumn and both at ones
    defaultColumn: occurrences
    direction: DESC
  tableView: true
  limit: 5
  columns:
    issue:
      title: Issue
      hide: false
    impact:
      hide: false
    kpi:
      hide: false
    occurrences:
      title: "# Invoices"
    custom:
      - kpi: CASH_DISCOUNT
How the execution gap impact is calculated
The default impact calculation: "(flagged - global) / global"
Let's say we have an On-Time Payment rate of 7% due to the slow approval rate. In all other cases, we detect an On-Time Payment rate of 23%.
Then the impact of the anomaly slow approval rate on On-Time Payment can be calculated as:
(7% - 23%) / 23% = - 69%
This means that with slow approval rates the On-Time Payment is -69% worse than it could be when resolving the anomaly (of slow approval rates).
Custom impact calculations: For many KPIs and anomalies a different impact calculation may make more sense than the default outlined above.
Therefore you can define custom impact calculations in the Knowledge Model to be used in the Execution Gap List component.
Example: "flagged / global" Consider the KPI Lost Cash Discount which is measured in dollars and not in percent like On-Time Payment.
Let's say we have a Lost Cash Discount of $67k with invoices that have a slow approval rate. In total, across all invoices, we have a Lost Cash Discount of $200k.
Thus the impact of the anomaly slow approval rate on Lost Cash Discount can be calculated as:
67k / 200k = 33.5%
This means that 33.5% of our Lost Cash Discount is affected by slow approval rates.