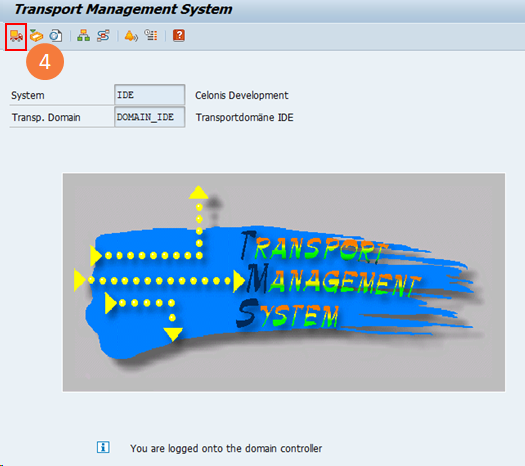
Step 2: Setting up the SAP components
You now need to set up and configurure the SAP components, including the SAP real time extension and installing the RFC module.
When configuring these SAP components, you also have a number of additional configuration options available to you: Additional configuration options.
Celonis RFC Module is responsible for extracting data from the SAP database. It gets the job metadata from the Extractor, i.e. which table, which columns, filters, etc, and then generates a background job in SAP. The job extracts the data and writes it in CSV files in a directory that is monitored by the Extractor.
System requirements
The minimum requirements for a successful installation of the extractor component in the SAP system are:
Minimum Version: SAP ECC 6 and Netweaver 7.0
For SAP ECC 4.6C and 5.0 we provide separate transports respectively
Development rights on the SAP system to install the modules (not required for the execution of an extraction)
100 GB of free disk space on the SAP system server hard drive or a network drive at the location used for installation step B for the temporary data folder
The system user running the SAP system needs to have access (reading and writing) rights to the temporary data folder
Note
The minimum required disk space is only used for the temporary storage of the data chunks which are removed after a successful transfer. The size of the compressed chunks varies from table to table, but their size is likely below 1 GB per chunk.
To install the RFC module, follow these steps:
1. Importing the transport
Check the folder where transports are placed with the transaction AL11 and look under DIR_TRANS; the default is /usr/sap/trans/ on Linux
Unzip the provided ZIP file and copy the cofile (K...) into DIR_TRANS/cofiles and the data file (R...) into DIR_TRANS/data
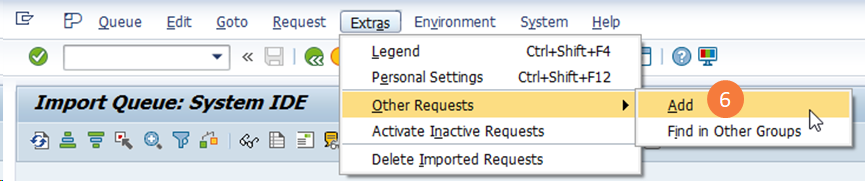
Run the transaction STMS in your SAP system
Click on import overview (F5)
Double-click on the import queue of the target system
Click on Extras → Other Requests → Add
Specify the name of the transport which is AI1K... (where "..." should be replaced by the number that is contained in the file names of the two transport files)
Click on import
Check the Troubleshooting Appendix at the bottom of this page in case you get an error during the import
Tip
Make sure to include the placeholder <FILENAME> at the end of the directory.
Create a dedicated directory on the file system of your SAP (preferably a network drive) and make sure that the user running the SAP system has read and write access to it
Warning
In case you are using Logon Groups, or there are multiple application servers where the extraction jobs can run, make sure that the directory is on a network drive, and is accessible from all the servers.
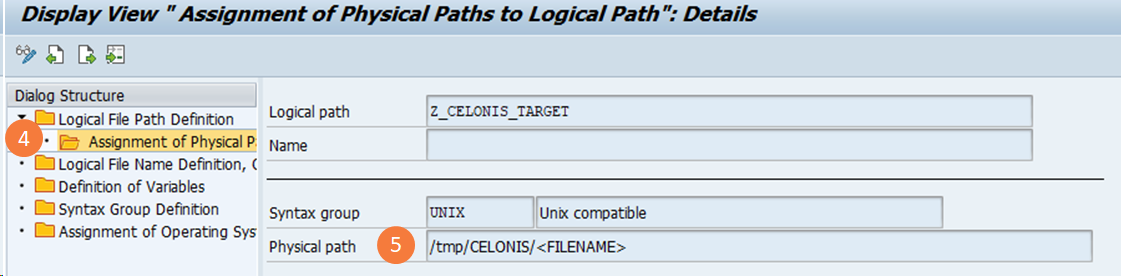
Run the transaction FILE in your SAP system
Find the Logical Path Z_CELONIS_TARGET in the list
Edit the entry by clicking on the button to the left of the new entry and then double-click on the folder "assignment logical and physical paths"
Set a path for UNIX and/or Windows (shown in the screenshot on the left); the path should be the directory on the system or a network drive that you created in step 1.
TIP: Make sure to INCLUDE the placeholder <FILENAME> at the end of the directory
Add a technical service user for the RFC connection.
Afterward follow these steps to apply the correct roles to the user:
Run the transaction PFCG
Go to Role → Upload
Select the provided role file (CELONIS_EXTRACTION.SAP).
Apply the uploaded role CELONIS_EXTRACTION to the RFC user
If you wish to set up the user yourself, make sure that the user has the following permissions:
Permission to write on the server hard disk under the path specified in step B
Permission to execute all RFC modules contained in the transport imported in step A (package name /CELONIS/DATA_EXTRACTION )
Read access to all tables that should be extracted
After the installation of the extractor component in the SAP system, the following information is needed to continue with the setup:
Username and password of the created user for the RFC connection.
Host name or IP of the SAP server system that is used for the RFC connection from the extractor server.
System number.
Client.
Maximum number of parallel table extractions to be done by the extractor.
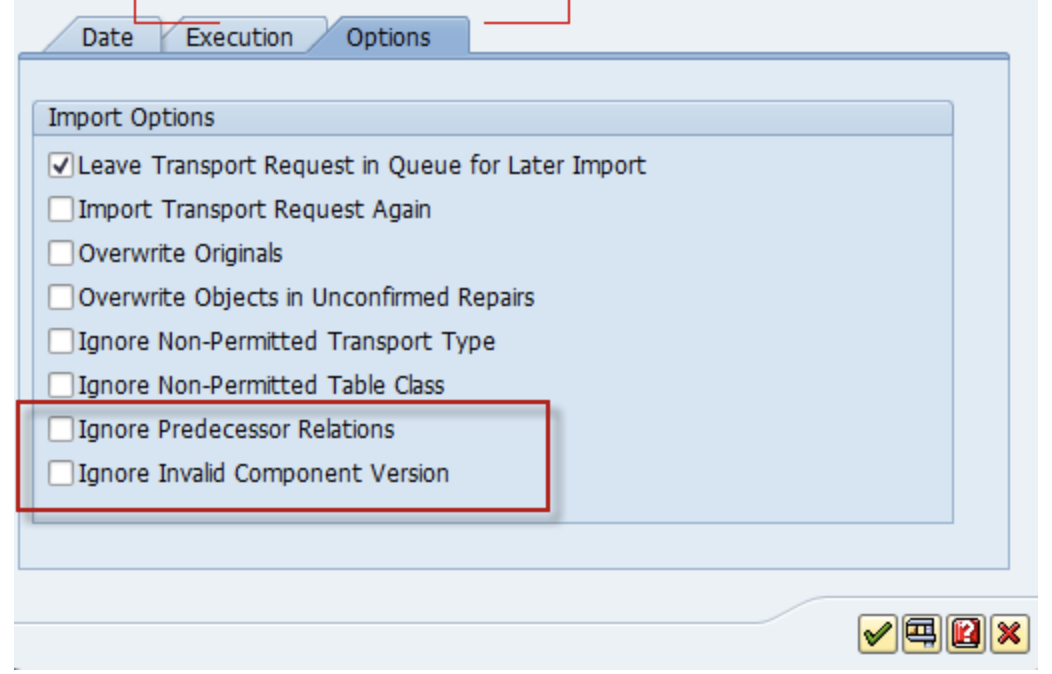
TMS import queue warning message: "Does not match component version" or "Checking components of the requests"
Symptom
When importing the RFC Module into your SAP system you may get the error message below.
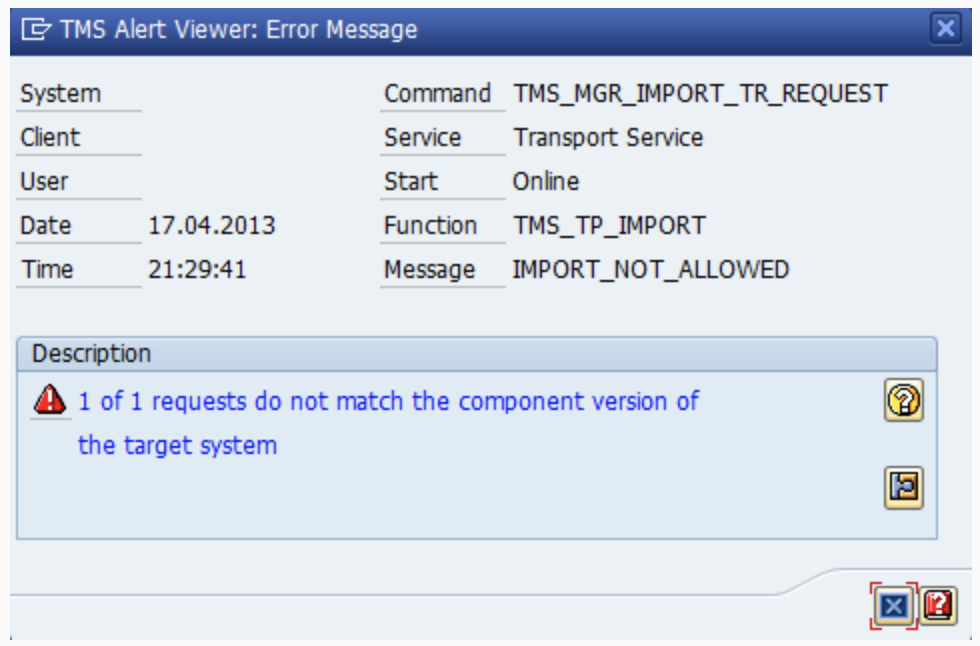 |
Cause
With Version SAP_BASIS 702 a new feature was added to the TMS system to check the component version of the transport which was released and the component version of the system where the transport was going to be imported. If there is a difference, this difference is highlighted in the import queue (transaction stms_import) and if you try to import the transport, the import will stop with a warning message about the difference in the SAPCOMPONENT versions.
Resolution
Ideally, the source system and target system should match in relation to component versions, but this is not possible for the RFC Module, because Celonis has only 1 development system, while our customers have a multitude.
You can bypass the warning with the import option "Ignore invalid component version". You will see this option in the options tab upon import.
 |
To set up the SAP extractor you must meet the following system requirements:
System requirements
Celonis Platform Deployment Options
Real Time Connection to SAP can be implemented both for Full Cloud and Hybrid (LYDIP) scenarios.
Supported Databases
The following database are currently supported:
Oracle
DB2
MS SQL (2012 and higher)
SAP HANA
Sybase
RFC Module and Extractor
The real-time extension requires the following minimum versions of the Celonis RFC Module and Extractor:
RFC Module: 2.0.0
SAP Extractor: 2020-10-19
Please install/upgrade these components before moving forward with the setup.
For clean installation of the RFC Module and Extractor Service follow the steps as described in Celonis RFC Module: Requirements and Installation.
The SAP real time extractor setup includes the following two actions:
Create the Log tables to store the changes in SAP
Install triggers to monitor the changes in SAP
Step 1 has been simplified by including the Change Logs of the standard templates (O2C, P2P, AR, AP) in the transports of the Celonis RFC Module. This means that the customer who is installing the RFC Extractor the first time can easily activate the Change Log tables for the respective process with minimal effort, as described below.
The standard SAP landscape is comprised of 3 systems - DEV, QA, and PROD. The Log tables can usually be created only in the DEV system because the QA and PROD systems are locked for these kinds of changes. After the tables are added in DEV, they should be transported to QA and then to PRD via transport. However, the triggers are not transportable, and should be installed in QA (for testing) and then subsequently in PRD (for productive use). The diagram below describes a typical setup process.

To add a Change Log table:
Log in into SAP and navigate to Transaction Code /CELONIS/CLMAN_UI
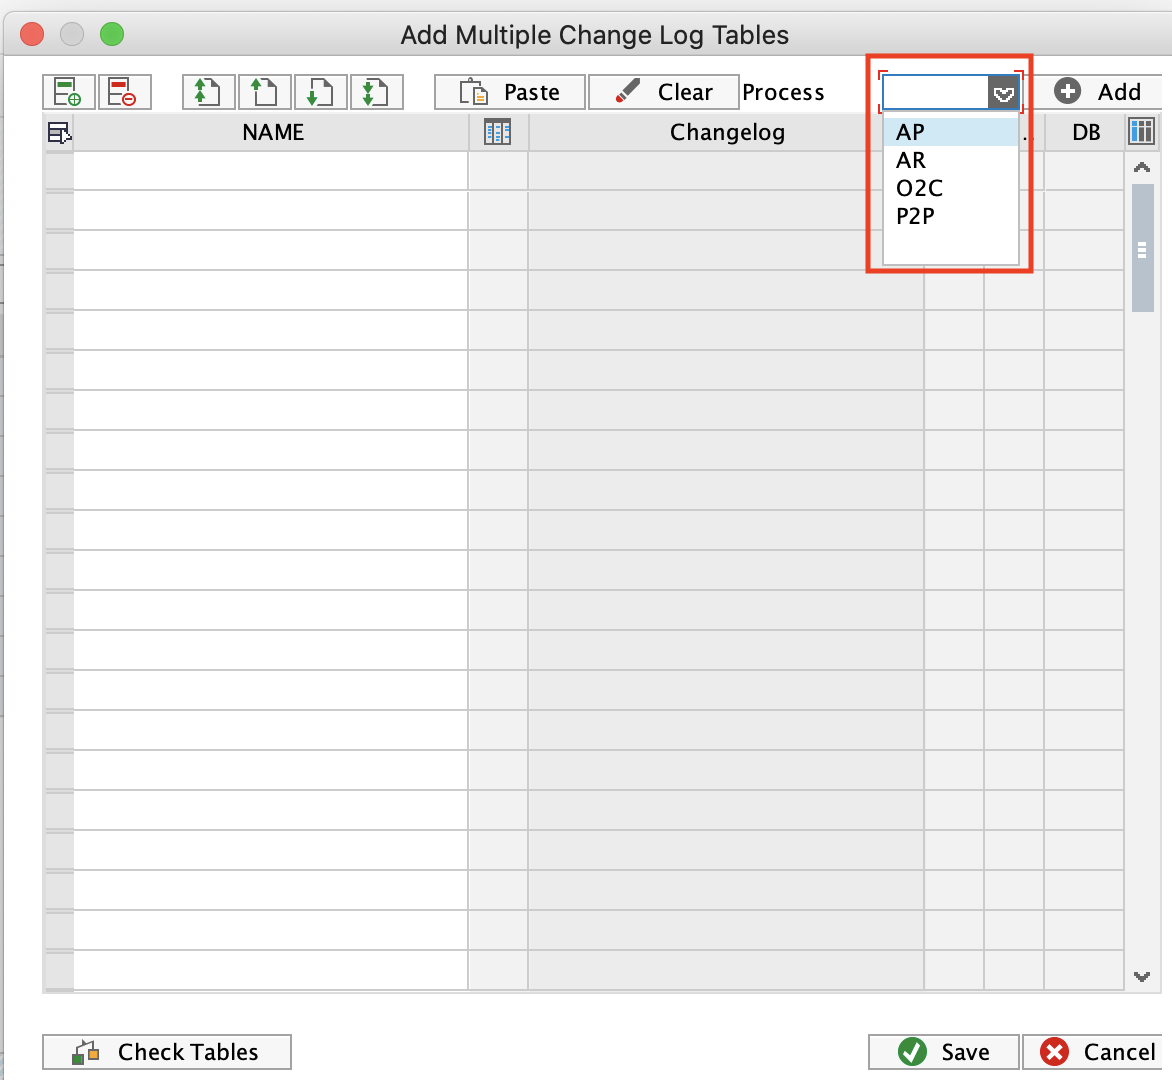
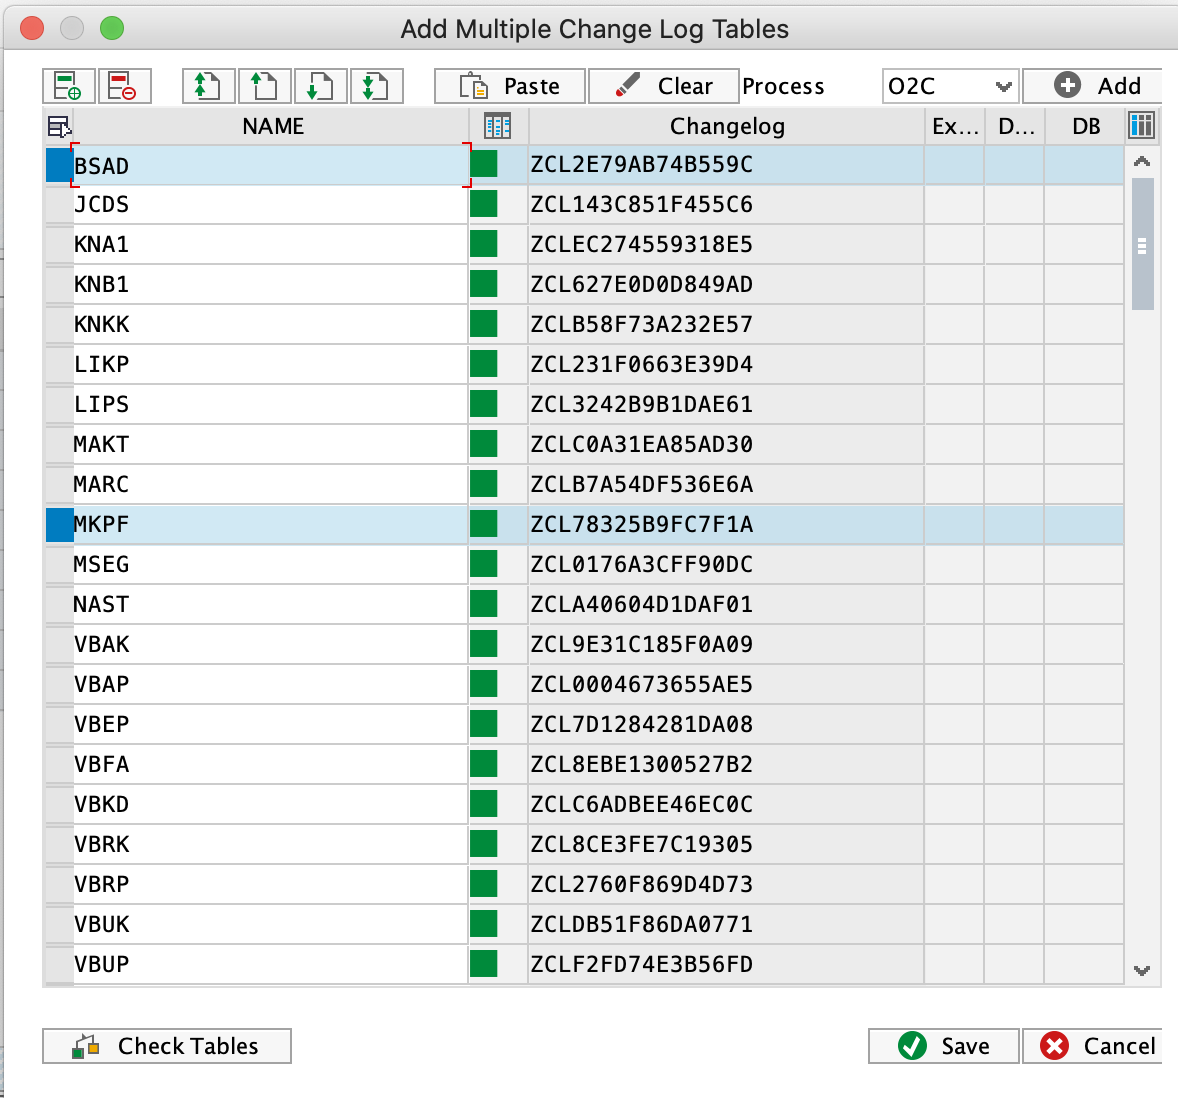
Click the button “Add Change Log Tables”
In the pop up select the process you want to activate. The respective tables will be populated on the screen.
Click "Check Tables" to dry run the creation process. If everything is green, click "Save", and the Change Log tables will be added
After the tables are created, you will need to transport them to the next system as described in the next section.
Default tables for the main 4 processes
You can find the recommended tables for the main four process in this Google sheet: https://docs.google.com/spreadsheets/d/19UUv__IqBHLcdGZ1FPEtvg_HPj-sMO-aCrSczvjOHIg/edit?usp=sharing.
Required SAP rights to add log tables and triggers
The SAP User should have a minimum of the following rights to be able to create the tables and add triggers. However, usually, this action is performed by SAP BASIS who has full admin rights.
Object: S_TCODE
TCD: /CELONIS/CLMAN_UI
Object: S_RFC
RFC_TYPE: FUGR
RFC_NAME: /CELONIS/EXTRACTION
ACTVT: 16
Object: S_TABU_NAM
ACTVT: 03
TABLE: * or the specific tables
Object: S_DEVELOP
ACTVT: *
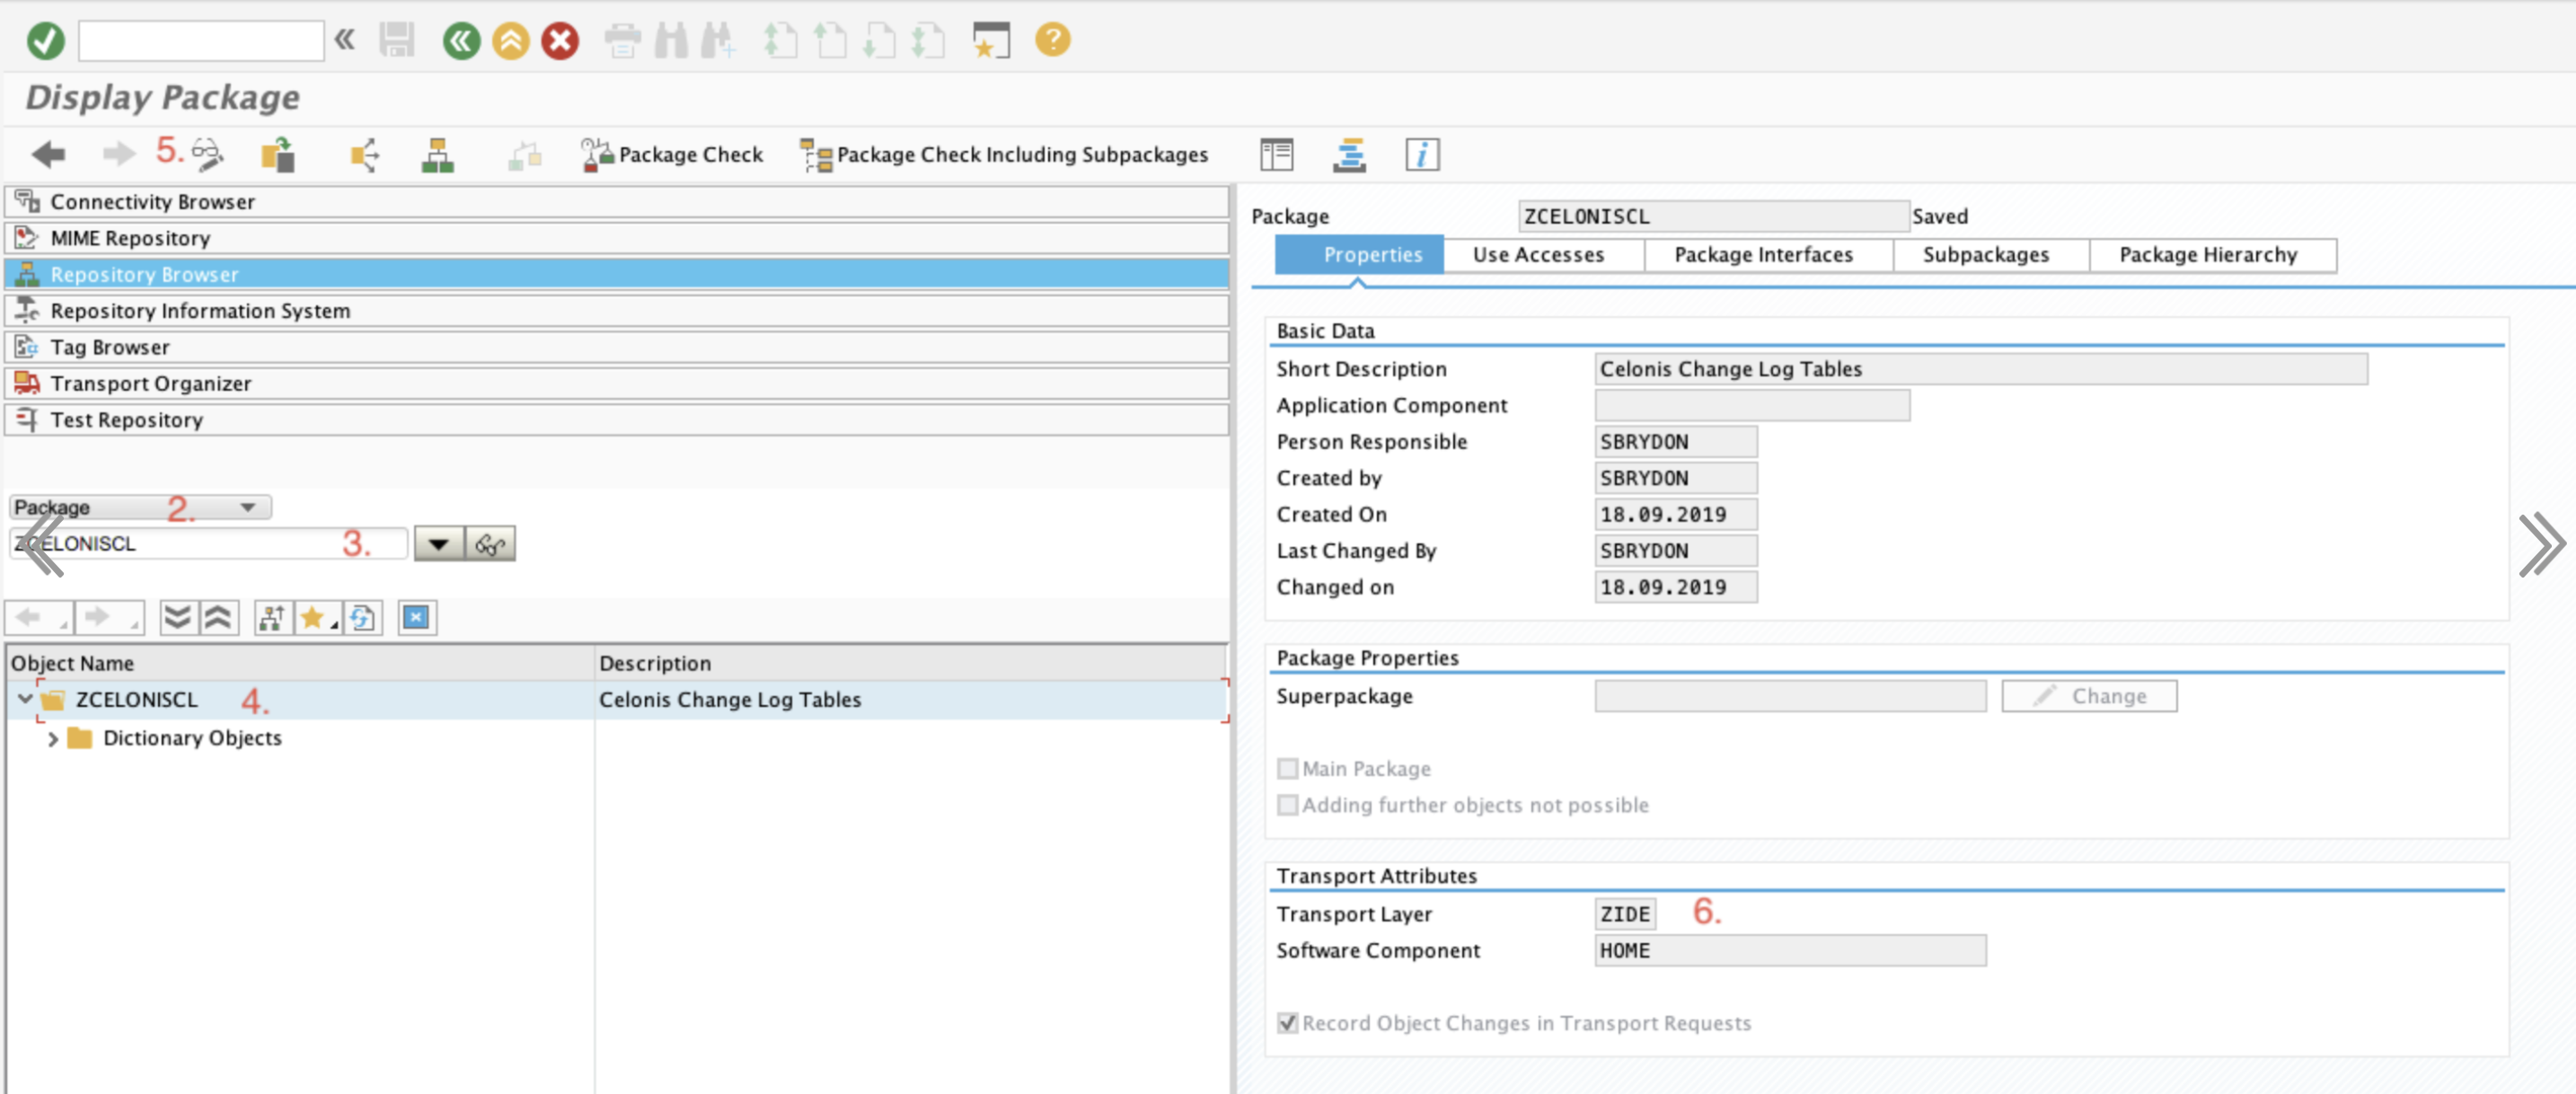
DEVCLASS: ZCELONISCL
OBJNAME: *
OBJTYPE: TABL
To streamline the transfer of CL tables from DEV to either QAS or PRD, the T code /CELONIS/CLMAN_UI allows the user to generate a transport that carries forward the setup configurations to the next system in the landscape.
Before creating the transport in DEV, the SAP BASIS admin should change the Transport Layer of the package ZCELONISCL. Make sure to select a Layer that contains a Consolidation Route connecting DEV to QAS. This will ensure that the log tables can be assigned to a transportable request, and therefore, be pushed forward from DEV to QAS. To change the layer:
Call SE80 to open the Object Navigator
In the object list selection, choose Package.
Enter ZCELONISCL and choose Display.
Double-click the name of the package.
Switch to edit mode
Select a Transport Layer that contains a Consolidation Route connecting DEV to QAS
Tip
After saving the Transport Layer change, you may be prompted to transport that modification too. However, this change is not needed in QA/PRD so you don't need to transport it.
After performing the steps above, you are ready to create a transport request for the Change Log tables. To do that:
Call the transaction code /CELONIS/CLMAN_UI
Click the Transport button
Select a Request where to place the transport, or create a new one
If creating a new Request, define a description and click save.
The all Change Log tables and the configuration table will be added to the transport request, which you can release to the next system.
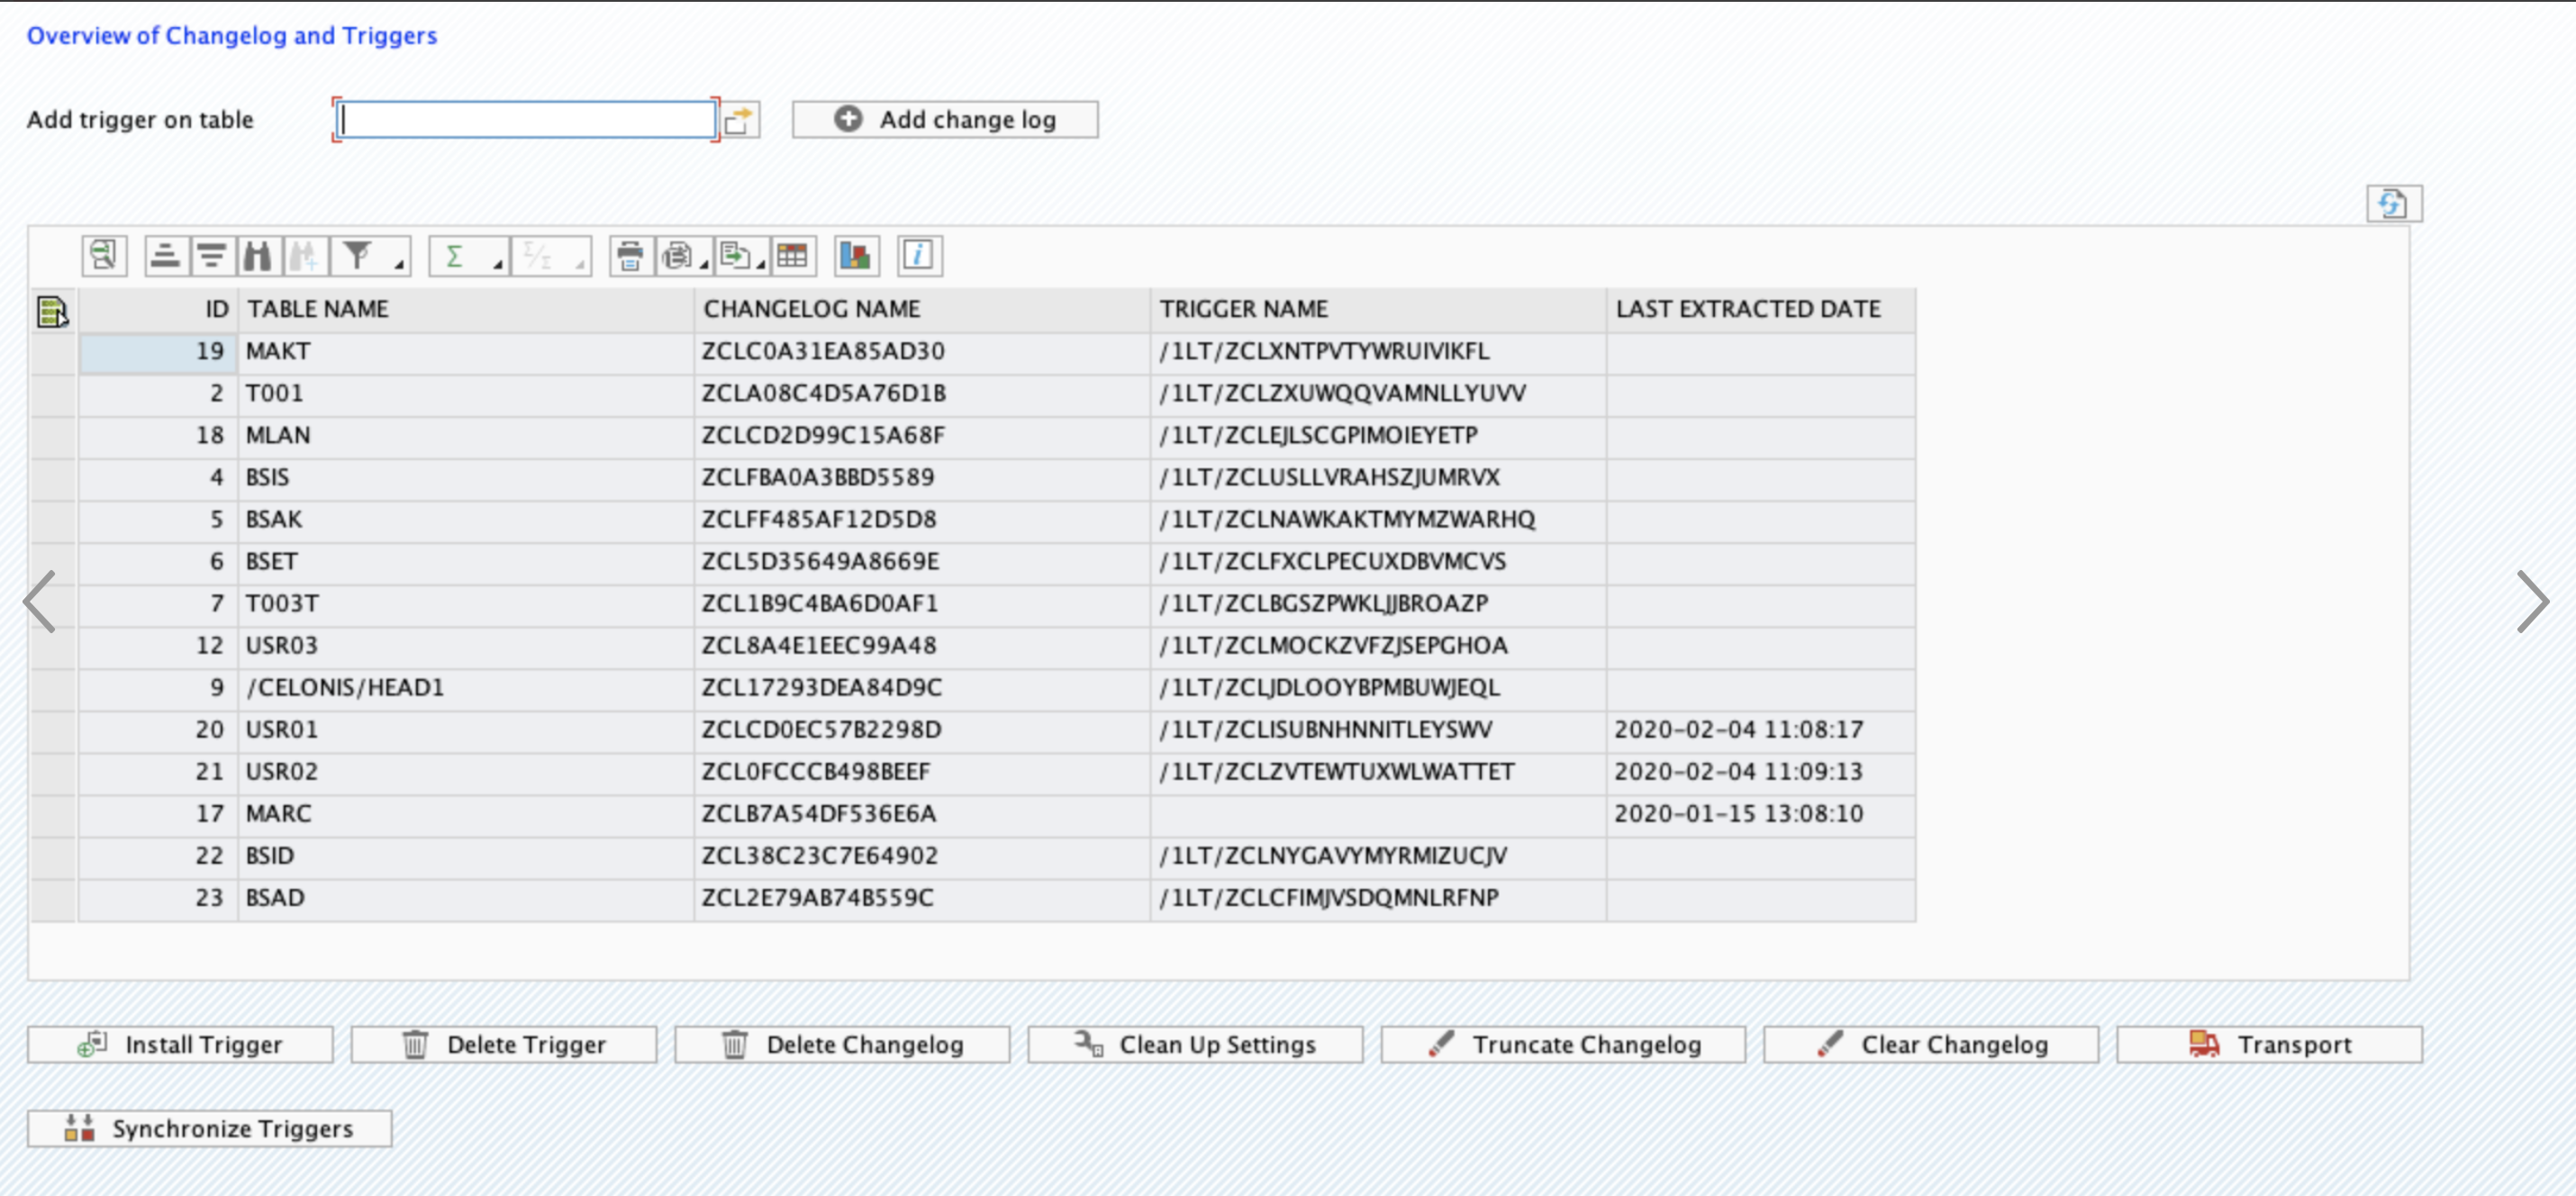
A trigger should be installed to track the changes in the source tables, and capture them in the respective Change Logs. To do that:
Log in into SAP and navigate to Transaction Code /CELONIS/CLMAN_UI
Find the table(s) in the grid (check this section for the steps on how to add a table)
Click on Install Trigger
After the trigger is installed successfully, its name will be displayed in the column “Trigger Name”
After these steps are completed successfully, the Delta Extractions for the specified tables will be executed in real time mode. The date and time of latest successful execution will be displayed in the column “Last Extracted Date”.
Warning
Triggers cannot be transported. They should be installed in QA (for testing) and then subsequently in PRD (for productive use).
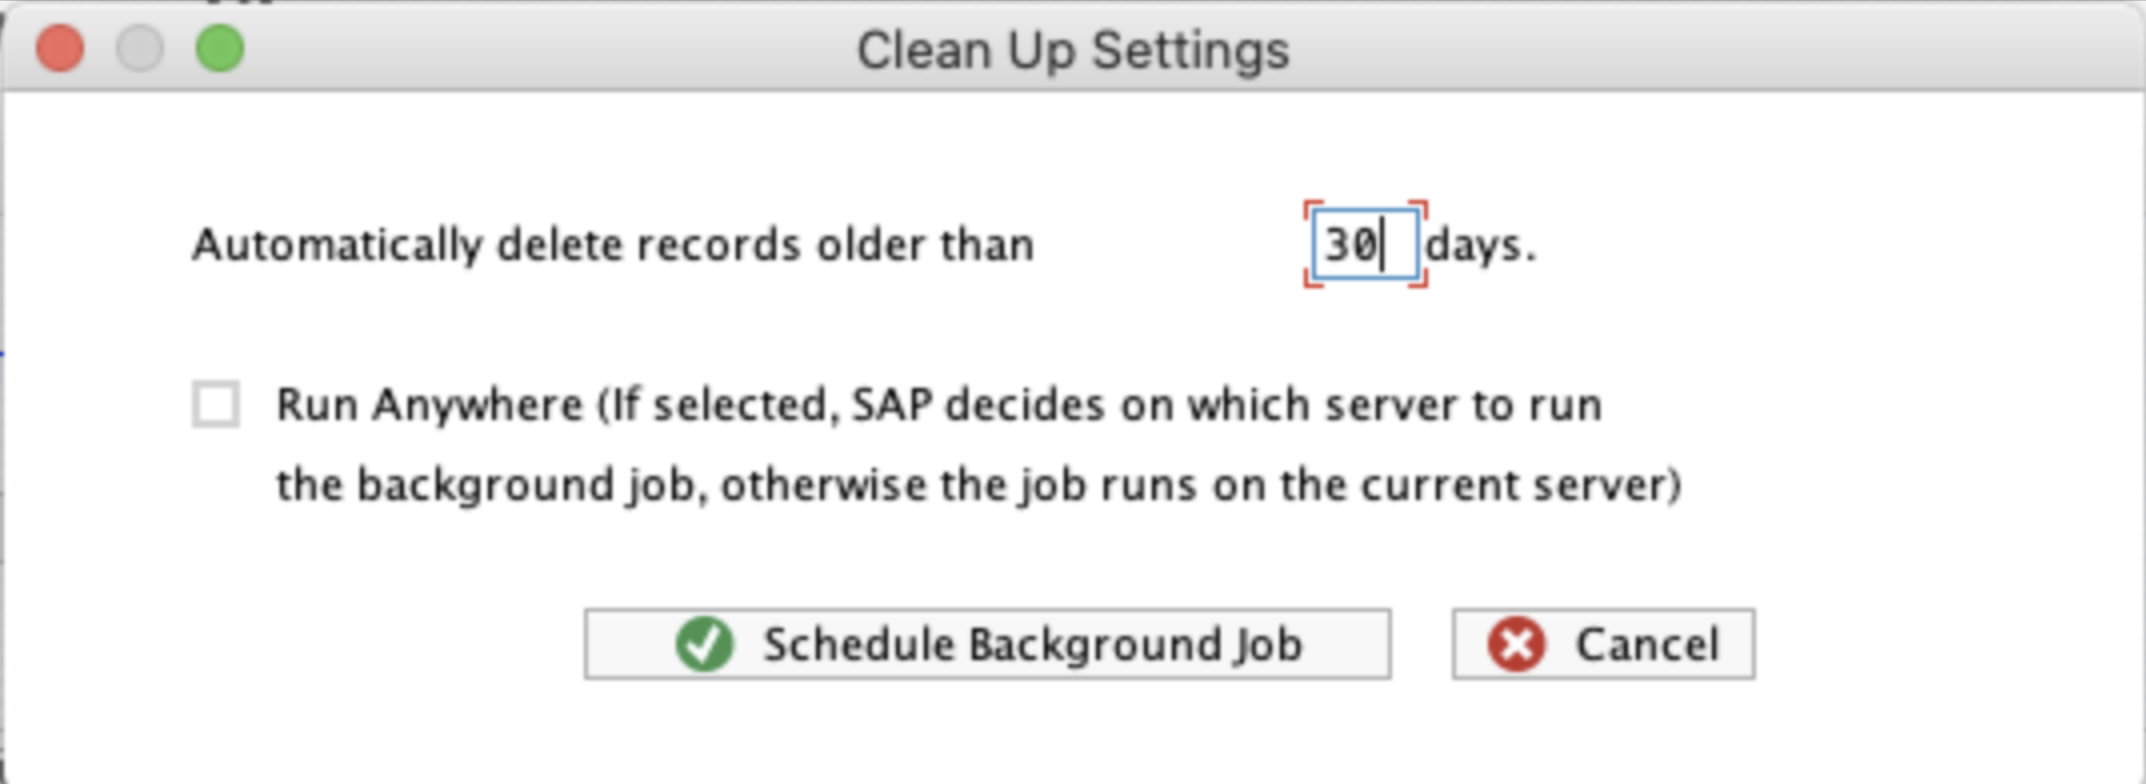
In the CL Management UI you can set up a recurring background job in SAP which will run on a daily basis and clean up the records from the Log tables.
To set up the job click the button "Clean Up Settings". A dialogue will pop up where you should define:
Number of days to keep records. All records older than the specified date will be removed from the log tables.
Where to run the background job. If the "Run Anywhere" option is selected, SAP system will decide on which server to execute the job. Otherwise, the job will be run on the same server where the settings have been defined.
Warning
The clean up background job is an important element to control the size of the Log tables. It prevents the tables from growing in case they are not being extracted.
Removing Triggers and Tables
Both the Triggers and Log tables can be removed via the transaction code /CELONIS/CLMAN_UI. Unlike adding a table, you DON'T need to create a transport from DEV. You can remove the log table and the trigger directly in production without opening the client for changes.
However, make sure that the same tables are removed in DEV and QA as well, to ensure that all systems in the landscape have a similar setup.
Temporary Suspension of the Triggers
There may be situations where it is necessary to temporarily suspend the triggers, for example during massive data migration. This can be done by deleting the trigger and then re-installing it later for the respective tables.
Checking the Table Type Before Activating Logs for it
SAP tables from which the data is extracted by Celonis usually fall into one of these classes:
Transparent Table
Cluster or Pool Table
Transparent tables physically exist at the database level, and there is a 1-to-1 mapping between the logical table in SAP and its physical equivalent in SAP. Most of the tables fit into this category, i.e. EKKO, EKPO, BKPF, VBAP, etc...
Pool and Cluster tables, on the contrary, exist only in the SAP logical layer and do not have a physical counterpart in the database. This makes it impossible to install triggers for them because there is simply no equivalent base table in the database. The most popular Cluster tables are BSEG and CDPOS.
If you want to activate real-time mode for a table that is not present in the standard script, you should first check whether it is transparent or not. Table classes are stored in the SAP table DD02L. This table should be extracted and then the following query run, to check the class of the tables for which triggers are desired. Replace XXXX with the desired table name.
|
Replacing BSEG with Secondary Index Tables
BSEG is not a Transparent table and therefore we cannot install triggers on it and extract it in real-time mode. Meanwhile, given its size and importance, we cannot simply exclude it from the real-time extraction, so it is strongly recommended to replace BSEG with alternative Transparent tables. You can find detailed documentation on how to do it here.
Are the triggers created in SAP or at the database level? The trigger creation command is executed from an SAP GUI (transaction code /CELONIS/CLMAN_UI), however, the trigger is created only at the database level executing native SQL command. In other words, the trigger does not exist in the SAP Data Dictionary. Therefore it cannot be transported and should manually be created in each environment. Is there a performance impact on the SAP system?
Triggers generate a logging entry for each transaction in SAP, so there is some impact. However, the impact is very small and does not slow down operations.
Triggers are a native database technology and therefore they are very effective. They are not a technology created by Celonis, and we just instruct the trigger when and how to react.
What should we do in case of data migrations, when there are billions of records entered in the database?
Before starting the data migration you can delete the triggers, and then re-install them once the migration is over.
When does the trigger fire, i.e. create a log record?
Triggers operate at the database level, and whenever the database record is inserted/updated/deleted the trigger works. The trigger responds to all field updates, and it does not distinguish between the standard SAP and custom (Z) fields. For any update, a log record will be generated.
We have thousands of transactions on a daily basis. I imagine that the Log tables will grow very fast. Are they cleaned up regularly?
When setting up the triggers you should also create the Clean Up job, which is basically an SAP Recurring Background Job that runs on a daily basis and removes the extracted records that are older than X days, where X is defined by you. This makes sure that the tables are regularly purged and consume minimal space.
We already have SLT running? Will the real-time extractor interfere with it?
The real-time extractor uses its own triggers which will not interfere with those of SLT. Both can be run in parallel.