How do I set up a Database connection?
New data integration content available
You're currently viewing a data integration topic that has been replaced and will eventually be removed from our documentation.
For the latest data integration content, see: Data Integration.
Step 1: Define the Connection Type (responsible role: database server and infrastructure admin)
There are two scenarios:
Uplinked: You do not want to or cannot allow the Celonis Platform to access your database directly, but you want to use an on-premise Extractor instead.
Only if your database is not reachable from the Celonis Platform: Set up an Extractor server on-premise in your network. A detailed diagram showing the extraction flow can be found here.
Please refer to the documentation on system requirements of the on-premise server.
Duplicate removal option
For uplinked connections, you can optionally activate the duplicate removal option via the application-local.yml file.
duplicate-removal:
  enabled: false/true
  strategy: CLOUD/LOCAL
duplicate-removal.enabled: Allows users to enable duplicate removal. Set to
falseby default, but can be set totrueto enable it.duplicate-removal.strategy: Allows users to specify the duplicate removal strategy. Allowed values:
LOCALorCLOUD.
Direct: You want to allow the Celonis Platform to access your database directly.
CLOUD: Duplicates are removed when data is inserted to the data pool. This operation can increase the insertion time.LOCAL: Duplicates are removed using a Bloom filter. Bloom filter is a memory-efficient probabilistic data structure, meaning there is a possibility of false positive matches.
Step 2: Modify your network settings to allow the Extractor to communicate to the database and the Celonis Platform (responsible role: infrastructure admin)
There are two scenarios that depend on the connection type selected in Step 1:
Network settings for scenario A (access through an on-premise Extractor)
Source System | Target System | Port | Protocol | Description |
|---|---|---|---|---|
On-premise Extractor server | Source system (on-premise) | Depending on the database, typical ports are 5432 for Postgres and 30015 for HANA for example. | TCP | JDBC connection from on-premise Extractor server to the database. The port is the one you normally use to connect to the database. |
On-premise Extractor server | Celonis Platform | 443 | TCP | HTTPS connection from on-premise Extractor server to Celonis cloud endpoint. The IPs of the Celonis Platform depending on the cloud cluster (which can be seen in the URL), and they can be found in the section below. |
Network settings for scenario B (direct access)
Source System | Target System | Port | Protocol | Description |
|---|---|---|---|---|
Celonis Platform | Source system (on-premise) | Depending on the database, typical ports are 5432 for Postgres and 30015 for HANA for example | TCP | JDBC connection from the Celonis Platform to the database. The port is the one you normally use to connect to the database. The IPs of the Celonis Platform depending on the cloud cluster (which can be seen in the URL), and they can be found in the section below. |
Celonis Platform IP addresses depending on the cluster
The respective clusters use multiple IPs each, so you need to enable all three of them in your firewall configuration to connect the on-premise Extractor server and the cloud endpoint.
Step 3: Only if your database is not reachable from the Celonis Platform: Set up the database Extractor on-premise in your network (responsible role: infrastructure admin)
Please refer to the documentation on how to set up an on premise Extractor.
For downloads, contact Celonis Support.
If you would like to use a proxy (optional), please refer to the proxy configuration page.
Step 4: Configure a user with sufficient permissions in your database (responsible role: database admin)
In order to extract from a database, you need to create or use an existing user who has read (SELECT) access to all tables that should be extracted. The user should also access the schema information_schema to read metadata for the tables to be extracted.
Step 5: Creating the Data Connection in a Data Pool (responsible role: data engineer)
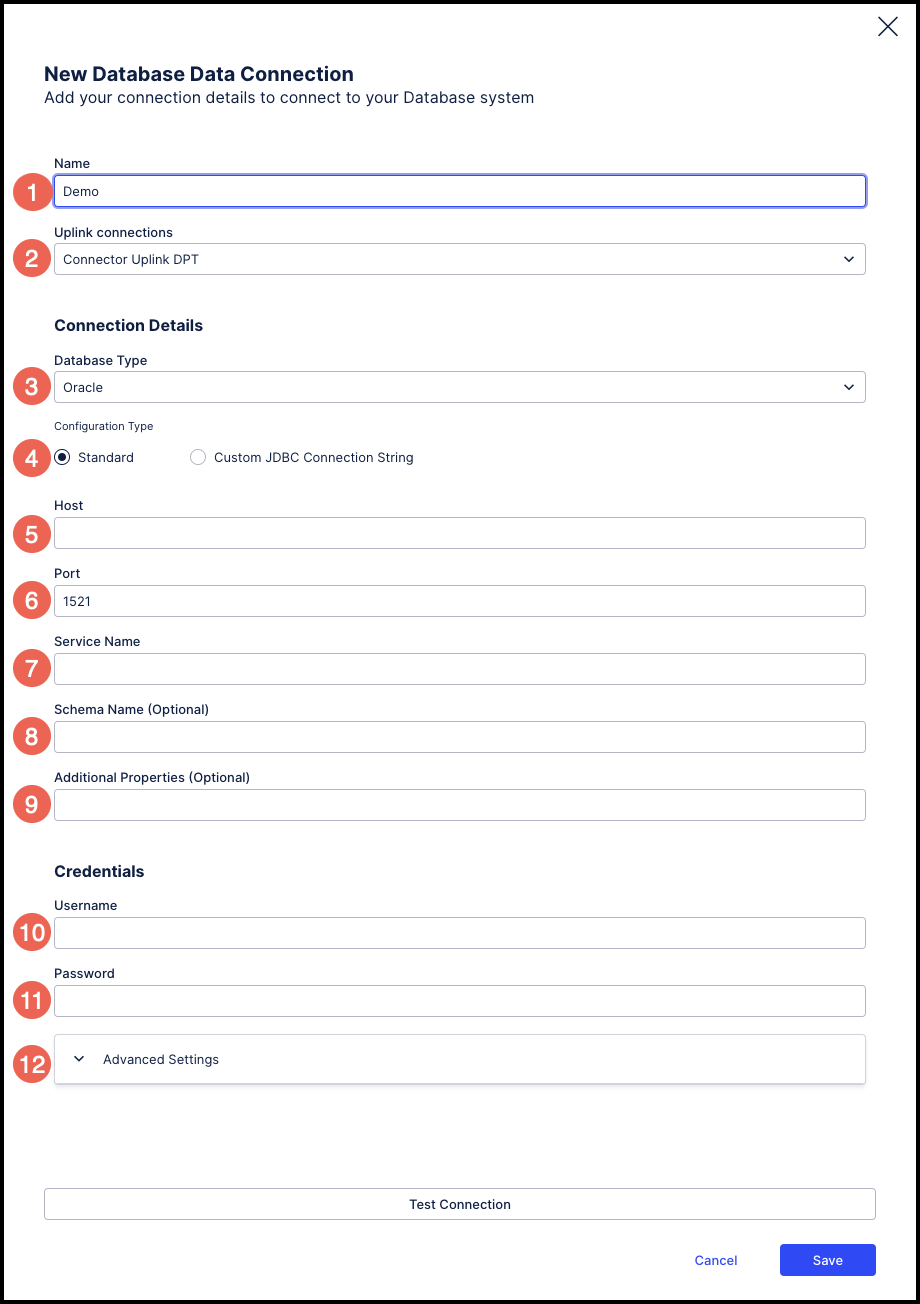 |
Fill in your connection details of the database that you would like to connect to:
Name: The name you want to assign to this data connection.
Uplink Connections: The name of the Uplink Extractor Server installed on your end. This is not applicable in the case of Direct Connections. This option will not show up in case you have selected the "Cloud Connection" option.
Database Type: The type (generic name) of the database to which you want to connect.
Configuration Type: Choose "Customer JDBC Query String" if you have the query string. If you want to enter the fields one by one below, use the "Standard" option.
Host: The database server name or IP address of the database server.
Port: The port to connect to the database server.
Service Name: If applicable to a specific database type (e.g. Oracle), enter the Service Name (Alias) associated with the database server.
Schema name: The schema to use. (Optional)
Additional Properties: Additional properties like validateCertificate=false for a HANA database or integratedSecurity=true for domain users in MSSQL.
Username: The username to connect to the database server (see Step 4 above).
Password: The password of the user (see Step 4 above).
Advanced Settings: Database-specific settings that you may need to configure. Default values are provided for each of these settings.
Maximum number of parallel extractions: This is usually governed by the database type you are using. The default value chosen is 4.
Timeout for database connections: Timeout for all database connections created in this connection (specific to this connection only). This value will overwrite the local timeout (in application.yaml) in case of uplinked connection.