Jira Connection
New data integration content available
You're currently viewing a data integration topic that has been replaced and will eventually be removed from our documentation.
For the latest data integration content, see: Data Integration.
Important
Any references to third-party products or services do not constitute Celonis Product Documentation nor do they create any contractual obligations. This material is for informational purposes only and is subject to change without notice.
Celonis does not warrant the availability, accuracy, reliability, completeness, or usefulness of any information regarding the subject of third-party services or systems.
Limited Availability
This extractor is currently in limited availability mode and can be added to your Celonis Platform environment by request only.
To request access to this extractor, please create a support ticket on Celopeers.
You can connect your Jira instance (both Cloud and Server) to the Celonis Platform using REST APIs, enabling you to share tables such as issues, projects, and status.
For information about the data you can extract from Jira into the Celonis platform, see: Jira data extraction.
And for information about the supported column types in the Celonis platform, see: Supported Jira column types.
Setting up and using this extractor is a three stage process, with steps in both your Jira instance and the Celonis platform needed.
Jira allows two different types of connection: Cloud or Server.
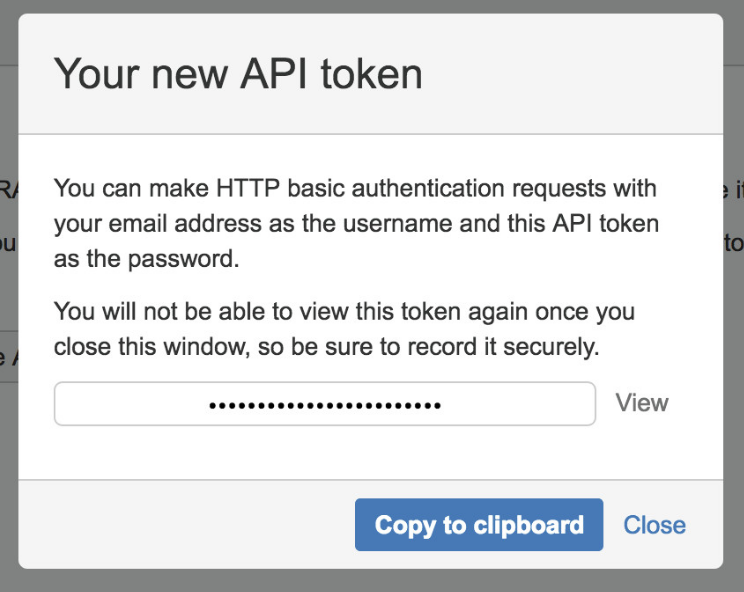
To connect to your Jira Cloud instance, you need to generate an API token with sufficient rights from your Atlassian account:
Navigate to https://id.atlassian.com/manage/api-tokens.
Click Create API token.
Enter a memorable Label for your token and click Create.
Click Copy to clipboard, then paste the token to your script or a notepad.
If your system is only reachable within a certain IP range, you need to whitelist the outbound IPs of the Celonis Platform, otherwise data cannot be extracted. The IPs of the Celonis Platform are different depending on the cluster (eu-1 or us-1). For more information, see Allowlisting domain names and IP addresses.
You must now create a data connection in your chosen data pool:
Click Data Connections - Add Data Connection.
Click Connect to Data Source.
Click Custom - Build Custom Connection - Build a new Extractor.
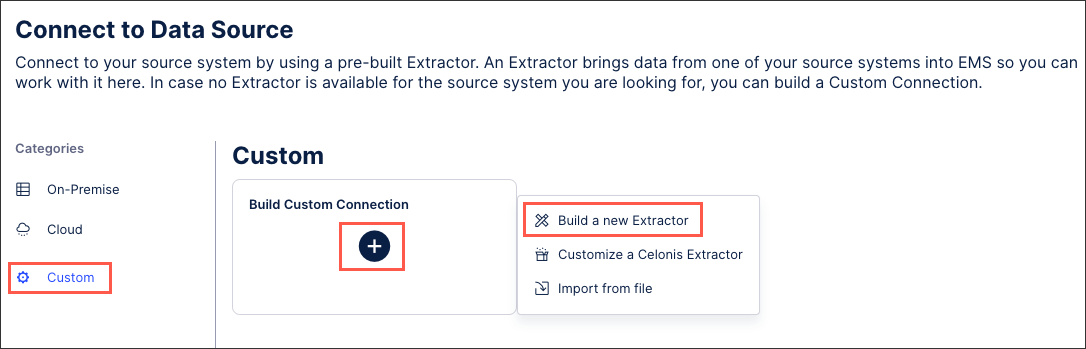
Follow the guided set up, including adding any required connection parameters, authentication methods, and defining your Jira endpoints.
Click Finish.
Data Access
The Celonis Extractor performs read-only operations on your Jira data. No writing changes (like updates, deletions) will be performed at any time during the extraction process.
Security
Transfer of the data from the Jira system to the target system is secured through HTTPS, which allows for an encrypted exchange of information.
Used API
The Celonis Cloud Extractor uses the REST API of Jira (Link).
Available Tables
Table | API |
issue | /rest/api/2/search |
applicationProperties | /rest/api/2/application-properties |
applicationRole | /rest/api/2/applicationrole |
configuration | /rest/api/2/configuration |
dashboard | /rest/api/2/dashboard |
field | /rest/api/2/field |
groups | /rest/api/2/groups/picker |
issueLinkType | /rest/api/2/issueLinkType |
issueSecuritySchemes | /rest/api/2/issuesecurityschemes |
issueType | /rest/api/2/issuetype |
notificationScheme | /rest/api/2/notificationscheme |
permissionScheme | /rest/api/2/permissionscheme |
project | /rest/api/2/project/search |
projectType | /rest/api/2/project/type |
projectCategory | /rest/api/2/projectCategory |
resolution | /rest/api/2/resolution |
role | /rest/api/2/role |
serverInfo | /rest/api/2/serverInfo |
status | /rest/api/2/status |
statuscategory | /rest/api/2/statuscategory |
user | /rest/api/2/user/search?username=. |
workflow | /rest/api/2/workflow |
board | /rest/agile/1.0/board |
board$epic | /rest/agile/1.0/board/%s/epic |
board$backlog | /rest/agile/1.0/board/%s/backlog |
board$issue | /rest/agile/1.0/board/%s/issue |
board$spring | /rest/agile/1.0/board/%s/sprint |
board$version | /rest/agile/1.0/board/%s/version |
The following column types are supported by the Jira extractor:
Any
Array
Date
Datetime
Number
Option
Option-with-child
String
User
Version
For all other column types, you must change the type from custom field to a string for it to be visible.