Oracle Fusion BICC extractor
New data integration content available
You're currently viewing a data integration topic that has been replaced and will eventually be removed from our documentation.
For the latest data integration content, see: Data Integration.
Important
Any references to third-party products or services do not constitute Celonis Product Documentation nor do they create any contractual obligations. This material is for informational purposes only and is subject to change without notice.
Celonis does not warrant the availability, accuracy, reliability, completeness, or usefulness of any information regarding the subject of third-party services or systems.
Limited Availability
This extractor is currently in limited availability mode and can be added to your Celonis Platform environment by request only.
To request access to this extractor, please create a support ticket on Celopeers.
The Oracle Fusion BICC extractor extracts data from Oracle Fusion by connecting to two different instances in your infrastructure:
BICC
External Storage (UCM or OCI Object Storage)
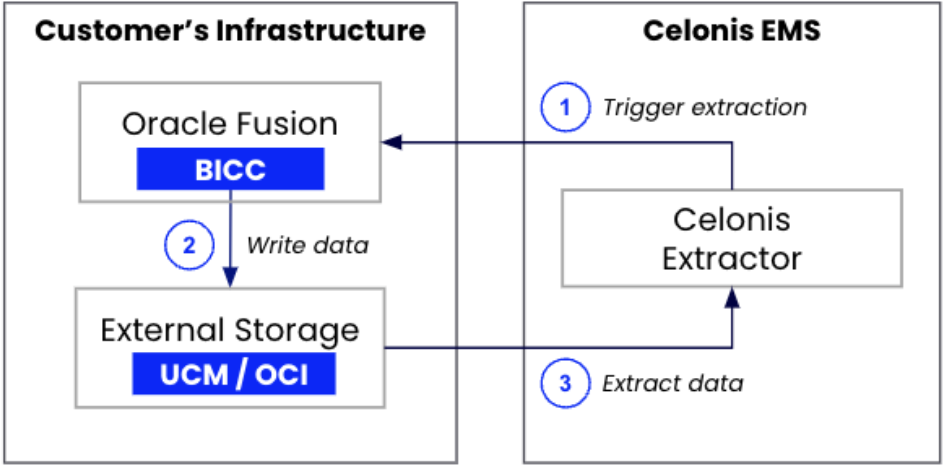 |
The extraction process works as follows:
You configure an extraction in Celonis where you define the tables to extract, the columns to include, and the filters to apply.
When executing an extraction, Celonis triggers an extract job in the BICC instance that is linked to the Oracle Fusion application.
BICC automatically writes the data into external storage.
The Celonis extractor reads the data from the external storage and ingests it into Celonis.
The Oracle Fusion BICC extractor supports the following functionalities:
Supported functionality | Comment |
|---|---|
Column selection | |
Column pseudonymization | The pseudonymization algorithm (SHA-1, SHA-256, SHA-512) can be selected in the advanced settings of the data connection configuration. |
Primary key definition | Primary keys are set to default values based on the metadata retrieved from BICC. It’s possible to adjust the defined primary keys in the column selection. |
Filtering | Supports filtering on all columns using the operators =, >, <, >=, and <=. |
Delta loads | For most tables, delta loads work out-of-the-box using BICC’s native functionality for incremental loads. In these cases, you don’t need to define any delta filters. A respective message will be shown in the UI as part of the table configuration. |
Parallelization of requests | The extractor parallelizes the number of requests made to BICC for increased performance. The maximum number of requests can be configured in the advanced settings of the connection configuration (default: 10). For this extractor, the setting is identical to the number of tables that are being extracted in parallel. |
Delta loads based on BICC incremental loads
When executing a delta load on a table using this extractor, we are leveraging a native capability of BICC for incremental loads. The incremental loads automatically identify the data that has changed since your last extraction.
By default, BICC applies a prune time which defines an offset for how long before the last extraction to extract data from. By default this value is set to 1,440 minutes (24 hours). You can adjust it as part of the Extract Preferences in BICC. The setting can be adjusted in BICC. Navigate to Manage Offerings and Data Stores -> Actions -> Extract Preferences -> Prune time in Minutes.
The default setting is suitable if you are scheduling daily delta loads. If you plan to extract more frequently (for example, hourly) we recommend you adjust this value accordingly.
For further information on this configuration, take a look at Oracle's Configure Extract Preferences documentation.
To set up the Oracle BICC Fusion extractor:
A user needs to be created in your Oracle Cloud Application that can access BICC and has the following two roles:
ESS Administrator Role
ORA_ASM_APPLICATION_IMPLEMENTATION_ADMIN_ABSTRACT
You need to be able to provide username and password to establish a data connection.
For more information, see Oracle's document: Provision a user with access to BICC.
You have two external storage options here, either using UCM or OCI object storage:
Using UCM external storage
The already created BICC user needs to have access to the files that are being written on the UCM server. Therefore, the following role is required:
OBIA_EXTRACTTRANSFORMLOAD_RWD
Using OCI object storage
When using OCI Object Storage as an external storage, you need to to specify the OCI bucket from which the files will be picked up and also configure a user with which you can authenticate.
In your OCI instance, you either need to create a new storage bucket to which BICC should push the data files, or choose an existing bucket to which BICC is already connected.
For the storage bucket, the following details are required for the connection set-up:
Tenant OCID. For more information, see Oracle's documentation: Required keys and OCID.
Region (e.g. EU_FRANKFURT_1)
Namespace
Bucket Name
To authenticate with the bucket, we require the following:
User OCID. For more information, see Oracle's documentation: Required keys and OCID.
Fingerprint
Private key
Storage name (provided in step 3)
The user needs to have the right permissions to be able to read from the bucket and rename the files. This requires the following permissions on the specific OCI bucket:
BUCKET_READ
OBJECT_CREATE
OBJECT_OVERWRITE
You can retrieve the Finterprint and PrivateKey by creating a new API key for the user (selecting the Generate API key pair option). The Private Key needs to be downloaded and is required in the data connection set-up. The fingerprint can be retrieved from the UI after generating the API key.
Based on your choice of external storage, you need to connect it to your BICC:
Using UCM external storage
If you're using UCM external storage, the connection is pre-configured and you need to just verify that it is working. To verify your connection:
Open your BICC instance, which can be accessed by appending /biacm to the URL of your Oracle Fusion instance. For example:
https://your-oracle-fusion-instance.oraclecloud.com/biacm
Navigate to Configure External Storage.
Open the UCM Connection tab.
Click Test UCM Connection.
If successful, a confirmation message is displayed.
For more information, see Oracle's documentation: Configure where to load data.
Using OCI object storage
If you're using OCI object storage, you need to create the connection:
Open your BICC instance, which can be accessed by appending /biacm to the URL of your Oracle Fusion instance. For example:
https://your-oracle-fusion-instance.oraclecloud.com/biacm
Navigate to Configure External Storage.
Open the OCI Object Storage Connection tab.
Click Test Connection.
If successful, a confirmation message is displayed.
Copy the name of the connection in BICC as this is required as an input parameter when creating a data connection in the Celonis Platform.
For more information, see Oracle's documentation: Configure where to load data.
You must now create a data connection in the Celonis Platform in your preferred data pool:
From your data pool diagram, click Data Connections.
Click Add Data Connection.
Click Connect to Data Source.
Select Oracle Fusion Cloud.
Provide the following connection details:
Name
Host
User name / password (based on the user created in step 1)
Select BICC
Select either UCM or OCI object storage
If you're using OCI object storage, the following input paramters are required:
Tenant OCID
Region
Namespace
Bucket Name
User OCID
Fingerprint
Private key
Storage name
Click Test Connection. If successful, click Save.
BICC is part of the Oracle Fusion SaaS package by Oracle. Every customer who has an Oracle Fusion Cloud instance, will have access to BICC without the need for additional licenses.
You can access it by adding /biacm to the host URL of your Oracle Fusion instance (for example, https://my-fusion-instance.oraclecloud.com/biacm).
The usage of Oracle BICC is free and included in your Oracle Fusion Cloud license. For the external storage it depends on which option you choose:
UCM is part of your Oracle Fusion Application and therefore it's free.
OCI Object Storage is part of the Oracle Cloud Infrastructure and comes with additional cost. However, storage cost are usually relatively low. For more information on list prices, refer to these Oracle resources:
Our Extractor exclusively utilizes standard BICC functionalities. We are creating jobs, customizing job data stores, and creating job schedules. All those are being configured via the available SOAP and REST APIs.
The Oracle Fusion BICC extractor takes PVOs (Public View Objects) from Oracle Fusion. The extractor is not limited to any process and can extract all the PVOs that are available in your Oracle instance (usually > 5,000). For further information about available objects per module, take a look at Oracle's documentation:
We are leveraging BICC's built-in functionality for incremental loads which identifies new and updated records automatically. For all tables that support incremental loads in BICC, it is not necessary to define a delta filter in Celonis. The incremental records will automatically be identified when triggering a delta load. You will be notified in the UI.
For the tables for which incremental loads are not supported, delta filter statements need to be defined by the user.
When creating the job execution in BICC, the FILE_EXPIRY_DAYS is set by default to 90. Therefore, files will automatically be deleted after 90 days.
You can adjust this setting in BICC: Manage Offerings and Data Stores > Actions > Extract Preferences > Uploaded file expiry(Days).
Data that is successfully inserted into Celonis is automatically tagged. All records and files which have not been processed correctly within an extraction are automatically picked up in the next run.
No, you do not need to create any of those manually in BICC. Our extractor automatically takes care of the job creation process via an API. The extract jobs are created based on the extraction configuration that is defined in Celonis.
No, the extractor only works with this dual connection approach to BICC and the external storage. The extractions and jobs in BICC are created by the extractor via an API. This has several advantages:
Reduced extraction time. Our extractor will pick the files up from the storage when the BICC job finishes. When scheduling extract jobs in BICC directly, the BICC schedules and the Celonis schedules would have to be coordinated with each other. This can be a tedious task, especially with more frequent extract schedules than just Daily. When controlling the BICC jobs from our Extractor, we ensure the minimal possible extraction time from the start of the job in BICC until the data reaches Celonis.
Maintenance. To ease the maintenance and make it seamless to add additional data, adjust filters, run new extractions, and so on, the extraction configuration needs to be defined in one place (Celonis). This provides a lot of flexibility.
File Identification and Differentiation. When BICC is used for multiple different purposes (e.g. not only Celonis), it would be hard to identify which files to pick up, as not all files would be relevant for us. Scheduling the extracts in BICC through our extractor allows us to identify the exact files that are related to the desired extract jobs.
Check whether there are any columns shown in the table’s column configuration. If there are none, it means that all columns have the flag isPopulate set to false and no BICC job can be created. Without available columns, this table cannot be extracted