Hive: How to install and configure Apache Hadoop and Hive on Ubuntu
New data integration content available
You're currently viewing a data integration topic that has been replaced and will eventually be removed from our documentation.
For the latest data integration content, see: Data Integration.
Steps to set up a database Data Connection
Step 1: Install and configure Apache Hadoop
Apache Hadoop 3.x fully needs Java 8 → Install java 8:
$ sudo apt install openjdk-8-jdk -y
Install OpenSSH on Ubuntu:
$ sudo apt install openssh-server openssh-client -y
Setup a non-root user for Hadoop and switch to the new user:
$ sudo adduser hdoop

$ su - hdoop
Enable Passwordless SSH for Hadoop User:
$ ssh-keygen -t rsa -P '' -f ~/.ssh/id_rsacat ~/.ssh/id_rsa.pub >> ~/.ssh/authorized_keyschmod 0600 ~/.ssh/authorized_keysssh localhost
Download and Install Hadoop on Ubuntu:
$ wget https://downloads.apache.org/hadoop/common/hadoop-3.2.1/hadoop-3.2.1.tar.gz

$ tar xzf hadoop-3.2.1.tar.gz
Configure Hadoop Environment Variables (bashrc):
#Edit the .bashrc shell configuration file using a text editor of your choice
$ sudo nano .bashrc

#Copy the following Hadoop Related Options
export HADOOP_HOME=/home/hdoop/hadoop-3.2.1
export HADOOP_INSTALL=$HADOOP_HOME
export HADOOP_MAPRED_HOME=$HADOOP_HOME
export HADOOP_COMMON_HOME=$HADOOP_HOME
export HADOOP_HDFS_HOME=$HADOOP_HOME
export YARN_HOME=$HADOOP_HOME
export HADOOP_COMMON_LIB_NATIVE_DIR=$HADOOP_HOME/lib/native
export PATH=$PATH:$HADOOP_HOME/sbin:$HADOOP_HOME/bin
export HADOOP_OPTS="-Djava.library.path=$HADOOP_HOME/lib/nativ"

#Apply the changes to the current running environment
$ source ~/.bashrc
Edit the hadoop-env.sh file:
$ sudo nano $HADOOP_HOME/etc/hadoop/hadoop-env.sh

#Uncomment the $JAVA_HOME variable and add the full path to the OpenJDK installation on your system
export JAVA_HOME=/usr/lib/jvm/java-8-openjdk-amd64
Edit core-site.xml File to specify the URL for your NameNode, and the temporary directory:
$ sudo nano $HADOOP_HOME/etc/hadoop/core-site.xml

#Copy the following to the file
<configuration>
<property>
<name>hadoop.tmp.dir</name>
<value>/home/hdoop/tmpdata</value>
</property>
<property>
<name>fs.default.name</name>
<value>hdfs://127.0.0.1:9000</value>
</property>
</configuration>
Create the temporary directory added in the previous step.
Edit hdfs-site.xmlFile to define the NameNode and DataNode storage directories:
$ sudo nano $HADOOP_HOME/etc/hadoop/hdfs-site.xml

#Add the following configuration to the file and, if needed, adjust the NameNode and DataNode directories to your custom locations.
<configuration>
<property>
<name>dfs.data.dir</name>
<value>/home/hdoop/dfsdata/namenode</value>
</property>
<property>
<name>dfs.data.dir</name>
<value>/home/hdoop/dfsdata/datanode</value>
</property>
<property>
<name>dfs.replication</name>
<value>1</value>
</property>
</configuration>
Create the specific directories you defined for the
dfs.data.dirvalue in above step.Editmapred-site.xmlFile to define MapReduce values.
$ sudo nano $HADOOP_HOME/etc/hadoop/mapred-site.xml

#Add the following to the file
<configuration>
<property>
  <name>mapreduce.framework.name</name>
  <value>yarn</value>
</property>
</configuration>
Edit the yarn-site.xml file to define settings relevant to YARN. It contains configurations for the Node Manager, Resource Manager, Containers, and Application Master.
$ sudo nano $HADOOP_HOME/etc/hadoop/yarn-site.xml

#Append the following configuration to the file<configuration>
<property>
<name>yarn.nodemanager.aux-services</name>
<value>mapreduce_shuffle</value>
</property>
<property>
<name>yarn.nodemanager.aux-services.mapreduce.shuffle.class</name>
<value>org.apache.hadoop.mapred.ShuffleHandler</value>
</property>
<property>
<name>yarn.resourcemanager.hostname</name>
<value>127.0.0.1</value>
</property>
<property>
<name>yarn.acl.enable</name>
<value>0</value>
</property>
<property>
<name>yarn.nodemanager.env-whitelist</name>
<value>JAVA_HOME,HADOOP_COMMON_HOME,HADOOP_HDFS_HOME,HADOOP_CONF_DIR,CLASSPATH_PERPEND_DISTCACHE,HADOOP_YARN_HOME,HADOOP_MAPRED_HOME</value>
</property>
</configuration>
Format HDFS NameNode:
#It is important to format the NameNode before starting Hadoop services for the first time

$ hdfs namenode -format
Start Hadoop Cluster:
#Navigate to the directory
$ cd hadoop-3.2.1/sbin

#Execute
$ ./start-all.sh
Now you can verify and access NameNode , DataNodes and YARN Resource Manager over the browser:
#Hadoop NameNode UI
http://localhost:9870

#DataNodes
http://localhost:9864

#YARN Resource Manager
http://localhost:8088
Step 2: Install and configure Apache Hive
Apache Hive is an enterprise data warehouse system used to query, manage, and analyze data stored in the Hadoop Distributed File System.
The Hive Query Language (HiveQL) facilitates queries in a Hive command-line interface shell. Hadoop can use HiveQL as a bridge to communicate with relational database management systems and perform tasks based on SQL-like commands.
Prerequisites: Apache Hive is based on Hadoop and requires a fully functional Hadoop framework.
Download and Untar Hive:
$ wget https://downloads.apache.org/hive/hive-3.1.2/apache-hive-3.1.2-bin.tar.gz

$ tar xzf apache-hive-3.1.2-bin.tar.gz
Configure Hive Environment Variables (bashrc):
$ sudo nano .bashrc

#Append following to the file
export HIVE_HOME=/home/hdoop/apache-hive-3.1.2-bin
export PATH=$PATH:$HIVE_HOME/bin

#Run
$ source ~/.bashrc
Edit the hive-config.sh file to add the HADOOP_HOME directory:
$ sudo nano $HIVE_HOME/bin/hive-config.sh

export HADOOP_HOME=/home/hdoop/hadoop-3.2.1
Create Hive Directories in HDFS. Create two separate directories to store data in the HDFS layer:
#The temporary, tmp directory is going to store the intermediate results of Hive processes.
$ hdfs dfs -mkdir /tmp
$ hdfs dfs -chmod g+w /tmp

#The warehouse directory is going to store the Hive related tables.
$ hdfs dfs -mkdir -p /user/hive/warehouse
$ hdfs dfs -chmod g+w /user/hive/warehouse
Configure the hive-site.xml file:
$ cd $HIVE_HOME/conf

$ cp hive-default.xml.template hive-site.xml

#Optionally if the metastore warehouse directory location is different than default replace it.
Initiate Derby Database. Derby is the default metadata store for Hive:
$ $HIVE_HOME/bin/schematool –initSchema –dbType derby
Special steps:
#Fix guava Incompatibility Error in Hive. The guava version has to be same as in Hadoop.

$ rm $HIVE_HOME/lib/guava-19.0.jar
$ cp $HADOOP_HOME/share/hadoop/hdfs/lib/guava-27.0-jre.jar $HIVE_HOME/lib/

#Remember to use the schematool command once again to initiate the Derby database:

$ $HIVE_HOME/bin/schematool –initSchema –dbType derby
Launch Hive Client Shell to issue SQL-like commands and directly interact with HDFS:
$ cd $HIVE_HOME/bin

$ hive
Boot and connect to the hiveserver2:
#Boot the hive server
$ $HIVE_HOME/bin/hiveserver2

#Connect to Hiveserver
$ $HIVE_HOME/bin/beeline -u jdbc:hive2://localhost:10000

# You can also access HiveServer2 Web UI via localhost:10002
Step 3: Install and configure Tez execution engine
Download and install Tez:
$ wget https://downloads.apache.org/tez/0.9.2/apache-tez-0.9.2-bin.tar.gz

$ tar zxvf apache-tez-0.9.2-bin.tar.gz
Copy tarball on HDFS:
$ $HADOOP_HOME/bin/hadoop fs -mkdir -p /apps/tez-0.9.2

$ cd apache-tez-0.9.2-bin

$ $HADOOP_HOME/bin/hadoop fs -copyFromLocal share/tez.tar.gz /apps/tez-0.9.2
Mitigation for a possible issue: https://issues.apache.org/jira/browse/HDFS-12920:
$ sudo nano ${HADOOP_HOME}/conf/hdfs-site.xml

#Append to the file<property>
<name>dfs.namenode.decommission.interval</name>
<value>30</value>
</property>
<property>
<name>dfs.client.datanode-restart.timeout</name>
<value>30</value>
</property>
Create tez-site.xml on
${TEZ_HOME}/conf$ cd ${TEZ_HOME}/conf $ cp tez-default-template.xml tez-site.xmlEdit hive-env.sh to add the Tez directories to HADOOP_CLASSPATH$ sudo nano ${HIVE_HOME}/conf/hive-env.sh #Append to the file export HADOOP_CLASSPATH=${TEZ_HOME}/conf:${TEZ_HOME}/*:${TEZ_HOME}/lib/*Edit hive-site.xml to change the execution engine property to Tez:
$ sudo nano ${HIVE_HOME}/conf/hive-site.xml

#Update the following configuration property to use tez as execution engine instead of mr (i.e. MapReduce)
<property>
<name>hive.execution.engine</name>
<value>tez</value>
</property>
Restart the Hive Server.
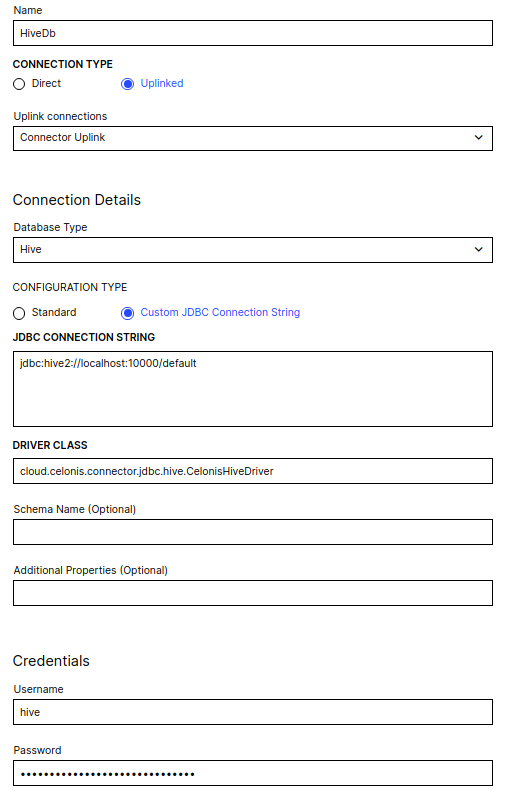
Step 4: Setup and configure Data Connection
Download all required hive-jdbc dependencies with respect to the specific hive version:
curator-framework
hive-common
hive-metastore
hive-service
hive-shims
libthrift
hadoop-common
hive-jdbc
hive-serde
hive-service-rpc
libfb303
zookeeper
Clone and build celonis-hive-driver. In order to do so, please contact the Celonis customer support mentioning the exact Hive version you are using.
Add all the jars from step 1 and 2, to the classpath of connector-jdbc.
Configure an uplink connection as described in Uplink connectors.
Create a new hive database data connection with custom driver class 'cloud.celonis.connector.jdbc.hive.CelonisHiveDriver'