How to Set up the Custom Connection, Python Extractor (Celoxtractor)
New data integration content available
You're currently viewing a data integration topic that has been replaced and will eventually be removed from our documentation.
For the latest data integration content, see: Data Integration.
Important
Any references to third-party products or services do not constitute Celonis Product Documentation nor do they create any contractual obligations. This material is for informational purposes only and is subject to change without notice.
Celonis does not warrant the availability, accuracy, reliability, completeness, or usefulness of any information regarding the subject of third-party services or systems.
Step 1: Set up an on premise server to install the Extractor
The Extractor needs to be installed on an on premise server. Please follow the page about system requirement for the setup.
Note
Requirements can often be lower for Python Extractors, depending on your data extraction volume.
Step 2: Modify your network settings to allow the Extractor to communicate to the Celonis Platform
Different clusters might use multiple IPs. You need to enable all your cluster's IPs in the firewall configuration of the Extractor server to allow for a connection between the Extractor server and the Celonis Cloud endpoint. For more information, see Allowlisting domain names and IP addresses.
Step 3: Set up the connection in the Celonis Cloud team settings
Go to your Celonis Cloud team's team settings, then select Uplink integrations
Create a new uplink with the type "Connector" (independent of which Connector type you would like to connect)
Copy the keys and save them temporarily (they will be needed in the next step)
Step 4: Install and configure the on premise Extractor
Download the Python Extractor package.
Add the copied keys from step 3 to the application-local.yml configuration file (see example below)
Spacing in the configuration
Please make sure not to change any white-spacing in the application-local.yml file. The different elements need to be spaced exactly as in the original example.
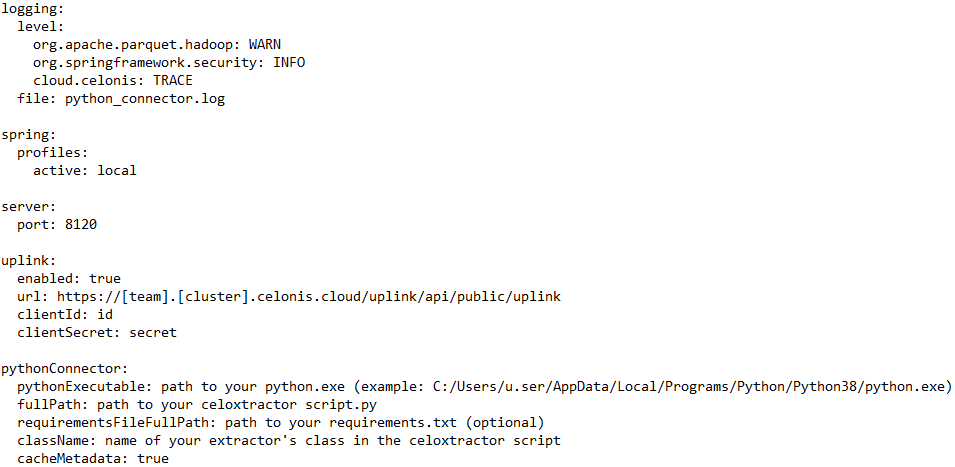 |
Most settings can be left as-is. Besides those:
The following input needs to be configured.
url: specify the team name and cluster where you want to use the extracted data
clientId: insert the client ID of the uplink endpoint that you generated in step 3
clientSecret: insert the client secret of the uplink endpoint that you generated in step 3
pythonExecutable: insert the path to your Python executable
fullPath: insert the path to your Python Extractor's Python script
requirementsFileFullPath: insert the path to a requirements file with required libraries
className: enter the name of your extractor's class in the Python script
The port setting is optional if the standard port is already in use.
The file name after fileindicates the name of the log file into which the extractor writes. It will be created automatically and also includes Python logs which can be useful for debugging your script.
Step 5: Run the Python Extractor
Option 1: Run the Extractor in the command line
Start the jar file by opening the terminal/cmd, navigating to the respective folder and running it with the following command:
java -jar connector-python.jar serve
Option 2: Run the Extractor as a service
The major benefit of running the Extractor as a service is that it can be automatically started with server reboots.
On Windows
The Extractor package contains four files that enable you to run the Extractor as a Windows service:
Celonis<ConnectionType>Extractor.xml: The configuration file of the service. Normally, you do not need to make any changes to this file.
install.bat: The batch file to install the services on the service.
startup.bat: The batch file to start the service manually.
shutdown.bat: The batch file to stop the service manually.
To perform an install, a startup or a shutdown, you need to run the batch file as an administrator. To do that, simply right-click on the respective file and then select "Run as administrator".
On Linux
If you wish to start the application on startup of the server, you can use systemd - the standard way to start a Linux service at boot.
For this you need to create a unit file and put it in the directory /etc/systemd/system/. You can use this example unit file below named celonis_extractor.service:
celonis_extractor.service
[Unit]
Description=Celonis Extractor Service.

[Service]
Type=simple
User=root
WorkingDirectory=[path to root folder of installation]
ExecStart=/usr/bin/java -jar connector-sap.jar serve
Restart=on-abort

[Install]
WantedBy=multi-user.target
To enable and start the service execute the following commands
Start the service
sudo systemctl start celonis_extractor.service: # starts the service
sudo systemctl enable celonis_extractor.service # registers the service so that it is started on boot
Step 6: Connect the Python Extractor to your Celonis Data Pool
Create a new Data Pool in Celonis Data Integration or open an existing one
Select Data Connections >> New Data Connection
Select the Python Connector tile (if you cannot see it directly, reach out to the Celonis ServiceDesk)
Select a name and the previously defined uplink connection
Test and save the connection