SAP S/4HANA Public Cloud Connection [Extractor Builder]
New data integration content available
You're currently viewing a data integration topic that has been replaced and will eventually be removed from our documentation.
For the latest data integration content, see: Data Integration.
Important
Any references to third-party products or services do not constitute Celonis Product Documentation nor do they create any contractual obligations. This material is for informational purposes only and is subject to change without notice.
Celonis does not warrant the availability, accuracy, reliability, completeness, or usefulness of any information regarding the subject of third-party services or systems.
The SAP S/4HANA Public Cloud Extractor is based on the Extractor Builder. You can use the default Extractor provided by Celonis or use the Extractor Builder to customize the Extractor further, based on your needs.
Authentication and permissions
The S/4HANA Public Cloud Extractor uses Basic authentication. To connect, you need to provide an API URL (the system hostname), a username and a password. For a successful connection test, the Catalog service needs to be accessible and queriable by the provided user.
Technical overview
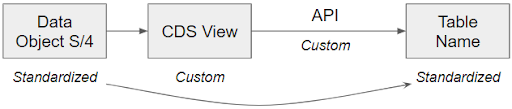
To use the S/4HANA Public Cloud Extractor, you need to set up custom CDS views in the source system that point to the correct data objects.
These CDS views can be exposed and accessed via Rest APIs based on the OData standard. Our Extractor uses these APIs to fetch the necessary data. The correct setup of the CDS views is a pre-requisite for the Extractor to be able to extract the correct data.
Endpoints
The current default Extractor provides default endpoints to extract the data for Accounts Payable, Purchase-to-Pay, and Order-to-Cash. For the Extractor to work out-of-the-box you either need to follow our proposed nomenclature for CDS views or you can adjust the CDS view names based on your preferences on the Data Connection set-up page.
Any additional endpoints can be added by customizing the Extractor via the Extractor Builder.
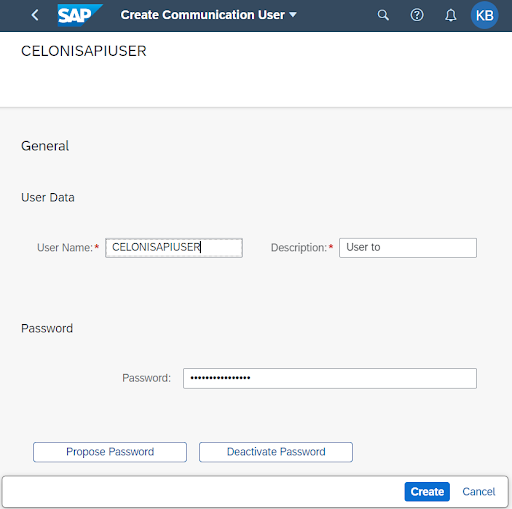
Step 1: Create a communication user
Navigate to the Maintain Communication Users app.
Create a new user and provide a name, description and password.
You'll need these credentials on the Connection form.
Step 2: Create a communication system and arrangement
Navigate to the Communication Systems app.
Create a new Communication system. You will need to provide an ID, a name for the Communication system and the system host name.
Select the Users for Inbound Communication tab.
Add the communication user that you just created and select Authentication method User name and password.
Go to the Communication Arrangements tab.
Add the SAP_COM_0449 communication arrangement.
Select the communication system that you created in Step 2.
This will auto-populate the user created in Step 1.
This is a standard communication arrangement that gives access to the Catalog Service which is required for a successful connection test.
Note
After this step, you can create a new Data Connection of type S/4HANA Public Cloud. You'll need to provide the system host name and the user credentials. You should then be able to test the connection successfully.
Step 3: Create and publish CDS views
The remaining steps describe, how to provide access for new data objects and tables to the created user. Our Extractor is pre-configured for a certain set of CDS views.
You can download CDS View Requirements for extraction from Celonis Platform Download Portal.
Navigate to the “Custom CDS Views” app.
Create a new custom CDS View and provide a label/name.
Select “External API” or “Standard CDS View” as a scenario dependent on the nature of the CDS view.
Our Support team k can provide a detailed spreadsheet with the required CDS views.
Add a primary data source.
Again, consult the detailed spreadsheet from Celonis Support. This provides the information you'll need for this step and steps 6 and 7.
Note
For some of the data sources to be visible you need to make the filter bar visible and remove the pre-defined filter “Recommended Data Source: Yes”.
Optionally, add an associated data source.
In the Elements tab, add the data elements.
Optionally, select the Filter tab and add the described filter.
Click Publish to publish the CDS view.
Step 4: Create a communication scenario for the CDS views
Navigate to the Custom Communication Scenarios app.
Provide an ID and a description.
Our recommendation is to collate all created CDS views into one communication scenario.
In the Inbound Services tab, add all relevant custom CDS views.
Click Publish to publish the communication scenario.
Step 5: Assign the communication scenario to the communication arrangement
Go to the Communication Arrangements app.
Create a new communication arrangement and add the communication scenario that you created in Step 4.
Select the communication system you created in Step 2. This will auto-populate the user created in Step 1.
Click Save.